
Written byStevenUpdated on Jul 01, 2026
Safely Remove & Change Time Machine Backup Drives on Mac
Approved byGerhard Chou
Before we start: To update the Time Machine backup drive, you can remove the old backup drive first. To avoid data breach on the old backup drive of Time Machine, you can use Donemax Data Eraser for Mac to permanently wipe the drive.
PAGE CONTENT:
Time Machine is a simple and effective backup solution for all Mac users. The tool backs up your data automatically and can restore your complete Mac if something goes wrong. Some users split up their redundant Time Machine backups across numerous hard drives to further protect their privacy.
On the other hand, you may decide that a certain computer no longer requires Time Machine. In this case, you'll want to remove a backup drive of Time Machine without erasing the entire backup collection. The task is simple to perform and will only prevent Time Machine from backing up to that drive. The process will not disable Time Machine for other disks or remove any backups already made.
Creating A Backup Versus Inheriting One
As long as there is adequate space on the backup drive, the new Mac can be configured to use the same backup drive as the old Mac that was backed up with Time Machine.
Inheriting the backup history from the previous Mac may be an option Time Machine presents during the initial backup if Migration Assistant was used to setting up the new Mac. Remember that Time Machine cannot continue copying just new files even if you opt to inherit the backup. Everything on the new Mac is automatically copied to the archive. There are upsides to inheriting, however.
When set up, files not on the new Mac can be restored from an old backup thanks to the ingenious "inherit a backup" feature. Time Machine automatically deletes backups from the older Mac when the backup drive is full.
Instead of overwriting the previous backup with the new one, Time Machine begins a new one. Assuming you have no plans to sell or get rid of your old Mac, that's wonderful news. You must manually delete the old backup set to make room. It isn't always simple, especially considering that "backup items cannot be updated," as Time Machine puts it.
How to Remove A Backup Drive from Time Machine?
If you don't want to use the old drive to back up your mac any more or you just want to disable Time Machine backup, just connect the backup drive to your Mac and then follow the guide below to remove the backup drive from Time Machine.
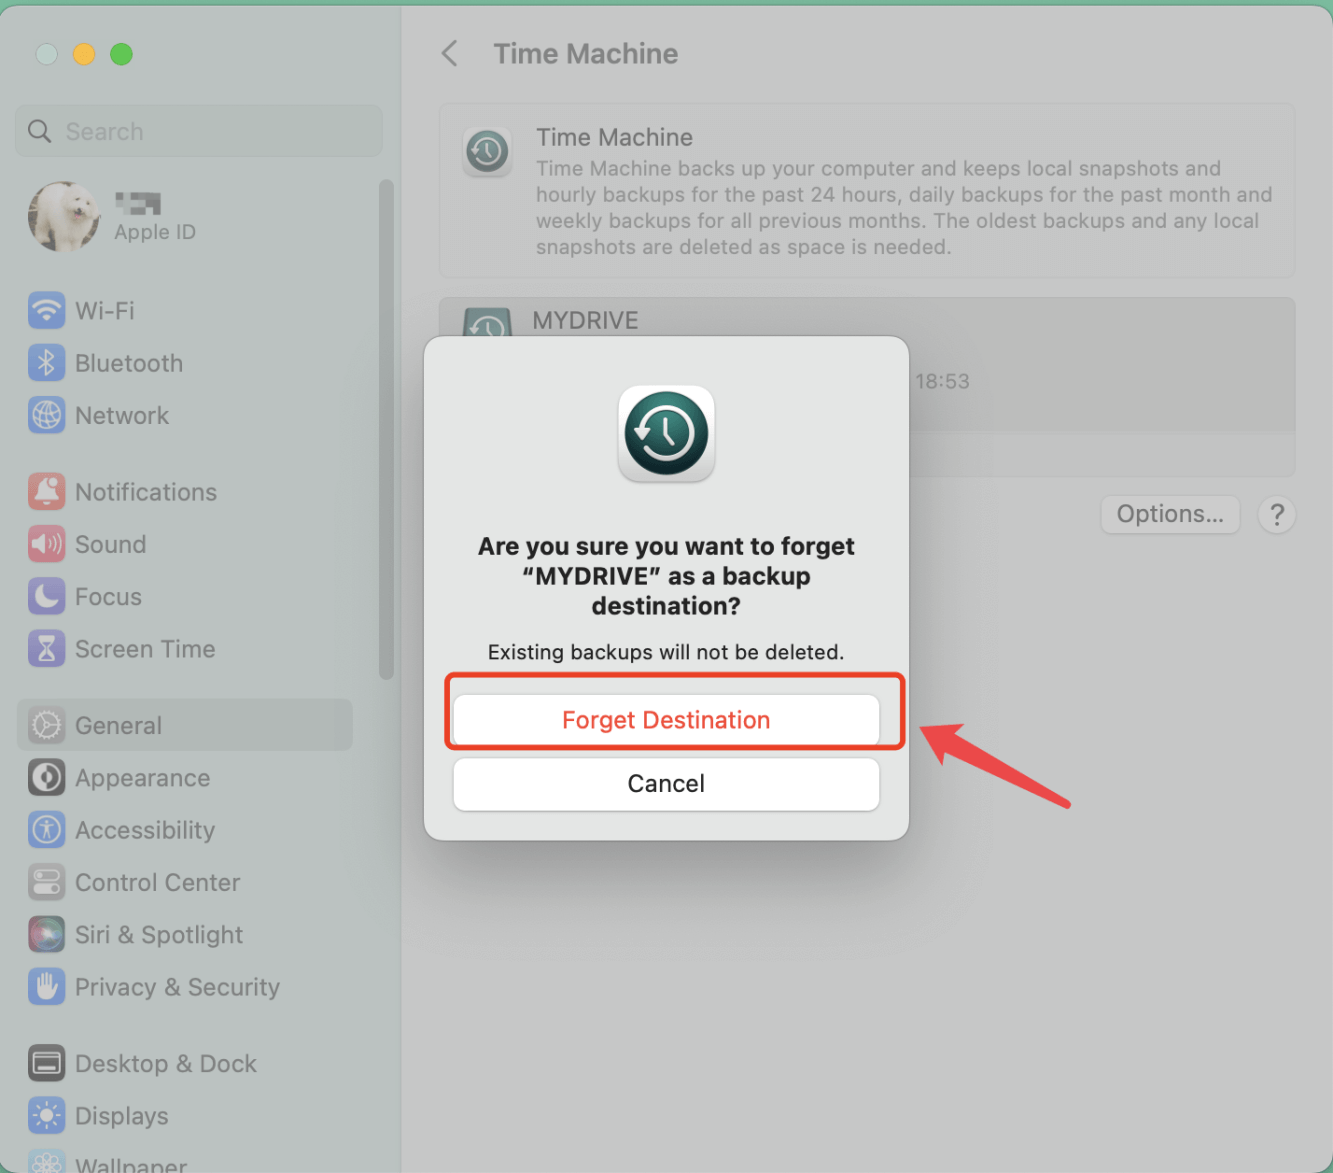
For macOS Ventura or later:
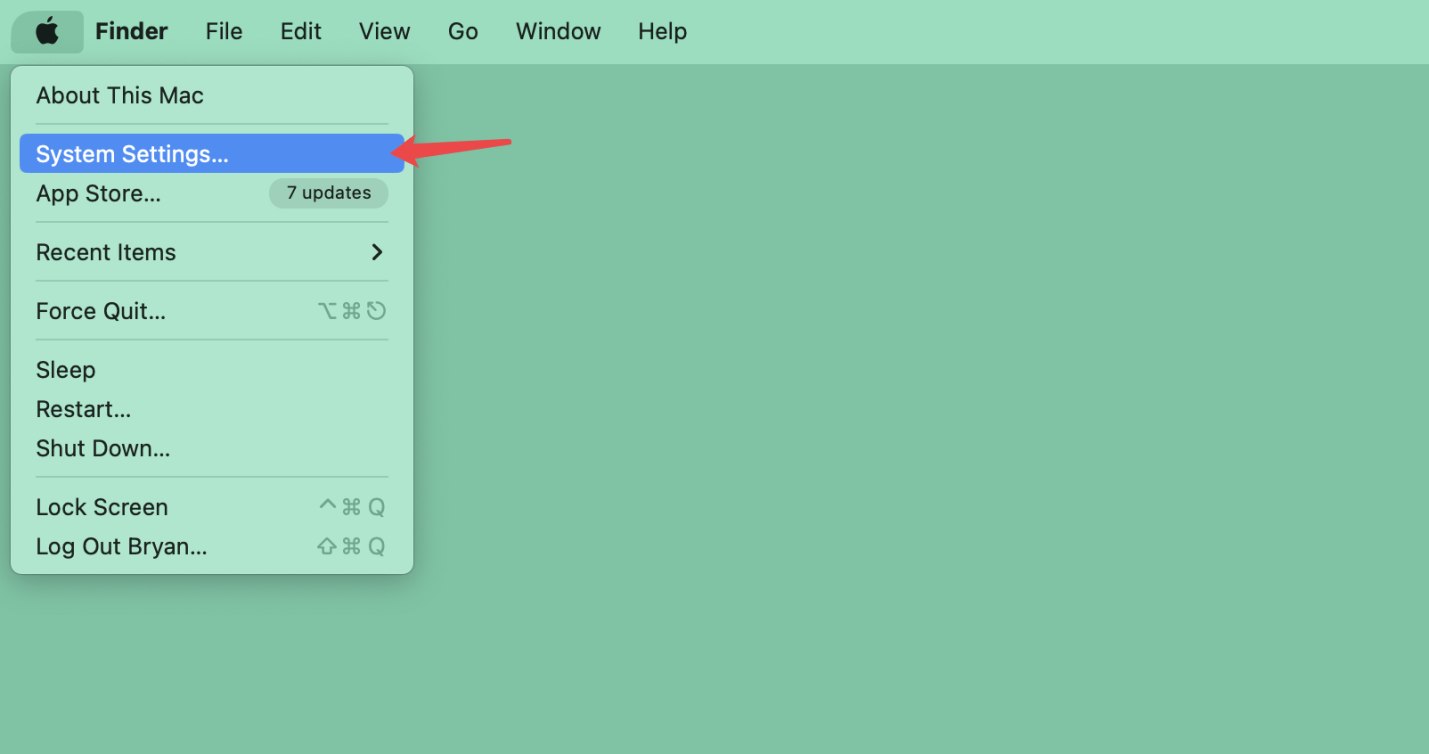
Step 1. Go to Apple menu > choose System Settings.
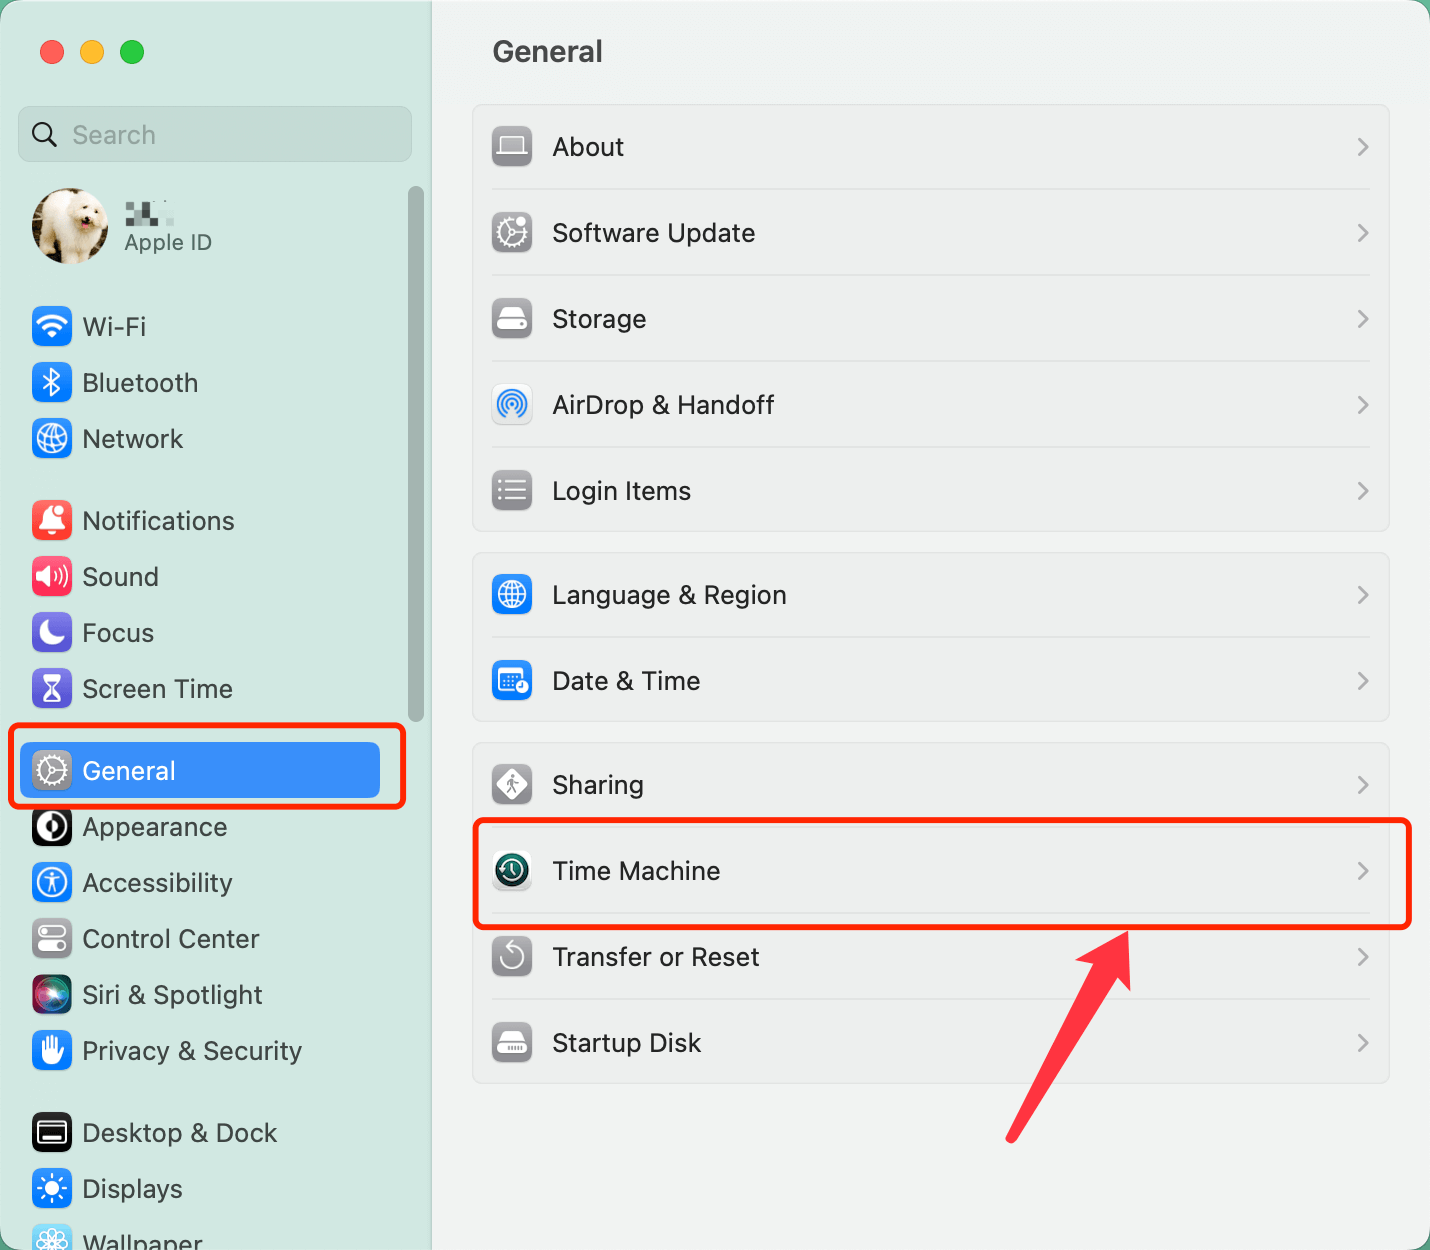
Step 2. Choose General in the sidebar and then click Time Machine.
Step 3. You will see all backup drives, select the hard drive you want to exclude and click "-".
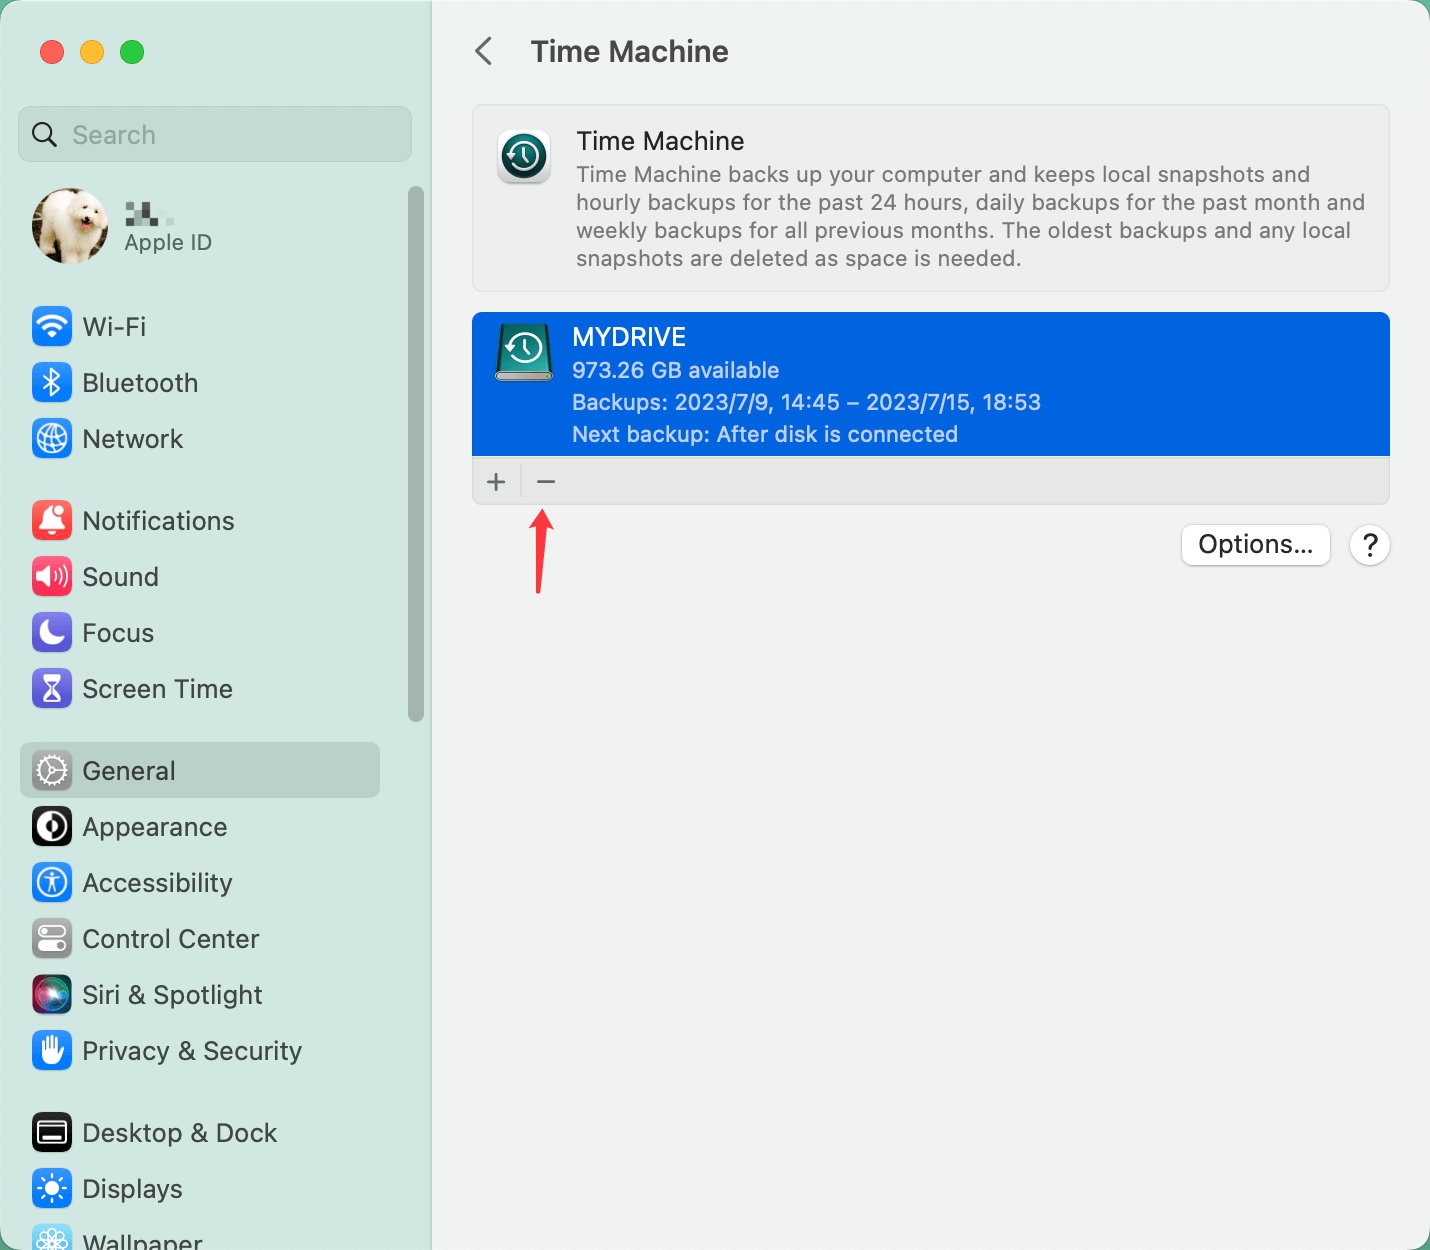
Step 4. It will pop up a window, click Forget Destination to remove the hard drive from Time Machine (It only removes the backup drive, won't format the drive).
For macOS Monterey or earlier:
Step 1. Click Apple menu, choose System Preferences.
Step 2. Go to the Time Machine settings panel in the System Preferences section of the menu.
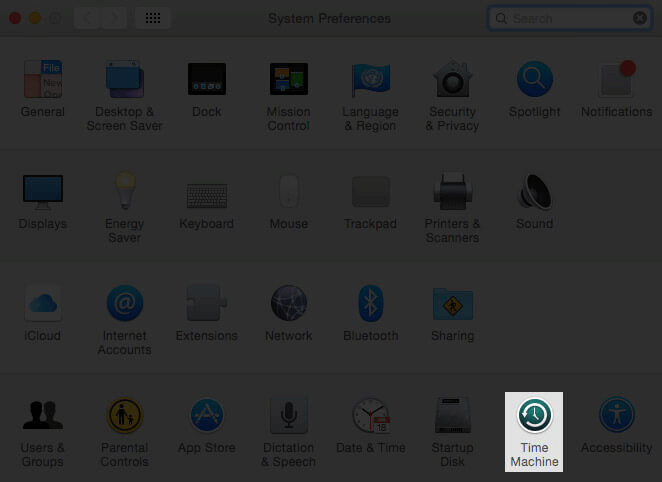
Step 3. Select "Add or Delete Backup Disk." from the drop-down menu.

Step 4. You may check out the available backup disks. To remove a disk, select it and then select "Remove Disk."
Step 5. When prompted, select "Stop Using This Disk" to make the desired changes permanent.
As the deleted drive is no longer in the Time Machine backup chain, it will no longer initiate a backup when connected to the Mac. Time Machine backups initiated manually will likewise no longer use the disconnected drive.
Removing a Time Machine drive does not lose data; backups will no longer be created on the removed drive. It does not disable Time Machine either.
The Time Machine backup files can be deleted manually, or the drive can be formatted with a Mac and emptied of all data if desired. If you anticipate future use or want to refer to the files, there's no harm in leaving them where they are.
How to Format or Wipe Old Time Machine Backup Drive?
If you will sell, donate, dispose of or recycling an old Time Machine backup drive, you may format it or wipe it.
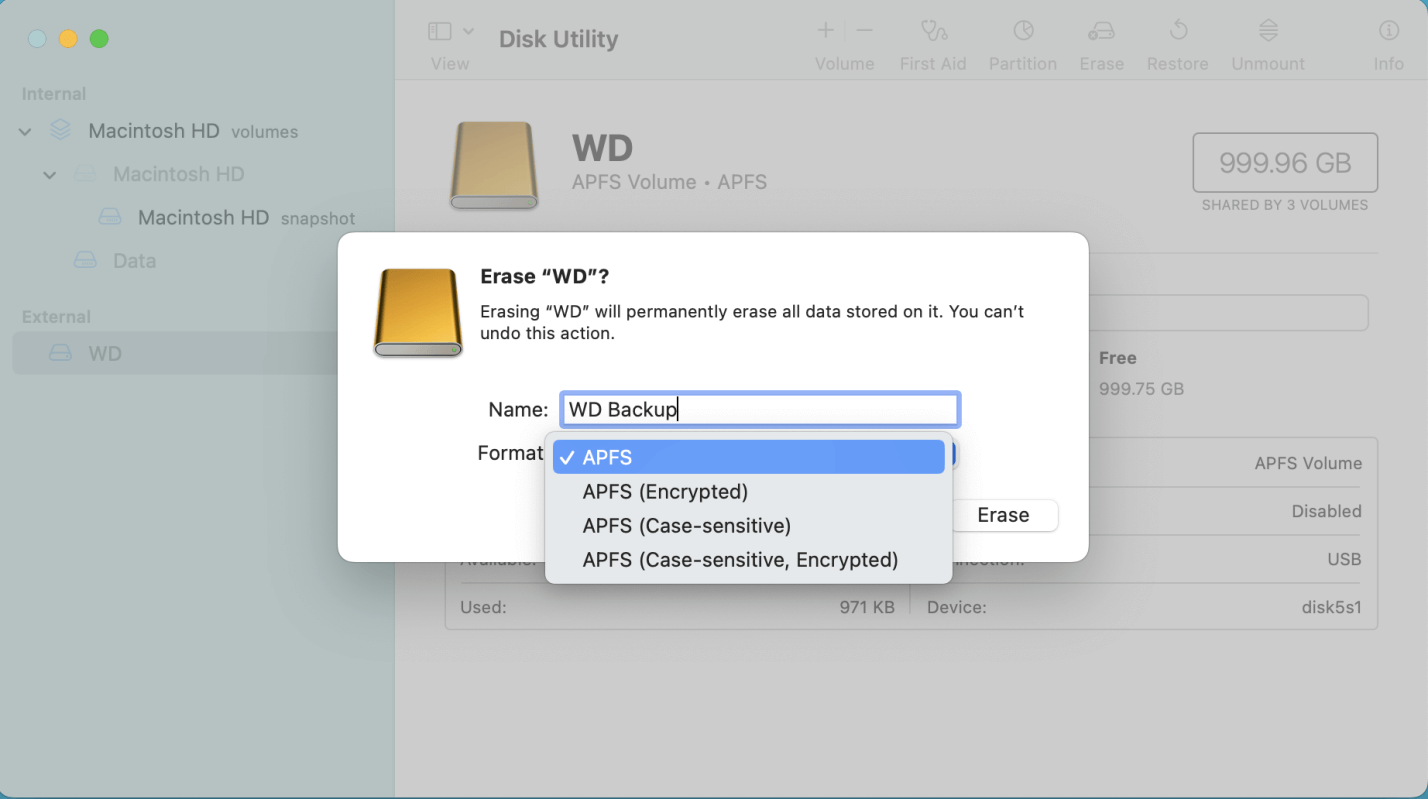
Option 1. Format Time Machine Backup Drive Using Disk Utility:
Step 1. Go to Launchpad and open Disk Utility.
Step 2. Select the Time Machine backup drive, click Erase.
Step 3. Give it a new name and select a file system, click Erase again. When it is completed, click on Done button.
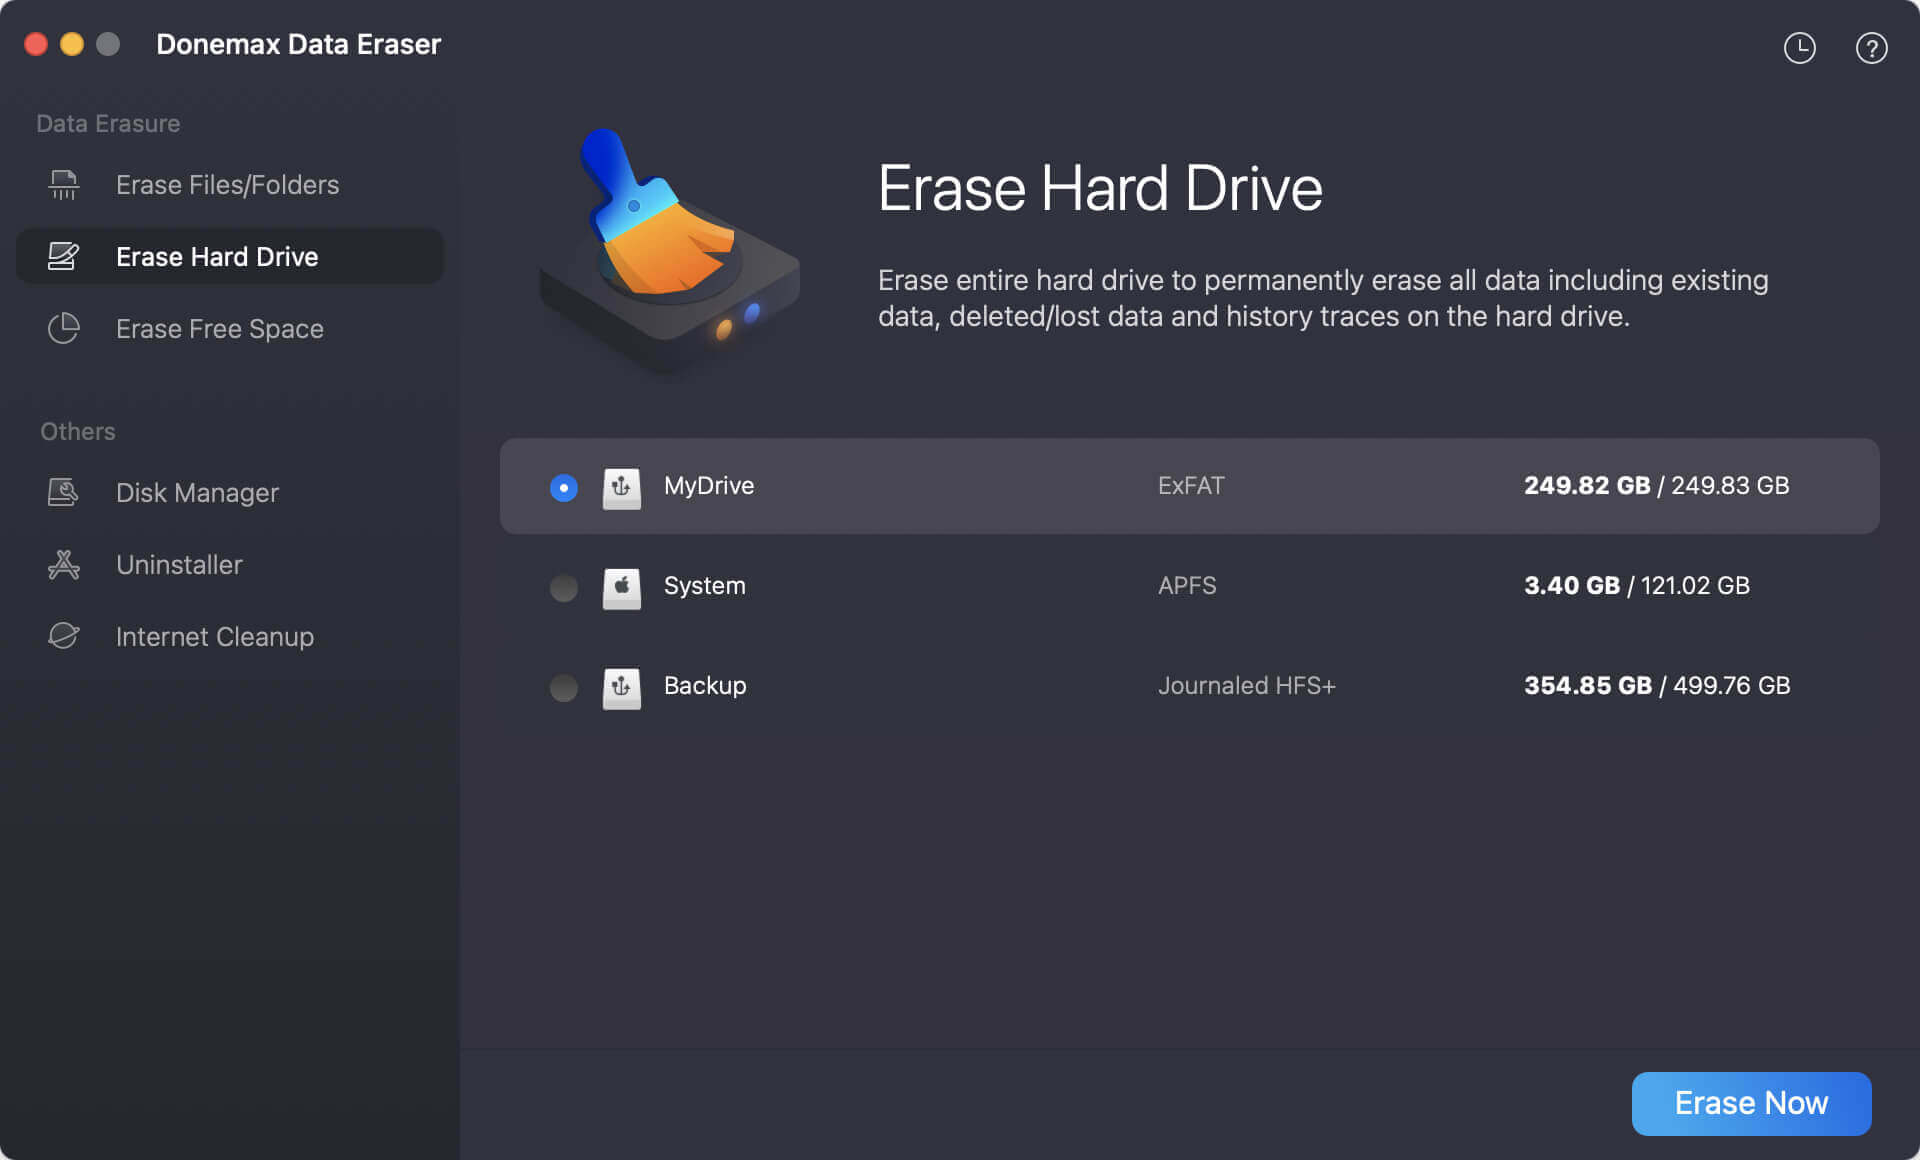
Option 2. Wipe Time Machine Backup Drive with Eraser:
If you will sell or donate your hard drive, you'd better permanently wipe all data from it to prevent potential data recovery. Donemax Data Eraser for Mac can help you easily and permanently erase data from local hard drive or external device on Mac.
Step 1. Download and install Donemax Data Eraser for Mac. Open it.
Donemax Data Eraser for Mac
- Wipe entire hard drive to permanently destroy all data.
- Erase free space to ensure the deleted/lost data is gone forever.
- Shred specified existing files/folders completely.
Step 2. Choose data erasure mode - Erase hard drive. It will wipe all data from the selected hard drive. Select the Time Machine backup drive and click on Erase Now button.
Step 3. Choose the data erasure standard from the drop-down list.
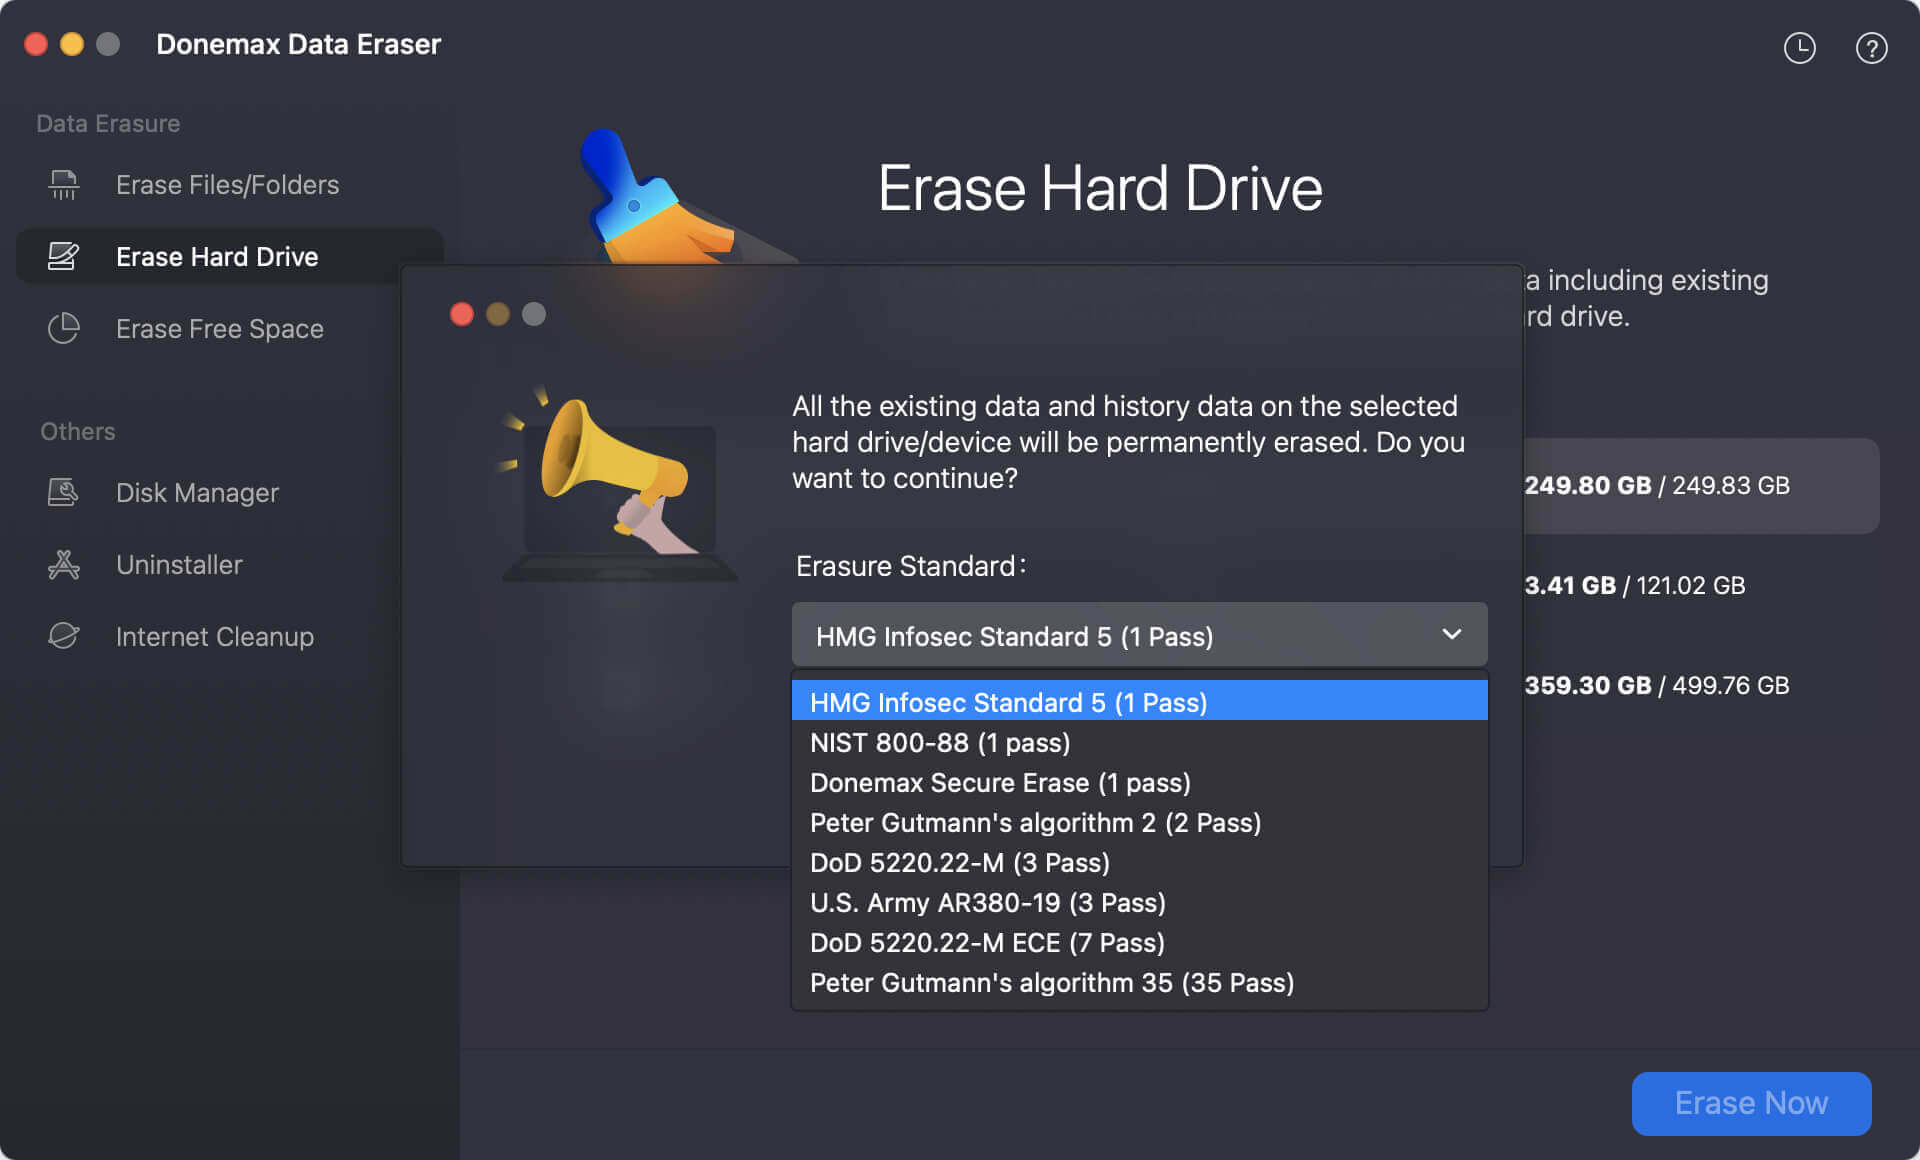
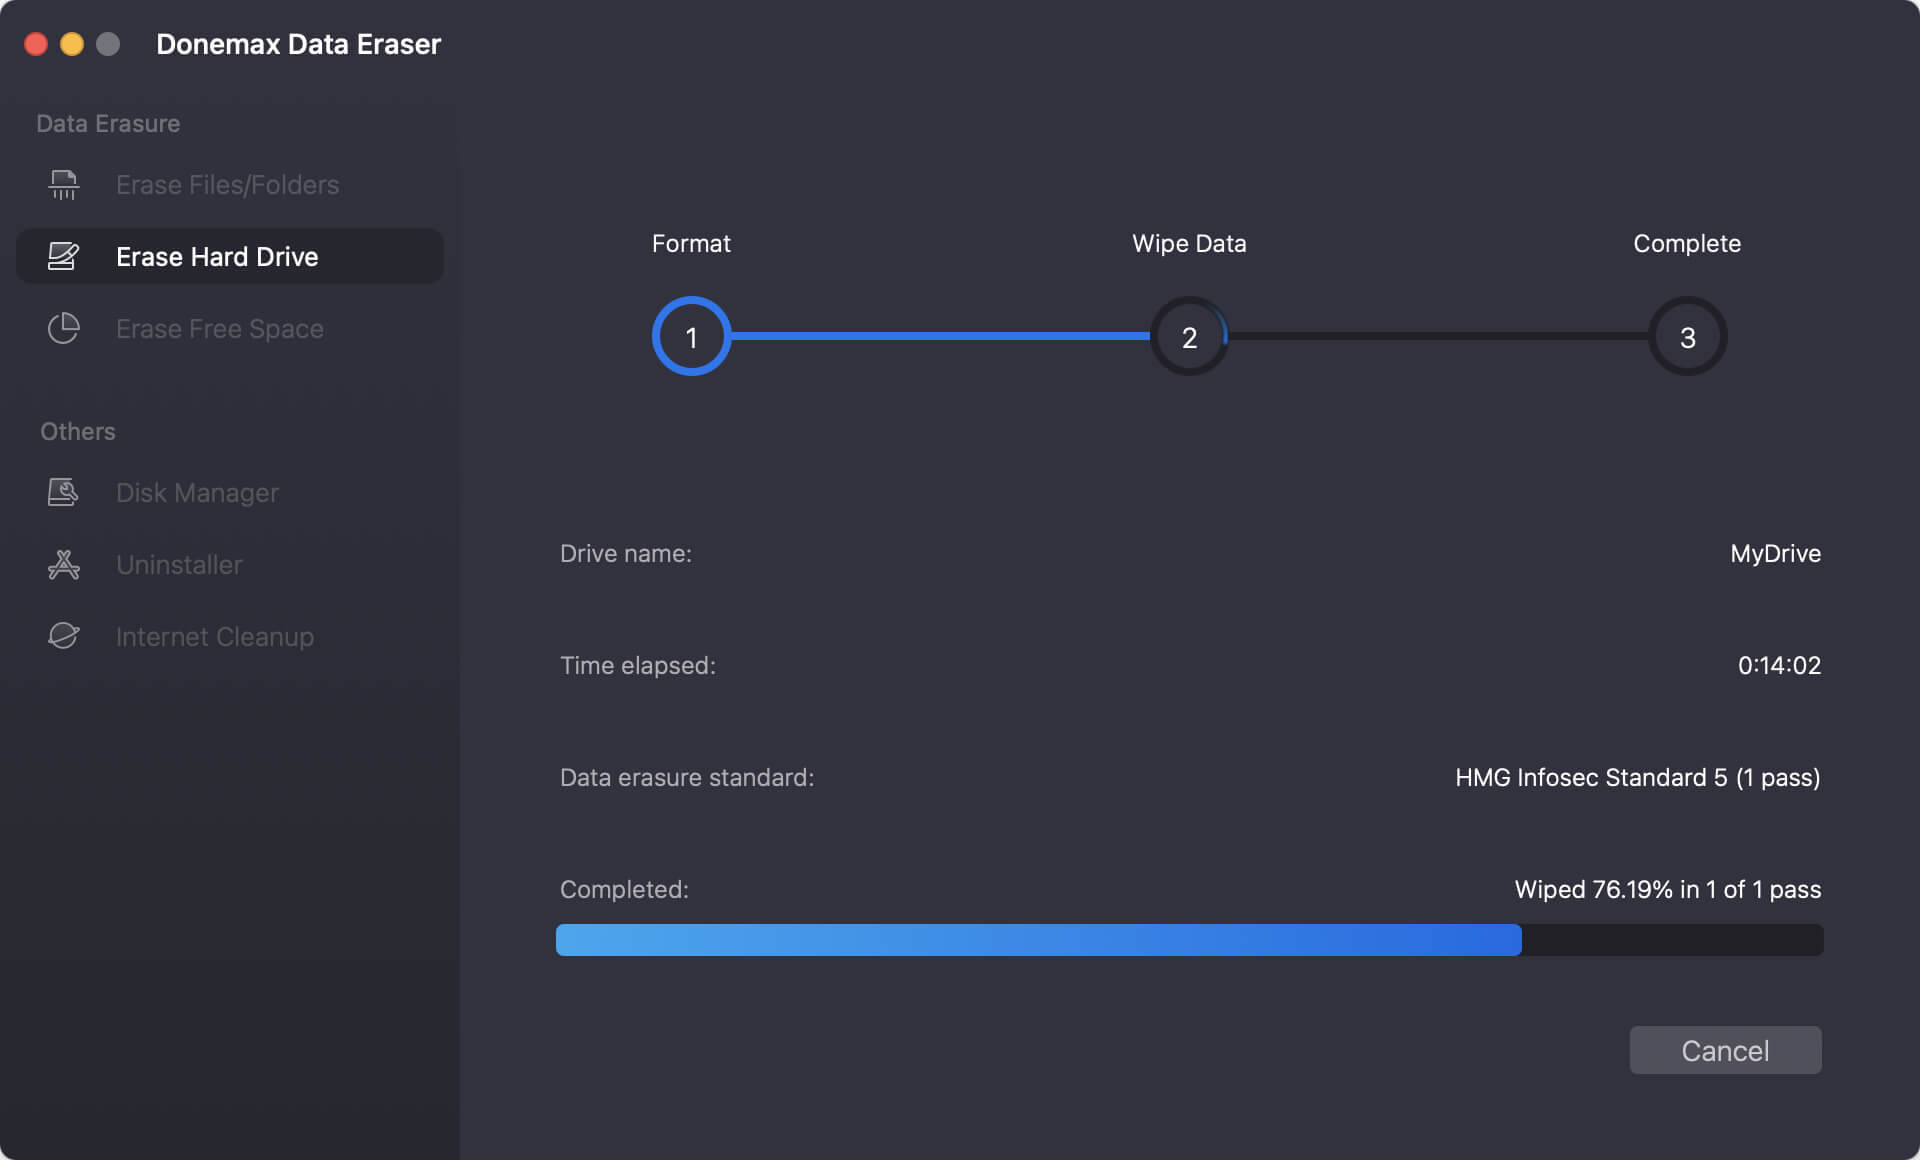
Step 4. Start to process the data wiping. It will securely and permanently erase all data from the drive.
🔖 Note: Please note that once your data is erased by Donemax Data Eraser for Mac, the data is lost forever, can't be recovered by any data recovery method.
FAQs about Deleting Time Machine Backup Drive
Click Apple menu and choose System Settings > Select General > Time Machine. Then select the unwanted backup drive and click “-” to remove the Time Machine backup drive.
No, if you only remove the backup drive from Time Machine, it will not erase the data on the drive. It only disable the backup function.
If you will sell or donate your hard drive, you can use Donemax Data Eraser for Mac to securely wipe the hard drive. It will permanently erase all data from the hard drive, making data recovery be impossible.
Disk cloning software can help you quickly create a full backup for Mac. For example:
- Download and install Donemax Disk Clone for Mac.
- Choose OS Clone mode, it will clone all data from the Mac to the external hard drive.
- Select the external hard drive as the destination drive.
- Click on Clone Now button.
Conclusion:
Time Machine is Apple's automated backup solution that may be set and forgotten. Time Machine creates backup copies of your files every hour. It saves previous versions of documents and deletes them so that they, or an entire computer, can be restored to a previous state at any time. When the backup drive is full, the oldest backups are deleted mechanically.
Since Time Machine is so reliable, it is often overlooked. In contrast, you will value these cutting-edge methods that put you in charge of the behind-the-scenes process if you ever have to replace computers or hard drives.
Donemax Data Eraser for Mac
100% safe and powerful Mac data erasure program. It offers certified data erasure standards including U.S. Army AR380-19, DoD 5220.22-M ECE to securely and permanently erase data from Mac HDD/SSD and external storage devices, making data recovery impossible.
Related Articles
- Jan 29, 2024How to Fix Toshiba External Hard Drive Not Showing Up on Mac?
- Mar 11, 2025How to Format Seagate One Touch HDD or SSD: A Step-by-Step Guide
- Jun 16, 2025How to Unlock USB Flash Drive?
- Jul 09, 2024External Hard Drive Is Not Initialized, How to Fix It?
- Jun 12, 2026Is Your Samsung SSD Dying? How to Check Health & Lifespan
- Mar 25, 2024(Solved) Hard Drive Shows As Untitled on Mac and Not Showing Up

Contributing Writer
Steven
Steven has been a senior writer & editor of Donemax software since 2020. He's a super nerd and can't imagine the life without a computer. Over 6 years of experience of writing technical solutions and software tesing, he is passionate about providing solutions and tips for Windows and Mac users.

Editor in chief
Gerhard Chou
In order to effectively solve the problems for our customers, every article and troubleshooting solution published on our website has been strictly tested and practiced. Our editors love researching and using computers and testing software, and are willing to help computer users with their problems