Written byLucienUpdated on May 28, 2025
How to Wipe Everything on M2 Mac?
Approved byGerhard Chou
Before we start: Erase the drive in Recovery mode and reinstall macOS on M2 Mac is not safe enough, especially if you will sell or donate the Mac. Using Donemax Data Eraser can wipe data permanently to avoid data leakages.
PAGE CONTENT:
Wiping everything on your M2 Mac means restoring it to factory settings—erasing all personal files, applications, and settings. Whether you're selling, gifting, troubleshooting, or just starting fresh, knowing how to completely wipe your M2 Mac is crucial. In this article, we'll guide you step-by-step through backing up your data, securely erasing your Mac, reinstalling macOS, and preparing it for a new beginning.
Why You Might Need to Wipe Your M2 Mac?
There are several reasons why someone might want to wipe an M2 Mac:
- Selling or Giving it Away: Ensure no personal data is left behind.
- Troubleshooting Major Issues: Fix persistent software or performance issues.
- Starting Fresh: Begin anew with a clean macOS installation.
- Preparing for Repurposing: Reassigning the device to another user.
Before you begin, be aware: wiping your M2 Mac is irreversible. Everything on the device will be lost unless properly backed up.
What to Do Before Wiping Everything on M2 Mac?
Step 1: Back Up Your Data
Before wiping your Mac, back up all important data to prevent permanent loss. Here are two main ways to back up your data:
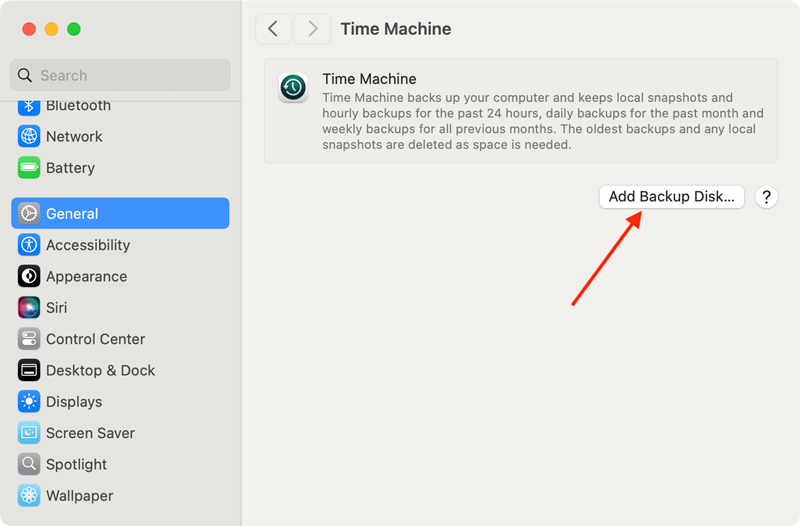
A. Time Machine Backup
Time Machine is Apple's built-in backup solution and one of the easiest ways to save all files, settings, and applications.
- Connect an external hard drive.
- Go to System Settings > General > Time Machine.
- Click Add Backup Disk, select your external drive, and start the backup process.
![Time Machine Backup]()
B. Cloud or Manual Backup
If you prefer, manually copy important files to:
- iCloud Drive
- Google Drive
- Dropbox
- External SSD/HDD
Make sure to back up the following:
- Documents, Photos, Videos
- Downloads folder
- Desktop items
- Application data (if needed)
C. Clone entire Mac
If you want to keep all applications, settings, personal files and the system, you can clone the entire Mac directly. With Donemax Disk Clone, you can make a full and bootable clone backup for the M2 Mac.

How to create bootable clone for Mac?
Donemax Disk Clone for Mac can easily make a full and bootable clone for Mac.
Step 2: Sign Out of Apple Services
Before wiping your M2 Mac, signing out of all Apple services is essential. Apple's security ecosystem is tightly integrated, and skipping this step may lead to Activation Lock being triggered. This lock ensures your Mac can't be used by anyone else unless they know your Apple ID credentials. It's great for anti-theft purposes but problematic if you're selling, gifting, or resetting the device and forget to remove your credentials.
Let's break down how to properly sign out from all critical services:
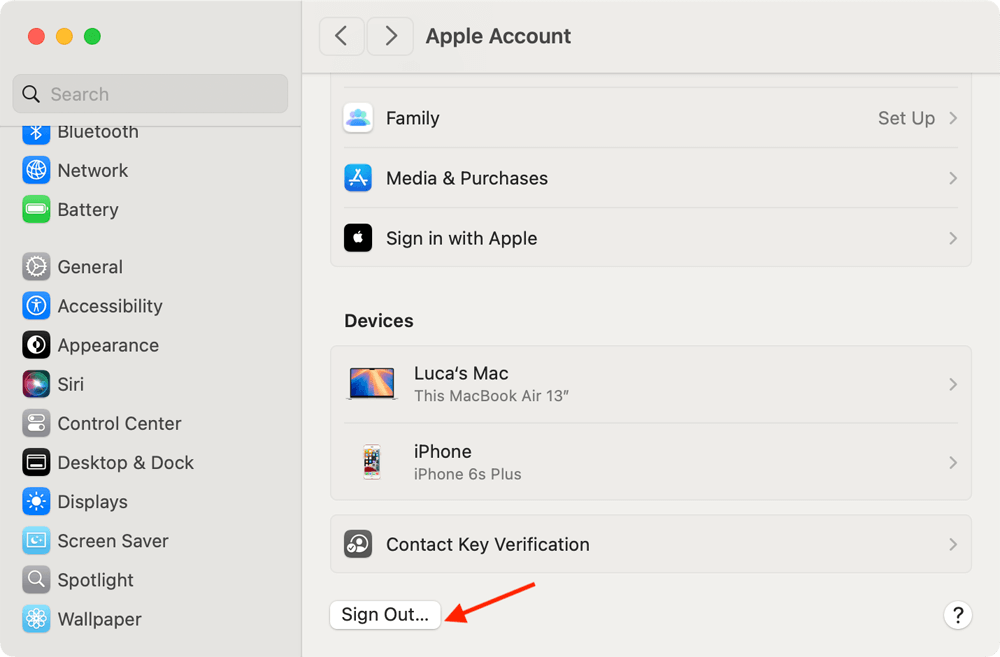
A. Sign Out of iCloud
This is the most important step. iCloud links your Mac to your Apple ID, and Find My Mac enables Activation Lock. If these aren't disabled, the next user will not be able to set up the device.
- Open System Settings.
- Click on your Apple Account (usually listed at the top left).
- Scroll down and click Sign Out.
![Scroll down and click Sign Out]()
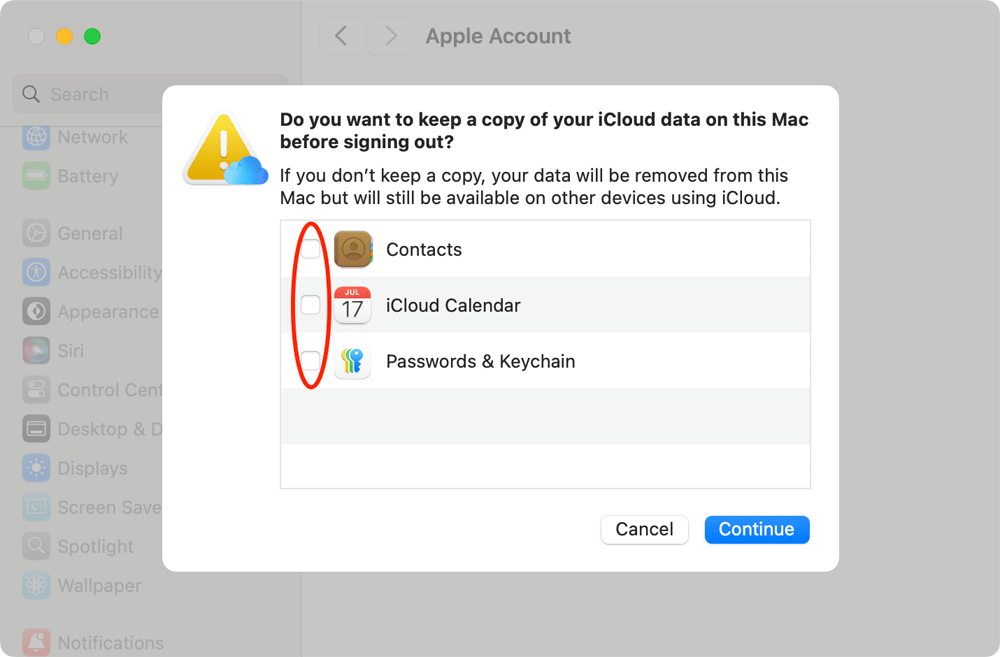
- A prompt will ask if you want to keep a copy of your data. Since you're wiping the Mac, you can uncheck all options.
![Sign Out of iCloud]()
- Enter your password when prompted to disable Find My Mac and remove the device from your Apple account.
💡Note: If you don't have your Apple ID password, you will not be able to turn off Find My Mac, and the Mac will remain locked even after wiping. This can only be resolved by entering the correct credentials or providing proof of purchase to Apple Support.
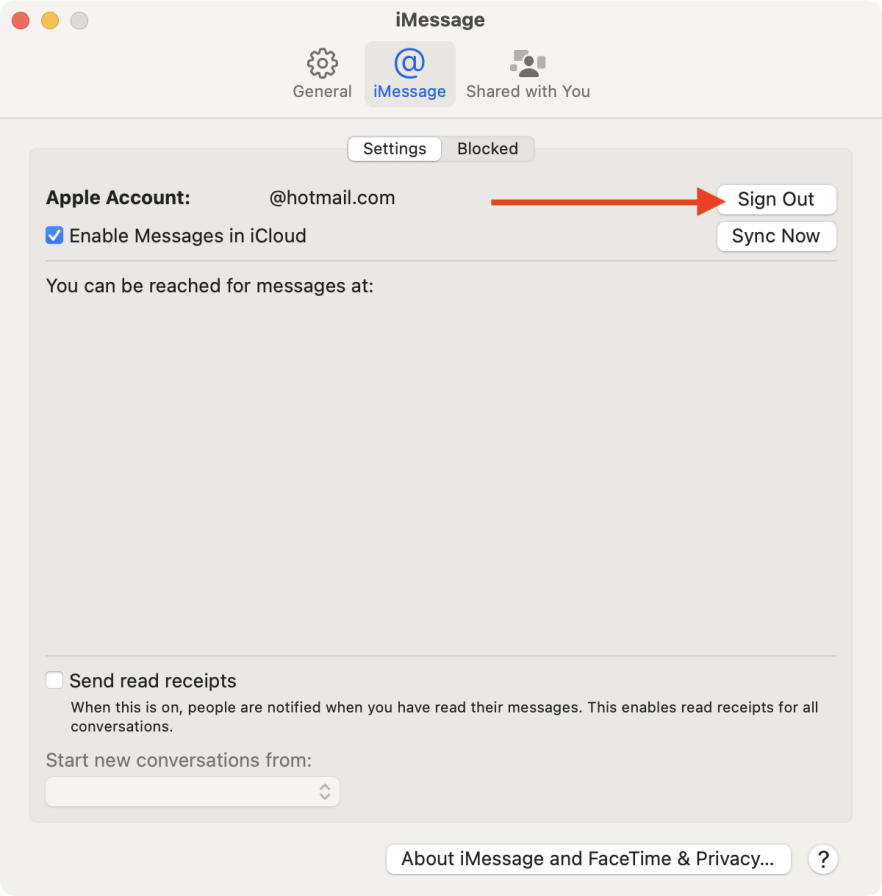
B. Sign Out of Messages
iMessage may continue to route messages to your device even after erasure if not properly signed out.
- Open the Messages app.
- From the menu bar, go to Messages > Settings.
- Select the iMessage tab.
- Click Sign Out.
![Sign Out of Messages]()
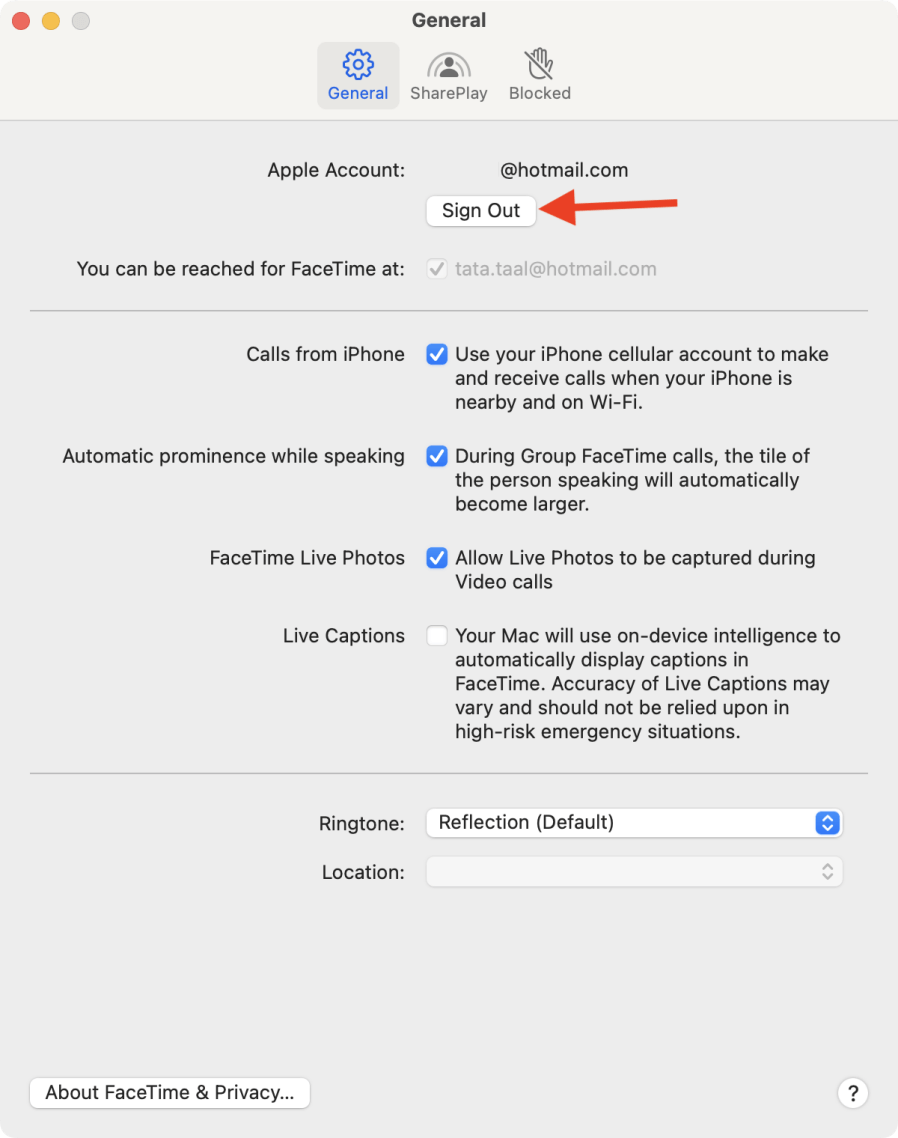
C. Sign Out of FaceTime
FaceTime, like iMessage, is tied to your Apple ID.
- Open the FaceTime app.
- Go to FaceTime > Settings.
- Click Sign Out under the Apple ID section.
![Sign Out of FaceTime]()
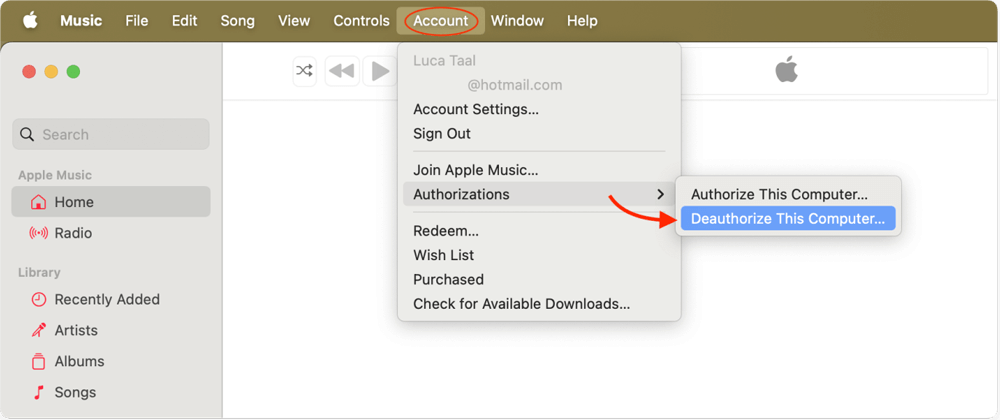
D. Deauthorize the Mac from Apple Music
While iTunes is no longer a standalone app in recent macOS versions, authorization and deauthorization still exist under the Apple Music or Apple TV apps.
Each Apple ID can authorize up to 5 devices to access protected content. If you're erasing the Mac, it's a good idea to deauthorize it, freeing up a slot.
- Open the Music app (or Apple TV, Books, depending on content).
- From the top menu bar, click Account > Authorizations > Deauthorize This Computer.
- Enter your Apple ID credentials to confirm.
![Deauthorize the Mac from Apple Music]()
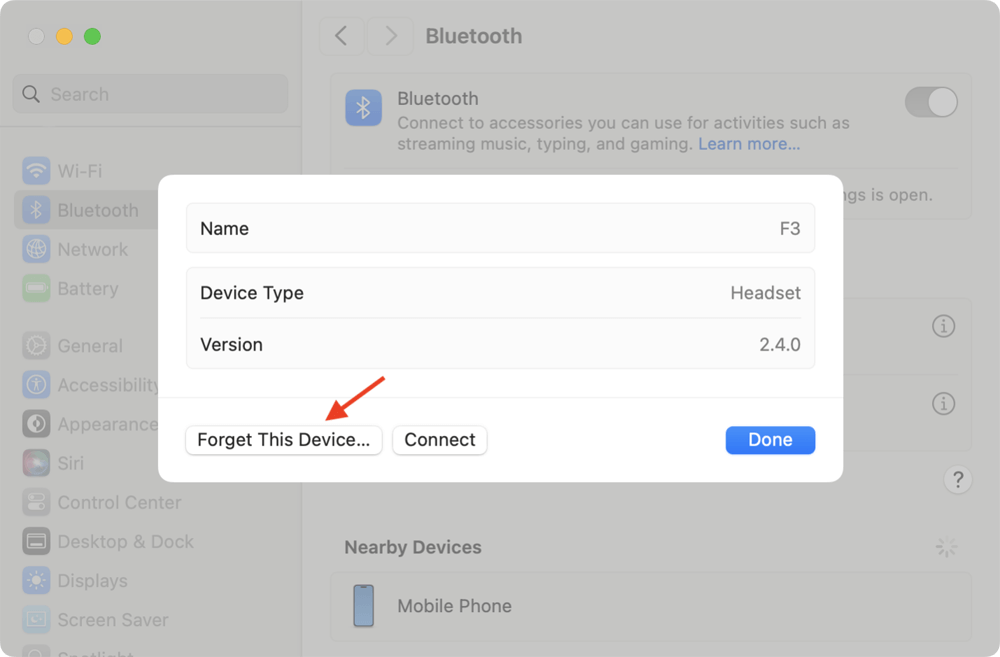
E. Unpair Bluetooth Devices (Optional)
This is optional but helpful if you plan to use the Bluetooth devices (keyboard, trackpad, AirPods) with another device.
- Go to System Settings > Bluetooth.
- Hover over the device name and click the "i" (info) icon.
- Choose Forget This Device.
![Unpair Bluetooth Devices]()
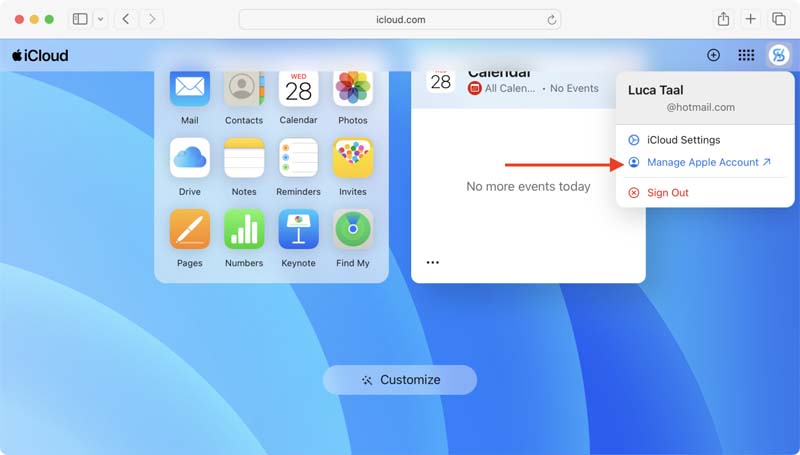
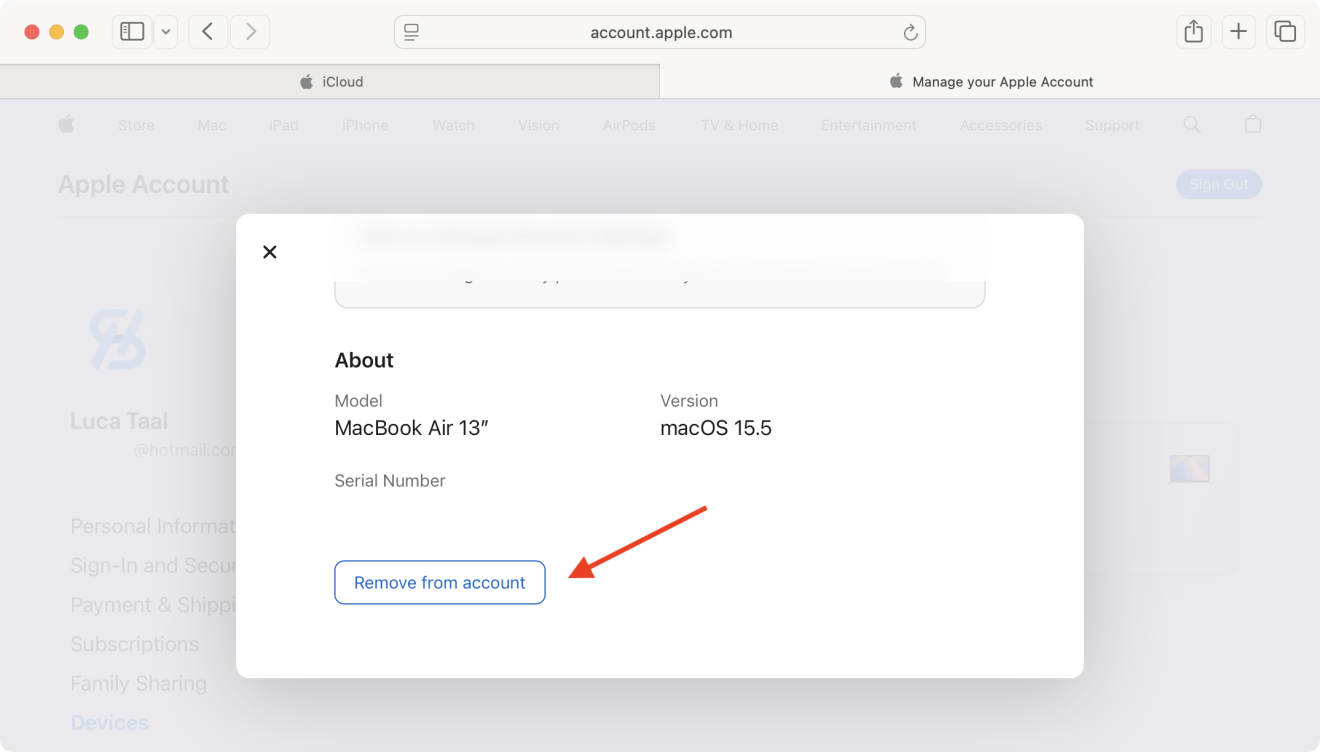
F. Unlink from Apple ID on the Web (Optional Check)
After signing out from your Mac, you can confirm that the device is removed from your account online.
- Visit https://appleid.apple.com.
- Log in with your Apple ID. Click the account and select Manage Apple Account.
![select Manage Apple Account]()
- Under Devices, check if your Mac is listed.
- If it is, select the Mac and click Remove from Account.
![select the Mac and click Remove from Account]()
Why This Step is So Important
Failing to sign out of Apple services before wiping your Mac can result in:
- Activation Lock, preventing new users from accessing the Mac.
- Your Apple ID still being associated with the device.
- Privacy risks if services like Messages or iCloud remain linked.
Even if you erase the disk and reinstall macOS, the Mac will still request the original Apple ID during setup. This is part of Apple's anti-theft protection, and it's a frequent issue for people selling Macs online.
Steps to Wipe Everything on M2 Mac:
Step 1: Boot into macOS Recovery Mode (for M2 Macs)
M2 Macs use Apple Silicon, which follows a different process than Intel-based Macs.
How to Enter macOS Recovery on M2 Mac:
- Shut down your Mac completely.
- Press and hold the Power button until "Loading startup options" appears on the screen.
- Click Options, then Continue.
![How to Enter macOS Recovery on M2 Mac]()
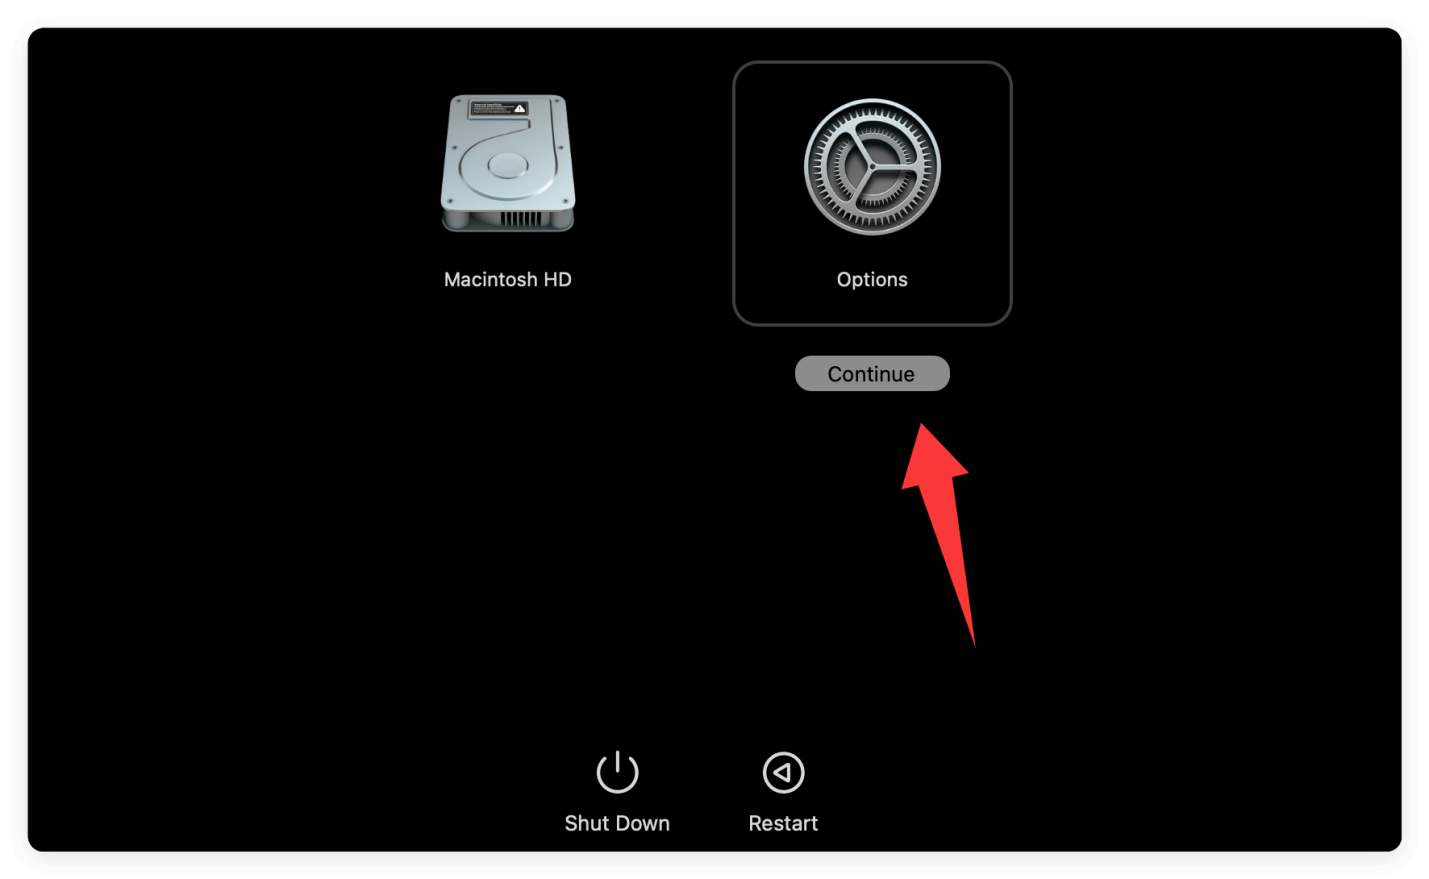
You're now in macOS Recovery, where you can access Disk Utility and other tools.
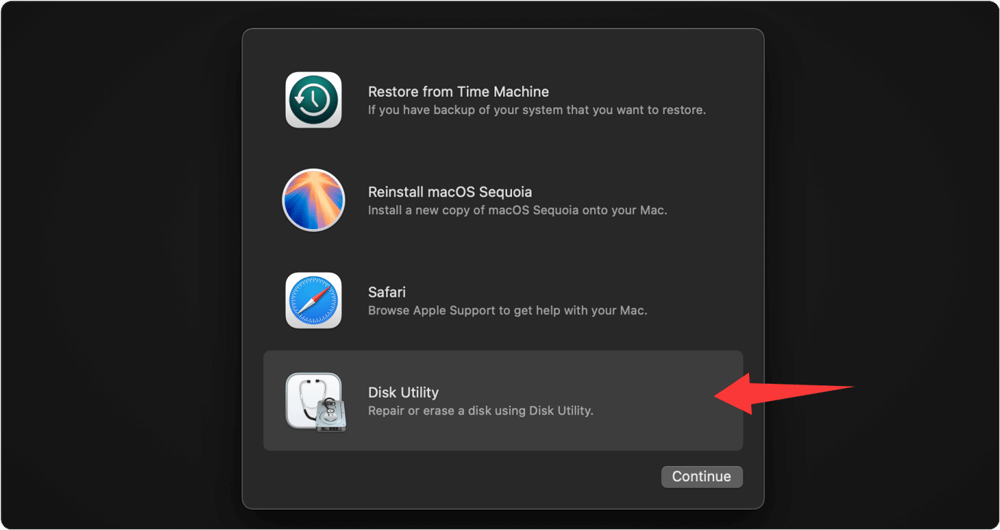
Step 2: Erase the Internal Disk with Disk Utility
Once in Recovery Mode, follow these steps to erase your Mac's internal storage:
- From the macOS Utilities window, choose Disk Utility.
![choose Disk Utility]()
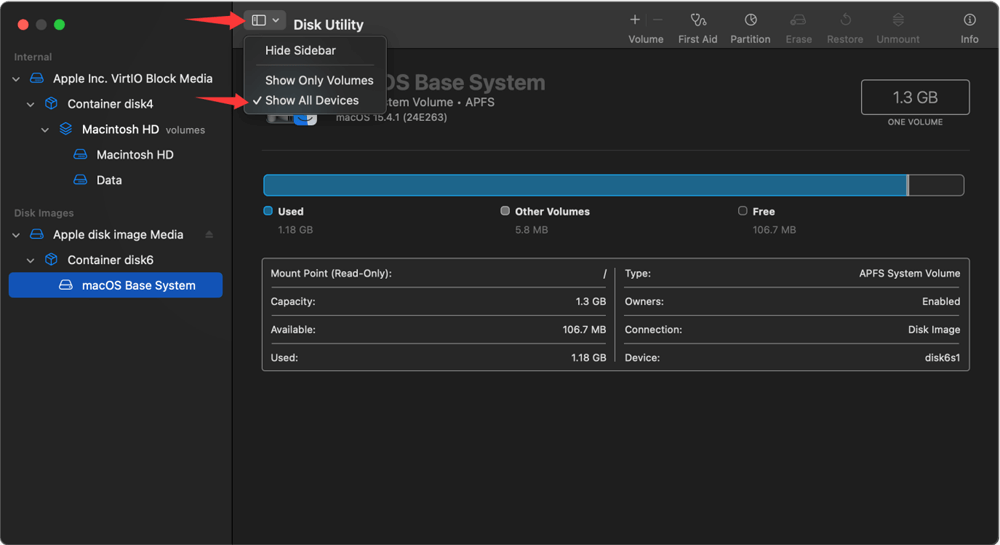
- Click View > Show All Devices (top-left) to reveal the full storage hierarchy.
![Click View > Show All Devices]()
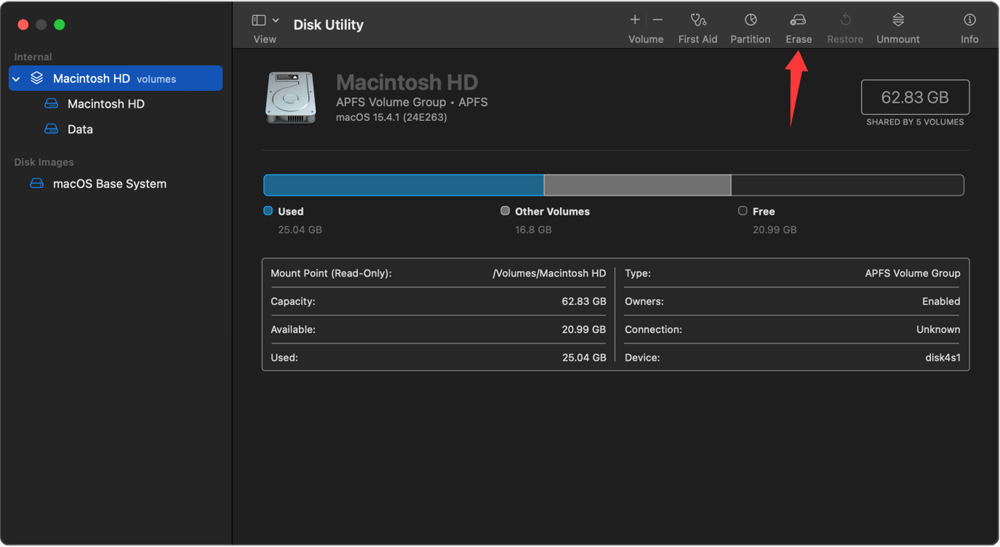
- Select the internal drive (usually named "Apple SSD" or "Macintosh HD"). Click Erase at the top.
![Select the internal drive and Click Erase at the top]()
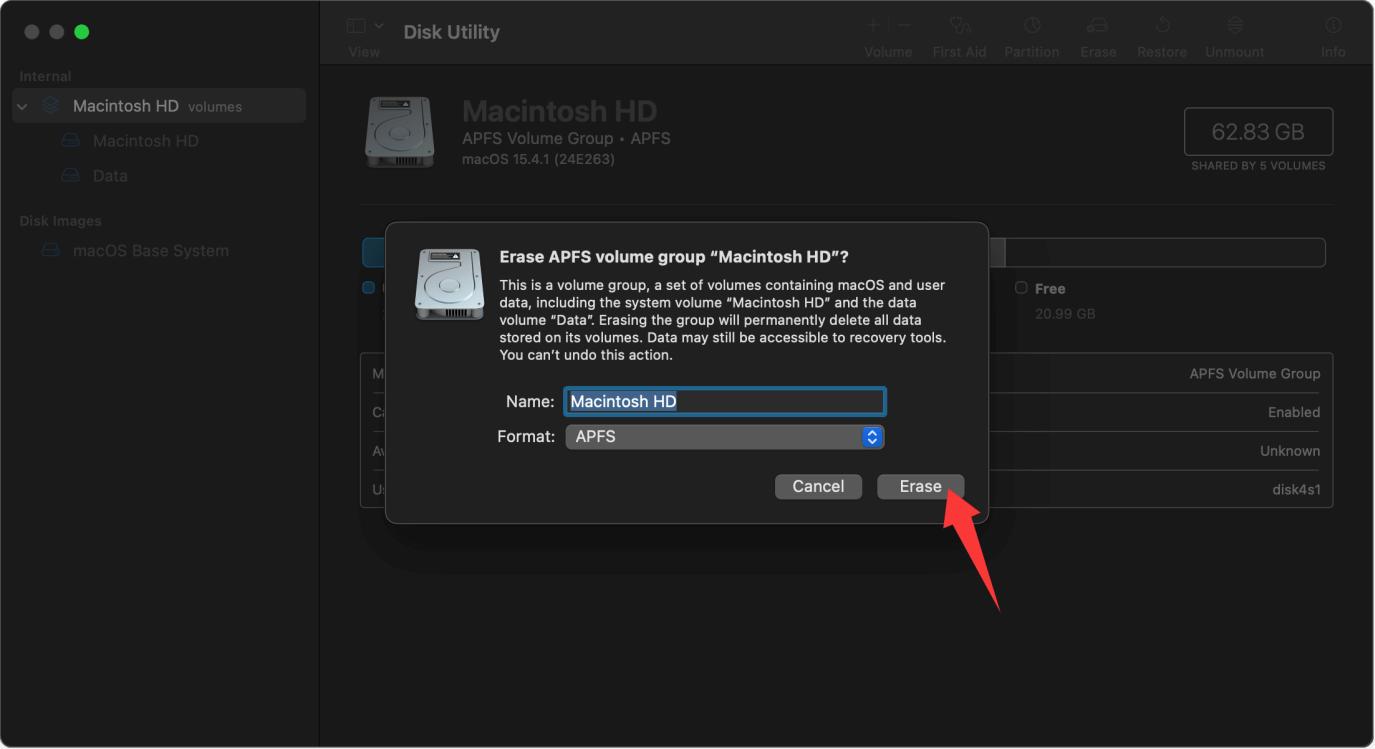
- Set the following:
- Name: Macintosh HD (or any name you prefer)
- Format: APFS
- Scheme: GUID Partition Map (usually auto-selected)
- Click Erase to confirm.
![Click Erase to confirm]()
If you see multiple volumes (e.g., "Macintosh HD" and "Macintosh HD – Data"), erase both. Start with the Data volume if needed.
Step 3: Reinstall macOS
After wiping your drive, you'll need to reinstall macOS:
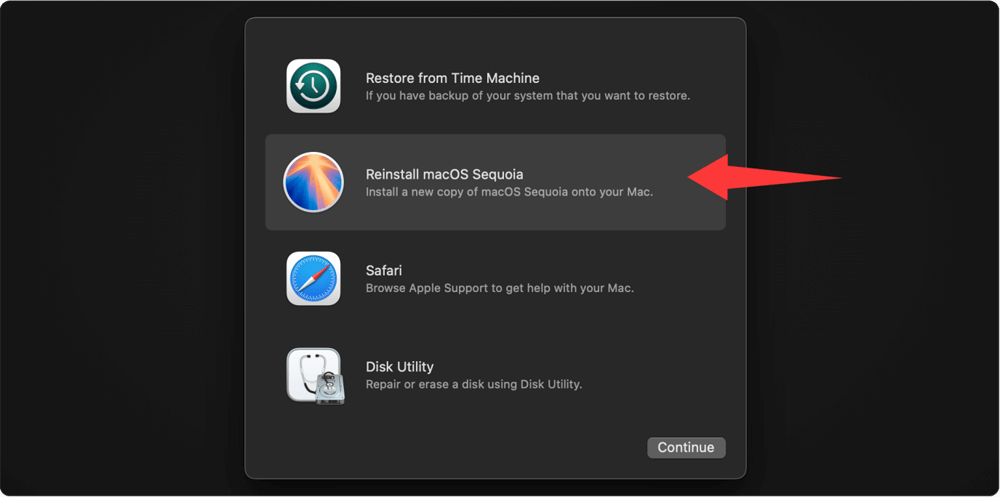
- Return to the macOS Utilities menu. Click Reinstall macOS Sequoia (or the macOS version currently available).
![Click Reinstall macOS Sequoia]()
- Follow on-screen prompts.
- Select the freshly erased drive (Macintosh HD) as the installation destination.
![Select the freshly erased drive as the installation destination]()
- The Mac will download and install a fresh copy of macOS from Apple's servers.

💡Note: You'll need a stable internet connection. This process may take 20–60 minutes depending on your network speed.
What Happens After the Wipe?
Once wiped and reinstalled:
- All previous user data is gone.
- The drive is formatted in APFS.
- macOS is clean and up to date.
- Activation Lock is disabled if you signed out of iCloud.
- The Mac is ready for a new owner or fresh use.
Step 4: Finish Setup or Shut Down for New Owner
After macOS reinstall, Setup Assistant will launch, allowing you to:
- Select your country/language
- Sign in with Apple ID
- Create a new user account
If You're Keeping the Mac:
Go through setup and restore data from Time Machine or iCloud.
If You're Selling or Gifting:
Instead of setting up, exit the setup screen, then shut down. This ensures the next person will see the welcome screen when they power it on.
Step 5: Extra Tips for Secure Erase (Optional)
If there was important or sensitive data on the M2 Mac, it's not safe enough even after reinstalling the macOS. There is still a chance to recover all or part of the data with professional data recovery methods or tools. To keep your privacy safe and avoid data breaches, you can use professional third-party data erasure utilities for data wiping.
How to wipe the personal data from the M2 Mac after reinstalling macOS? You can use the software Donemax Data Eraser for Mac. It's used for advanced erasure or data destruction before selling.
Donemax Data Eraser for Mac
- Most reliable data erasure application for Apple Silicon Macs.
- Three data erasure modes for different requirements.
- Securely wipe data to prevent unauthorized data access or recovery.
After reinstalling the macOS on M2 Mac, how to prevent the removed data being recovered? With Donemax Data Eraser for Mac, you can wipe the free space of the Mac drive directly. It can ensure all the removed or lost data on the drive is gone permanently.
Here are the steps to wipe the free space drive on M2 Mac with Donemax Data Eraser for Mac:
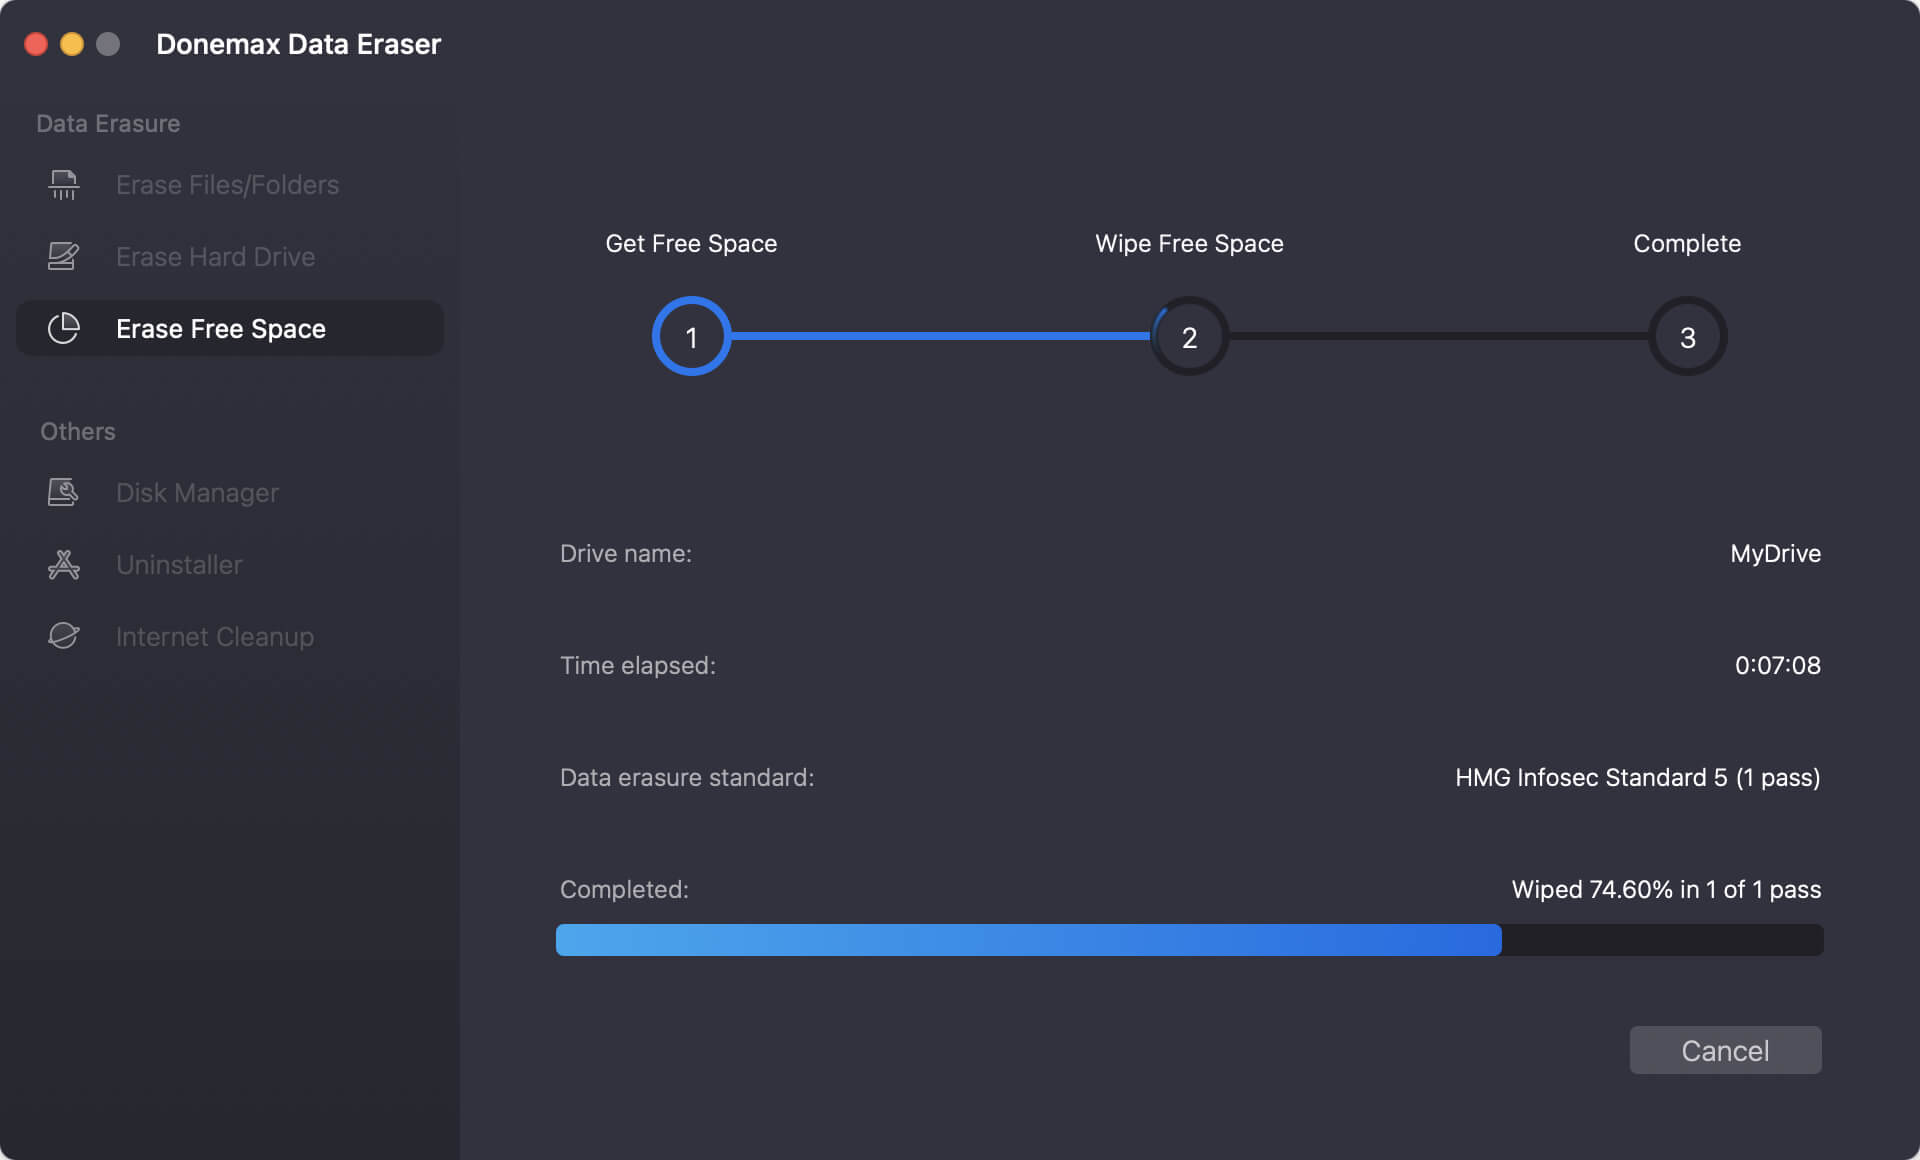
Step 1. Run the software from launchpad and change to the Erase Free Space mode. Select the Mac drive and click Erase Now button.
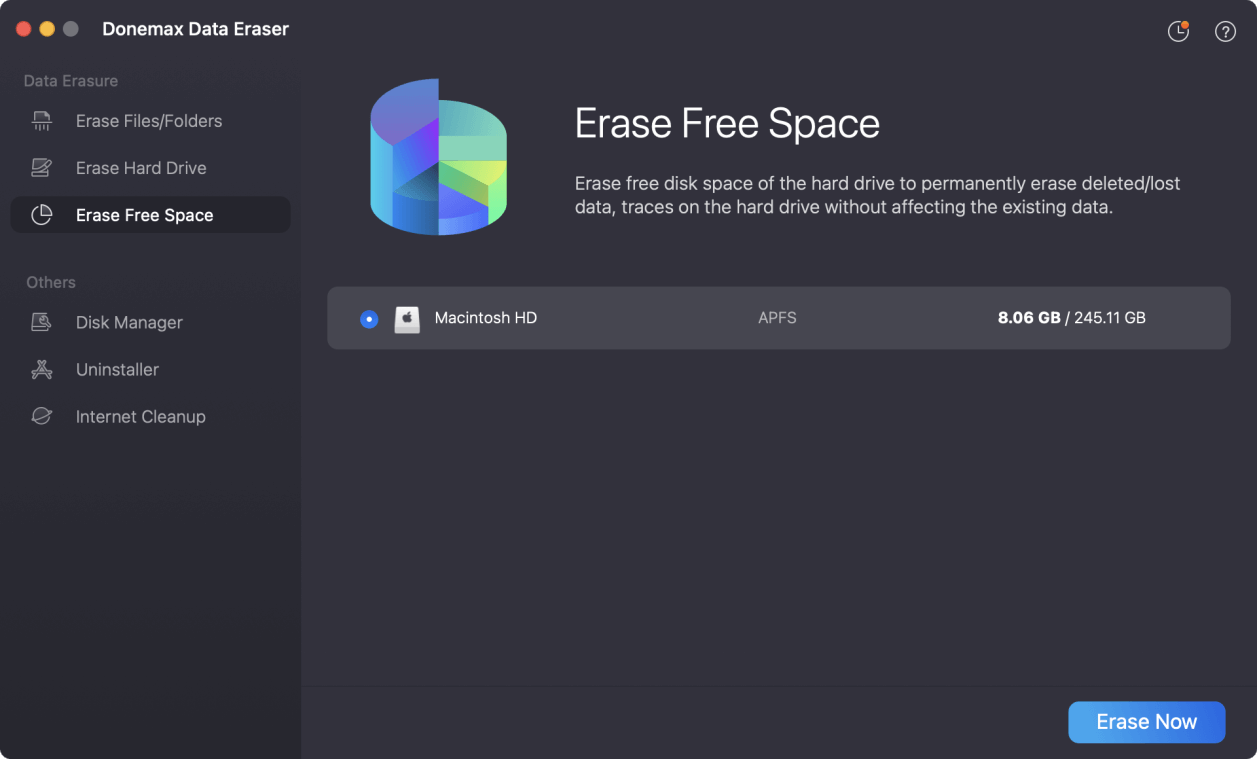
Step 2. The software will ask you to select a data erasure standard. It will be applied to wipe data permanently from the drive. Confirm the data erasure standard by clicking the Continue button.

Step 3. The software will start to wipe the free space of the Mac drive. It will take some time to wipe all data on the free space, just wait patiently.
Once the data wiping process is done, all the removed data on the Mac drive is gone forever. You can now sell the M2 Mac or give it away with peace of mind.
Troubleshooting Common Issues
Can't Access macOS Recovery
- Ensure you're using Apple Silicon instructions.
- Hold Power button, not Command + R.
- If still stuck, use Apple Configurator 2 from another Mac to revive the firmware.
Disk Won't Erase
- Try selecting the parent volume in Disk Utility, not just the container.
- Boot into Recovery Mode again and retry.
macOS Won't Reinstall
- Check your Wi-Fi connection.
- Use another network or USB installer if needed.
Activation Lock Still Enabled
- Must sign out of iCloud and disable Find My Mac.
- If device is second-hand, contact the previous owner or Apple with proof of purchase.
Conclusion
Wiping your M2 Mac may seem intimidating at first, but Apple has made the process fairly straightforward. As long as you follow the correct steps—especially backing up data and signing out of iCloud—you can safely reset your Mac to factory conditions.
Whether you're preparing for resale, troubleshooting, or just craving a clean start, wiping your Mac ensures no personal information lingers behind and gives your device a fresh slate. With the power and security of Apple Silicon, wiping an M2 Mac is also inherently secure due to hardware-level encryption—giving you peace of mind.
Donemax Data Eraser for Mac
100% safe and powerful Mac data erasure program. It offers certified data erasure standards including U.S. Army AR380-19, DoD 5220.22-M ECE to help in securely and permanently erase data from Mac HDD/SSD and external storage device, making data recovery be impossible.
Related Articles
- Mar 03, 2025How to Wipe a USB Flash Drive on Mac: A Comprehensive Guide
- Feb 19, 2024How to Permanently Delete or Shred Files on Mac?
- Jun 16, 2026Wipe Everything on macOS Ventura: Factory Reset macOS Ventura
- Mar 11, 2025Factory Reset Mac OS X 10.11 El Capitan: Step-by-Step Guide
- Apr 20, 2026How to Erase a Drive Using Terminal on Mac: Diskutil Guide (2026)
- Oct 14, 2025How to Erase Startup Disk on Mac?

Contributing Writer
Lucien
Lucien is a writer and a chief programmer of Donemax software who has worked in the company for 5+ years. He has written much of the content on the site and devotes to providing troubleshooting and solution for Windows and Mac users including disk cloning, data recovery, migration, eraser, error fixes.

Editor in chief
Gerhard Chou
In order to effectively solve the problems for our customers, every article and troubleshooting solution published on our website has been strictly tested and practiced. Our editors love researching and using computers and testing software, and are willing to help computer users with their problems