
Written byStevenUpdated on Feb 05, 2026
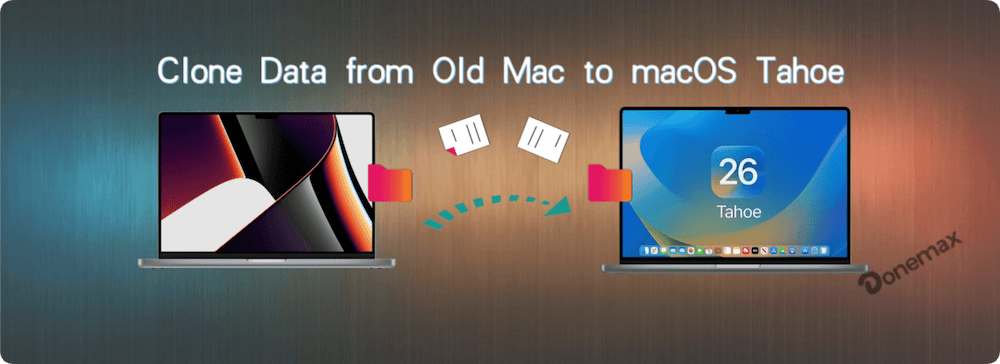
Clone Data from Old Mac to macOS Tahoe Mac
Approved byGerhard Chou
Before we start: After getting a new Mac with macOS Tahoe, you can clone the data from old Mac to avoid reconfiguring everything again. Time Machine, Migration Assistant or other methods are available to do the job. Donemax Disk Clone for Mac is a recommended tool to clone Mac in an easy and reliable way.
Upgrading to a new Mac running macOS Tahoe 26 brings the promise of faster performance, better AI integration, and new productivity features. But before you can fully enjoy the experience, one big task stands in your way: cloning data from old Mac to macOS Tahoe.
Whether you're concerned about transferring apps, documents, settings, or everything in between, this guide walks you through all the best methods—step by step—to make the data migration smooth and error-free.
Why Clone Data Instead of Manually Transferring?
Cloning is not just about copying files. It ensures that:
- Your apps are preserved and functional.
- Your system settings, preferences, and user accounts are retained.
- You minimize setup time on the new device.
- You avoid missing hidden files, app dependencies, or security configurations.
Manually dragging and dropping files, while simple, often leaves behind critical components or causes apps to break.
Preparing Both Macs for the Data Transfer
Before you begin, a little preparation can help avoid mid-transfer issues.
1. Update Your Old Mac
Ensure that your old Mac is running a relatively recent version of macOS—preferably at least macOS Big Sur or newer. Migration Assistant and some third-party Mac cloning tools may not function properly with outdated systems.
2. Sign Out of iCloud (Optional but Useful)
If you plan to sell, trade, or reset the old Mac afterward, sign out of:
- iCloud
- iMessage
- FaceTime
- App Store
This avoids iCloud activation lock conflicts later.
3. Create a Backup (Strongly Recommended)
Before performing any cloning operation, back up your old Mac using:
- Time Machine
- Donemax Disk Clone for Mac
- or simply a manual backup to an external drive
In case anything goes wrong during the cloning process, you'll have a fallback.
Method 1: Clone Data to macOS Tahoe with Migration Assistant
When transitioning to a new Mac running macOS Tahoe, Migration Assistant is by far the most streamlined and hassle-free solution for transferring your entire user environment from an older Mac. It not only moves files but also retains system preferences, installed applications, network settings, and even user accounts.
Let's go deeper into how this tool works and how you can use it with precision.
What is Migration Assistant?
Migration Assistant is a built-in utility developed by Apple, included in all macOS versions. Its purpose is to help users migrate their data from another Mac, a Time Machine backup, or even a Windows PC. For Mac-to-Mac transfers, the tool facilitates a near-identical copy of your old system, making the new Mac feel familiar from the first boot.
It can migrate:
- All user accounts
- System settings
- Installed apps (that are compatible)
- Email, contacts, calendars
- Network and printer settings
- Photos, music, and documents
Requirements for Migration Assistant
To use Migration Assistant effectively, you need:
1. Both Macs: Your old Mac (source) and new macOS Tahoe Mac (destination).
2. macOS Compatibility: Both Macs should be running macOS Big Sur (11) or later for optimal compatibility with macOS Tahoe.
3. A Stable Connection:
- Preferably Thunderbolt or USB-C cable for high-speed transfers.
- Alternatively, both Macs must be on the same Wi-Fi network (slower but works).
Step-by-Step Instructions:
1. Connect Both Macs
- Use the same Wi-Fi network or connect them via a Thunderbolt/USB-C cable.
- For large amounts of data, a wired connection is faster and more reliable.
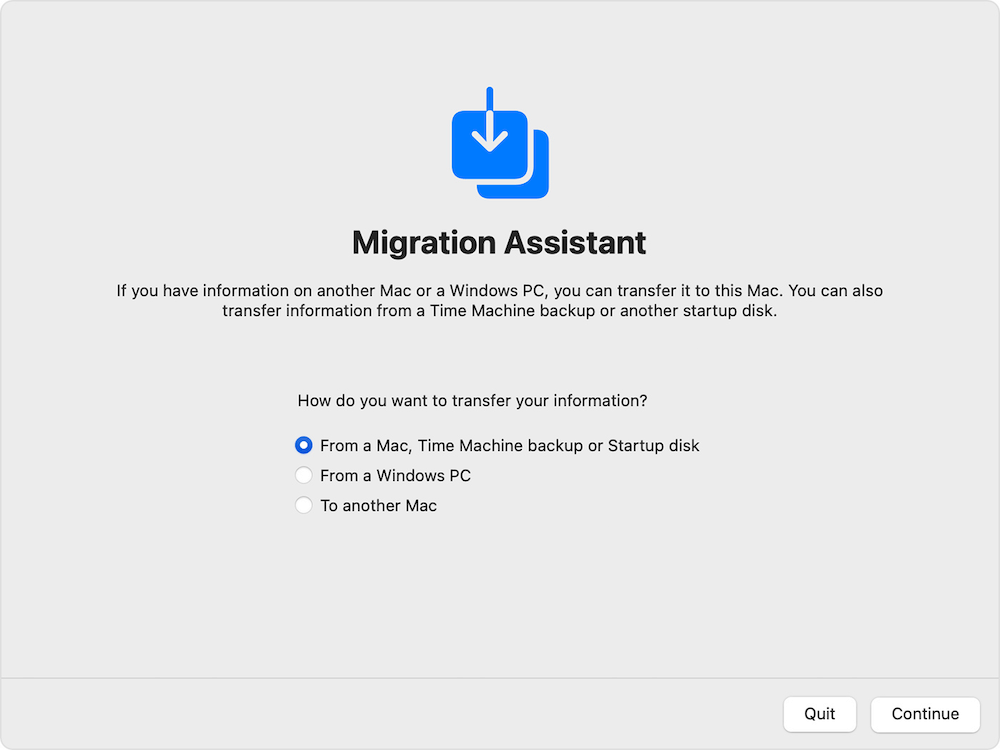
2. Open Migration Assistant
- On both Macs: Go to Applications > Utilities > Migration Assistant.
- On the new macOS Tahoe Mac, select "From a Mac, Time Machine backup, or startup disk."
![clone data from old Mac to macOS Tahoe]()
- On the old Mac, select "To another Mac."
![clone data from old Mac to macOS Tahoe]()

3. Select What to Transfer
- You'll see options like:
- Applications
- User accounts
- System & Network settings
- Files and folders
- Choose everything or pick selectively.
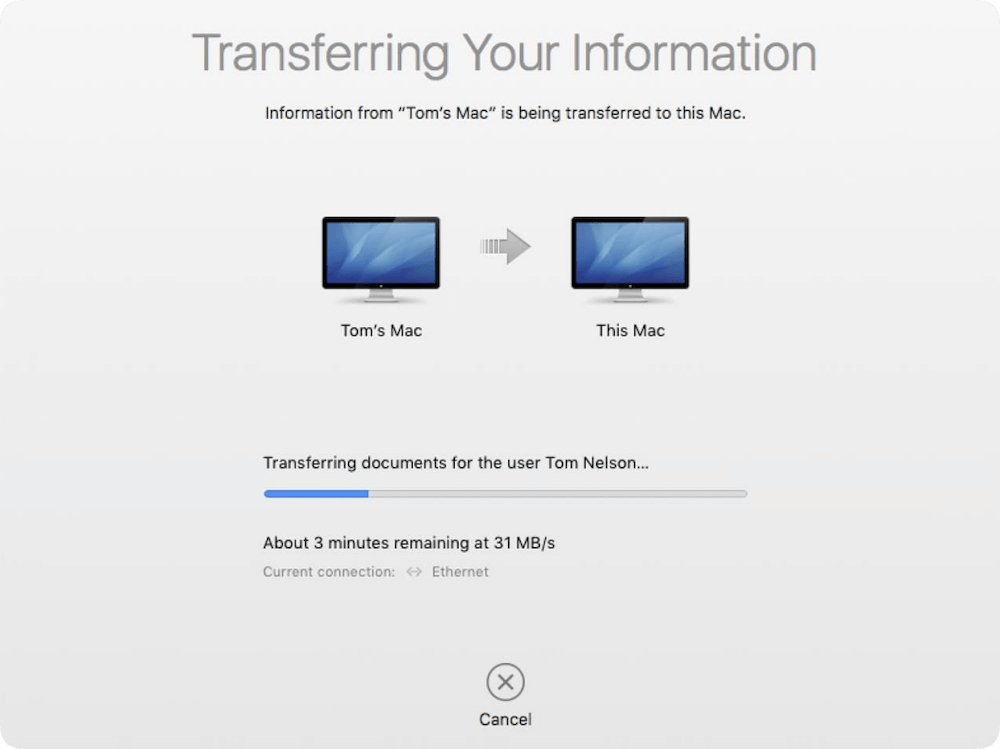
4. Start the Transfer
- Confirm and begin the process.
- Duration depends on file size and connection speed.
5. Complete Setup
- Once the transfer finishes, log in on the macOS Tahoe Mac and verify your files.
Pros
- Built-in and free
- Preserves user accounts, settings, and apps
- Little technical knowledge needed
Cons
- Can be slow over Wi-Fi
- May transfer unnecessary clutter
Method 2: Transfer data to macOS Tahoe via Time Machine Backup
If you previously used Time Machine to back up your old Mac, you can restore that backup during the setup of your new macOS Tahoe Mac. Here are the steps:
1. Create a Time Machine Backup
- Connect an external drive to your old Mac.
- Go to System Settings >General > Time Machine and start a backup.
2. Set Up Your New Mac
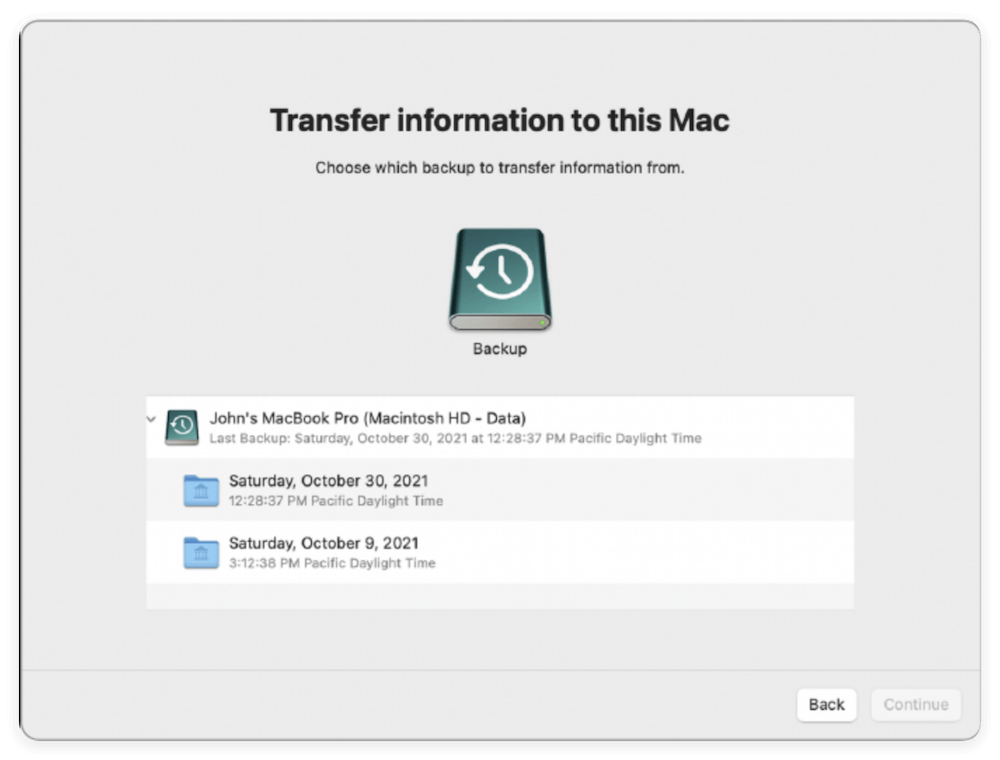
- During the initial setup of your new Mac, choose "Transfer information from a Time Machine backup."
- Plug in the external Time Machine drive.
3. Restore and Finish
- Choose the backup and what to restore.
- Wait for the process to complete and boot into your cloned system.
Pros
- Works even if your old Mac is dead (as long as you have a backup)
- Fully restores apps, preferences, and documents
Cons
- Needs an external drive
- Can't pick individual files during initial transfer
Method 3: Clone Data Using Disk Cloning Software
Disk cloning apps offer a more advanced, customizable way to copy your entire disk or selected files. Best Cloning Tool Recommended - Donemax Disk Clone for Mac. The software allows both bootable and non-bootable backups, ideal for users who want granular control.
Donemax Disk Clone for Mac
- Best Mac disk cloning software
- Create exact copy of Mac hard drive.
- Make bootable clone for macOS.
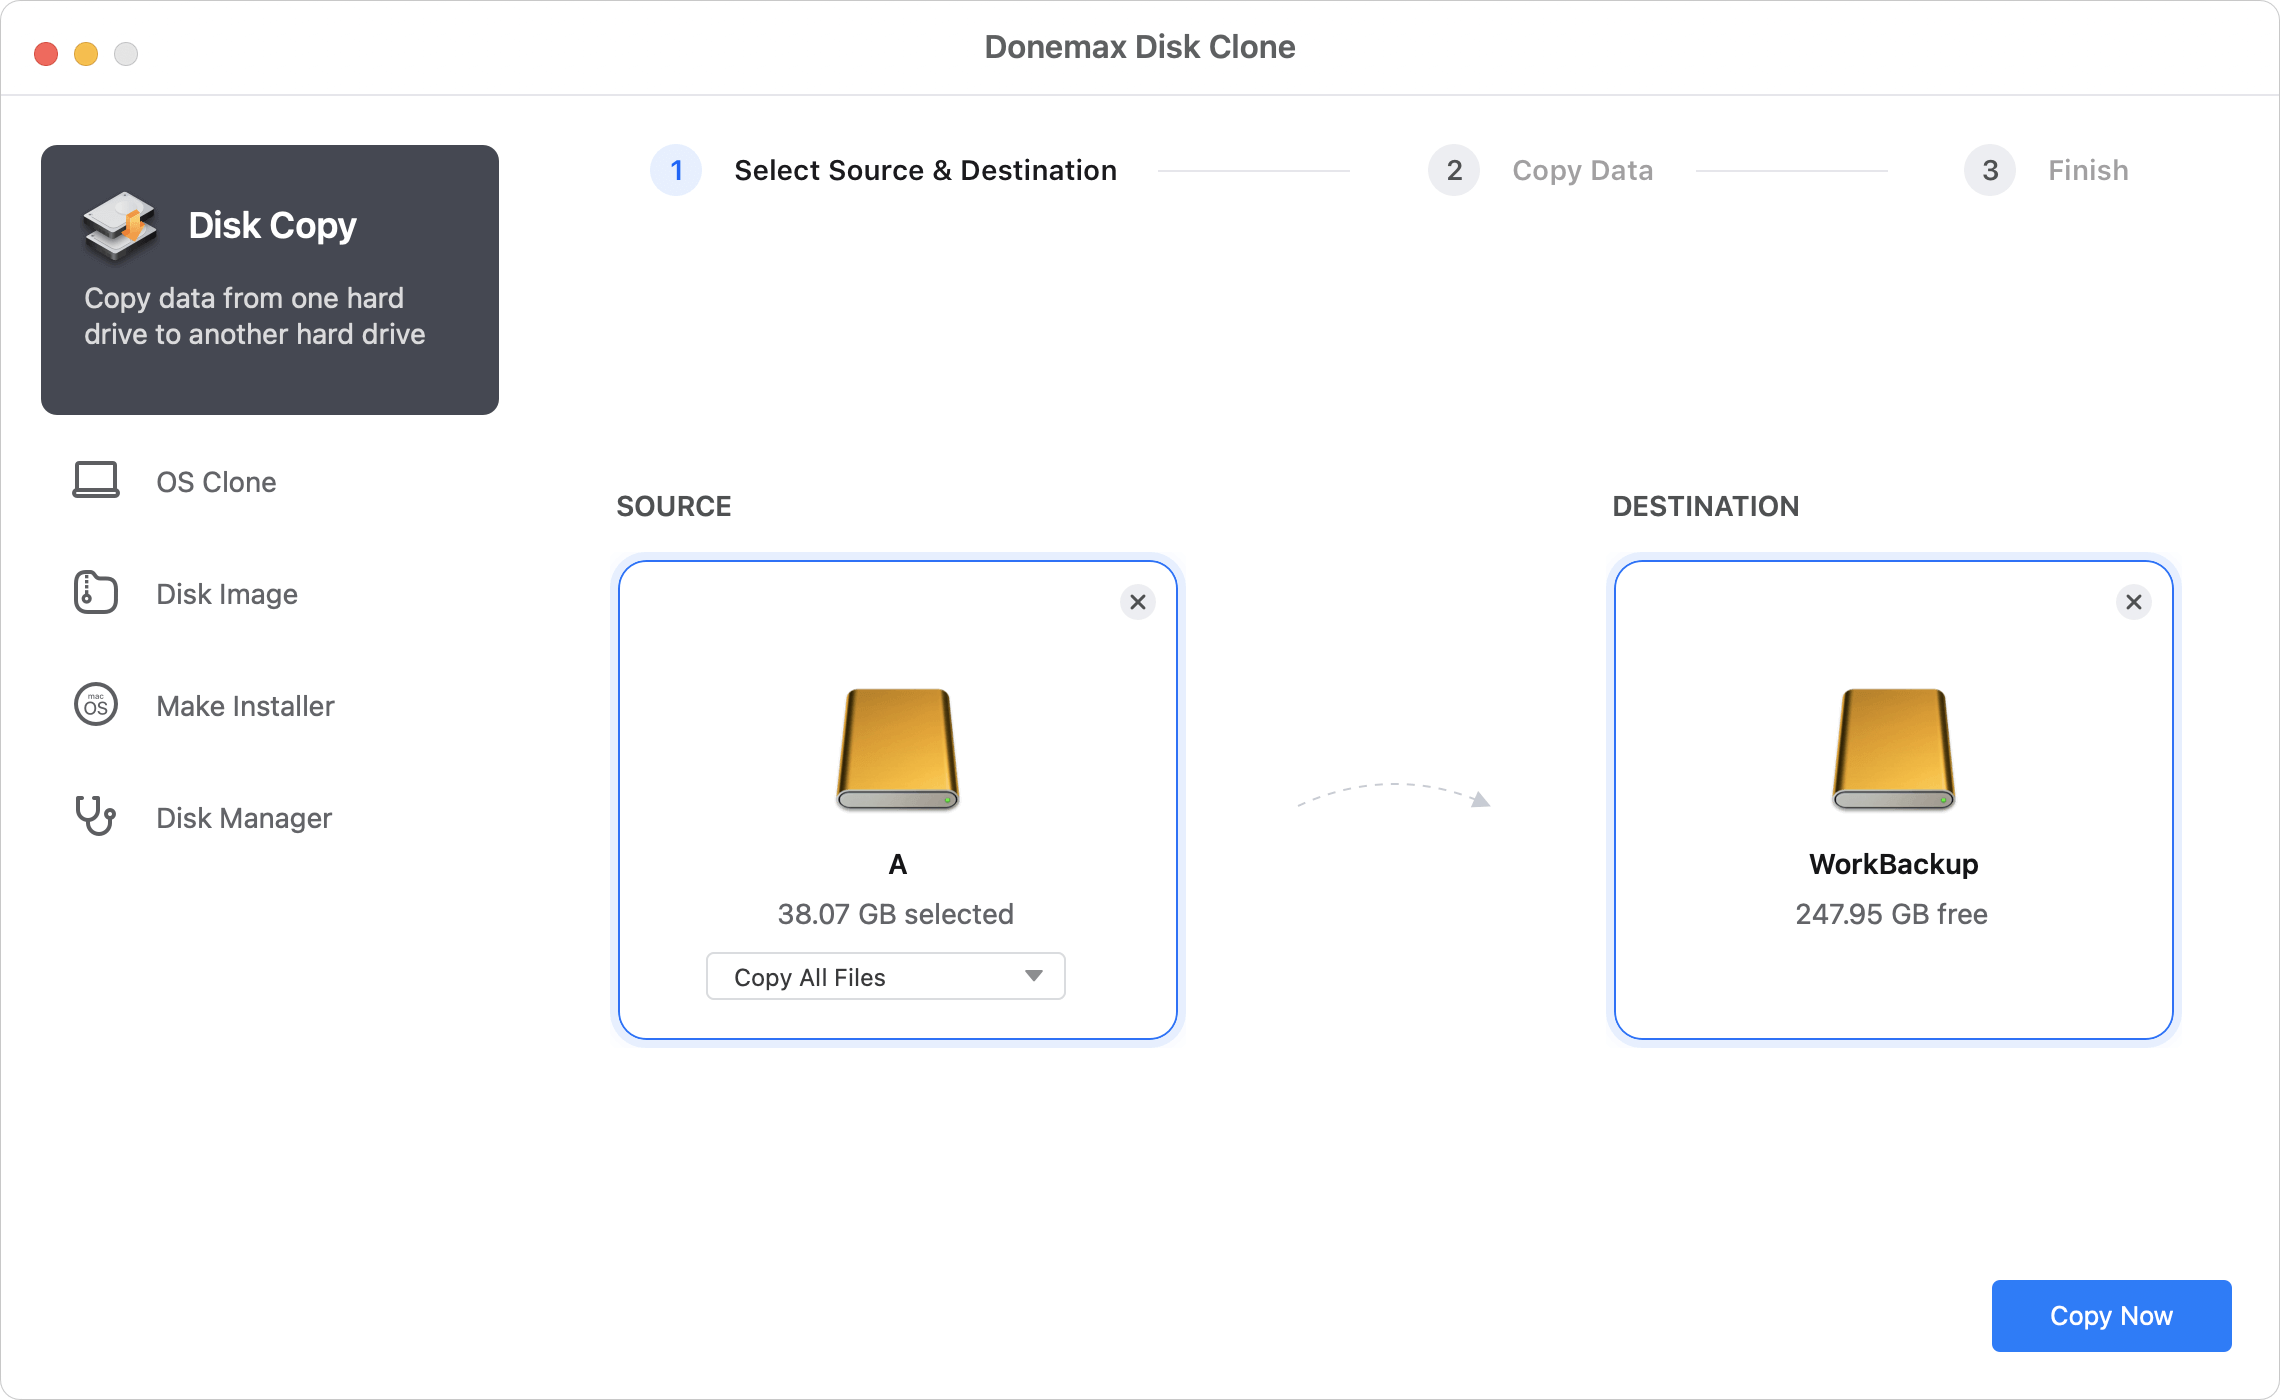
How to Clone Mac with Donemax Disk Clone for Mac:
1. Install Donemax Disk Clone on the old Mac, connect an external drive and make sure the drive is large enough for all your data.
2. Choose "Disk Copy" mode and set the old Mac's drive as source. Set the external drive as destination. Click "Copy Now" to start the cloning process.
3. Connect the cloned external drive to your macOS Tahoe Mac. Use Migration Assistant or manually copy files from the clone drive.
Bootable Cloning:
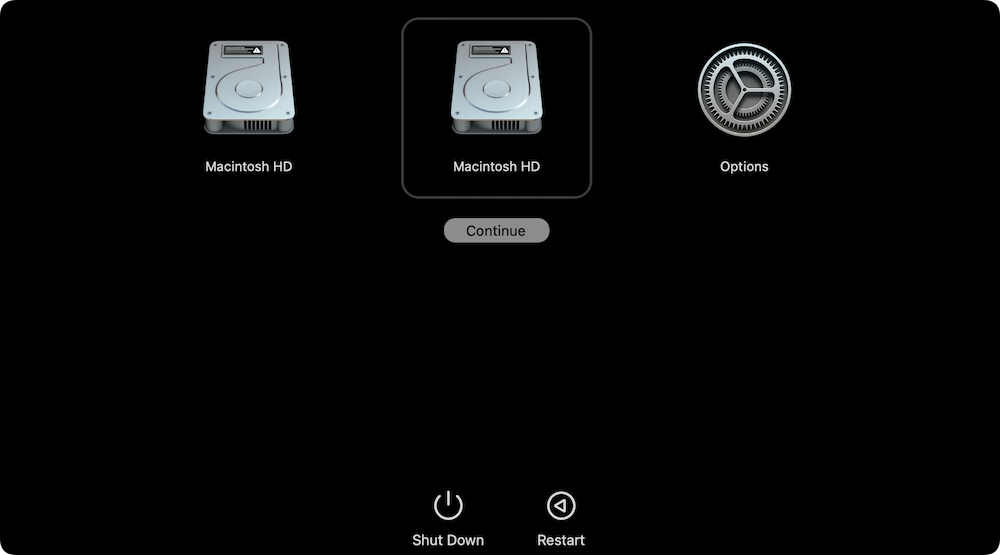
If you create a bootable clone with OS Clone mode, you can start your new Mac from the external drive:
Restart Mac and hold power button until you see "Loading startup options" message. Choose the cloned drive to boot from.
Pros
- Faster than Migration Assistant in many cases
- Better control over what is cloned
- Allows bootable clone
Cons
- Paid tool
Method 4: Use Target Disk Mode to Transfer Files
For Macs with Thunderbolt or USB-C ports, Target Disk Mode (now known as Mac Sharing Mode) can turn your old Mac into an external drive.
Requirements:
- Thunderbolt or USB-C cable
- Both Macs should support Mac Sharing Mode (macOS Big Sur or later)
How to Use:
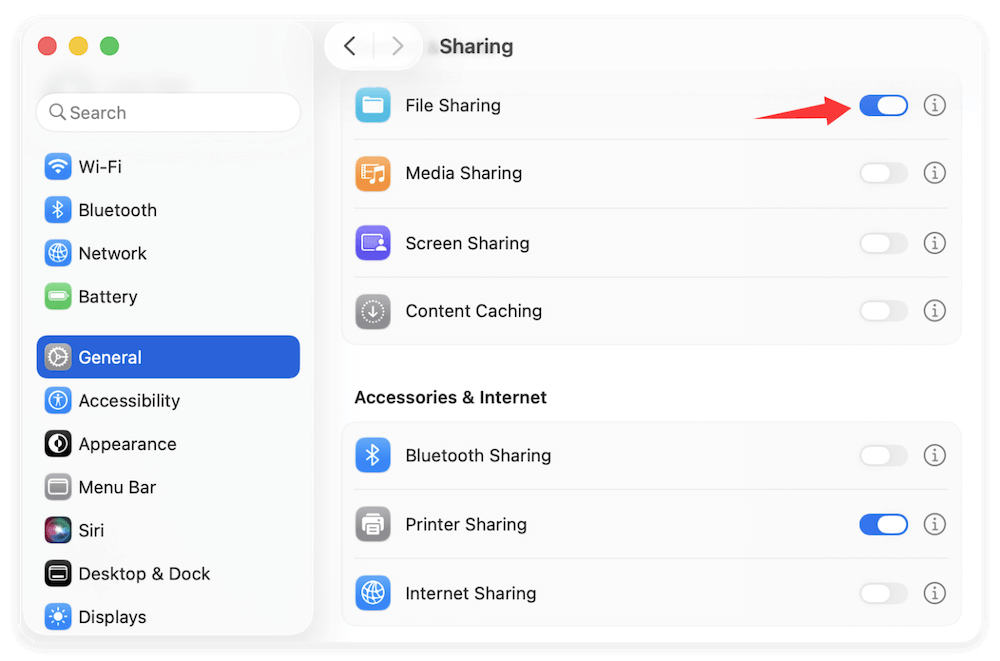
1. Boot Old Mac into Sharing Mode
- Go to System Settings > General > Sharing > File Sharing
2. Connect to macOS Tahoe Mac
- Connect via cable. The old Mac's drive will appear as an external disk.
3. Transfer Data
- Drag and drop files manually.
- You can't transfer system settings or apps this way.
Pros
- Fastest method for transferring large files
- Doesn't require internet or software
Cons
- Manual (no apps or settings transfer)
- Not suitable for full system clone
What to Do after Cloning Data to macOS Tahoe
1. Verify Data
- Check user folders, apps, and custom settings.
- Make sure nothing important is missing.
2. Reinstall Non-Compatible Apps
- Older 32-bit apps are no longer supported.
- Check for updated versions compatible with macOS Tahoe.
3. Reconnect Services
- Sign into iCloud, iMessage, FaceTime, and other Apple services.
- Reauthorize any licenses or software (e.g., Adobe, Microsoft Office).
Troubleshooting Common Cloning Issues
Problem: Migration Assistant Freezes or Crashes
- Solution: Restart both Macs, use a wired connection, or try Safe Mode.
Problem: Apps Don't Work After Cloning
- Solution: Reinstall from App Store or official sources.
Problem: External Drive Not Recognized
- Solution: Check disk format (APFS or Mac OS Extended), use Disk Utility to reformat if needed.
Problem: Data Transferred But User Account Not Usable
- Solution: Ensure you log into the cloned user account, not a new one created during setup.
Conclusion
Cloning your old Mac to a new macOS Tahoe Mac doesn't have to be a headache. Apple offers powerful built-in tools like Migration Assistant and Time Machine for most users. Power users might prefer third-party tools, like Donemax Disk Clone for Mac, for more control. Manual methods like Target Disk Mode are fast for basic file transfers.
Use Migration Assistant for a complete clone, and back up with Time Machine just in case. After the transfer, double-check all your data, reconnect your accounts, and enjoy your macOS Tahoe experience to the fullest.
FAQs about Cloning Data to macOS Tahoe
Yes. Use Migration Assistant and select only "Documents" or manually transfer files via Target Disk Mode.
Some licenses (e.g., App Store apps) do, but third-party apps may need reactivation.
iCloud is great for syncing documents and photos, but it doesn't transfer system settings, apps, or configurations.
If you have a Time Machine or cloned backup, restore it to the new Mac. Otherwise, data recovery services may be needed.
Donemax Disk Clone for Mac
An award-winning disk cloning program to help Mac users clone HDD/SSD/external device. It also can create full bootable clone backup for Macs.
Related Articles
- Feb 22, 2024How to Clone Mac SSD to A HDD?
- Aug 08, 2025Professional Disk Cloning Software for M1 Chip Mac
- Jun 15, 2023How to Clone macOS Ventura to An External Hard Drive?
- Jan 26, 2026How to Clone Hard Drive on macOS High Sierra?
- Aug 20, 2024How to Create a Disk Image on Mac?
- May 23, 2023Clone APFS Disk Volume on Mac with Two Methods

Contributing Writer
Steven
Steven has been a senior writer & editor of Donemax software since 2020. He's a super nerd and can't imagine the life without a computer. Over 6 years of experience of writing technical solutions and software tesing, he is passionate about providing solutions and tips for Windows and Mac users.

Editor in chief
Gerhard Chou
In order to effectively solve the problems for our customers, every article and troubleshooting solution published on our website has been strictly tested and practiced. Our editors love researching and using computers and testing software, and are willing to help computer users with their problems