
Written byStevenUpdated on Sep 22, 2025
Create a USB Installer for macOS Tahoe 26
Approved byGerhard Chou
Before we start: It's flexible to install macOS Tahoe 26 with a bootable USB installer. Following the guide can help you easily make the bootable USB installer for macOS Tahoe with the system built-in tool or Donemax Disk Clone for Mac.
PAGE CONTENT:
Creating macOS Tahoe USB installer is a practical and powerful method to install Apple's latest operating system on your Mac. Whether you're a developer testing your apps, a tester exploring new features, or someone who prefers clean installations, a bootable USB drive simplifies the process.
In this guide, we'll walk you through everything you need—from downloading the installer to booting from the USB. This method is ideal for installing macOS on multiple Macs, clean-installing the OS, or troubleshooting software issues.
Why Create a USB Installer for macOS Tahoe 26?
macOS Tahoe 26 brings several improvements in performance, visual design, and system security. But as a beta version, it can also be buggy or unstable. A USB installer lets you:
- Perform a clean install, eliminating legacy bugs and clutter.
- Install the OS on multiple Macs without redownloading.
- Recover your system if the beta becomes unbootable.
- Test Tahoe on a separate partition or drive before upgrading your main system.
Creating a USB installer is relatively easy and only takes about 20–30 minutes, provided you follow the steps carefully.
What You'll Need to Create macOS Tahoe USB Installer
Before starting, make sure you have the following:
Compatible Mac
Ensure your Mac is supported by macOS Tahoe 26. While Apple has expanded compatibility in recent years, some older models may not support it.
USB Flash Drive (18GB or More)
You'll need a USB drive with at least 18GB of storage. All data on this drive will be erased, so back it up first.
macOS Tahoe 26 Installer
You can download this from:
- Apple App Store
- Other trusted download sources
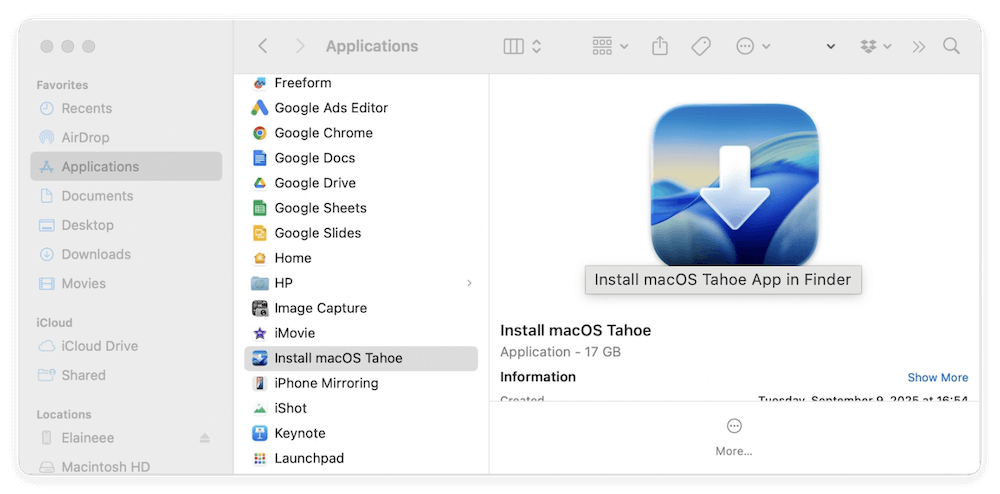
After download, it should appear in the /Applications folder as: Install macOS Tahoe.app
Reliable Internet Connection
A strong internet connection is essential when downloading the installer, which can exceed 12GB in size.
How to Download macOS Tahoe 26 Installer
There are some methods to get a installer for macOS Tahoe 26, follow one of these methods:
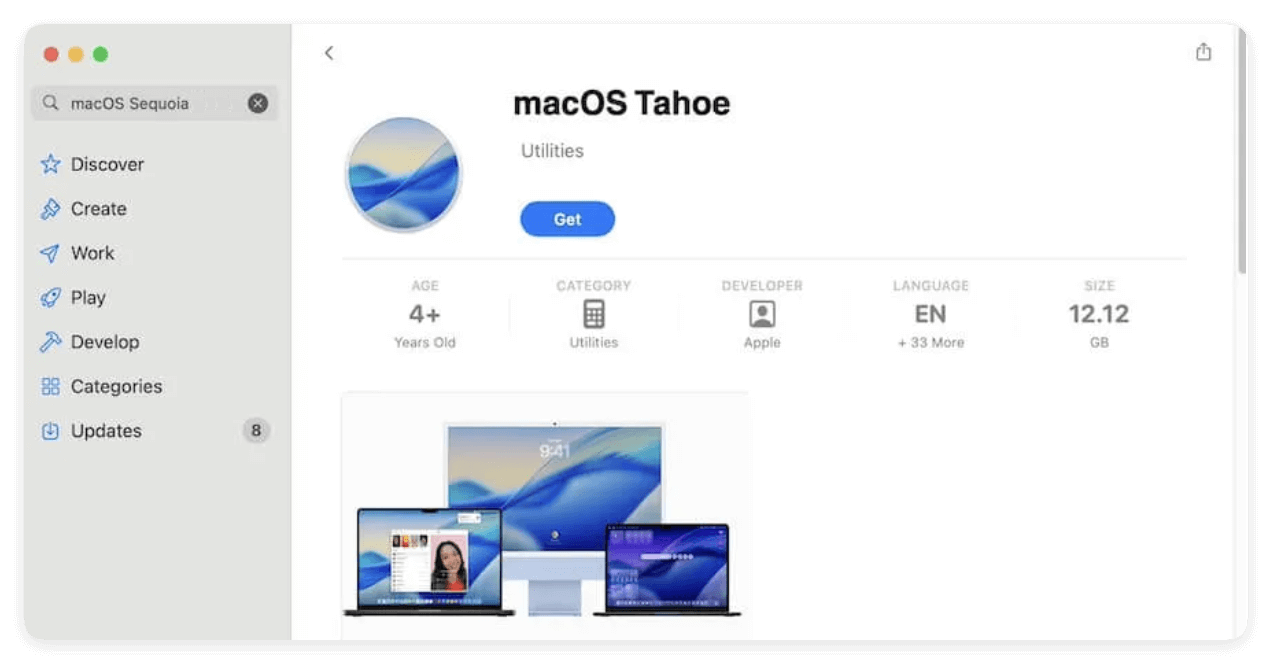
Option A: Apple App Store
- Open App Store on Mac.
- Type "macOS Tahoe" to search it.
- Find and select the item for macOS Tahoe
- Click Get to ownload macOS Tahoe 26.
Option B: Apple Software Update Program
- Open System Settings → Software Update.
- Click Check for Update button.
- Download the installer if macOS Tahoe is available.

Once the download completes, the installer launches automatically. Quit it, as you'll use it to create a USB installer.
Prepare Your USB Drive
Step 1: Backup the Drive
All contents will be erased. Copy any important files from your USB drive elsewhere.
Step 2: Format the USB Using Disk Utility
- Insert the USB drive.
- Open Disk Utility from Utilities via Applications.
- Select the USB drive from the sidebar.
- Click Erase.
- Use the following settings:
- Name: TahoeUSB (or anything short and easy)
- Format: Mac OS Extended (Journaled)
- Scheme: GUID Partition Map
- Click Erase and wait for formatting to complete.
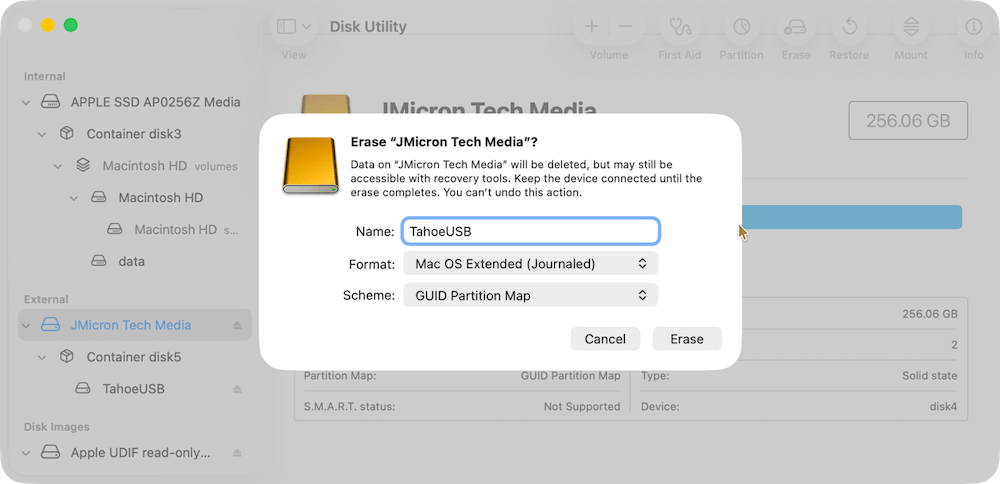
📍 Tip: You can use APFS if you're only installing to newer Macs, but Mac OS Extended (Journaled) is safer for compatibility.
Create the macOS Tahoe Bootable Installer Using Terminal
Option 1: Create bootable USB installer in Terminal
Step 1: Launch Terminal
- Open Terminal from Utilities via Applications.
Step 2: Run the Createinstallmedia Command
- Enter the following command:
sudo /Applications/Install\ macOS\ Tahoe.app/Contents/Resources/createinstallmedia --volume /Volumes/TahoeUSB
Replace TahoeUSB if your drive has a different name.
Step 3: Authenticate
- Terminal will prompt you for your admin password (you won't see the characters as you type).
- Press Enter after typing the password.
Step 4: Confirm Erase
- Terminal will ask if you want to erase the volume.
- Type Y and press Enter.
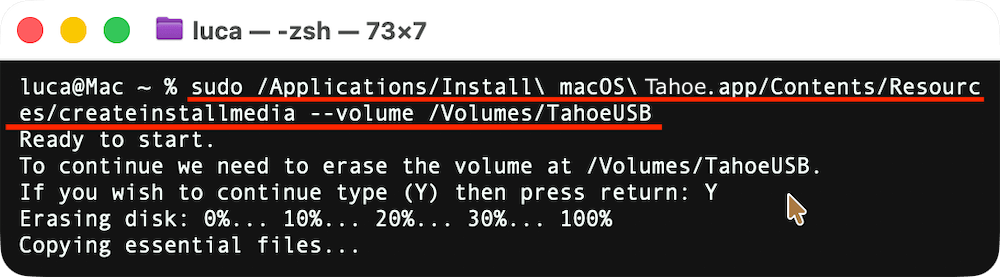
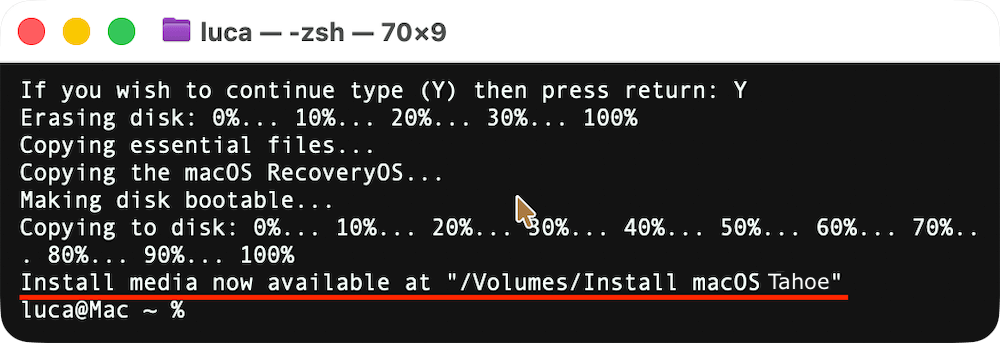
Step 5: Wait for Completion
- The process takes several minutes, depending on your system and USB speed.
- Once complete, you'll see:
Install media now available at "/Volumes/Install macOS Tahoe"
Option 2: Create macOS Tahoe USB installer with Donemax Disk Clone
If you are not familiar with commands, you can also try another easy way to create the macOS Tahoe 26 bootable USB installer. With the third-party software Donemax Disk Clone for Mac, you can easily make the bootable USB installer for macOS Tahoe.
Donemax Disk Clone for Mac
- Top disk cloning software for macOS.
- Create bootable macOS USB installer easily.
- Make bootable clone backup for macOS.
Here is how to create the bootable installer with the software:
Step 1. Run the software Donemax Disk Clone for Mac and change to Make Installer option.

Step 2. Click the Add button and then select the installation app of macOS Tahoe 26.
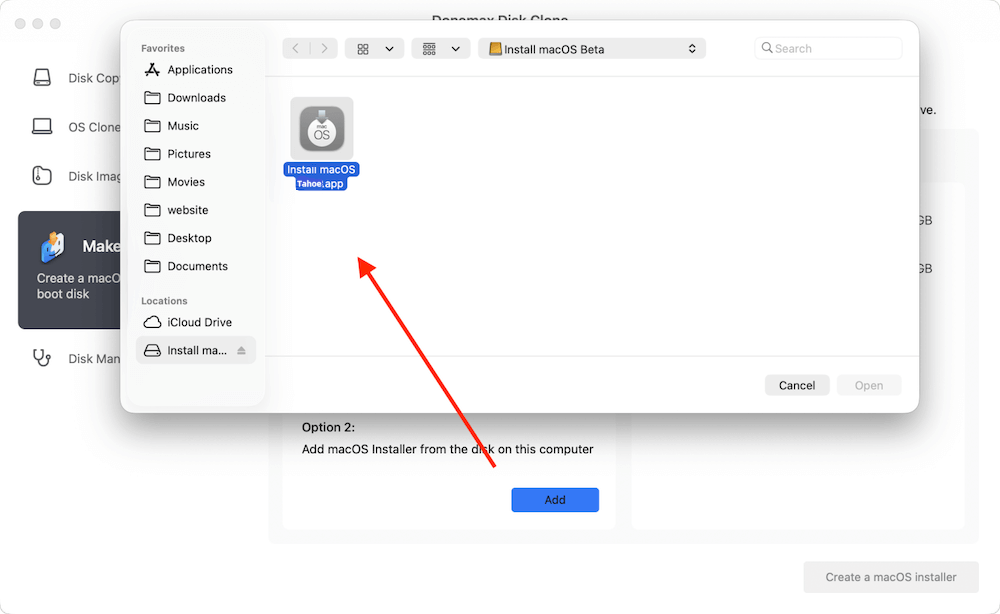
Step 3. Then select the prepared USB drive and click the button Create a macOS installer. The software will start to make a bootable USB installer for macOS Tahoe.
Congratulations! Your USB installer is ready.
How to Boot from the macOS Tahoe USB Installer
With the USB drive prepared, follow these steps to boot into the installer and Install macOS Tahoe from USB:
- Insert the USB installer.
- Shut down your Mac completely.
- Press and hold the power button until "Loading startup options" appears.
- Select the USB drive and click Continue.
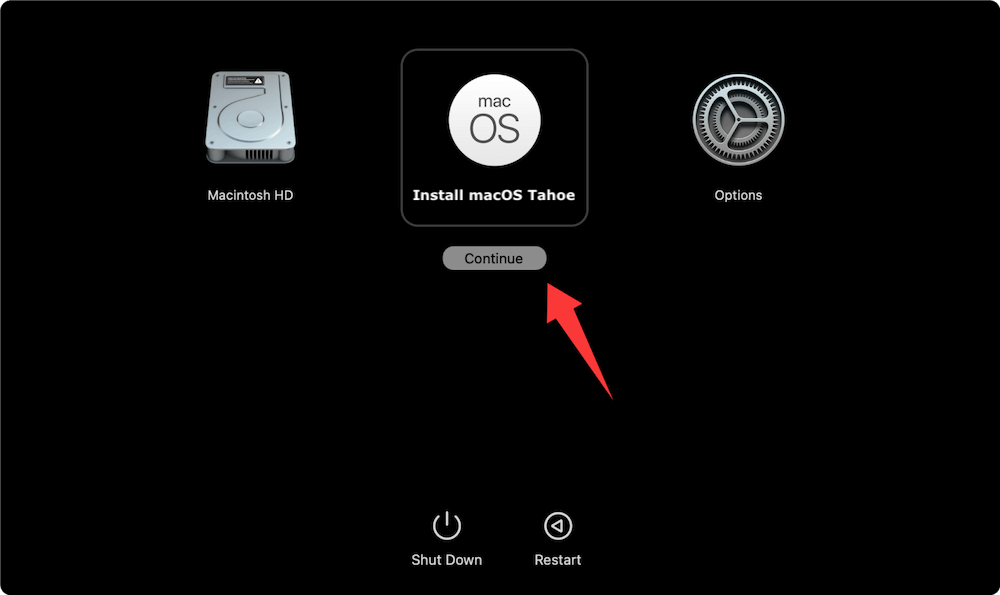
The macOS Tahoe 26 installing page will show up. You can follow the guide to install the system step by step.
Troubleshooting and Tips when Creating macOS Tahoe USB Installer
⚠️ Problem: USB Drive Not Detected During Boot
Symptoms:
- USB installer doesn't appear in the boot menu.
- Mac boots directly into existing macOS.
Solutions:
- Double-check formatting: Ensure the USB drive was formatted with GUID Partition Map and Mac OS Extended (Journaled) using Disk Utility.
- Reconnect the USB drive: Remove and plug it into a different port. On newer Macs, avoid using dongles if possible.
- Try another drive: Some USB sticks—especially older or promotional ones—may not support bootable installations.
- Check startup security settings (Apple Silicon Macs):
- Boot into macOS Recovery (hold power button).
- Go to Utilities > Startup Security Utility.
- Select your startup disk, then click Security Policy.
- Choose Reduced Security and enable external boot.
⚠️ Problem: Terminal Command Fails
Common errors:
- command not found
- Installer not found at path
- Permission denied
Fixes:
- Installer location: Make sure Install macOS Beta.app is in the /Applications folder. Move it there if needed.
- Correct spacing and slashes: Use backslashes to escape spaces in Terminal: /Applications/Install\ macOS\ Tahoe.app
- Use sudo and enter your password correctly.
- Copy-paste the command rather than typing it manually to avoid typos.
⚠️ Problem: USB Creation Takes Too Long
Symptoms:
- Terminal seems stuck at "Copying installer files to disk…"
- Creation process exceeds 30 minutes
Tips:
- Use USB 3.0 or USB-C drives for significantly faster speeds.
- Avoid background tasks during creation.
- Reformat the USB stick and try again if it stalls repeatedly.
⚠️ Problem: USB Installer Boots, But Installation Fails
Symptoms:
- Installation halts at "A critical error occurred"
- "macOS could not be installed on your computer" message
Resolutions:
- Recreate the USB installer — the image may be corrupted.
- Check available space on your internal drive. At least 25–30 GB is recommended.
- If installing on a partition, reformat it using APFS via Disk Utility in the installer.
⚠️ Problem: 'This copy of the installer is damaged or can't be verified'
This error occurs if:
- The installer was modified or corrupted.
- The system clock is out of sync.
Solutions:
- Check your date and time: In the Terminal at the installer screen, type:
date
If it's incorrect, set it using:
date MMDDhhmmYYYY
For example, for June 12, 2025, 3:30 PM:
date 061215302025
- Download the installer again from Apple's official sources.
Pro Tips for a Smooth Experience
- Label Your USB Drive Clearly: Use a simple, recognizable name like TahoeUSB. This avoids confusion in Terminal commands and boot menus.
- Use an SSD-based external drive instead of a traditional USB stick for faster installs—especially helpful when doing multiple installs.
- Back up before every beta install using Time Machine or a cloning tool like Carbon Copy Cloner.
- Test the USB installer right after creation on at least one Mac to ensure it boots correctly.
Frequently Asked Questions (FAQ)
Can I downgrade using this USB?
No. This USB is for installation of macOS Tahoe 26 only. Downgrading requires a USB installer of the previous macOS version.
Can I use this on other Macs?
Yes, as long as those Macs are compatible with macOS Tahoe 26 and are enrolled in the beta program.
How long does it take to create the USB installer?
Usually 10–20 minutes, depending on USB speed and Mac performance.
Can I use this USB drive for future beta updates?
Not directly. This USB installs the current version. Future updates will come through System Settings → Software Update.
Conclusion
Creating a USB installer for macOS Tahoe 26 is an essential tool for anyone serious about testing, system maintenance, or clean installations. It gives you flexibility, improves troubleshooting options, and saves you time when dealing with multiple machines.
Just make sure to back up your data, follow the steps precisely, and always test beta software responsibly. A bootable USB drive can be your best friend if things go wrong during your macOS experience.
Donemax Disk Clone for Mac
An award-winning disk cloning program to help Mac users clone HDD/SSD/external device. It also can create full bootable clone backup for Macs.
Related Articles
- Jul 21, 2025How to Upgrade MacBook SSD?
- Aug 15, 2025How to Clone Mac El Capitan to New SSD?
- Jan 02, 2024How to Create A Bootable Clone Backup for Mac?
- Jun 21, 2023Free Download EaseUS Disk Copy for Mac Alternative Software
- Jul 25, 2025Clone Mac Hard Drive Using Disk Utility
- Jan 21, 2026How to Create A Bootable Clone for macOS Mojave?

Contributing Writer
Steven
Steven has been a senior writer & editor of Donemax software since 2020. He's a super nerd and can't imagine the life without a computer. Over 6 years of experience of writing technical solutions and software tesing, he is passionate about providing solutions and tips for Windows and Mac users.

Editor in chief
Gerhard Chou
In order to effectively solve the problems for our customers, every article and troubleshooting solution published on our website has been strictly tested and practiced. Our editors love researching and using computers and testing software, and are willing to help computer users with their problems