PAGE CONTENT:
Installing a new operating system is like giving your Mac a fresh start, free from the digital clutter and legacy of old apps. A "clean install" removes everything from your Mac's storage, reinstalling macOS from scratch. This process often resolves performance issues, removes unwanted files, and can make your Mac feel like it just rolled off the assembly line. In this article, we'll guide you through a step-by-step process to perform a clean install of macOS Mojave, including preparation, data backup, installation, and optimization tips.
Why a Clean Install macOS Mojave?
A clean install of macOS Mojave is essentially like wiping your slate clean. It's an opportunity to clear out outdated software, lingering bugs, and years of accumulated files. When macOS becomes sluggish, applications crash frequently, or storage space is mysteriously low, a clean install can be the solution to revitalize your device. With Mojave's enhanced features, such as Dark Mode, Stacks, and improved security, you might want the new system without any baggage from past installations. Situations warranting a clean install include major software upgrades, recurring system issues, or a general desire for a fresh start.
But a clean install isn't to be taken lightly. By wiping everything, it will erase all files, apps, and settings, requiring a thoughtful approach to data backup and reinstallation. With the right preparation and a detailed guide, though, you can streamline this process and set up Mojave to suit your needs.
Preparing for the Clean Install of macOS Mojave
Before clean installing macOS Mojave, preparation is key. It will save you from data loss and make it easier to get up and running afterward.
1. Back Up Your Data
First things first: back up your data. Performing a clean install will erase your hard drive, so ensure all essential files and data are backed up. There are multiple ways to back up:
- Time Machine: macOS's built-in tool for backups, which can back up your entire system, including settings, files, and apps.
- External Storage: If you only need to save specific files, an external hard drive or cloud storage (like iCloud, Google Drive, or Dropbox) works well. With disk cloning software, you can clone everything from your Mac's internal disk to an external disk, making a full bootable clone backup.
- Cloud Services: Use cloud-based backup services to store important documents, photos, and videos to avoid any risk of losing critical data.
2. Make a List of Essential Software and Settings
Jot down a list of the apps, settings, and configurations you rely on daily. Knowing what you'll need to reinstall or reconfigure helps you avoid missing anything crucial.
3. Create a macOS Mojave Bootable Installer
The clean install of macOS Mojave requires you to install the system from an external source, which means you need a bootable USB installer. This external installation tool will allow you to reinstall Mojave on your Mac, even if you've erased everything on the system's internal drive.
Here's how you can create your own macOS Mojave bootable installer:
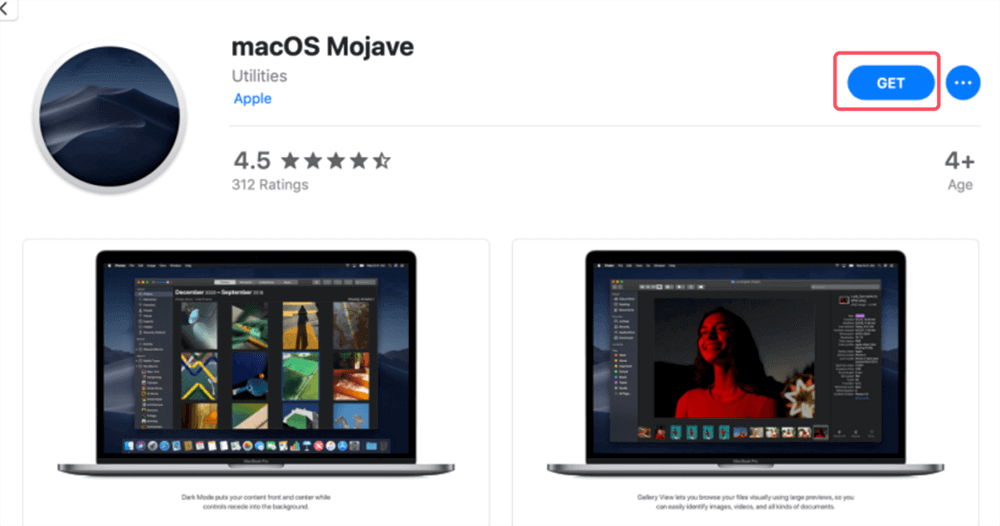
- Download macOS Mojave from the Mac App Store. You can find it by searching for "macOS Mojave" in the App Store. Once you've located it, click Get and wait for the download to complete. It will automatically save to your Applications folder.
![Download macOS Mojave]()
- Prepare a USB Flash Drive: A USB flash disk with at least 8GB of empty space should be inserted. Make sure there are no vital files on this disk because it will be wiped.
- Use Terminal to Create the Bootable Installer:
- Open Terminal and type the following command:
sudo /Applications/Install\ macOS\ Mojave.app/Contents/Resources/createinstallmedia --volume /Volumes/MyVolume
![Use Terminal to Create the Bootable Installer]()
Replace "/Volumes/MyVolume" with the name of your USB drive (you can check this by opening Finder and looking for your USB drive name).
- When you hit Return, Terminal will request your administrator password. Enter your password and press Return again. The process will erase your USB drive and copy the installation files from the Mojave installer to it.
- Open Terminal and type the following command:
- Wait for the Process to Complete: It may take a while, so be patient. Once it's done, your bootable installer is ready.
When the process is complete, you'll have a USB drive that can install macOS Mojave on any compatible Mac, and you won't need to rely on the internet or the App Store to install Mojave again. This tool can also be a lifesaver if your Mac is facing issues and you need to reinstall the operating system without relying on Recovery Mode.
Wipe Hard Drive and Clean Install macOS Mojave
1. Wipe the Mac's Hard Drive
Now that you're prepared, it's time to wipe your Mac's hard drive. This step will erase all content on the drive, so double-check that you've backed up everything you need.
- Restart in macOS Recovery Mode: Turn off your Mac, then turn it on while holding down Command + R to enter Recovery Mode.
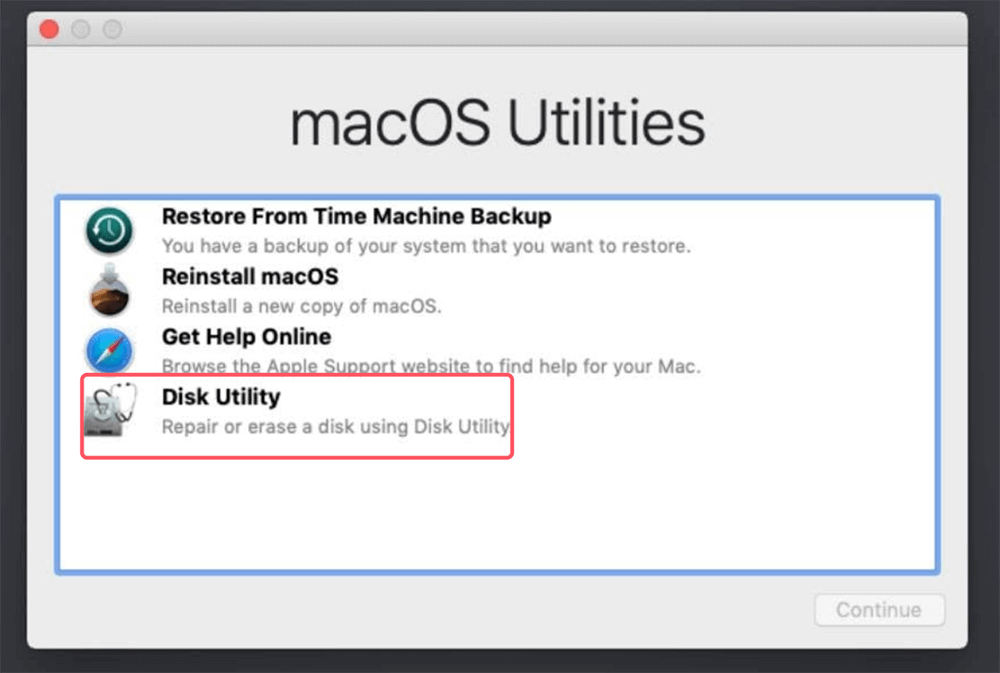
- Open Disk Utility: Once in Recovery Mode, select Disk Utility from the macOS Utilities menu.
![Open Disk Utility]()
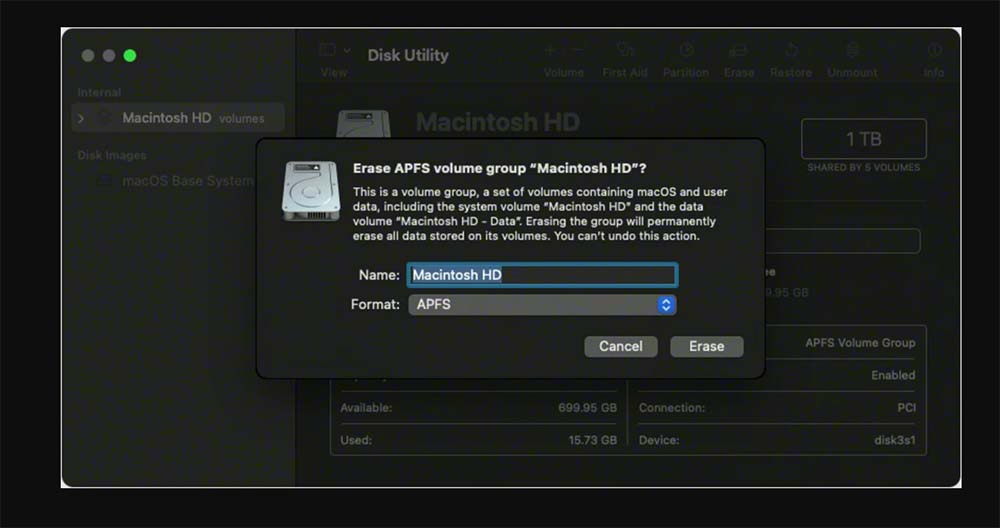
- Erase Your Hard Drive:
- Select your main hard drive (often labeled as "Macintosh HD") in Disk Utility.
- Click Erase and choose a format. For Macs with SSDs, use APFS; otherwise, choose Mac OS Extended (Journaled) for older drives.
![Erase Your Hard Drive]()
- Confirm and wait for the process to complete.
2. Install macOS Mojave
With your hard drive clean, you're ready to install Mojave. Follow these steps:
- Plug in the Bootable USB Drive with Mojave.
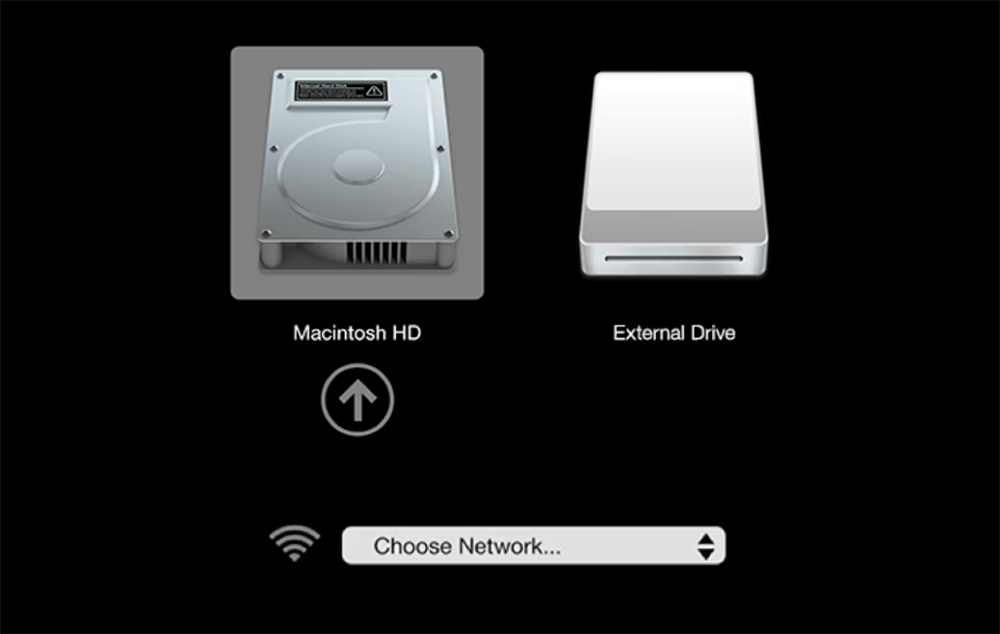
- Restart Your Mac while holding down the Option key. This will prompt your Mac to show available startup drives.
- Select the USB Drive as the startup disk, and your Mac will boot into the Mojave installer.
![Install macOS Mojave]()
- Follow the Installation Prompts: Choose the destination drive (your freshly erased hard drive) and follow the prompts to install macOS Mojave.
Troubleshooting Installation Issues
If you encounter any issues during the installation process, such as "This copy of the Install macOS Mojave application is damaged," try re-downloading the installer or adjusting your system clock in Terminal. If your Mac can't find the bootable USB drive, double-check that it was formatted correctly in Disk Utility.
Setting Up macOS Mojave: A Fresh Start
After installing Mojave, your Mac will start up with a setup assistant, guiding you through the initial configuration.
- Account Setup: Create a user account with your name, username, and password.
- System Preferences: Configure essential settings, such as Wi-Fi, Apple ID, iCloud, and privacy options.
- Security Settings: macOS Mojave includes enhanced security features, such as app permission settings. Consider enabling FileVault to encrypt your hard drive for added security.
Take your time to customize settings according to your preferences. This is also an ideal moment to explore Mojave's new features, like Dark Mode, which can be enabled during setup or later in System Preferences > General.
Restoring Data Thoughtfully
While it may be tempting to restore everything at once, selectively restoring files can help keep your system uncluttered. If you used Time Machine, you can use the Migration Assistant to restore files, apps, and settings. However, be selective: choose only essential files and settings to avoid reintroducing any clutter or outdated files.
Another approach is to manually drag and drop files from an external backup or cloud storage. For applications, it's generally best to reinstall the latest versions from the App Store or developer websites to ensure compatibility with Mojave.
Optimizing macOS Mojave for Best Performance
Once you've restored the essentials, you can make a few adjustments to optimize your fresh install of Mojave.
- Manage Startup Items: Too many startup items can slow down your Mac. Head to System Preferences > Users & Groups and select your user account. Then, go to Login Items to remove any unnecessary apps from the startup list.
- Enable Do Not Disturb: Notifications can be a distraction. Mojave includes an improved Do Not Disturb feature in the Notification Center, which you can use to block interruptions during work hours.
- Use Stacks to Organize Your Desktop: Mojave introduces Stacks, a feature that groups files by type or date, making your desktop look cleaner. Enable Stacks by right-clicking on your desktop and selecting Use Stacks.
- Adjust Energy Saver Settings: Head to System Preferences > Energy Saver to adjust settings that can prolong your battery life or reduce energy usage.
Regular maintenance, like cleaning cache files and uninstalling unneeded apps, will help Mojave run smoothly.
Troubleshooting Common Issues After Installation
Even with careful preparation, you may encounter minor issues after installing Mojave. Here are some common post-installation issues and quick solutions:
✦ App Compatibility: Some apps might not work correctly on Mojave. Make sure to update all your apps to the latest versions. If an app is still incompatible, check the developer's website for updates or alternatives.
✦ Missing Permissions: Mojave introduces stricter security permissions for apps accessing system resources. If an app isn’t functioning correctly, go to System Preferences > Security & Privacy and adjust the permissions under the Privacy tab.
✦ External Devices Not Recognized: Some peripherals may need updated drivers to work with Mojave. Check the manufacturer's website for updated drivers or support documentation.
If you encounter more complex issues, forums like Apple Support Communities or the macOS Mojave subreddit can provide additional troubleshooting tips.
Recover Lost Data After Clean Install of macOS Mojave Without Backup
Clean installing macOS Mojave will wipe everything from your Mac. But the lost data is not lost for good and can be recovered by data recovery software. If you have lost data due to clean installing macOS Mojave, you can use Donemax Data Recovery for Mac to get all the erased or lost data back.
Step 1. Download and install Donemax Data Recovery for Mac.
Donemax Data Recovery for Mac
- Recover permanently deleted data on Mac.
- Recover formatted or erased data on Mac.
- Recover lost data from HDD, SSD, USB drive, SD card, etc.
Step 2. Open Donemax Data Recovery for Mac, select the internal drive (Macintosh HD) to start data recovery.

Step 3.Click on Scan button to deeply scan the drive and find all deleted/erased/lost files.

Step 4. Once the scan is completed, check what it has found. Then preview the recoverable files, select the wanted ones, click on Recover button to save them.

Note: if you will sell your Mac, you can use disk wipe software - such as Donemax Data Eraser for Mac to wipe everything permanently so that no data is recoverable.
Conclusion
A clean install can breathe new life into an older Mac, making it run faster, more efficiently, and more securely. With macOS Mojave, you'll enjoy modern features and security updates while leaving behind any digital clutter. Congratulations on taking the time to revamp your Mac! Remember to keep regular backups and follow best practices for macOS maintenance to keep it running smoothly.
Whether you were experiencing issues, seeking better performance, or simply wanted a fresh start, a clean install can make all the difference. Embrace your updated system, take advantage of Mojave's features, and enjoy the newfound speed and stability on your Mac.
Related Articles
- Jan 17, 2025Force Delete Files on Mac: A Complete Guide
- Dec 17, 2024How to Clean Install macOS High Sierra?
- Sep 30, 2025Fix macOS Tahoe 26 Download Is Stuck: Step-by-Step Guide
- Sep 23, 2025Fix Xcode Not Working on macOS Tahoe, Sequoia, Sonoma, etc.
- Sep 29, 2025How to Install macOS Tahoe on Unsupported Macs?
- Aug 10, 2025How to Set Default Browser on Mac?

Steven
Steven has been a senior writer & editor of Donemax software since 2020. He's a super nerd and can't imagine the life without a computer. Over 6 years of experience of writing technical solutions and software tesing, he is passionate about providing solutions and tips for Windows and Mac users.

Gerhard Chou
In order to effectively solve the problems for our customers, every article and troubleshooting solution published on our website has been strictly tested and practiced. Our editors love researching and using computers and testing software, and are willing to help computer users with their problems
