Written byChristinaUpdated on May 21, 2026
How to Safely Eject or Force Eject an External Drive, USB, or SD Card on Mac?
Approved byGerhard Chou
PAGE CONTENT:
- The Hidden Mechanics: Why Proper Ejection Matters
- 4 Easy Methods to Safely Eject Device on Mac
- When a Drive Gets Stuck: How to Troubleshoot
- Advanced Solutions: How to Force Eject External Hard Drive on Mac
- Recovering Lost Data If an Improper Ejection Causes Data Loss
- FAQs about Ejecting External Device on Mac
- Conclusion
We've all been there. You are wrapping up a long project, your desk is tidy, and you are ready to pack up your Mac and head out. You reach for the cable of your external hard drive, thumb drive, or camera SD card, but just as you are about to pull it out, a nagging voice in your head stops you. Or worse, you attempt to do things the right way, only for macOS to throw a frustrating warning dialog: "Disk Not Ejected Properly" or "The disk wasn't ejected because one or more programs may be using it."
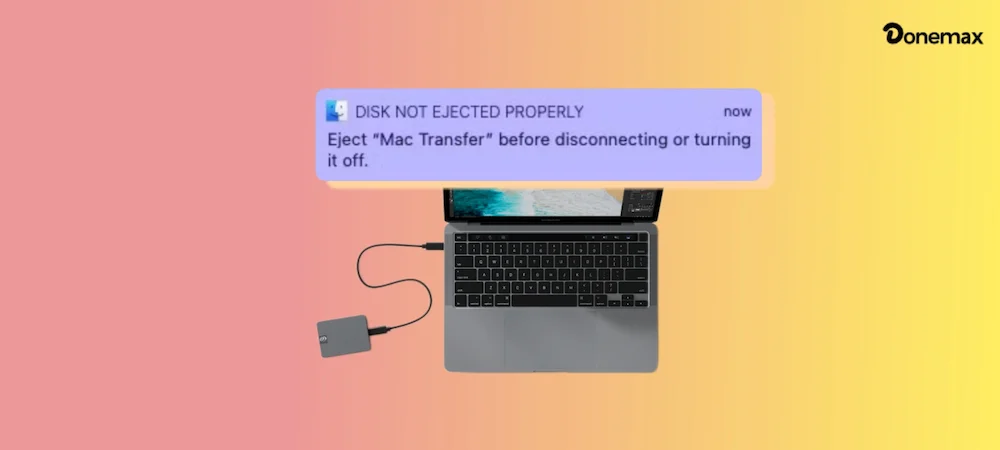
When you need to eject device on Mac, it is easy to view these warning prompts as minor digital annoyances. However, pulling a live data cable out of your computer without a formal system release is playing a dangerous game of digital roulette.
In this complete, home-user-friendly guide, we will break down the exact native methods to cleanly remove your external hardware. More importantly, we'll explore advanced troubleshooting steps to safely force eject external hard drive on Mac when your system refuses to let go.
The Hidden Mechanics: Why Proper Ejection Matters
Before diving into the steps, let's talk about what happens under the hood when a storage device is plugged into your Mac.
Modern macOS setups use a smart strategy called write caching. To make your apps run faster and prevent performance stutters, your Mac doesn't always write changes to an external drive the exact millisecond you make them. Instead, it holds those bits of data in its high-speed internal RAM memory, waiting for a quiet moment to flush that data safely onto the external platters or flash storage chips.
When you trigger a command to eject device on Mac, you aren't just making an icon disappear from your screen. You are sending a formal command to the operating system to:
- Finish writing all pending cached data blocks from the RAM to the physical external sectors.
- Terminate hidden background index trackers.
- Cut off power distribution lines to the physical ports cleanly.
If you skip this step and pull the cord, you risk creating corrupted file headers, scrambling your partition map, or even physically frying your external enclosure's controller chip due to sudden voltage drops.
4 Easy Methods to Safely Eject Device on Mac
Apple provides several built-in visual methods to safely unmount your hardware. Choose whichever path feels most natural for your workflow.
Method 1: The Finder Sidebar (The Golden Standard)
The central file hub of your Mac is the best place to start.
- Open a new Finder window by clicking the smiley-face icon on your Dock.
- Glance down the left-hand sidebar menu until you see the Locations category.
- Locate your attached drive name. You will spot a small, triangular Eject icon sitting directly to the right of the name. Click the that icon or right click the drive and select Eject "driveName"
- Within a few seconds, the drive name will vanish, signaling that it is entirely safe to unplug.
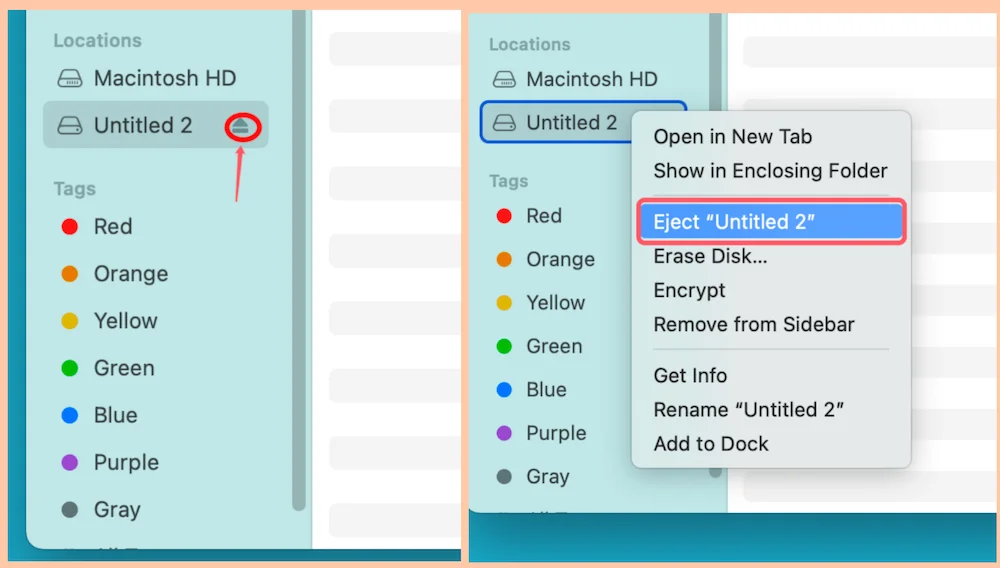
📍 Tips: If your drive isn't showing up in the Finder sidebar, go to the top menu bar and select Finder > Settings > Sidebar, and ensure that the checkbox for External disks is toggled on.

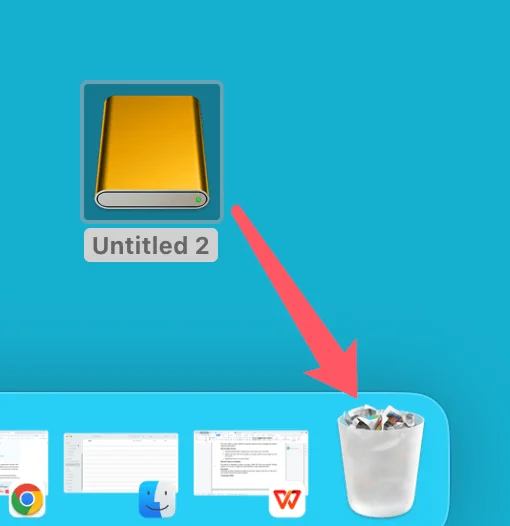
Method 2: The Desktop Drag-and-Drop
If you like keeping a clean desktop with visible storage icons, this classic Mac shortcut is perfect:
- Find your external hard drive or USB icon directly on your glass desktop surface.
- Click and hold the icon, then drag it down towards the Trash on your Dock.
- Notice how the classic Trash Can icon instantly morphs into a silver Eject symbol the moment your drive hovers over it.
- Release your trackpad or mouse button to drop the icon onto the symbol. The drive will unmount immediately.
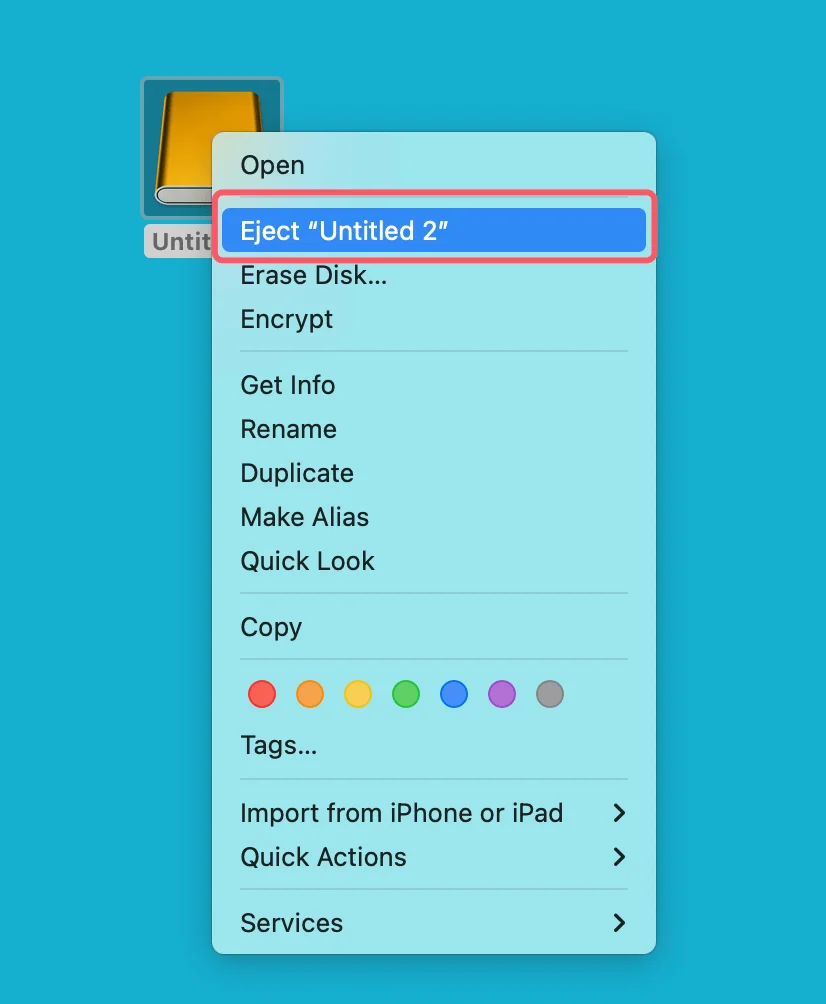
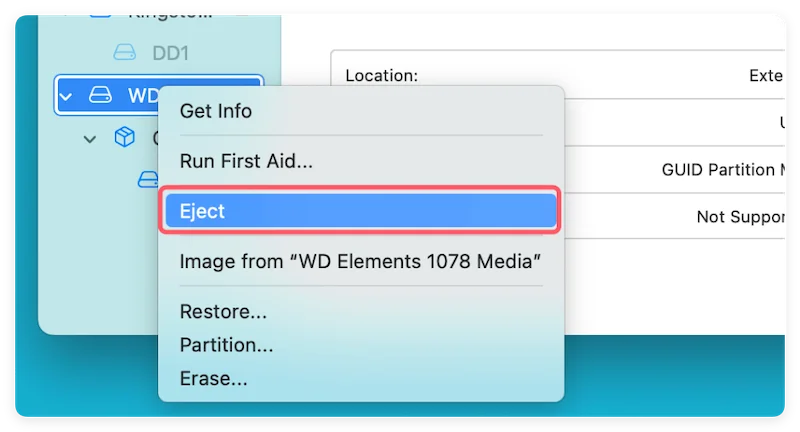
Method 3: The Right-Click Context Menu
- Locate your storage device icon on your desktop or inside your Finder window.
- Right-click (or hold down the Control key while clicking) on the disk icon.
- From the dark contextual action menu that pops up, select the option labeled Eject "[Your Drive Name]".
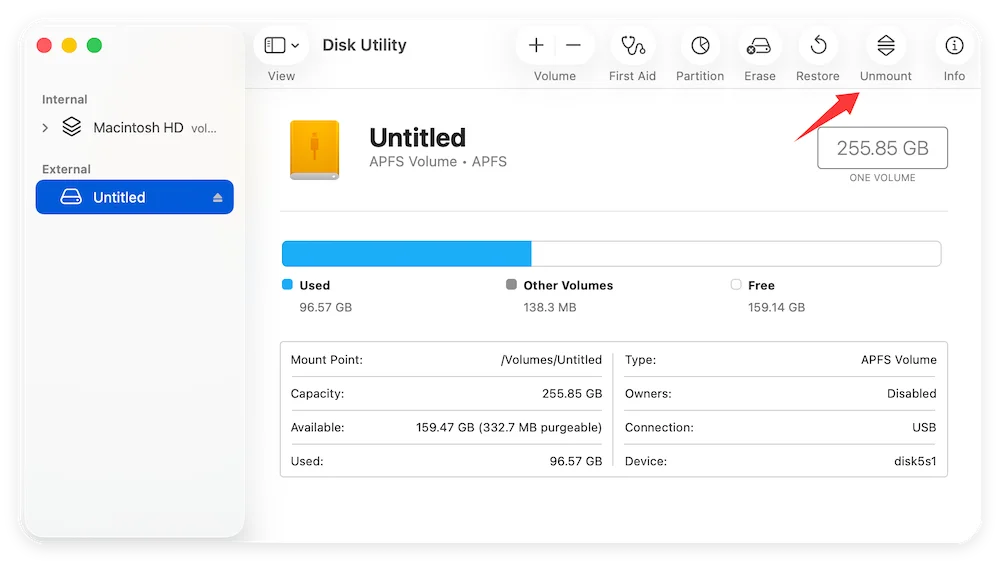
Method 4: The Disk Utility Method
When standard Finder layouts are acting laggy or failing to respond to your mouse clicks, you can go a level deeper using Apple's built-in storage manager:
- Open your Mac's Spotlight Search by pressing Command + Spacebar, type Disk Utility, and press Enter.
- In the sidebar list on the left side of the screen, click on your external drive partition block.
- Look at the top toolbar menu row and click the crisp Eject option.
When a Drive Gets Stuck: How to Troubleshoot
Sometimes, you try all four of the native steps above, but your Mac stubborn refuses to let go, flashing a warning that the device is busy. Why does this happen?
Most of the time, it isn't your fault. While you might have closed your open Microsoft Word documents or finished moving your family videos, hidden system tasks might still be reading from the drive. For instance, Apple's built-in search engine (Spotlight) might be actively indexing every single folder on your newly connected drive, or a background backup process might be cross-checking old archive logs.
Before you resort to aggressive measures to force eject external hard drive on Mac, try these smart troubleshooting steps:
- Isolate and Quit Your Apps: Take a look at the indicators on your Dock. Apps like Photoshop, Final Cut Pro, or VLC Media Player can lock a drive down if they even think they might need to look at a recently opened file again. Manually close them out entirely.
- The Log Out Trick: If you can't figure out which application is keeping a lock on your device, save your open projects, click the Apple logo in the top-left corner of your screen, and choose Log Out. Logging out of your user account forces macOS to kill all active user application processes, freeing up the stuck drive blocks without requiring a full computer reboot.
Advanced Solutions: How to Force Eject External Hard Drive on Mac
If the standard routes fail and you cannot turn off or restart your machine right away, you can use advanced administrative tools to force the volume to detach.
Option A: Force Unmounting inside Disk Utility
Disk Utility has an integrated override system built directly into its core logic:
- Open Disk Utility (Command + Spacebar > type Disk Utility).
- Locate the specific external drive item in the left menu column.
- Instead of the standard Eject button, click the Unmount option located in the top actions bar.
- If a file is currently open, macOS will prompt you with an action warning box. Confirm your intent by clicking Force Unmount. This breaks the software access connection immediately.
Option B: The Terminal Power Move (For Tech-Savvy Users)
If you aren't afraid of utilizing command line environments, you can instruct your Mac's core kernels to break the drive connection directly.
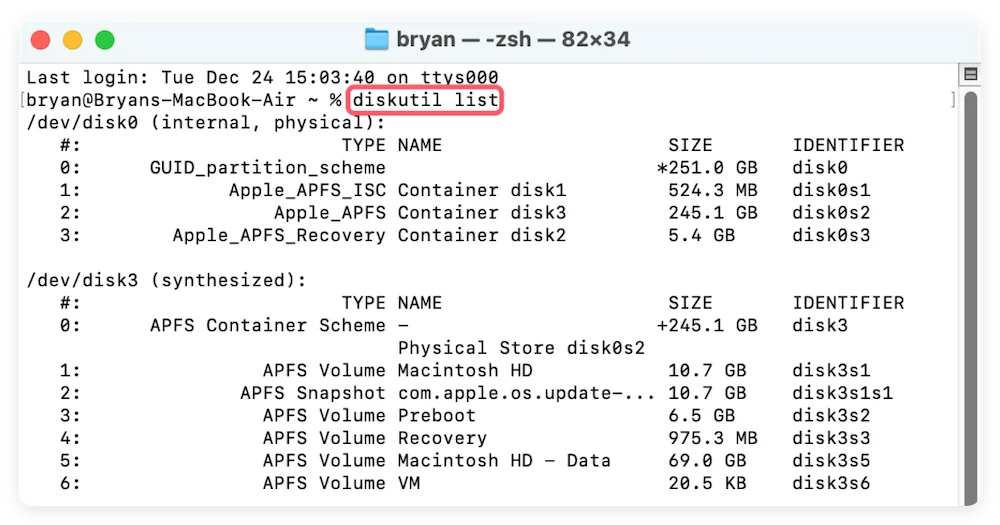
- Open your Mac's Terminal app (found inside Applications > Utilities or via Spotlight).
diskutil list
![eject or force eject external device on Mac]()
- Scan the text read-out to locate your external drive. Look closely at the right-hand column to find its identifier code (it will look like disk2, disk3, or disk4).
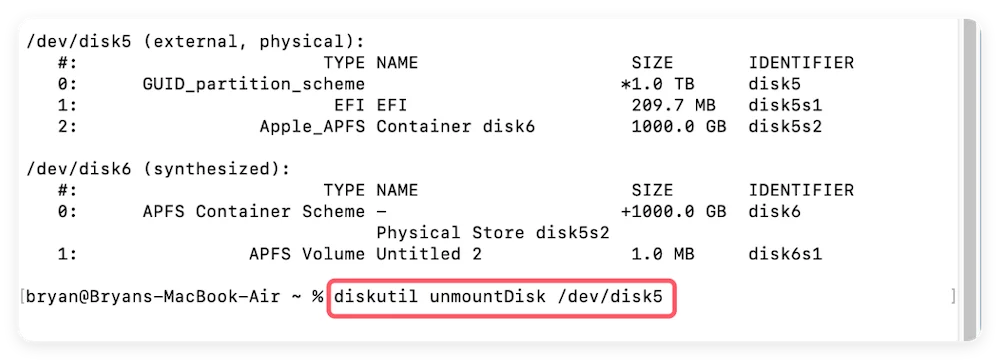
- To safely force an unmount, type the following line (make sure to replace the X with your exact drive identifier number) and hit Enter:
diskutil unmountDisk /dev/diskX
![eject or force eject external device on Mac]()
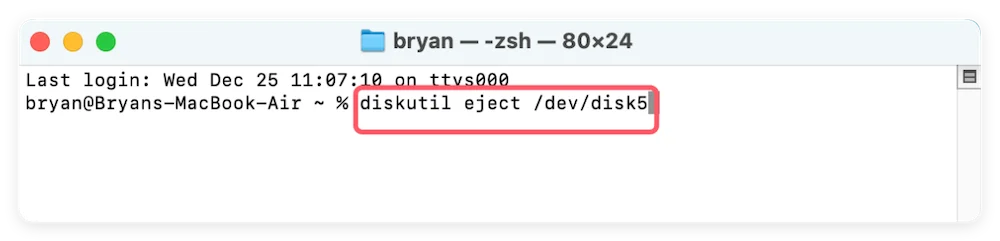
- If the system still pushes back, enter this strong ejection override command string:
diskutil eject /dev/diskX
![eject or force eject external device on Mac]()
Recovering Lost Data If an Improper Ejection Causes Data Loss
If you accidentally pulled a storage cord loose without realizing an app was actively writing data, or if an aggressive force unmount corrupted your drive's file structure, do not panic. The files themselves are often still resting intact on the data sectors; your Mac has simply lost the indexing map needed to locate them.
This is where specialized tools like Donemax Data Recovery for Mac save the day. Built with a powerful deep-scanning algorithmic engine, Donemax bypasses damaged drive tables to find and rebuild lost documents, photos, and media archives.
Here is how easily you can recover your files:
Step 1. Download and Install: Download the official copy of Donemax Data Recovery for Mac and install it into your Applications folder.
Donemax Data Recovery for Mac
- Recover data in different situations on Mac.
- Easy to recover lost files within a few clicks.
- Support data recovery for different kinds of files.
Step 2. Connect and Select: Plug your damaged external drive into your Mac and open the software. Select your external device from the clean main visual menu list.

Step 3. Scan: Click the bright blue Scan button. Don't worry if it takes a little time—the software is thoroughly scanning every sector of the drive to piece your corrupted files back together.

Step 4. Preview and Restore: Once the scan finishes, browse through the neat layout of found files. Use the preview tool to verify your photos or documents, check the boxes next to what you want to save, and click Recover to copy them to a completely safe folder on your Mac's internal hard drive.

FAQs about Ejecting External Device on Mac
Yes, it is always risky. While you might get lucky if the drive is completely idle, pulling the plug while files are moving will cause instant file corruption. Over time, repeated improper removals can ruin the drive's file system, making the whole device unreadable.
This usually happens because hidden background tools are working behind the scenes. Programs like Spotlight might be indexing the drive for search, Time Machine might be checking for backup changes, or an app you recently closed might still be holding onto a temporary file cache.
Force ejecting doesn't usually hurt the physical hardware components, but it can easily scramble your software files. It abruptly breaks the connection while files might still be mid-transfer. Only use a force eject if the drive is completely stuck and standard methods aren't working.
Absolutely. External hard drives formatted in older formats like exFAT or Windows-centric NTFS are much more prone to eject errors on a Mac. For the smoothest, most stable performance, format your external hard drive to Apple's modern APFS (Apple File System) format using Disk Utility.
If your external hard drive isn't showing up because of corrupted files, Donemax can easily read the damaged blocks and rescue your data. However, if the drive won't turn on or show up because it is physically broken or has a dead USB port, you will need to take it to a hardware repair specialist.
Conclusion
Taking an extra five seconds to properly eject device on Mac is one of the easiest ways to protect your digital life. Whether you use the simple Finder sidebar shortcut or rely on the advanced options in Disk Utility to force eject external hard drive on Mac, keeping your files safe is well worth the tiny bit of effort. And if things ever do go wrong, you can rest easy knowing that recovery tools like Donemax Data Recovery are always ready to help you bring your lost files back.
Donemax Data Recovery for Mac
Donemax Data Recovery for Mac is one of the best Mac data recovery software. It is easy-to-use and can help in recovering deleted, formatted, inaccessible or lost data from Mac HDD/SSD, external disk, USB drive, SD card, camera or other storage devices.
Related Articles
- Dec 23, 2024Fix LaCie External Hard Drive Read-Only on Mac: Comprehensive Guide
- Jul 19, 2025[4 Methods] How to Unmount a Drive on Mac: Step-by-Step Guide for All Users
- Mar 06, 2025Repair an External Hard Drive with Terminal on Mac
- Mar 11, 2025How to Use Seagate Expansion Desktop Hard Drive on Mac?
- Sep 15, 2025[11 Fixes] How to Fix Steam Quit Unexpectedly on Mac?
- Apr 09, 2026Voice Memos on Mac: Storage Location, Backup & Export Guide

Contributing Writer
Christina
Christina is the senior editor of Donemax software who has worked in the company for 4+ years. She mainly writes the guides and solutions about data erasure, data transferring, data recovery and disk cloning to help users get the most out of their Windows and Mac. She likes to travel, enjoy country music and play games in her spare time.

Editor in chief
Gerhard Chou
In order to effectively solve the problems for our customers, every article and troubleshooting solution published on our website has been strictly tested and practiced. Our editors love researching and using computers and testing software, and are willing to help computer users with their problems