
Written byChristinaUpdated on Jun 06, 2025
Sabrent Rocket External SSD Not Mounting on Mac, Fix It Now
Approved byGerhard Chou
Before we start: When the Sabrent Rocket External SSD is not mounting on Mac, check the connections, run First Aid and other introduced solutions. Before you reformat the drive, ensure to recover the important data first with Donemax Data Recovery for Mac.
PAGE CONTENT:
- Understanding the Problem Sabrent Rocket External SSD Not Mounting on Mac
- Preliminary Checks for Sabrent Rocket External SSD Not Mounting on Mac
- Step-by-Step Solutions for Sabrent Rocket External SSD Not Mounting on Mac Issue
- Recovering Data from an Unmountable Sabrent Rocket SSD
- Reformatting the Drive (If You Don't Need the Data)
- Conclusion
External SSDs like the Sabrent Rocket series are known for their blazing-fast speed, reliable performance, and sleek design, making them an ideal choice for creatives, gamers, and professionals alike. However, encountering issues like your Sabrent Rocket external SSD not mounting on Mac can be frustrating, especially if you rely on the drive for storing important data or backups.
If you've connected your SSD and nothing shows up in Finder, or if Disk Utility displays a grayed-out drive, you're not alone. This article walks you through step-by-step solutions to fix a Sabrent Rocket SSD that won't mount on macOS, whether it's due to software glitches, hardware faults, or formatting issues.
Understanding the Problem Sabrent Rocket External SSD Not Mounting on Mac
Before diving into the fixes, it's important to understand what "not mounting" actually means.
What Does "Not Mounting" Mean?
On macOS, for a drive to be accessible in Finder, it must be mounted. Mounting is the process where the operating system assigns the drive a path and makes its file system accessible. When an external SSD fails to mount:
- The drive may appear in Disk Utility, but is grayed out.
- It may not show up at all in Finder or on the desktop.
- You may receive error messages like "The disk you inserted was not readable by this computer."
This differs from "not detected", where the drive doesn't appear in Disk Utility at all.
Common Causes for Mounting Failure
Here are some reasons why your Sabrent Rocket external SSD might not mount on your Mac:
- Damaged USB cable or faulty port
- Lack of sufficient power, especially on USB-C hubs
- Corrupted file system
- Drive formatted in an unsupported file system (e.g., EXT4 or NTFS)
- Outdated macOS or firmware
- System Management Controller (SMC) or NVRAM bugs
- Drive corruption or physical failure
Knowing the cause can help you identify the right fix more efficiently.
Preliminary Checks for Sabrent Rocket External SSD Not Mounting on Mac
Before jumping into advanced solutions, try these basic troubleshooting steps:
1. Try another USB Port or Cable
A worn-out or incompatible cable is a common culprit. Use the original Sabrent cable if available, and try connecting the SSD to a different port.
2. Check LED Lights and Sounds
If the SSD has an LED indicator, it should light up when connected. If there's no light or noise, the drive may not be receiving power.
3. Use Another Mac or PC
Try connecting the SSD to another Mac or even a Windows PC. If it mounts elsewhere, the issue is likely with your Mac.
4. Avoid USB Hubs
Plug the SSD directly into your Mac's port without using USB hubs or docking stations. These intermediaries can sometimes underpower or miscommunicate with external drives.
Step-by-Step Solutions for Sabrent Rocket External SSD Not Mounting on Mac Issue
Solution 1: Use Disk Utility to Mount the Drive
If your Sabrent Rocket SSD shows up in Disk Utility but is grayed out, it's often a sign that macOS can see the drive but is having trouble mounting it. This is typically due to minor file system issues or corruption that can be fixed by using the built-in tools macOS provides.
How to Use Disk Utility to Mount the SSD:
- Open Disk Utility: Go to Disk Utility from Utilities via Applications or search for "Disk Utility" in Spotlight.
![Sabrent Rocket external SSD not mounting on Mac]()
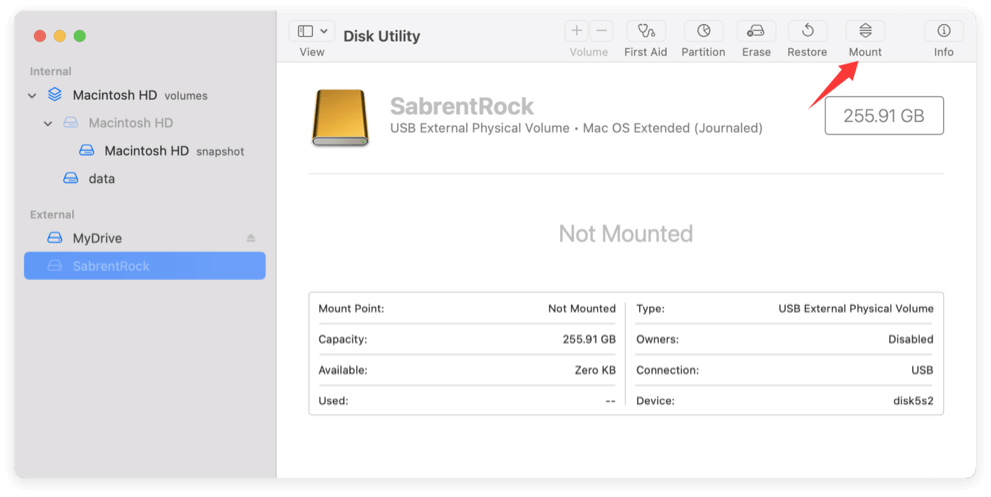
- Find Your SSD: In the left sidebar of Disk Utility, look for your Sabrent Rocket SSD under External. If it's grayed out, it means the system detects the drive but hasn't successfully mounted it.
- Click Mount: Select the drive and click the Mount button at the top of the window. This tells macOS to attempt to mount the drive.
![Sabrent Rocket external SSD not mounting on Mac]()
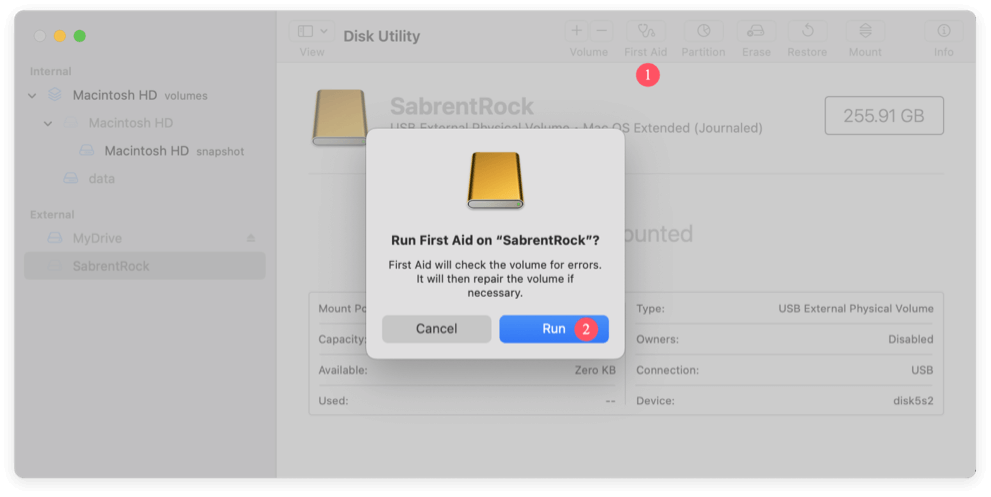
- Run First Aid: If the drive is still grayed out or if mounting fails, click on First Aid at the top of Disk Utility. This tool checks the drive for errors and repairs any found issues, such as corrupt file systems, partition table errors, or directory problems.
![Sabrent Rocket external SSD not mounting on Mac]()
💡 Note: First Aid may not work if the drive has severe corruption or physical damage, but it's worth trying before moving on to more advanced solutions.
Solution 2: Use Terminal to Manually Mount the SSD
If Disk Utility's Mount option doesn't work, you can try mounting the SSD manually through Terminal, which can sometimes bypass problems that Disk Utility can't fix. Using Terminal involves entering a few commands that will help macOS mount the drive manually.
How to Use Terminal to Mount Your SSD:
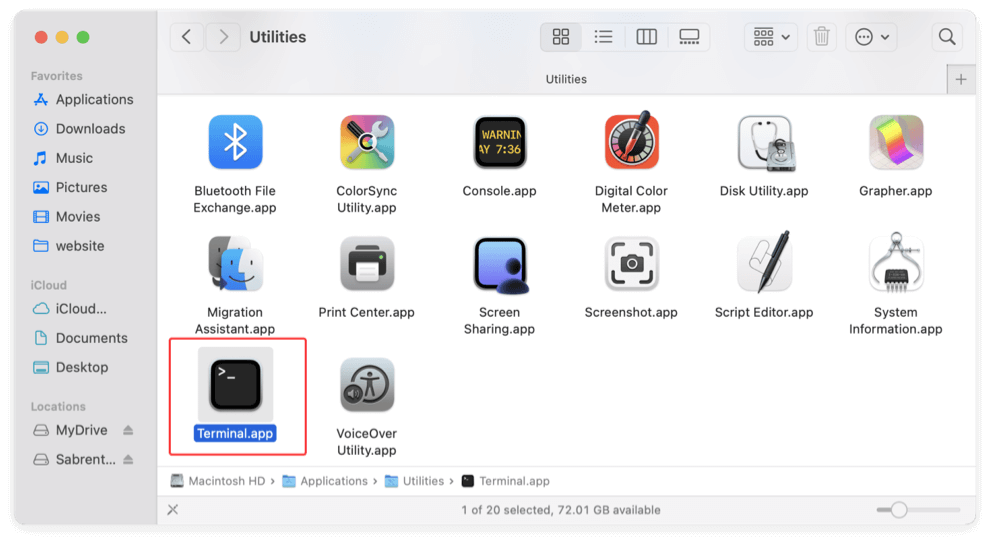
- Open Terminal: Go to Terminal from Utilities via Applications or search for "Terminal" using Spotlight.
![Sabrent Rocket external SSD not mounting on Mac]()
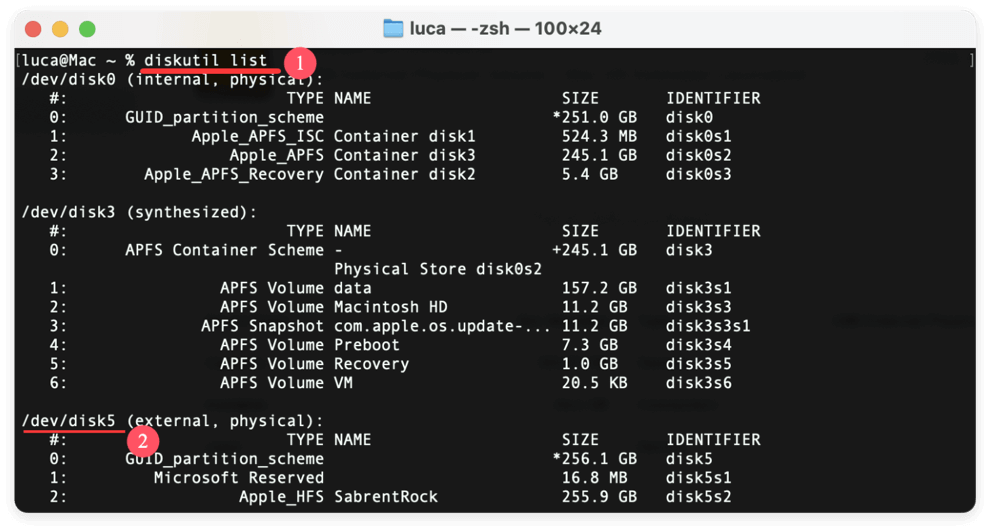
- List All Disks: Type the following command in Terminal and press Enter:
diskutil list
![Sabrent Rocket external SSD not mounting on Mac]()
This will display all connected disks and partitions, including your Sabrent Rocket SSD. Identify the disk number for your drive (it might be something like /dev/disk3).
- Mount the Disk: Type the following command, replacing /dev/diskX with the disk number you identified:
sudo diskutil mountDisk /dev/diskX
![Sabrent Rocket external SSD not mounting on Mac]()
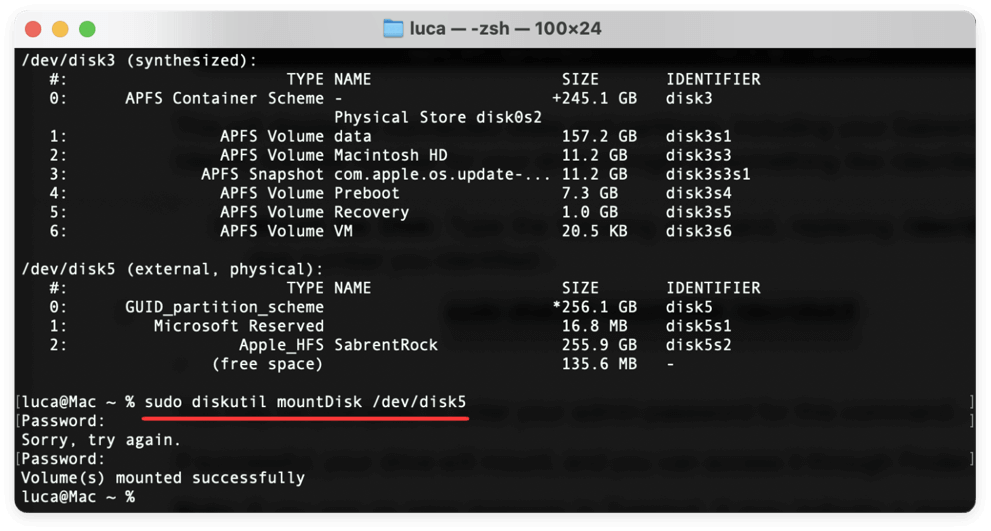
You may be prompted to enter your admin password for this command.
If successful, your drive will mount, and you can access it through Finder.
💡 Note: If you see an error message in Terminal, it may indicate a more serious issue with the drive's file system.
Solution 3: Reset NVRAM and SMC
Sometimes macOS settings stored in NVRAM or issues with the System Management Controller (SMC) can prevent external drives from mounting.
Reset NVRAM:
- Turn Off your Mac.
- Press and hold Option + Command + P + R as soon as you turn it on.
- Release after 20 seconds of holding.
Reset SMC:
The process depends on your Mac model. For Apple Silicon Macs, simply shut down and wait 30 seconds before restarting. For Intel Macs, SMC reset instructions vary depending on whether your Mac has a T2 chip or not.
Solution 4: Boot into Safe Mode
Safe Mode can help determine if third-party extensions are interfering with your drive.
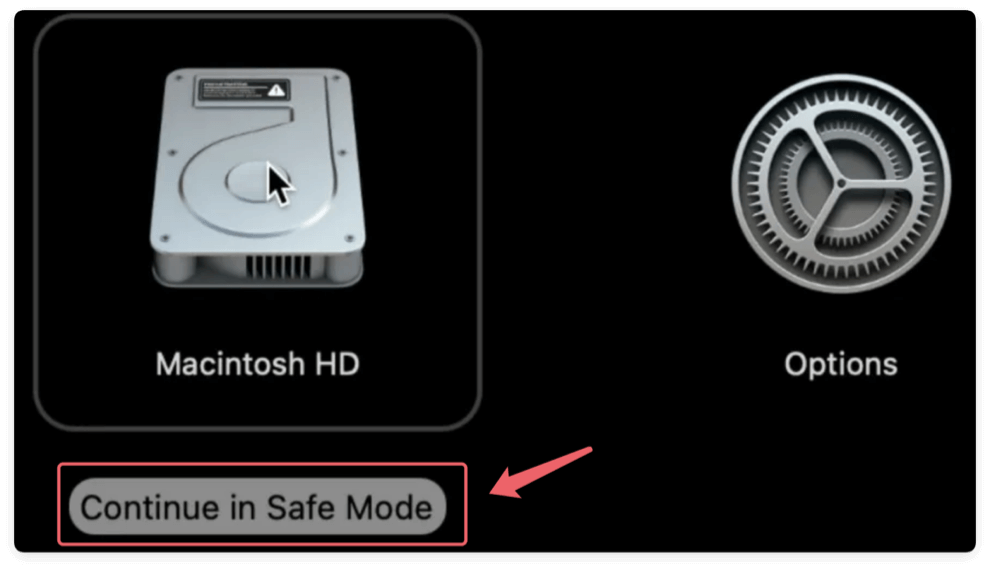
- Turn Off your Mac.
- Turn it on while holding the power key until the startup disk shows up. Then hold Shift key and click Continue in Safe Mode.
![Sabrent Rocket external SSD not mounting on Mac]()
- Once in Safe Mode, open Disk Utility and check if the SSD appears.
- Try to mount it and run First Aid again.
Solution 5: Boot into macOS Recovery
macOS Recovery allows you to access Disk Utility outside of the main operating system.
- Turn Off your Mac.
- Press and hold power key as soon as you turn it on.
- Select Options and click Continue to get into Recovery mode.
![Sabrent Rocket external SSD not mounting on Mac]()
- Open Disk Utility and look for the Sabrent SSD.
- Try mounting or repairing it.
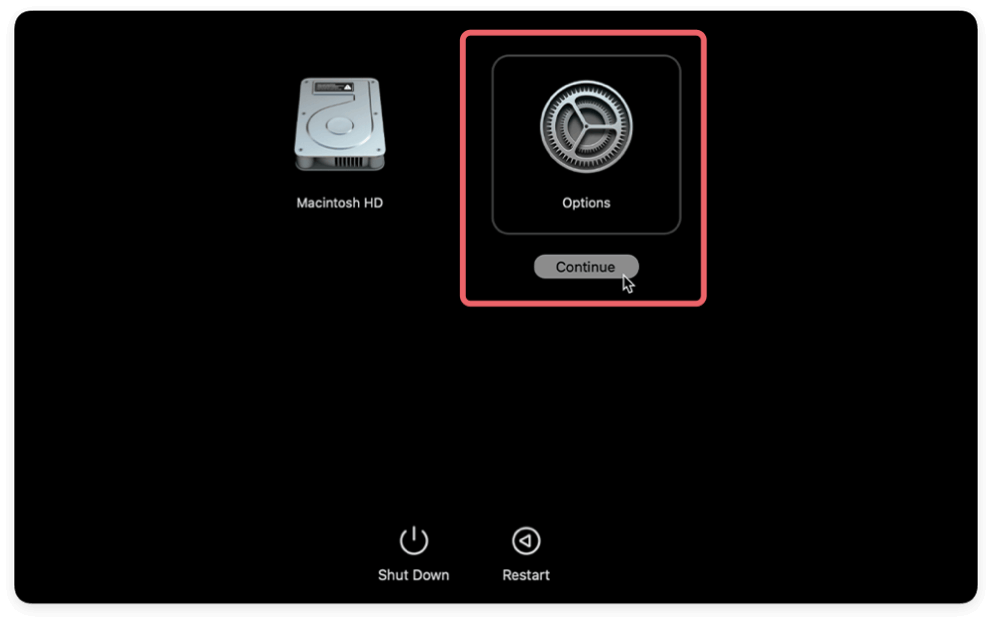
This environment can sometimes access drives that fail to mount in normal mode.
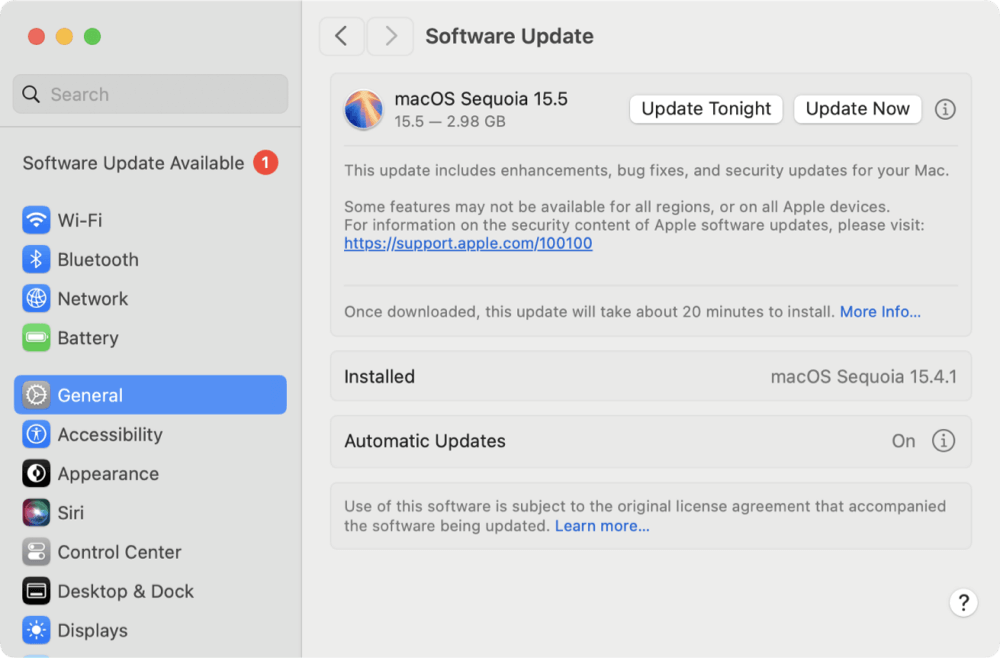
Solution 6: Update macOS and Sabrent Firmware
If macOS doesn't recognize your SSD, or if it worked previously and has suddenly stopped working, outdated software or firmware could be the problem. Ensure that both your macOS and the firmware for your Sabrent Rocket SSD are up-to-date.
How to Check for macOS Updates:
- In the upper left corner of your screen, click the Apple logo.
- Choose System Settings (or System Preferences in previous iterations).
- Go to General > Software Update and check for available updates.
- Restart your Mac after installing any available updates.
![Sabrent Rocket external SSD not mounting on Mac]()
How to Update Sabrent SSD Firmware:
- Visit the Sabrent support page.
- Look for any firmware updates available for your model of the Sabrent Rocket SSD.
- Follow the instructions to update the firmware (usually involves using the Sabrent SSD Toolbox on Windows, as macOS may not support direct SSD firmware updates).
Updating both your macOS and SSD firmware can fix compatibility issues and improve performance.
Recovering Data from an Unmountable Sabrent Rocket SSD
If the Sabrent Rocket external SSD appears in Disk Utility or Terminal but won't mount, your data may still be recoverable.
Several professional tools can help you recover data from an inaccessible SSD. Here we suggest the most reliable Mac data recovery software Donemax Data Recovery for Mac.
Donemax Data Recovery for Mac
- DIY data recovery software for macOS.
- Recover data from SSD, HDD, SD card, USB flash drives, etc.
- Easy-to-use and effective recovery tool.
Steps to recover data from unmountable Sabrent Rocket SSD with Donemax Data Recovery for Mac:
- Download and install one of the tools. Launch the program and select your Sabrent external SSD.
![Select the Sabrent external SSD]()
- Run a scan to recover the files from the drive. It may take some time and just wait patiently.
![Scan the Sabrent external SSD]()
- Preview and save recovered files to a different location (not the same SSD).
![Preview and Recover the Files]()


💡 Tip: Do not reformat your SSD until you've attempted data recovery. Reformatting can overwrite recoverable data.
Reformatting the Drive (If You Don't Need the Data)
If the SSD is unmountable and you don't need to recover the data, reformatting it may resolve the issue.
How to Reformat Sabrent SSD on Mac:
- Open Disk Utility.
- Select the Sabrent Rocket SSD from the sidebar.
- Click Erase at the top.
- Choose:
- Name: Any label you want.
- Format: APFS (for macOS-only) or exFAT (for cross-platform use).
- Scheme: GUID Partition Map.
- Click Erase.
![Sabrent Rocket external SSD not mounting on Mac]()
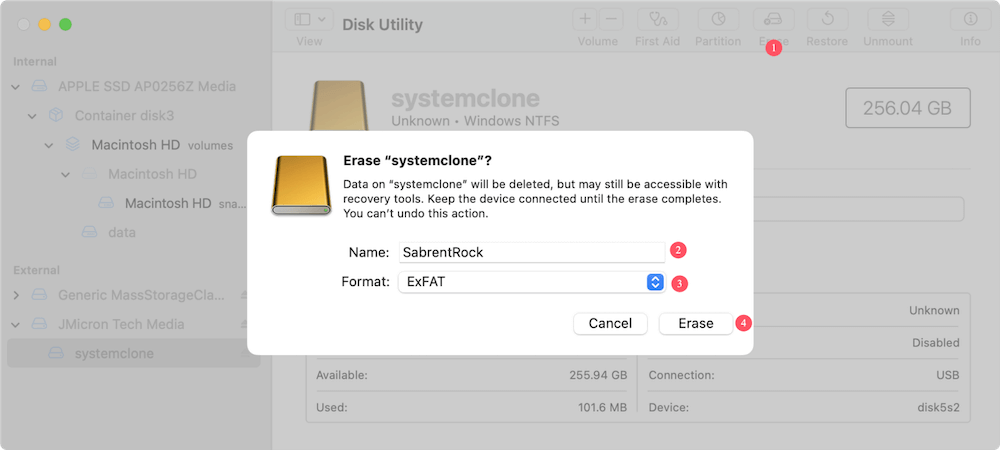
After reformatting, the drive should automatically mount and appear in Finder.
When to Contact Sabrent Support
If none of the solutions work, and the drive:
- Doesn't show in Disk Utility or Terminal,
- Doesn't light up or power on,
- Makes clicking or beeping sounds,
…it may be a hardware issue.
Sabrent Support:
- Visit: https://www.sabrent.com/pages/contact-us
- Check your purchase receipt and warranty period.
- Be prepared to describe all troubleshooting steps you've tried.
Preventing Future Issues
To avoid encountering this issue again in the future, follow these best practices:
- Always eject the SSD properly before unplugging.
- Avoid excessive heat, drops, and vibration.
- Use high-quality cables and avoid low-powered USB hubs.
- Run First Aid occasionally to keep the drive healthy.
- Back up your data regularly to another location (like cloud or another drive).
Conclusion
A Sabrent Rocket external SSD not mounting on your Mac doesn't necessarily mean the drive is dead. In most cases, the issue can be traced to minor problems like a faulty cable, outdated software, or corrupted file system. With the step-by-step methods discussed—ranging from Disk Utility fixes to Terminal commands and data recovery options—you should be able to restore access to your SSD or at least recover important files.
If nothing works, don't hesitate to reach out to Sabrent's customer support or consult professional data recovery services. Always remember: regular backups and safe handling are your best insurance against data loss.
Donemax Data Recovery for Mac
Donemax Data Recovery for Mac is one of the best Mac data recovery software. It is easy-to-use and can help in recovering deleted, formatted, inaccessible or lost data from Mac HDD/SSD, external disk, USB drive, SD card, camera or other storage devices.
Related Articles
- Apr 13, 2026How to Show and Access the opt Folder on Mac
- Dec 25, 2024How to Resize and Partition SSD on Mac?
- Nov 19, 2024How to Perform Clean Install of macOS Sonoma?
- Apr 30, 2025What is fsck and How to Use It to Check and Repair a Disk on Mac?
- Apr 15, 2025Accidentally Deleted Macintosh HD? Fix It Now
- Apr 08, 20265 Ways to Compress Files on Mac: Built-in, Terminal & Third-Party

Contributing Writer
Christina
Christina is the senior editor of Donemax software who has worked in the company for 4+ years. She mainly writes the guides and solutions about data erasure, data transferring, data recovery and disk cloning to help users get the most out of their Windows and Mac. She likes to travel, enjoy country music and play games in her spare time.

Editor in chief
Gerhard Chou
In order to effectively solve the problems for our customers, every article and troubleshooting solution published on our website has been strictly tested and practiced. Our editors love researching and using computers and testing software, and are willing to help computer users with their problems