Written byCharlesUpdated on Sep 08, 2026

Before we start: Have you ever plugged a Windows external hard drive or USB thumb drive into your Mac, only to discover you cannot copy, edit, or delete any files? If this sounds familiar, you are dealing with Apple's native limitation regarding Microsoft's NTFS file system. In such a case, you can use Donemax NTFS for Mac to make the drive fully writable without doing changes.
PAGE CONTENT:
By default, macOS offers full read access to NTFS drives, but write privileges are completely disabled. This safeguard exists because NTFS is proprietary Microsoft software. While this prevents accidental cross-platform system corruption, it creates a real bottleneck when you need to share large media files or documents between Mac and Windows computers.
The good news is that you do not need to delete your existing files or buy a brand-new drive. In this comprehensive guide, we will explore four effective methods explaining how to get read and write access to NTFS on macOS without losing data. Whether you are running macOS Golden Gate, Tahoe, Sequoia, or older versions on Apple Silicon or Intel Macs, these solutions will get your drives working seamlessly.
To understand why this issue happens, it helps to take a quick look at file systems. Windows computers primarily use the NTFS (New Technology File System) format for internal and external drives. NTFS supports large file sizes, advanced security permissions, and file journaling.
Apple uses its own file systems: APFS (Apple File System) for modern macOS builds and Mac OS Extended (HFS+) for older versions. Because NTFS is proprietary to Microsoft, Apple includes read support so Mac users can view files stored on Windows disks. However, native write support is omitted to avoid licensing disputes and potential data corruption risks.
When you connect an NTFS drive to your Mac, macOS mounts it as a read-only volume. You can read files freely, but actions like copying files to the drive, modifying existing documents, renaming folders, or formatting sectors are blocked. To unlock full write capabilities without wiping your drive, you need the right software driver or workaround.
If you want a hassle-free solution that works in seconds without touching complex Terminal commands or risking file loss, using dedicated NTFS driver software is your best choice. Donemax NTFS for Mac is a professional utility engineered specifically to enable full read and write access to NTFS drives on macOS.
Unlike experimental command-line workarounds, Donemax NTFS for Mac works seamlessly with Apple Silicon (M1, M2, M3, M4, M5, M6 chips) as well as Intel-based Macs. It automatically detects and mounts connected NTFS drives with full read/write privileges at native speeds. You can edit, rename, transfer, and delete files on your NTFS drive just like any native Mac-formatted volume.
Key Features of Donemax NTFS for Mac:
Step-by-Step Guide: How to Enable Read/Write Access with Donemax NTFS for Mac
Step 1: Download and install Donemax NTFS for Mac on your computer. Launch the application from your Finder or Launchpad.
Step 2: Connect your NTFS external hard drive, SSD, or USB flash drive to your Mac using a USB or Thunderbolt cable.
Step 3: Donemax NTFS for Mac will list all connected storage devices. Select your NTFS volume from the left sidebar.
Step 4: Click the 'Enable Writable' button. If prompted, grant the necessary permission in macOS System Settings.
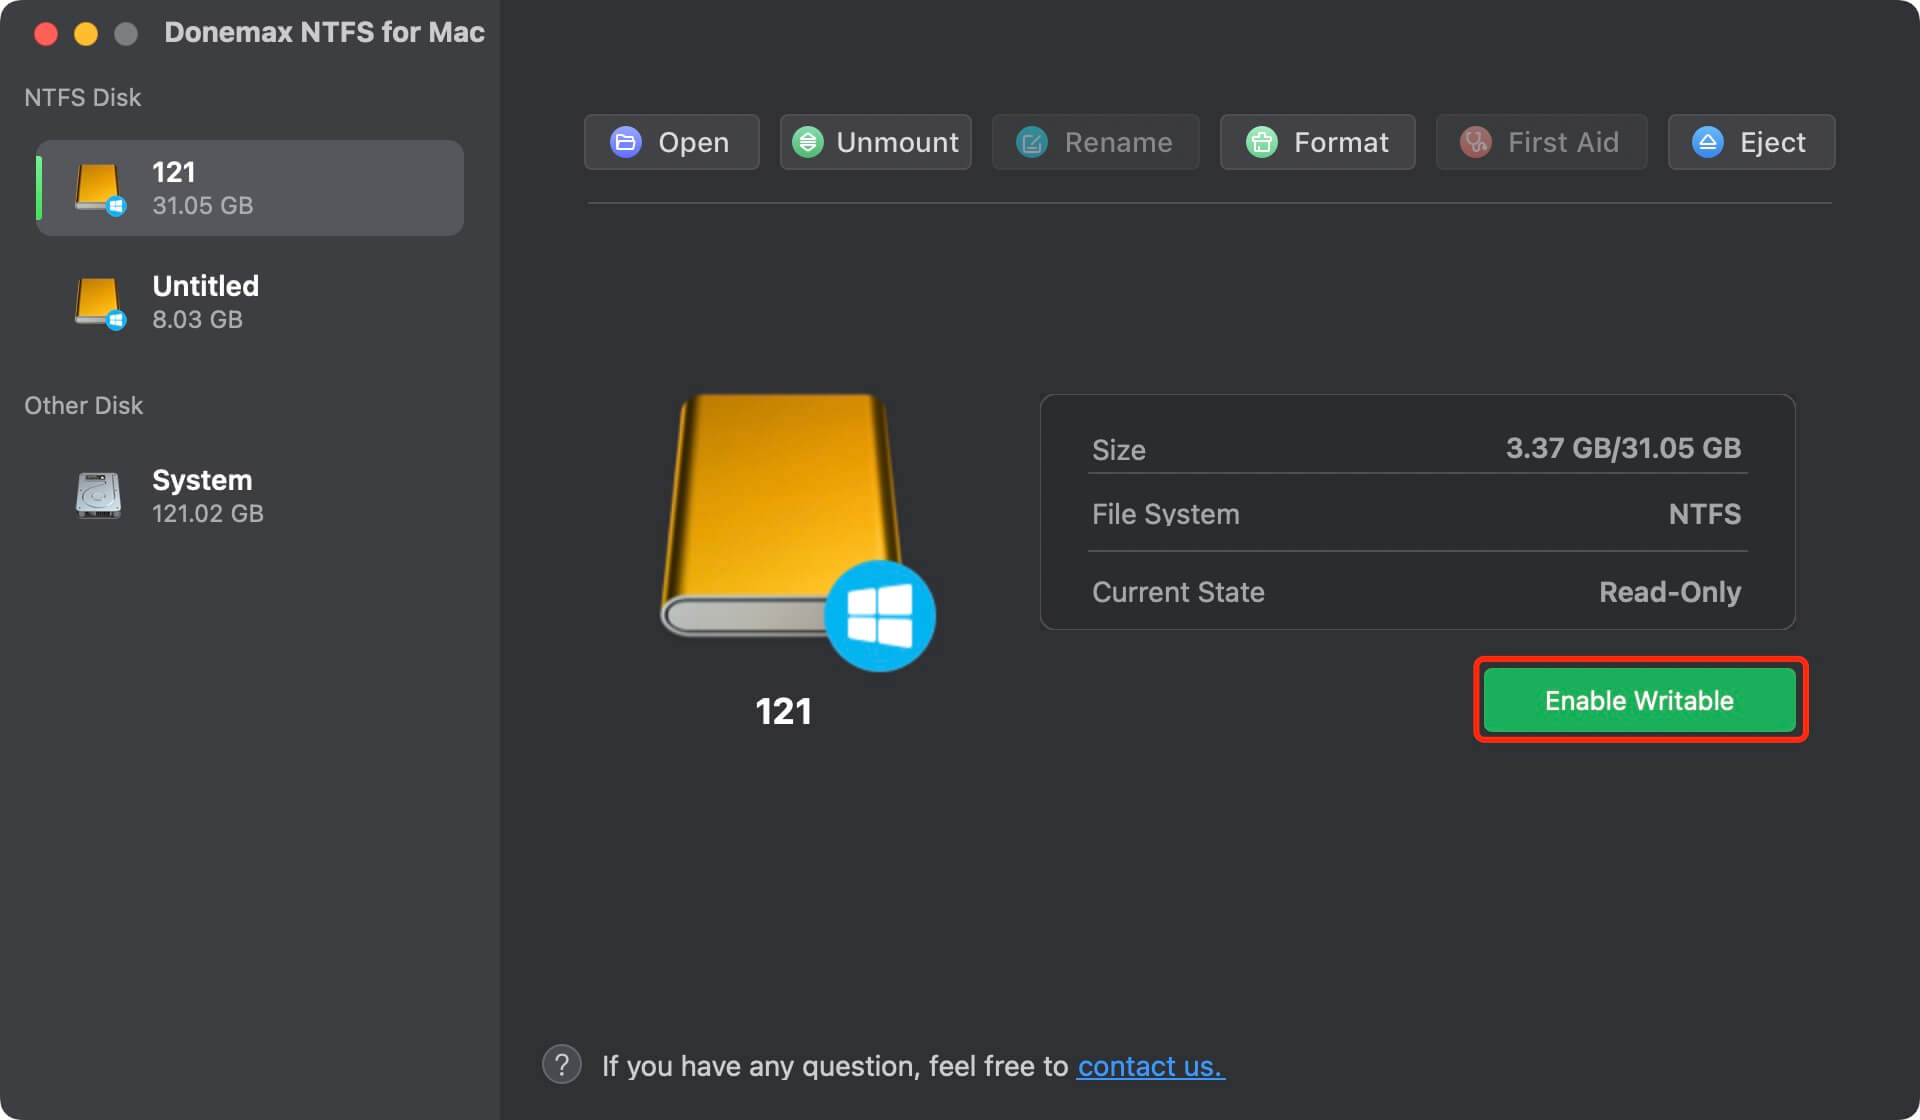
Step 5: Once mounted as Writable, click 'Open' to view your drive. You can now freely copy, edit, delete, and save files on your NTFS drive with zero data loss!
For advanced users looking for a free, open-source approach, open-source projects like macFUSE combined with NTFS-3G offer an alternative. This method creates a file-system bridge that enables write capabilities on NTFS partitions.
However, this approach is quite technical and requires comfort with Terminal lines, Xcode command-line tools, and Homebrew package installation. Furthermore, on modern Apple Silicon Macs running macOS Ventura, Sonoma, or Sequoia, installing macFUSE requires entering macOS Recovery Mode and downgrading system kernel security settings by relaxing System Integrity Protection (SIP).
Basic Steps for Open-Source NTFS Drivers:
💡 Warning: Because open-source drivers often lag behind official macOS system updates, unexpected updates can lead to mount failures or read/write errors. If you handle critical business or personal files, caution is advised when using open-source kernel modules.
If you want native read and write access on both Mac and Windows without relying on any third-party software, reformatting your drive to exFAT (Extended File Allocation Table) is an excellent long-term option.
exFAT was designed by Microsoft specifically for flash storage and external drives. Both macOS and Windows read from and write to exFAT drives natively without requiring extra software or drivers. It also eliminates the legacy 4GB file size limit found on older FAT32 drives.
How to Reformat Your NTFS Drive to exFAT Without Losing Data:
💡 Important Notice: Formatting a drive completely wipes every file stored on it. To achieve this without losing your data, you must perform a temporary backup first.
Step 1: Connect your NTFS drive to your Mac.
Step 2: Copy all existing files from the NTFS drive onto your Mac's internal storage or a cloud backup service.
Step 3: Open Disk Utility on your Mac (press Command + Space, type 'Disk Utility', and hit Enter).
Step 4: Select your external drive from the left sidebar and click the 'Erase' button at the top menu.
Step 5: Choose 'exFAT' as the Format and 'GUID Partition Map' as the Scheme. Enter a name for your drive.
Step 6: Click 'Erase' to format the drive. Once finished, copy your backed-up files back onto the newly formatted exFAT drive.
Working with cross-platform external storage requires a few best practices to keep your files secure and prevent unexpected data corruption:
Dealing with read-only restrictions on Windows-formatted drives can be frustrating, but unlocking full access is quick and painless. If you need immediate, full access without risking your files, Donemax NTFS for Mac is the most reliable choice. It gives you instant read and write access to NTFS drives on macOS without losing data, keeping your workflow smooth across all your devices.
Charles
Charles, who lives in Sydney, Australia, is an editor & writer of Donemax Team. He is good at writing articles related with Apple Mac computers, Windows operating systems, data recovery, data erasure, disk clone and data backup, etc. He loves reading and playing tennis in his spare time and is interested in testing new digital devices such as mobile phones, Macs, HDDs, SSDs, digital cameras, etc.
Gerhard Chou
In order to effectively solve the problems for our customers, every article and troubleshooting solution published on our website has been strictly tested and practiced. Our editors love researching and using computers and testing software, and are willing to help computer users with their problems