
Written byStevenUpdated on Jun 09, 2025
How to Clone Windows 11/10/8/7 to NVMe SSD?
Approved byGerhard Chou
Before we start: To ensure everything on Windows 11/10/8/7, including system data, installed programs, and personal data, will be migrated to NVMe SSD smoothly, download Donemax Disk Clone to make a full and bootable copy of the system.
PAGE CONTENT:
In the ever-evolving world of computer technology, upgrading your hard drive to an NVMe SSD (Non-Volatile Memory Express Solid State Drive) is one of the best decisions you can make to boost your PC's performance. NVMe SSDs are significantly faster than traditional hard drives (HDDs) and older SATA-based SSDs, offering faster data transfer speeds, quicker boot times, and better overall system responsiveness.
One of the easiest and most efficient ways to upgrade your storage device without reinstalling Windows is to clone your existing system (whether it's Windows 11, 10, 8, or 7) to an NVMe SSD. Cloning your drive preserves your system's settings, installed applications, and personal files, making it an ideal solution for users who want to migrate to a new drive while keeping everything intact.
In this article we will explore through the process of cloning Windows to an NVMe SSD step by step, providing essential information and troubleshooting tips to ensure a smooth transition.
What You Need Before Cloning Windows to NVMe SSD?
Before you begin cloning your Windows OS to an NVMe SSD, there are a few preparations you should make to ensure the process goes smoothly.
1. An NVMe SSD
The first thing you'll need is a compatible NVMe SSD. Unlike SATA SSDs, NVMe SSDs use the PCIe interface, which offers significantly higher read/write speeds. Before purchasing one, ensure that your motherboard has an available M.2 slot that supports NVMe drives. NVMe SSDs come in various capacities, so choose one that offers enough space for your operating system and applications. Typically, a 500GB or 1TB NVMe SSD should suffice for most users.
2. Cloning Software
You will need a cloning software to facilitate the transfer of data from your existing hard drive to the NVMe SSD. Many free and paid options are available. Here are some reliable disk copy tools:
- Donemax Disk Clone
- AOMEI Backupper
- Clonezilla
These cloning tools allow you to clone your entire system, including the operating system, applications, and files, to the new NVMe SSD drive.
3. Backup Important Data
While cloning is a relatively safe process, it's always wise to back up your important data before proceeding. This ensures that if anything goes wrong, you won't lose your essential files. For the backup, you can utilize cloud storage or an external hard drive.
4. Check NVMe Compatibility
Make sure your motherboard supports NVMe SSDs and that it is running the latest BIOS or UEFI firmware. Some older systems may not support NVMe or require additional drivers for proper recognition. It's essential to confirm this before beginning the cloning process.
5. Prepare SSD
Before cloning, it's recommended to initialize the NVMe SSD. If the SSD is brand new, it should be initialized by default, but if it's used or unformatted, you might need to do so manually via Disk Management on Windows. Initialize the SSD to the GPT (GUID Partition Table) format, which is required for bootable Windows installations.
How to Clone Windows 11/10/8/7 to NVMe SSD (Step-by-Step)
Once you have all the necessary tools and preparations, follow these steps to clone your Windows OS to your NVMe SSD.
Step 1: Install the NVMe SSD
If you are upgrading an existing drive, you need to install the NVMe SSD into your computer. Shut down your PC, disconnect the power supply, and open the computer case. Insert the NVMe SSD into the M.2 slot on the motherboard. Tighten the screw to hold the SSD in place. If you're using a USB-to-M.2 NVMe adapter, simply connect the NVMe drive to the adapter and plug it into a USB port on your computer.
After physically installing the SSD, power up the system and make sure the BIOS/UEFI recognizes the new drive. You can check this by entering the BIOS/UEFI settings and ensuring the NVMe SSD appears under the storage devices list.
Step 2: Download and Install Cloning Software
Next, download and install the cloning software of your choice. For this guide, let's assume you're using Donemax Disk Clone (one of the most popular tools). The installation process is simple: download the installer, run it, and follow the on-screen instructions.
Donemax Disk Clone
- Best tool to migrate Windows system to NVMe SSD.
- Ensure to create a bootable clone for system disk.
- Clone everything including system, programs, settings and personal data.
Once installed, launch the software. You will be presented with an interface where you can select the source (your current system drive) and the destination (your new NVMe SSD).
Step 3: Prepare the Source Disk and Target NVMe SSD
Before cloning, it's a good idea to clean up your system. Delete unnecessary files, uninstall unwanted applications, and run a disk cleanup to free up space. This will ensure that you only clone the data you need, making the cloning process faster and more efficient.
Next, check the available space on your NVMe SSD. If the NVMe drive is larger than your source drive, that's great! If it's smaller, you will need to make sure that the data on the source drive fits within the available space on the NVMe SSD. You might need to resize or remove some partitions if necessary.
Step 4: Start the Cloning Process
With everything set up, it's time to begin the cloning process.
- First select the Disk Clone mode. When cloning the system drive, ensure to choose this mode that will clone all the related system preserved and recovery partitions. In Donemax Disk, select your current system drive (the one you want to clone) as the source disk. Choose your NVMe SSD as the destination. You can opt for a sector-by-sector clone (which clones every single sector of the source drive) or not (which only clones used sectors). The latter option is faster and more efficient for most users.
![select the Disk Clone mode]()
- At the next step, you can preview and edit the disk layout. Also, tick the option Check the option if the destination is SSD.
![Check the option if the destination is SSD]()
- After confirming the settings, click Clone button to begin the process. The time it takes to clone will depend on the amount of data you have on your source drive.
![click Clone button to begin the process]()


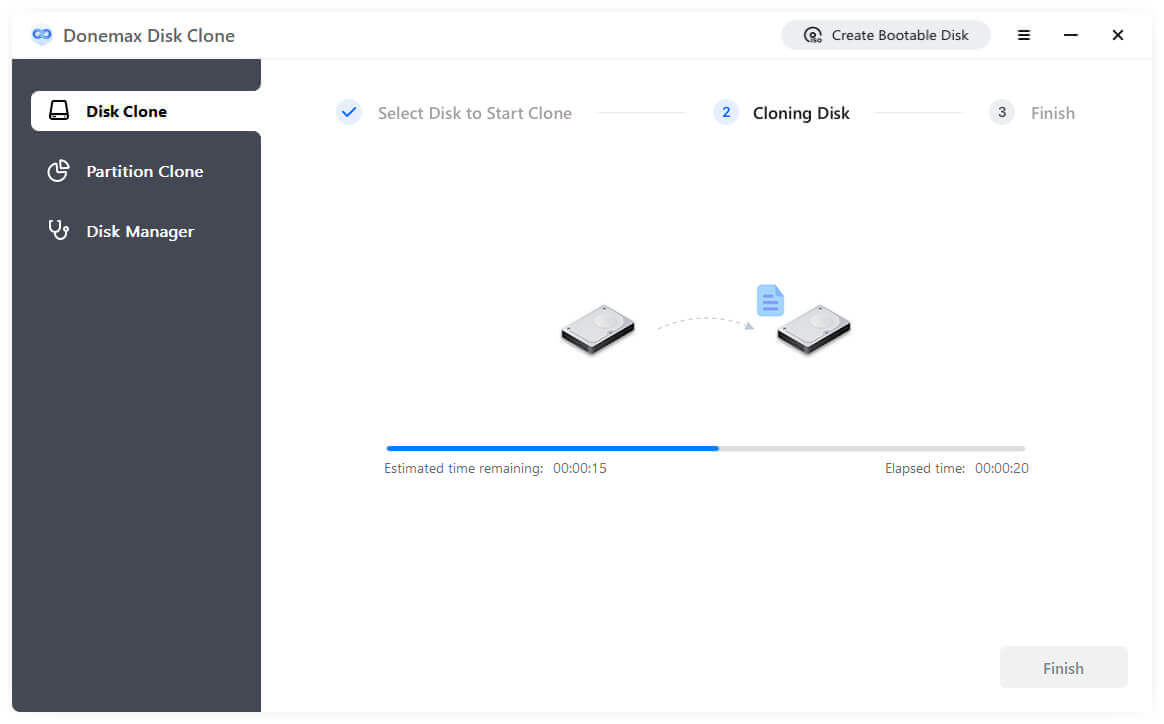
Once the cloning process is complete, the software will inform you that the operation was successful. You can now proceed to the next step.
Step 5: Set NVMe SSD as the Boot Drive
After cloning, you need to configure your PC to boot from the new NVMe SSD.
- Enter BIOS/UEFI: To access the BIOS/UEFI settings, restart your computer and press the assigned key, which is typically F2, DEL, or ESC.
- Change Boot Order: In the BIOS/UEFI, navigate to the "Boot" or "Boot Order" section and set the NVMe SSD as the first boot device.
- Save and Exit: After saving the modifications, close the BIOS/UEFI settings.
Step 6: Test the System
Now that your system is set to boot from the NVMe SSD, restart your computer and see if it boots into Windows. If everything was cloned successfully, your PC should boot from the NVMe SSD just as it did from your old drive.
Verify that all your files, applications, and system settings are intact. If you encounter any issues, such as Windows not booting properly, check for common errors like incorrect boot order, missing or incompatible drivers, or corrupt partitions.
Troubleshooting Issues Transferring Windows to NVMe SSD
Despite the simplicity of the cloning process, users may occasionally run into issues. Below are some common problems and their solutions.
1. Windows Won't Boot After Cloning
If your computer doesn't boot from the cloned NVMe SSD, you might encounter a boot error. This could happen if the boot configuration data (BCD) was not copied correctly. You can use the Startup Repair tool in Windows Recovery to fix this issue:
- Start from a USB or DVD that contains the Windows installation.
- Select Startup Repair from Advanced options via Troubleshoot.
![cloning Windows to an NVMe SSD]()

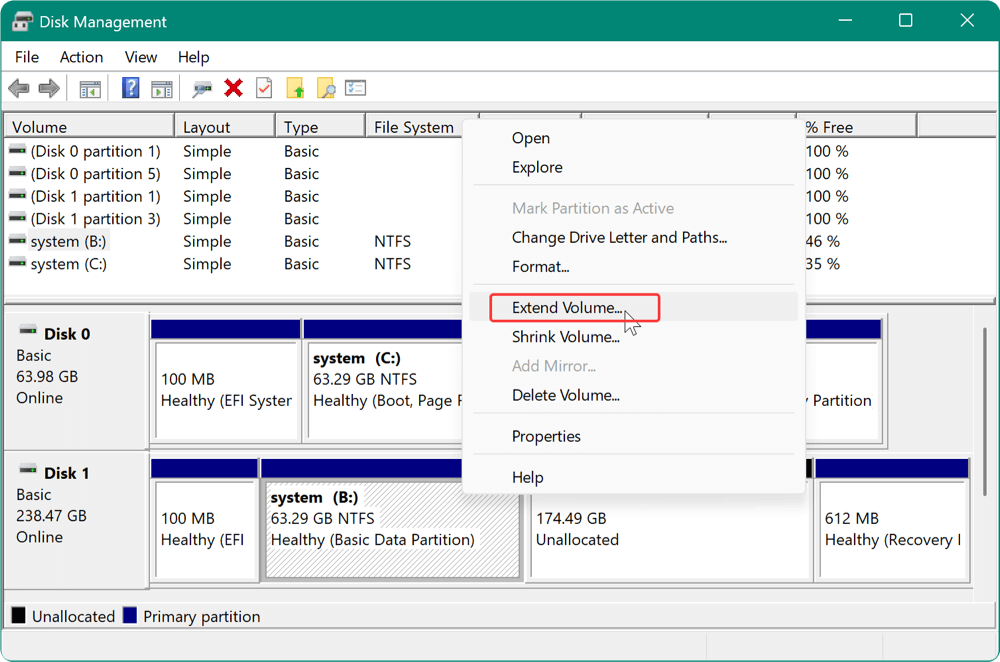
2. Cloned Drive Shows Wrong Size
After cloning, you may notice that the partition on the NVMe SSD is smaller than the full capacity of the SSD. This can happen if the cloning tool did not automatically resize the partition. You can use Disk Management in Windows to resize the partition:
- Open Disk Management (type "disk management" in the Start menu).
- Right-click the cloned partition and select Extend Volume to make use of the full space.
![cloning Windows to an NVMe SSD]()
3. Cloning Fails Halfway
If the cloning process fails halfway, the problem could be due to disk errors or insufficient space on the destination drive. Run CHKDSK on your source drive to check for errors, and make sure your NVMe SSD has enough space for the data.
4. Blue Screen After Cloning
In some cases, users experience a Blue Screen of Death (BSOD) after cloning. This could be due to missing or outdated drivers for the NVMe SSD. Ensure that you have the latest NVMe drivers installed and try booting into Safe Mode to troubleshoot.
Tips for a Better Cloning Experience
- Update System Drivers: Ensure that all your drivers, especially storage drivers, are up to date before cloning.
- Disconnect the Old Drive: After cloning, disconnect the old drive to prevent confusion during booting.
- Check BIOS Settings: Some systems require enabling the UEFI boot mode or NVMe support in the BIOS for optimal performance.
Conclusion
Cloning your Windows operating system to an NVMe SSD is a straightforward process that can greatly improve the speed and responsiveness of your system. By complying the steps outlined in this article, you can easily migrate your data without losing any settings, applications, or personal files.
With proper preparation, the right disk cloning tools, and some troubleshooting know-how, you can enjoy the speed benefits of an NVMe SSD while keeping your existing Windows installation intact.
Donemax Disk Clone
An award-winning disk cloning program to help Windows users and Mac users clone HDD/SSD/external device. It also can create full bootable clone backup for Windows PCs and Macs.
Related Articles
- Jun 29, 2024How to Transfer Data Between Laptop and Desktop PC?
- Apr 15, 2024WD Disk Clone With Acronis True Image
- Jun 05, 2023How to Create A Bootable Clone Backup for Windows?
- Apr 25, 2024Best Samsung Clone Software to Help You Clone HDD/SSD or Storage Device
- Jun 10, 2025Bit Copy SD Card: How to Clone SD Card Bit-by-Bit?
- Jun 03, 2025How to Clone an exFAT Drive to a FAT32 Drive?

Contributing Writer
Steven
Steven has been a senior writer & editor of Donemax software since 2020. He's a super nerd and can't imagine the life without a computer. Over 6 years of experience of writing technical solutions and software tesing, he is passionate about providing solutions and tips for Windows and Mac users.

Editor in chief
Gerhard Chou
In order to effectively solve the problems for our customers, every article and troubleshooting solution published on our website has been strictly tested and practiced. Our editors love researching and using computers and testing software, and are willing to help computer users with their problems