
Written byCharlesUpdated on Oct 10, 2025
Format an External Hard Drive for macOS Tahoe
Approved byGerhard Chou
Before we start: Format hard drive can help you change the file system and remove all data on the drive. However, if you want to ensure the data is gone forever and no longer recoverable, you can use Donemax Data Eraser for Mac to permanently wipe the external hard drive drive and data.
PAGE CONTENT:
If you've just upgraded to macOS Tahoe or bought a new external hard drive, you may need to format it before it's ready for use. Formatting prepares a drive by erasing its contents, setting up a file system, and making it compatible with your operating system.
For Mac users, formatting is often required when:
- A new external hard drive is unrecognized by macOS.
- You need to switch from Windows file systems like NTFS.
- You want to optimize a drive for Time Machine backups.
- You plan to share the drive between macOS and Windows.
This step-by-step guide will explain everything you need to know about formatting an external hard drive for macOS Tahoe. We'll cover file system choices (APFS, HFS+, exFAT), precautions before formatting, troubleshooting issues, and best practices to keep your data safe.
Before Formatting an External Hard Drive for macOS Tahoe
Before diving into the formatting process, it's important to take some precautions:
- Backup Your Data
Formatting erases everything on the drive. If your external hard drive contains important files, copy them elsewhere first. - Know Your File System Options
macOS Tahoe supports several file systems, each with its pros and cons. Choosing the right one depends on whether you want macOS-only use, cross-platform sharing, or compatibility with older systems. - Check Drive Compatibility
- Drives pre-formatted with NTFS will be read-only on macOS unless you install third-party software.
- Some drives ship formatted in exFAT, which works on both Mac and Windows.
- If you plan to use your drive only with macOS, APFS is the modern choice.
File System Options for macOS Tahoe
When formatting an external hard drive, you'll be asked to choose a file system. Here are the main ones available in macOS Tahoe:
1. APFS (Apple File System)
Introduced with macOS High Sierra, APFS is Apple's modern file system designed for SSDs and flash storage. It's now the default in macOS Tahoe and comes with powerful features.
⭐ Key Benefits:
- Speed: Faster file operations, especially with large directories and small files.
- Snapshots: Lets you save system states for easy rollbacks, useful for backups and system recovery.
- Cloning: Duplicating files or directories doesn't use extra space until changes are made.
- Encryption: Built-in strong encryption, ideal for sensitive data.
👍 Best Use Case:
If you plan to use your external SSD strictly with macOS Tahoe (or newer Macs), APFS is the best choice.
👎 Limitations:
- Not compatible with older macOS versions (before High Sierra).
- Not readable on Windows without third-party tools.
2. Mac OS Extended (HFS+)
Before APFS, Mac OS Extended (also called HFS+) was the default file system. While it's gradually being phased out, it's still available for compatibility reasons.
⭐ Key Benefits:
- Backward Compatibility: Works with macOS versions before High Sierra.
- Journaling: Protects against corruption during unexpected shutdowns.
- Time Machine Support: Still supported for some Time Machine setups.
👍 Best Use Case:
Use HFS+ if you're formatting a drive that will be used on older Macs or if you want maximum compatibility with legacy systems.
👎 Limitations:
- Slower than APFS, especially on SSDs.
- Lacks advanced features like snapshots and cloning.
3. exFAT
If you need cross-platform compatibility, exFAT is the most flexible choice. Both macOS and Windows support it natively, making it perfect for drives that move between systems.
⭐ Key Benefits:
- Universal Compatibility: Works on macOS, Windows, and even Linux.
- Large File Support: Handles files larger than 4GB (unlike FAT32).
- No Size Limit: Works on very large drives, making it ideal for external HDDs.
👍 Best Use Case:
Choose exFAT if you want to transfer large files between Macs and Windows PCs without extra software.
👎 Limitations:
- No journaling, meaning greater risk of corruption if the drive is unplugged improperly.
- Slightly slower than APFS or NTFS in heavy workloads.
4. NTFS (Windows Default)
NTFS is the standard file system for Windows, but macOS Tahoe can only read from NTFS drives by default—it cannot write to them.
⭐ Key Benefits:
- Excellent for Windows systems, offering speed, security, and journaling.
- Great for external drives used mainly with PCs.
👍 Best Use Case:
Only use NTFS if you're primarily a Windows user and rarely connect the drive to a Mac.
👎 Limitations on macOS Tahoe:
- Read-only without third-party drivers.
- Requires extra software (e.g., Donemax NTFS for Mac) for full functionality.
Recommendation:
- Use APFS if the drive is only for macOS Tahoe.
- Use exFAT if you want cross-platform use with Windows.
- Use HFS+ only if you need older Mac compatibility.
Quick Comparison Table
| File System | Works with macOS Tahoe | Works with Windows | Best For | Limitations |
|---|---|---|---|---|
| APFS | Full Support | No native support | macOS-only SSDs, secure storage | Not backward compatible with older macOS; not Windows-friendly |
| HFS+ | Full Support | No native support | Older Macs, Time Machine setups | Slower, outdated format |
| exFAT | Full Support | Full Support | Cross-platform large file sharing | No journaling, risk of corruption |
| NTFS | Read-only support | Full Support | Windows-focused drives | Requires drivers for write access on Mac |
How to Format an External Hard Drive in macOS Tahoe?
Formatting an external hard drive is simple with Disk Utility, the built-in tool in macOS. Follow these steps:
Step 1: Connect the Drive
- Plug your external hard drive into your Mac via USB, Thunderbolt, or another supported port.
- Ensure macOS recognizes the drive. You should see it appear in Finder or Disk Utility.
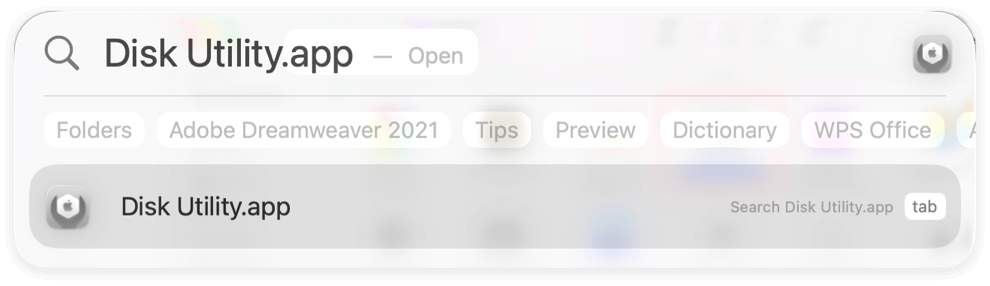
Step 2: Open Disk Utility
- Go to Disk Utility from Utilities via Applications.
![format an external hard drive for macOS Tahoe]()
- Alternatively, use Spotlight Search (Command + Space → type Disk Utility → hit Enter).
![format an external hard drive for macOS Tahoe]()

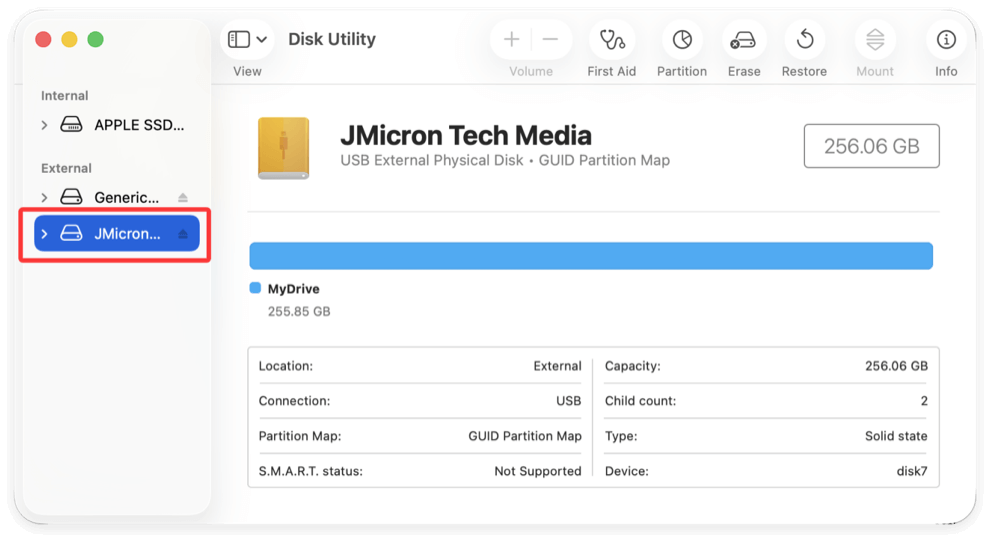
Step 3: Select the Drive
- In the left sidebar, you'll see a list of drives and partitions.
- Select the drive itself (the top-level entry), not just the volume beneath it.
![format an external hard drive for macOS Tahoe]()
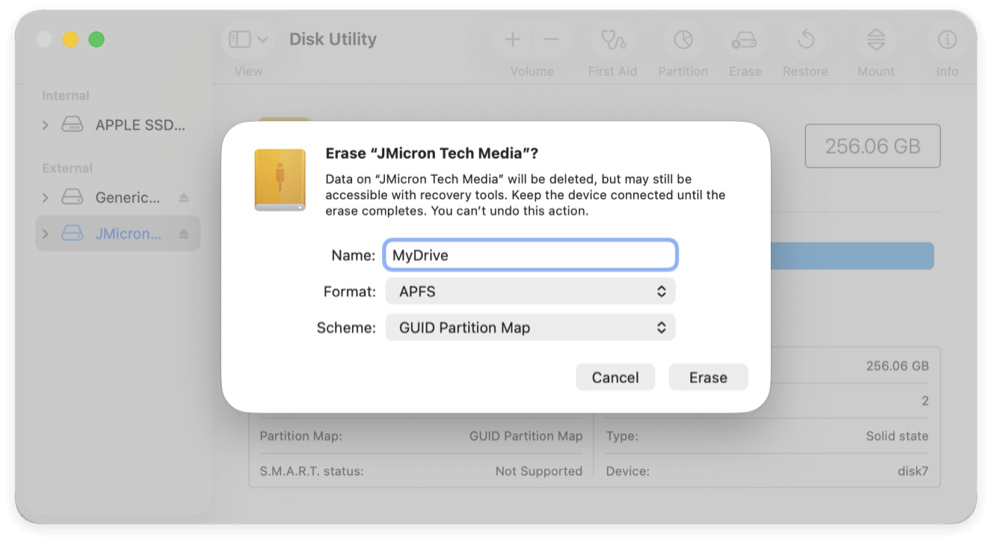
Step 4: Erase and Choose Format
- Click the Erase button in the toolbar.
- In the dialog box:
- Name: Enter a name for your drive (e.g., "BackupDrive" or "MyDrive", etc.).
- Format: Choose from APFS, Mac OS Extended, or exFAT.
- Scheme: Select GUID Partition Map (recommended for macOS).
- Click Erase to confirm.
![format an external hard drive for macOS Tahoe]()
- A warning may appear that all data will be erased. Confirm if you've backed up your files.
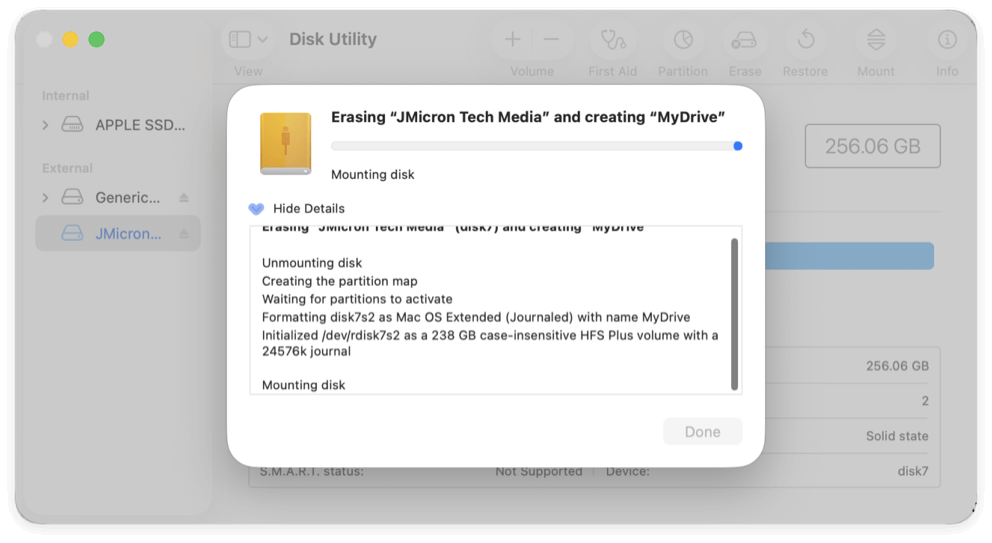
Step 5: Wait for Process to Complete
- Disk Utility will erase and format the drive.
- This usually takes seconds to a few minutes, depending on drive size.
- Once complete, you'll see a confirmation message.
![format an external hard drive for macOS Tahoe]()
Now your drive is ready to use on macOS Tahoe.
Advanced Formatting Options
Formatting isn't just about wiping a drive. macOS Tahoe offers advanced options for power users:
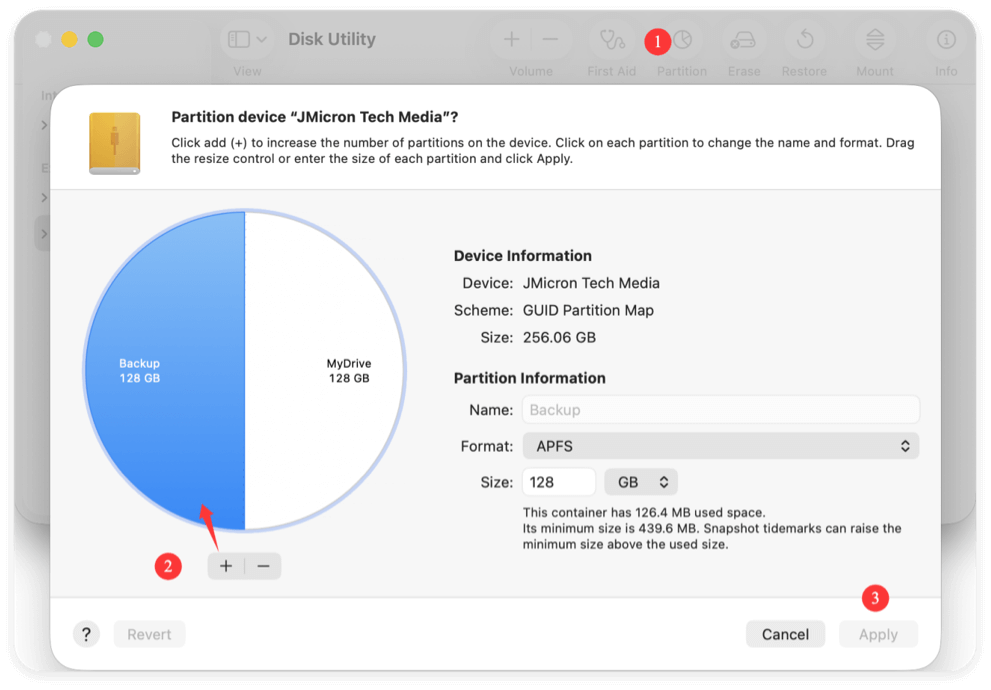
1. Partitioning the Drive
- Use Partition in Disk Utility to split the drive into multiple sections.
- Useful if you want separate spaces for backups, files, or cross-platform use.
![format an external hard drive for macOS Tahoe]()
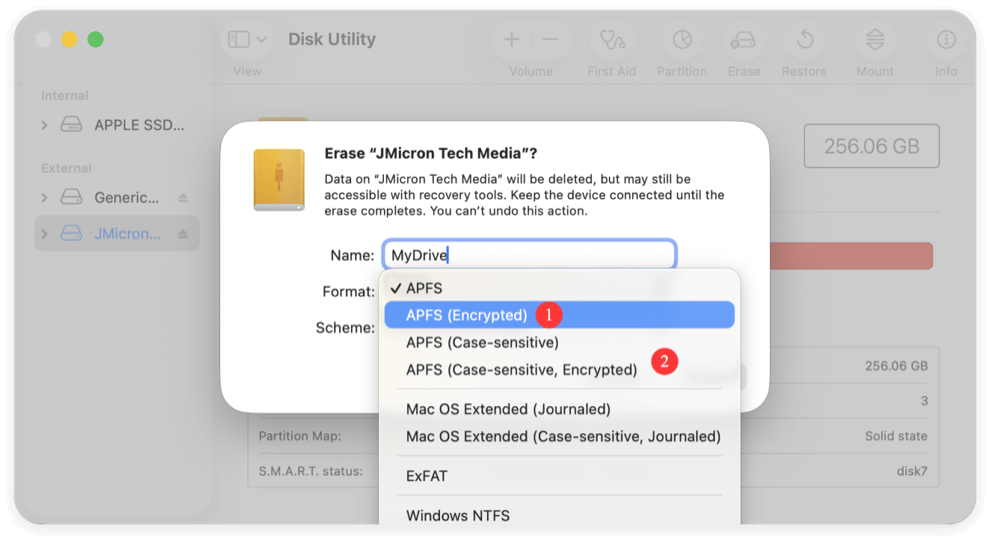
2. Encrypting the Drive
- Choose APFS (Encrypted) or APFS (Case-sensitive, Encrypted) during formatting.
- This adds a password lock, protecting your data if the drive is lost or stolen.
![format an external hard drive for macOS Tahoe]()
3. Using Terminal for Formatting
Advanced users can format drives via the Terminal app using commands like:
diskutil list
diskutil eraseDisk APFS "MyDrive" /dev/disk2
This method offers more control but should be used with caution.
4. Wipe External Drive Data Permanently on macOS Tahoe
Please note that if you only format an external hard drive, it can only remove the files from the hard drive. However, the data is still recoverable with professional data recovery methods. If you also want to ensure the data is gone forever, formatting the drive is not enough.
How to recover data from erased external hard drive?
With professional recovery software, it's easy to recover data from the external hard drive erased by Disk Utility.
Why do you want to wipe the data permanently from the external hard drive? For example, you may want to format an old drive and then sell it or give it to another person. In such cases, it's necessary to wipe the personal or sensitive data from the drive permanently first.
To wipe data from external hard drive on macOS Tahoe permanently, it's highly suggested to use a reliable and professional software, such as Donemax Data Eraser for Mac.
Donemax Data Eraser for Mac
- Most reliable data wiping tool for macOS Tahoe.
- Permanently wipe data from external drive and other devices.
- rase data with international data erasure algorithms.
The software is also very easy to use. With only a few clicks, you can easily wipe all data permanently from an external hard drive on macOS Tahoe. Here you can see the detail steps:
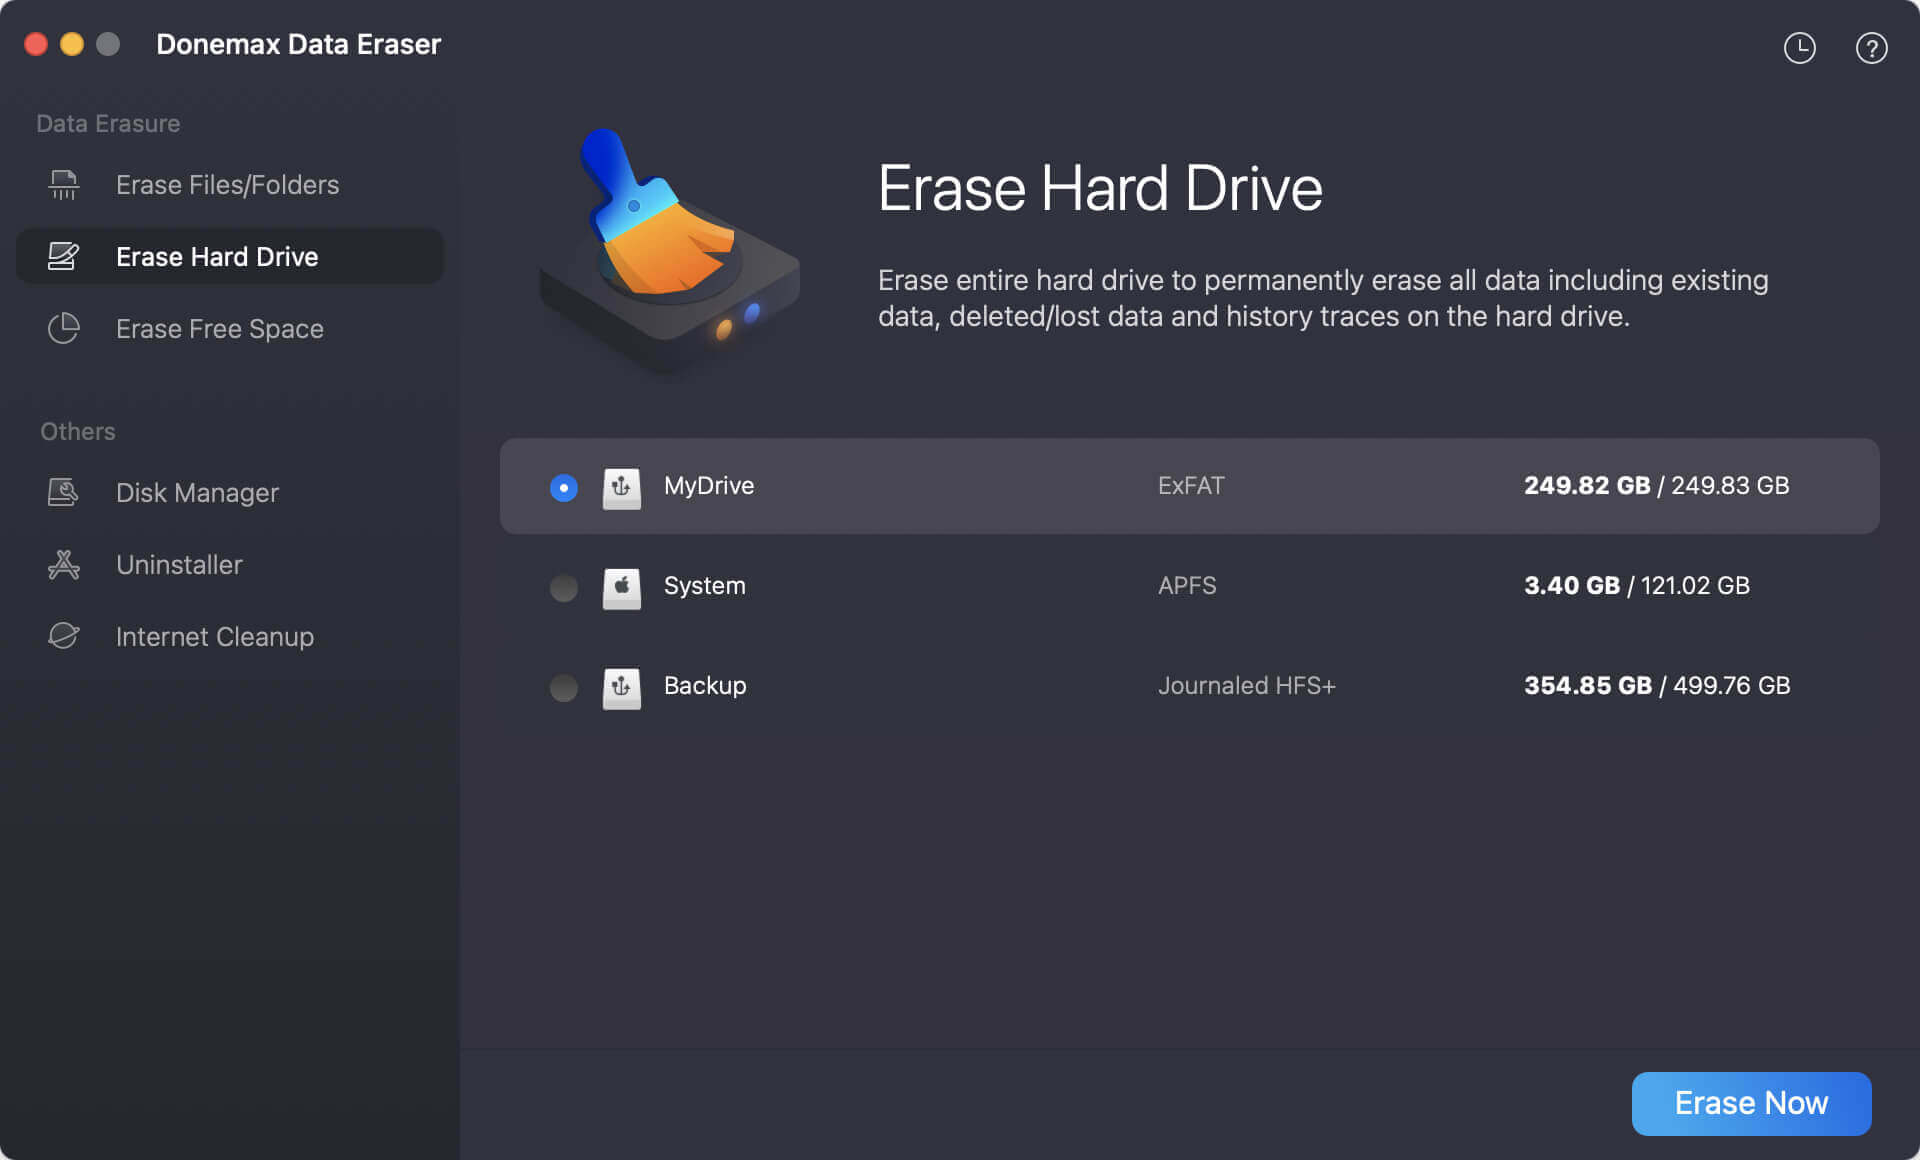
Step 1. Connect the external hard drive to the Mac and run the software Donemax Data Eraser for Mac. Choose the mode Erase Hard Drive. Choose the external hard drive you want to format and wipe. Click the Erase Now button.
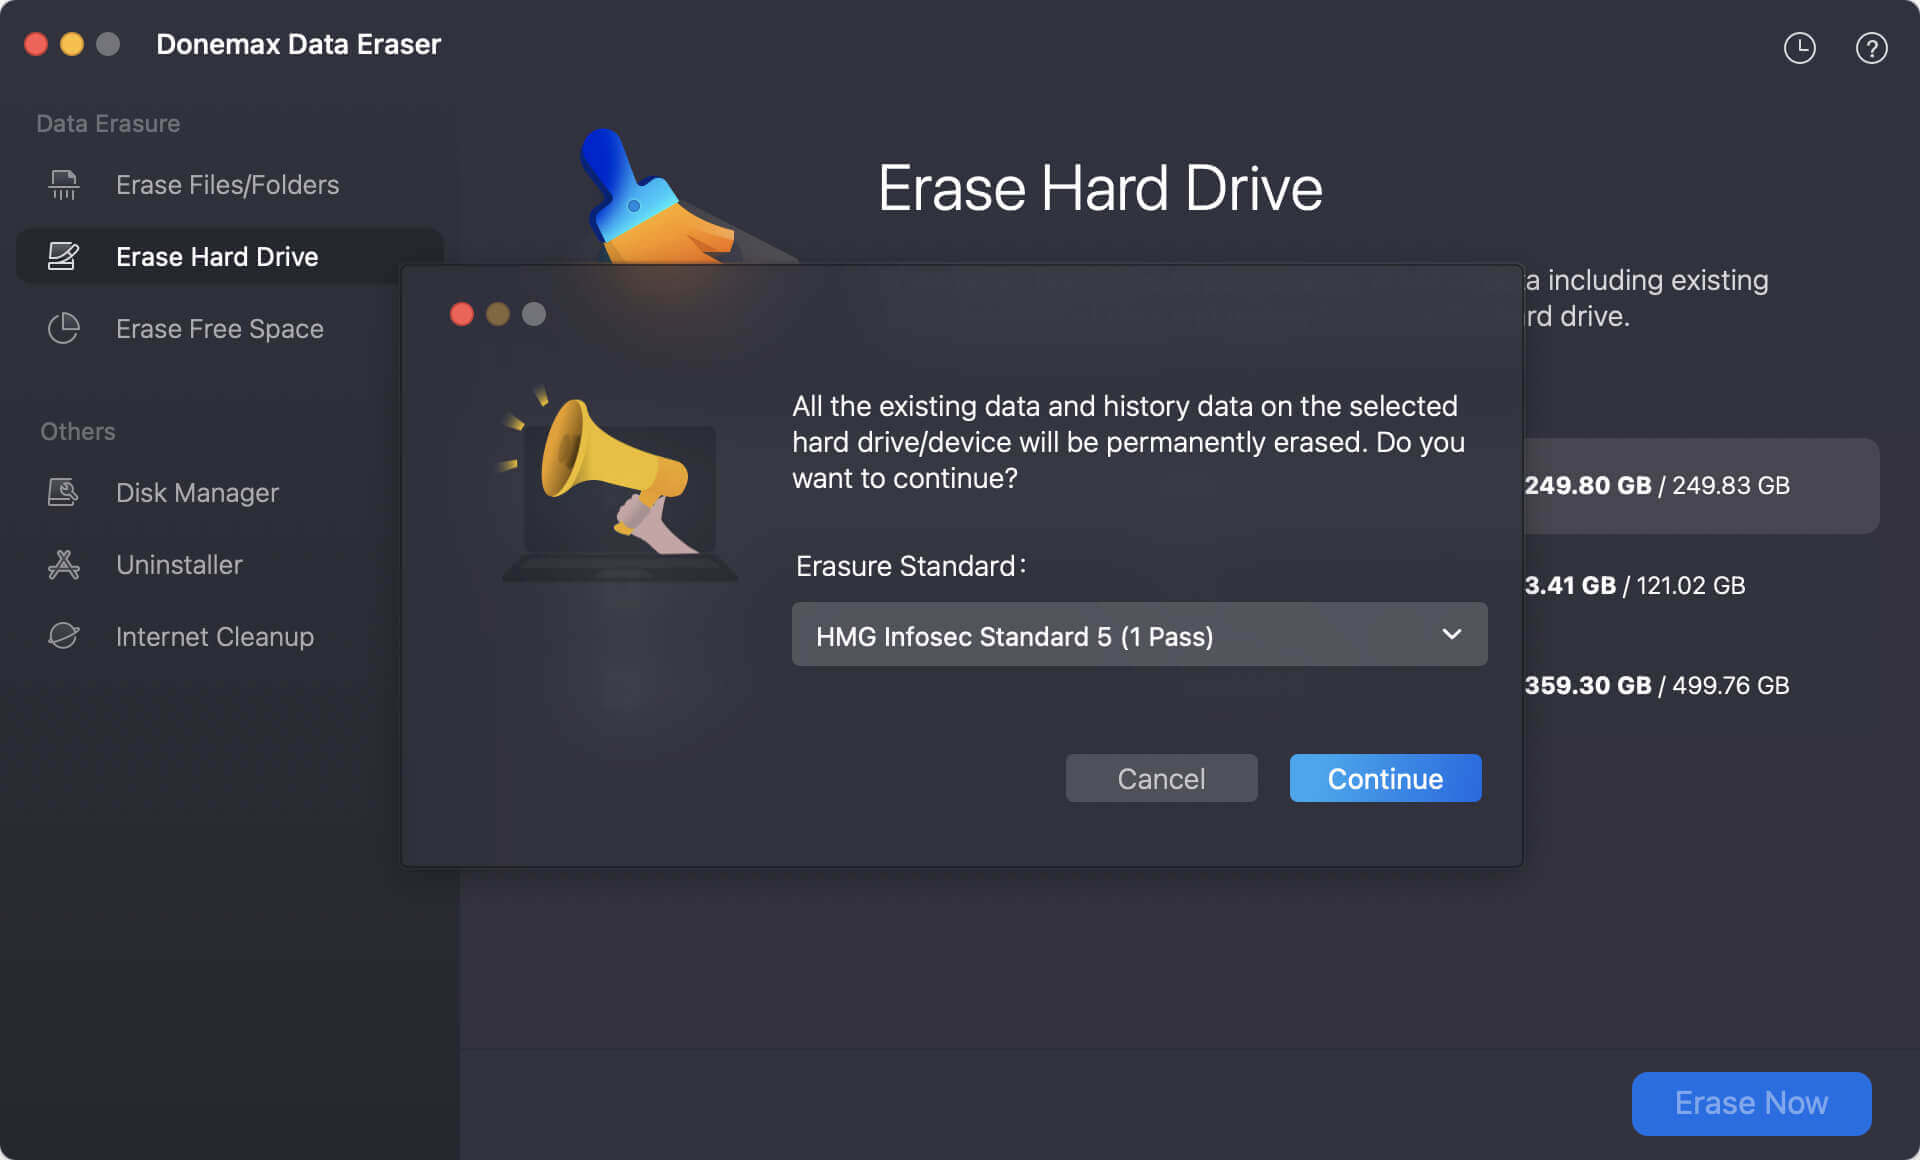
Step 2. Select the data erasure standard from the drop-down menu. Then click the Continue button.
Step 3. The software will start to wipe all data from the external hard drive. Also, it will reformat the external drive.
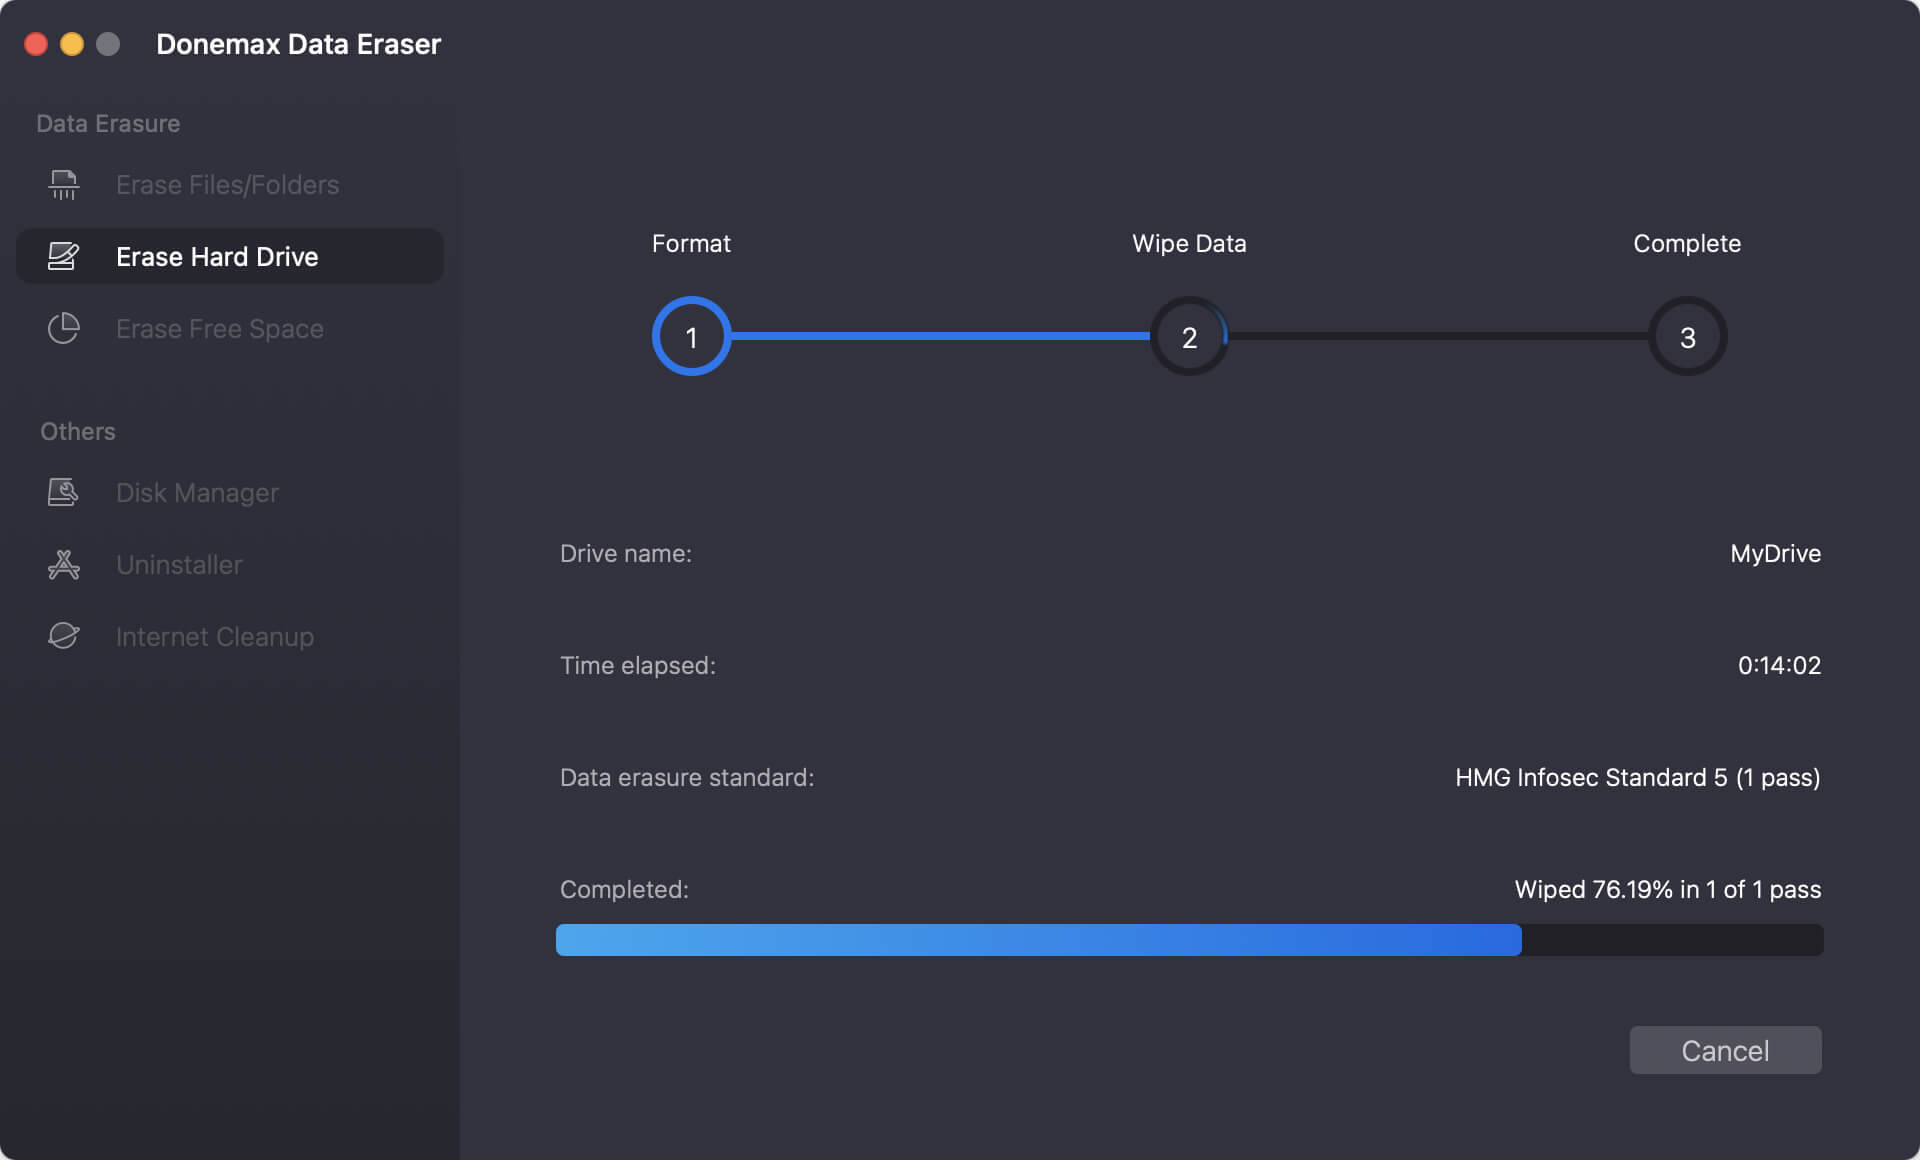
After the process is finished, all data on the external hard drive is gone permanently. There will be no chance to recover the erased data in any way.
Troubleshooting Formatting Issues
Sometimes formatting doesn't go smoothly. Here are common issues and solutions:
1. Drive Not Showing in Disk Utility
- Check cables and ports.
- Try a different USB/Thunderbolt port.
- Ensure the drive is powered on (for large desktop drives).
2. Format Option Grayed Out
- You may have selected a volume instead of the drive.
- Select the top-level drive in Disk Utility's sidebar.
3. "Erase Process Has Failed" Error
- Run First Aid in Disk Utility to repair the drive before retrying.
- If the drive still fails, try formatting with exFAT or using Terminal.
4. macOS Still Doesn't Recognize the Drive
- The drive may be corrupted or physically damaged.
- Try connecting it to another computer to test.
- If unreadable everywhere, consider professional data recovery services.
Best Practices After Formatting
Once your external hard drive is formatted for macOS Tahoe, follow these best practices to keep it healthy:
- Always Eject Safely
Before unplugging, right-click the drive in Finder and select Eject. This prevents corruption. - Label Your Drives
Give your drives clear names like "PhotosBackup" or "WorkDocs" for easy identification. - Run First Aid Periodically
Use Disk Utility's First Aid tool to check for and fix minor file system issues. - Consider Time Machine Backups
If using the drive for backups, set it up with Time Machine. macOS Tahoe will prompt you automatically. - Monitor Drive Health
Keep an eye on performance. If you notice slow speeds or frequent disconnects, back up your data immediately.
Conclusion
Formatting an external hard drive in macOS Tahoe is straightforward with Disk Utility. The key is choosing the right file system for your needs:
- APFS for macOS-only use and SSDs.
- HFS+ for older Mac compatibility.
- exFAT for cross-platform sharing with Windows.
With proper formatting, your drive will perform reliably, store data safely, and work seamlessly with macOS Tahoe. Always back up before formatting, eject drives safely, and run maintenance checks to prevent issues.
By following this guide, you'll ensure your external hard drive is optimized and ready for years of use.
Donemax Data Eraser for Mac
100% safe and powerful Mac data erasure program. It offers certified data erasure standards including U.S. Army AR380-19, DoD 5220.22-M ECE to help in securely and permanently erase data from Mac HDD/SSD and external storage device, making data recovery be impossible.
Related Articles
- Jun 16, 20257 Reliable Mac Disk Wipe Software – Expert Picks
- Apr 20, 2026How to Factory Reset macOS Tahoe: 2 Easy & Secure Ways (2026)
- May 12, 2026Factory Reset macOS Sequoia: A Comprehensive Guide
- Dec 03, 2024How to Factory Reset a Mac Without Password?
- Feb 29, 2024How to Format Mac Startup Disk?
- Aug 21, 2023How to Erase An Intel-based Mac?

Contributing Writer
Charles
Charles, who lives in Sydney, Australia, is an editor & writer of Donemax Team. He is good at writing articles related with Apple Mac computers, Windows operating systems, data recovery, data erasure, disk clone and data backup, etc. He loves reading and playing tennis in his spare time and is interested in testing new digital devices such as mobile phones, Macs, HDDs, SSDs, digital cameras, etc.

Editor in chief
Gerhard Chou
In order to effectively solve the problems for our customers, every article and troubleshooting solution published on our website has been strictly tested and practiced. Our editors love researching and using computers and testing software, and are willing to help computer users with their problems