
Written byCoco LinUpdated on Jul 09, 2025
How to Format an External Hard Drive for macOS Tahoe 26?
Approved byGerhard Chou
Before we start: Formatting an external hard drive is free and easy with macOS built-in tools Disk Utility and Terminal. To ensure data is wiped permanently while formatting external drive on macOS Tahoe 26, you can use professional data erasure software Donemax Data Eraser for Mac.
PAGE CONTENT:
With the release of macOS Tahoe 26, Apple continues to refine its operating system with new features, improved security, and enhanced compatibility for external devices. Whether you're setting up an external hard drive for backups, file storage, or transferring data between devices, formatting the drive correctly ensures optimal performance and seamless integration with your Mac.
This comprehensive guide walks you through everything you need to know about formatting an external hard drive for macOS Tahoe 26. We'll cover preparation steps, formatting procedures using Disk Utility and Terminal, choosing the right file system, troubleshooting common issues, and best practices for external drive maintenance.
Why You Need to Format an External Hard Drive for macOS Tahoe 26
When you purchase a new external hard drive, it often comes pre-formatted with file systems designed for Windows, such as NTFS, which macOS can only read, not write. To use your drive effectively with macOS Tahoe 26—whether for Time Machine backups, general file storage, or creating bootable media—you'll need to reformat it to a Mac-compatible file system.
Additionally, formatting can:
- Improve drive performance
- Ensure compatibility with your intended devices
- Allow partitioning or encryption setup
- Erase corrupted files or resolve errors
Important Considerations Before Formatting
Before you begin formatting, keep these critical points in mind:
1. Backup Your Data
Formatting erases all existing data on the drive. Ensure you've backed up any important files before proceeding.
You can use Time Machine to back up macOS Tahoe 26 automatically and create incremental backups. Also, third-party tool like Donemax Disk Clone for Mac can back up data on external hard drive on macOS Tahoe 26. Also, the tool can make full and bootable clone backup.
2. Understand File System Options
Selecting the right file system depends on how you plan to use your external drive:
APFS (Apple File System)
APFS, introduced by Apple in macOS High Sierra, is designed specifically for modern Mac environments, offering advanced features such as:
- Faster read/write performance, especially on SSDs
- Built-in encryption options
- Space sharing (multiple volumes dynamically share space)
- Snapshots for easy backups and system restores
- Native support for case sensitivity (optional)
When to Use APFS:
- You intend to use the drive exclusively with macOS Tahoe 26 or newer
- The drive is an SSD or flash-based device
- You need the highest performance, security, and reliability
- You want to create Time Machine backups (Time Machine requires APFS for newer macOS versions)
Limitations:
- Not readable by older macOS versions (pre-High Sierra)
- Limited or no compatibility with Windows or non-Apple devices
- Some backup software outside of Time Machine may not support APFS
Mac OS Extended (Journaled) – HFS+
Mac OS Extended (Journaled), commonly referred to as HFS+, is the older standard macOS file system. While APFS has largely replaced it for most modern workflows, it remains relevant for:
- Mechanical hard drives (HDDs)
- Backward compatibility with older Macs
- Certain legacy software requirements
Key Features:
- Journaling helps protect against data corruption during power loss or system crashes
- Compatible with older macOS versions (pre-High Sierra)
- Can be encrypted for added security
When to Use Mac OS Extended (Journaled):
- You're using an older external HDD with a traditional spinning platter
- You need compatibility with Macs running versions before macOS High Sierra
- You plan to use the drive for Time Machine backups on older systems
Limitations:
- Slower performance on SSDs compared to APFS
- Gradually being phased out in favor of APFS for newer macOS workflows
- No native support for use with Windows or other operating systems
exFAT – Cross-Platform Compatibility
 exFAT (Extended File Allocation Table) is designed for seamless use between macOS and Windows systems. It overcomes the limitations of older FAT32 formatting by:
- Supporting files larger than 4GB
- Offering compatibility with most modern operating systems
- Working well with flash drives, external HDDs, and SSDs
When to Use exFAT:
- You frequently transfer files between Mac and Windows computers
- You need to store large files (movies, ISO images, backups) exceeding 4GB
- You use the external drive with devices like gaming consoles, smart TVs, or cameras (check device compatibility)
Limitations:
- Lacks journaling, which increases the risk of data corruption in case of improper ejection
- No built-in encryption through macOS Disk Utility
- Less resilient for critical backups or long-term storage compared to APFS or HFS+
FAT32 – Legacy Support for Older Devices
 FAT32 is a decades-old file system known for its universal compatibility but significant limitations:
- Max file size of 4GB
- Max partition size of 2TB (practical limit)
- Works across most devices, including older computers, cameras, printers, and smart appliances
When to Use FAT32:
- You need maximum compatibility with older hardware or legacy systems
- File sizes remain below 4GB
- The drive will be used for firmware updates, boot loaders, or small file transfers
Limitations:
- File size and partition size restrictions make FAT32 unsuitable for modern storage needs
- Higher risk of file fragmentation
- Lacks journaling and security features
- Not recommended for external drives used for daily data storage or backups
Different file systems offer unique benefits depending on your needs:
| File System | Best For | Notes |
|---|---|---|
| APFS | SSDs, general Mac use, security | Modern, efficient, encryption-friendly |
| HFS+ | Older Macs, HDDs, Time Machine backups | Classic macOS file system, journaled for safety |
| exFAT | Sharing between macOS and Windows | Large file support, no journaling |
| FAT32 | Older devices, cross-platform use (small files) | Max 4GB file size, limited for modern use |
💡 Note: APFS is recommended for macOS Tahoe 26 unless you require cross-platform compatibility.
3. Consider Encryption Needs
macOS offers native encryption options. If storing sensitive data, consider encrypting the drive during formatting.
3 Methods to Format an External Hard Drive on macOS Tahoe 26
With proper formatting tools for macOS Tahoe 26, it's easy to format an external hard drive on Mac. Several macOS built-in tools or third-party tools are available to accomplish the task. Here we will outline 3 popular methods to wipe hard drive on macOS Tahoe.
Method 1. Format an External Hard Drive Using Disk Utility
Disk Utility is the built-in macOS tool for managing drives. Follow these steps:
Step 1: Connect Your External Hard Drive
Plug your external hard drive into your Mac. If it's a newer Mac with only USB-C or Thunderbolt ports, you may need an adapter.
Step 2: Launch Disk Utility
- Click the Finder icon
- Go to Disk Utility from Utilities via Applications.
- You can also type "Disk Utility" into Spotlight Search (Command + Space).
Step 3: Locate the External Drive
In Disk Utility's sidebar, look for your external drive under the "External" section. Be careful not to select your internal system drive.
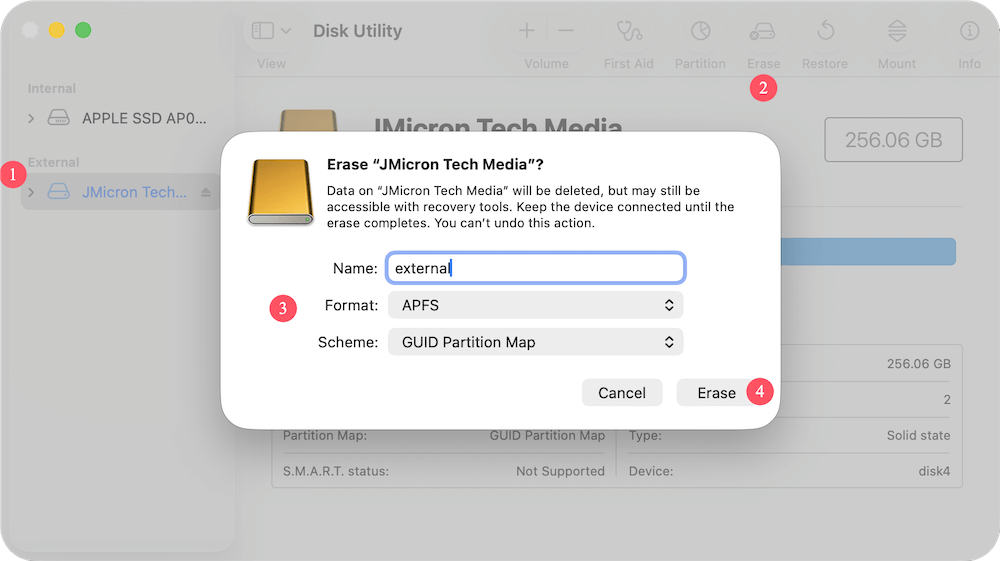
Step 4: Erase and Format the Drive
- Select the external drive
- Click the Erase button at the top
- Enter the following details:
- Name: Choose a recognizable name for your drive
- Format: Select from APFS, Mac OS Extended (Journaled), exFAT, or FAT32
- Scheme: Choose GUID Partition Map (recommended for modern Macs)
· Click Erase to initiate the process
Step 5: Wait for the Process to Complete
The process typically takes a few seconds to a few minutes, depending on drive size. Once finished, your drive is ready for use with macOS Tahoe 26.
Method 2: Format and External Hard Drive Using Terminal
For advanced users comfortable with the command line, Terminal provides powerful formatting options.
Step 1: Open Terminal
- Go to Applications → Utilities → Terminal
- Alternatively, use Spotlight Search to open Terminal
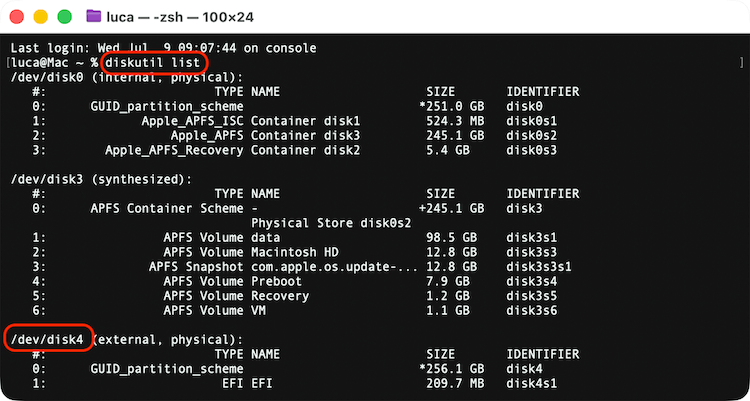
Step 2: Identify the Drive
Type the command:
diskutil list
Find your external drive in the list. Note the disk identifier, e.g., disk4.
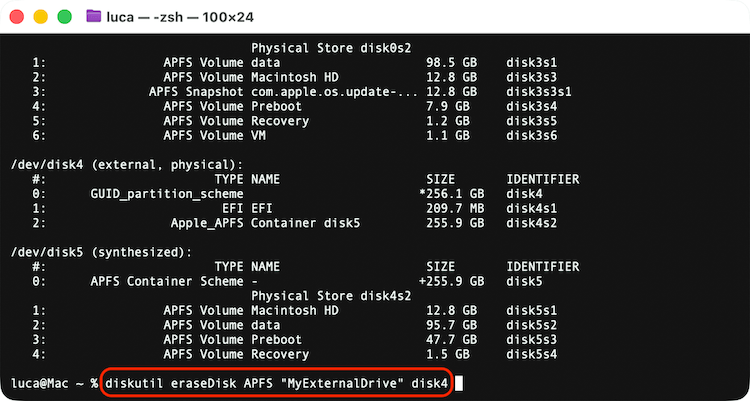
Step 3: Format the Drive
Use the diskutil eraseDisk command. Example for formatting as APFS:
diskutil eraseDisk APFS "MyExternalDrive" disk4
Replace "MyExternalDrive" with your preferred name and disk2 with your correct disk identifier.
Other format options:
- JHFS+ for Mac OS Extended (Journaled)
- ExFAT for exFAT
- MS-DOS FAT32 for FAT32
💡 Caution: Using Terminal incorrectly can erase the wrong drive. Always double-check identifiers before proceeding.
Method 3: Format and Wipe External Hard Drive Data Permanently
In special cases, formatting an external hard drive simply is not enough. For example, you may need to sell or give away an old external drive. The data can be recovered after a quick format.
How to make sure the data is gone forever? It's essential to wipe the data permanently with professional tools. Donemax Data Eraser for Mac is a data wiping tool for macOS. It can wipe data on macOS Tahoe 26 and ensure the wiped data cannot be recovered in any way.
Donemax Data Eraser for Mac
- Format external drive and wipe data permanently.
- Ensure wiped data cannot be recovered with any recovery tools.
- Three data erasure modes for different data wiping requirements.
Download and install the software on your Mac. Then run the software Donemax Data Eraser for Mac. Follow the steps below to completely destroy data on an external hard drive:
Step 1. Connect the external hard drive to the Mac and choose Erase Hard Drive mode in Donemax Data Eraser for Mac.
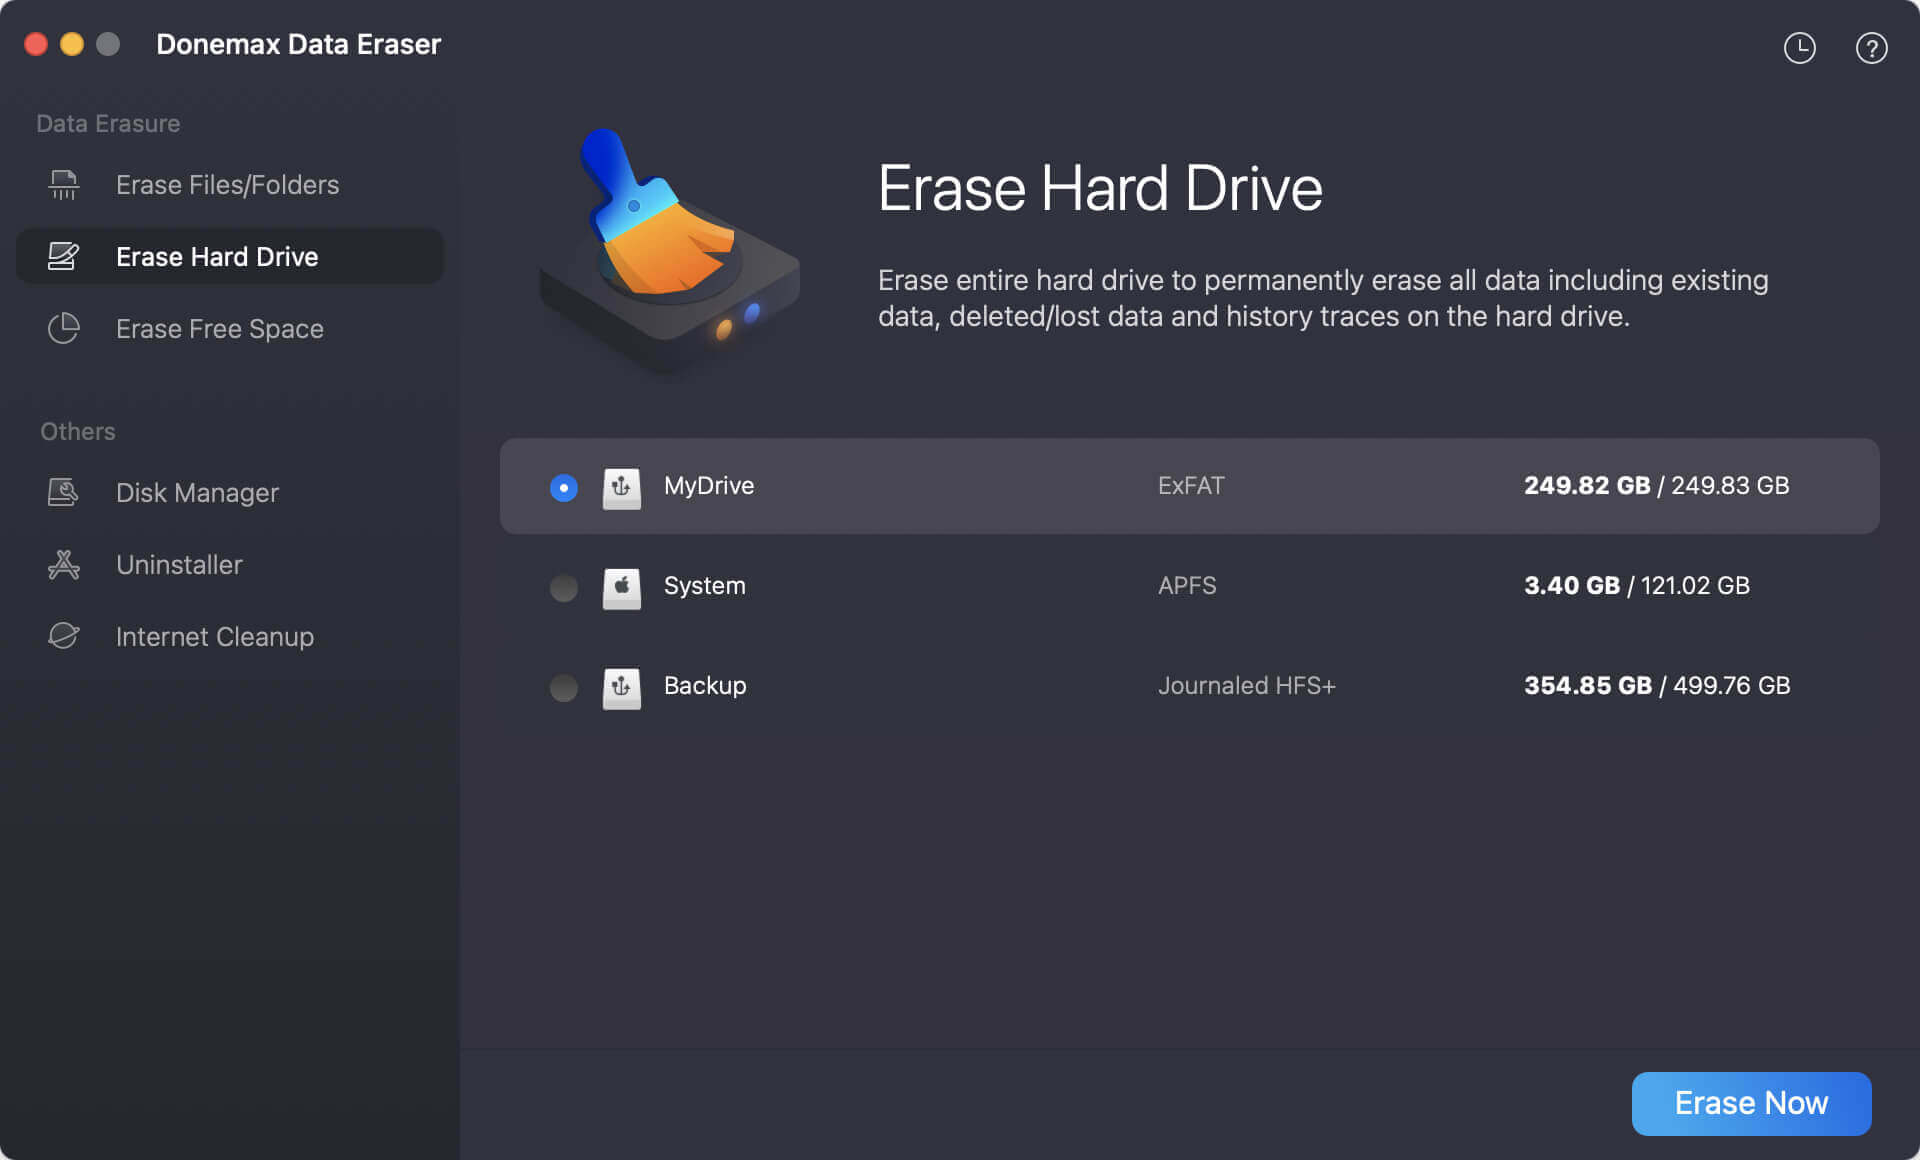
Step 2. To completely destruct data on external drive, choose one data erasure standards.
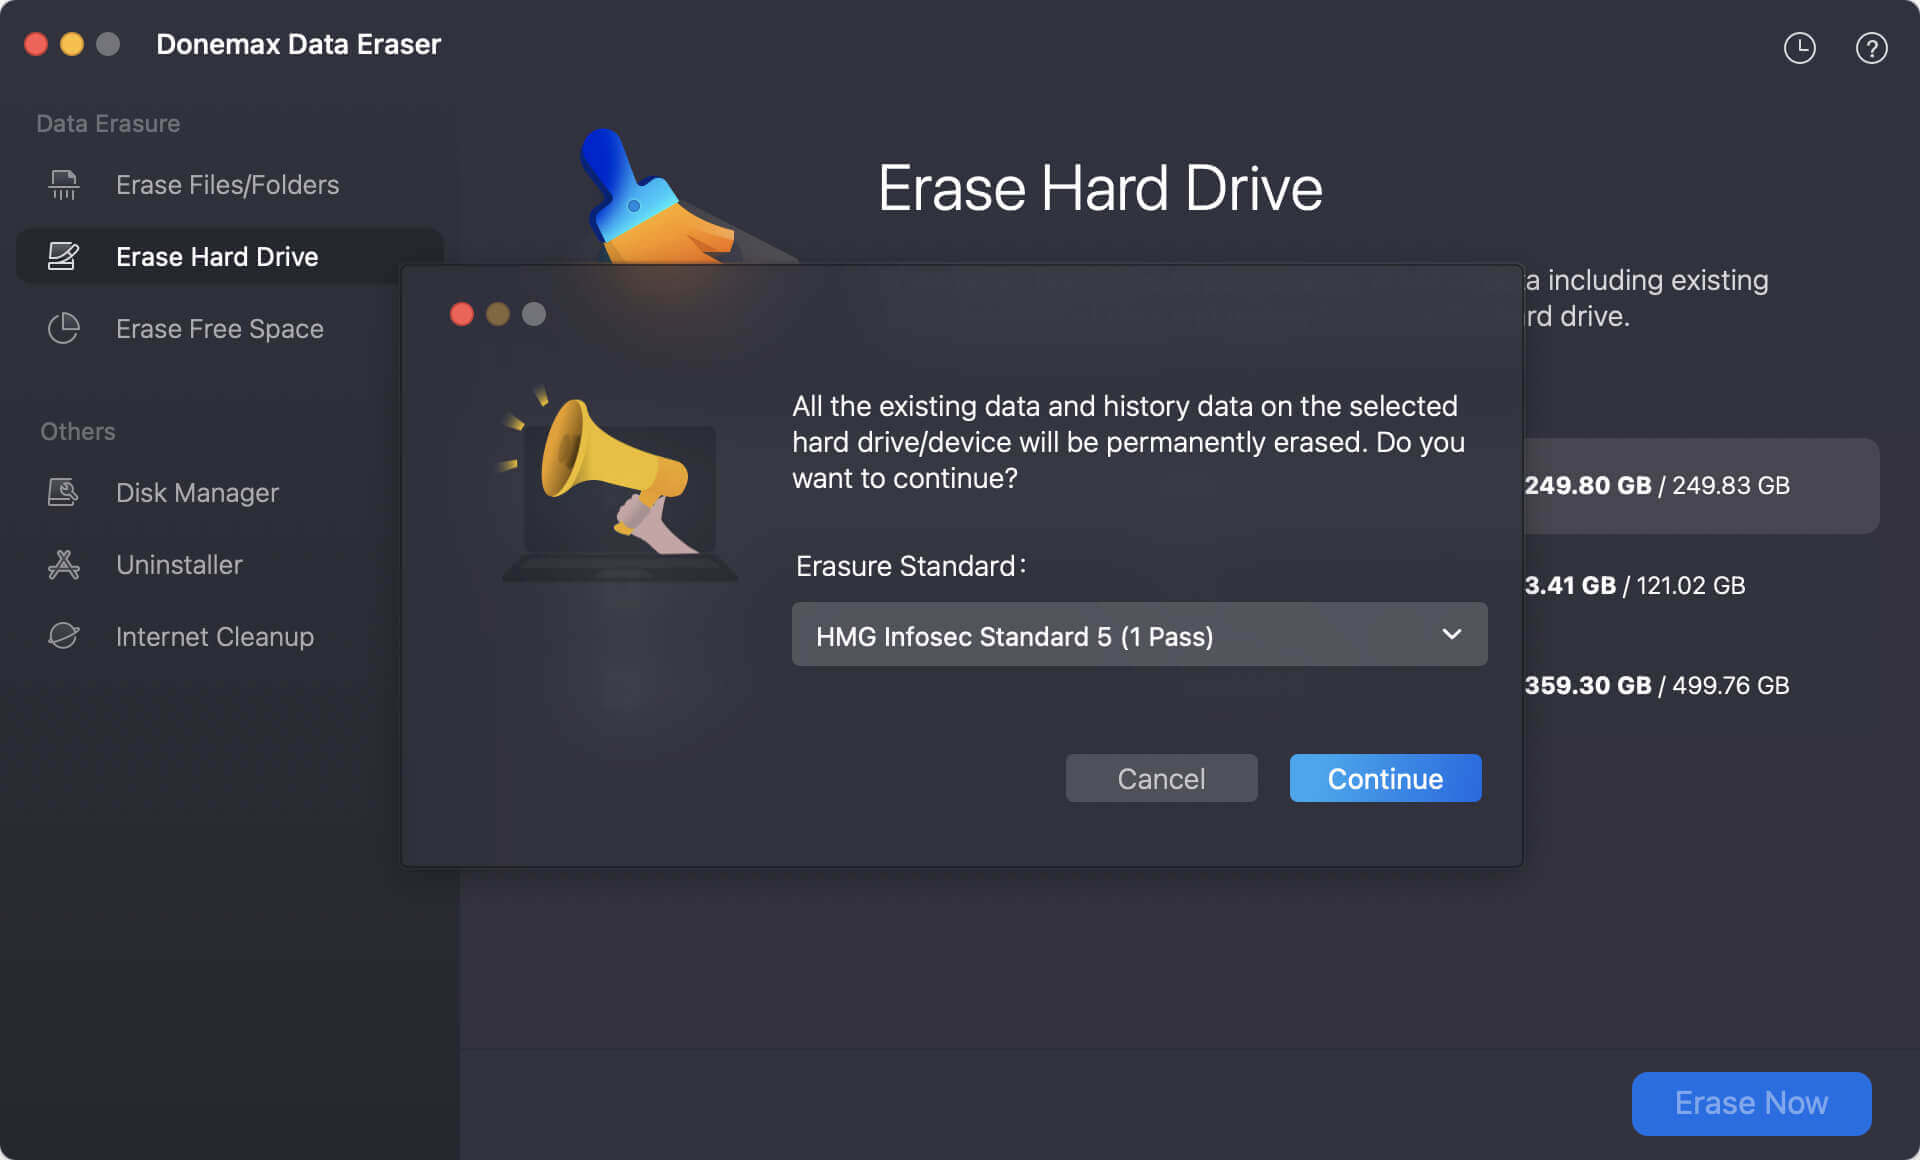
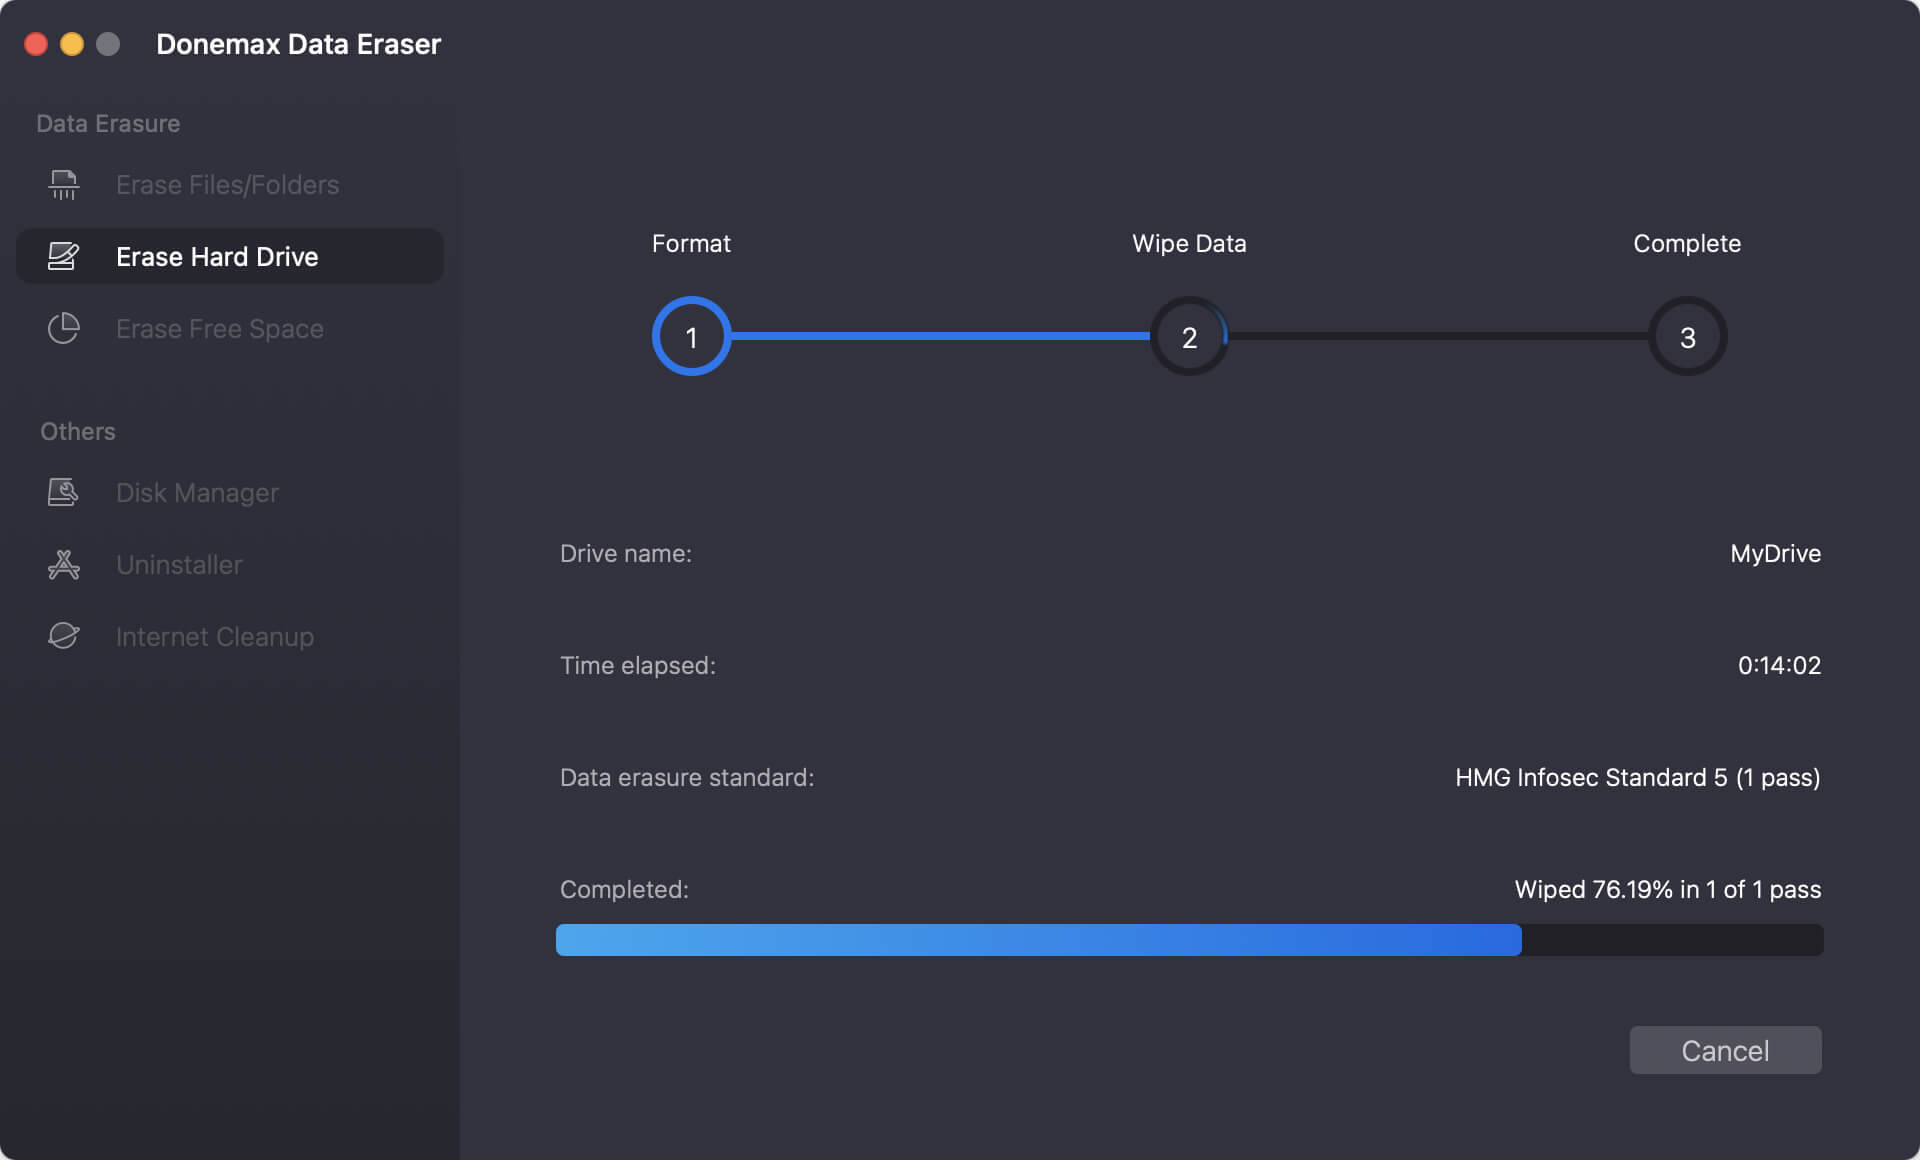
Step 3. Click the Continue button and the software will start to wipe all data permanently from the external hard drive.
Troubleshooting Common External Drive Formatting Issues
Formatting an external hard drive is generally straightforward, but you may encounter problems. Here's how to address them:
1. Drive Not Showing Up in Disk Utility
- Check physical connections and try different ports
- Test the drive on another computer
- If it still doesn't appear, the drive may be faulty
2. Erase Option is Grayed Out
- Ensure you've selected the parent drive, not just a volume under it
- Restart your Mac and try again
- Boot into macOS Recovery Mode (hold Power button during startup) and access Disk Utility
3. Errors During Formatting
- Run First Aid in Disk Utility:
- Select the drive
- Click First Aid and let it scan and repair the disk
- If errors persist, consider formatting via Terminal (covered below)
4. External Drive is Read-Only
- Likely formatted in NTFS (Windows format). In such a case, you can use Microsoft NTFS driver tool, like Donemax NTFS for Mac to make it writable.
- Reformat to a macOS-compatible file system like APFS or exFAT
Maintaining External Hard Drive on macOS Tahoe 26
Proper maintenance helps extend the life of your external hard drive:
1. Safely Eject the Drive
Always eject your external drive by:
- Dragging it to the Trash
- Right-clicking and selecting Eject
- Using Finder's sidebar eject button
2. Run Disk Utility First Aid Periodically
- Open Disk Utility
- Select your external drive
- Click First Aid to check for and repair errors
3. Keep Regular Backups
Even reliable drives can fail unexpectedly. Maintain backups of essential files to prevent data loss.
4. Monitor Drive Health
For SSDs and some external drives, manufacturers offer utilities to check health status. Use these tools if available.
5. Reformat When Necessary
Over time, file systems can become fragmented or corrupted. If you notice performance issues, consider reformatting after backing up your data.
Conclusion
Formatting an external hard drive for macOS Tahoe 26 ensures full compatibility, optimal performance, and data security. Whether you're using the drive for Time Machine backups, file storage, or cross-platform sharing, choosing the correct file system and following best practices is essential.
With these steps, you can confidently prepare your external hard drive for use with macOS Tahoe 26, ensuring a smooth, reliable experience.
Donemax Data Eraser for Mac
100% safe and powerful Mac data erasure program. It offers certified data erasure standards including U.S. Army AR380-19, DoD 5220.22-M ECE to securely and permanently erase data from Mac HDD/SSD and external storage devices, making data recovery impossible.
Related Articles
- Apr 15, 2025How to Wipe APFS Volume on Mac: A Complete Guide
- Apr 14, 2026How to Permanently Erase Files and Folders on Your Mac?
- Oct 17, 2025Permanently Erase Data from Digital Camera on Mac
- Apr 10, 2026How to Safely Factory Reset macOS Big Sur: Wipe Data for Resale
- Jun 16, 2026Wipe Everything on macOS Ventura: Factory Reset macOS Ventura
- Jun 20, 2025How to Permanently Delete a RTF File on Mac?

Contributing Writer
Coco Lin
Coco has been a writer and a chief programmer at Donemax software since 2018. Over 10 years of experience of writing troubleshooting articles in the software industry, she is passionate about programming and loves to providing solutions to Windows and Mac users. Also she enjoys music and palying tennis in her free time.

Editor in chief
Gerhard Chou
In order to effectively solve the problems for our customers, every article and troubleshooting solution published on our website has been strictly tested and practiced. Our editors love researching and using computers and testing software, and are willing to help computer users with their problems