
Written byStevenUpdated on Jul 15, 2025
Best 3 Methods to Wipe HFS+ Drive on Mac: A Complete Step-by-Step Guide
Approved byGerhard Chou
Before we start: To avoid data leakage, you'd better wipe your HFS+ drive before selling or donating it. Donemax Data Eraser for Mac is an award-winning disk wipe program. It can securely wipe HFS+ drive and permanently erase all data from the drive beyond the scope of data recovery.
PAGE CONTENT:
Wiping an HFS+ (Mac OS Extended) drive on a Mac is a crucial step whether you're selling your computer, repurposing an old external drive, or simply trying to start fresh. Unlike simple file deletion, wiping a drive ensures that data is completely and securely erased - making it unrecoverable through standard recovery methods.
In this comprehensive guide, we'll explain what an HFS+ drive is, why and when you should wipe it, and provide step-by-step instructions using Disk Utility, Terminal, and third-party disk wipe software tools. Let's get started.
What is an HFS+ Drive?
HFS+ (Hierarchical File System Plus), also known as Mac OS Extended, is a file system developed by Apple. It was the primary file system for macOS from 1998 until the introduction of APFS (Apple File System) in macOS High Sierra (2017). You might still encounter HFS+ in:
- Older Mac internal drives
- Time Machine backup drives
- External hard drives formatted for macOS
HFS+ supports journaling, which helps prevent data corruption. However, over time or due to formatting needs, it may become necessary to completely wipe the drive.
Why Wipe an HFS+ Drive?
You might need to wipe an HFS+ drive for several reasons:
- Selling or donating your Mac or external drive: Wiping ensures your personal data can't be recovered.
- Fixing file system corruption: A fresh start can resolve disk errors.
- Changing file system format: Switching to APFS or exFAT requires erasing the drive.
- Removing malware or persistent files: Wiping clears hidden system or unwanted files completely.
Wiping a drive is far more secure than dragging files to the Trash or even formatting without overwrite.
Important Preparations Before Wiping HFS+
Before you begin, take these steps:
1. Backup Your Data
Wiping a drive erases everything. Use Time Machine, disk cloning software, iCloud Drive, or an external disk to back up important files.
2. Verify the Drive
Open Disk Utility (Applications > Utilities) and make sure the drive you want to wipe appears and is mounted.
3. Is It a Boot Drive?
If you're wiping your internal boot drive, ensure you're doing this through macOS Recovery Mode or an external installer, as you can't erase a drive while it's running the OS.
Best 3 Methods to Format and Wipe HFS+ Drive on Mac
Before wiping the HFS+ drive, ensure you've backed up the important data to another drive or iCloud.
Method 1: Wipe HFS+ Drive Using Disk Utility
Disk Utility is macOS's built-in tool for managing and erasing drives. Here's how to securely wipe an HFS+ drive:
Disk Utility is the built-in macOS tool for managing disks and volumes. It offers a simple interface for users to erase, partition, and reformat internal or external drives, making it a preferred option for most users who want to wipe their HFS+ drive without using Terminal or third-party apps.
Detailed Step-by-Step Instructions:
1. Open Disk Utility
- Go to Disk Utility from Utilities via Applications or search for "Disk Utility" using Spotlight (Command + Space).
![erase HFS+ on Mac]()
- Once opened, you'll see a list of all connected drives and their volumes on the left-hand panel.
![erase HFS+ on Mac]()


2. Select the Correct Drive
- It's critical to select the physical drive (e.g., "APPLE HDD HTS541010A9E662 Media"), not just the volume (e.g., "Macintosh HD").
- Selecting the physical drive ensures that the entire disk is wiped, not just a single partition or volume.
3. Click the "Erase" Button
At the top of the Disk Utility window, click Erase.

A dialog box will prompt you to enter:
- Name: You can enter any name for the drive (optional).
- Format: Choose Mac OS Extended (Journaled) if you want to keep it in HFS+ format. Other options include:
- APFS – better for SSDs and newer macOS systems
- ExFAT – suitable for cross-platform compatibility
- Scheme: Choose GUID Partition Map (standard for most Intel- and Apple Silicon-based Macs).
![erase HFS+ on Mac]()

4. Use the "Security Options" (for Old macOS Versions)
- Click the "Security Options…" button (only visible for HDDs, not SSDs).
![erase HFS+ on Mac]()
- You'll see a slider with four options:
- Fastest – Quick erase with minimal overwrite (data might be recoverable).
- Single-Pass Zero Fill – Overwrites data with zeros once.
- 3-Pass – U.S. Department of Energy standard.
- 7-Pass – U.S. Department of Defense (DoD) 5220.22-M standard.
- For most personal data, 3-pass is sufficient. For sensitive or regulatory data, opt for 7-pass.

💡 Note: If your drive is an SSD or the macOS is macOS Ventura or later, the Security Options button won't appear because modern SSDs use TRIM and wear leveling, which manage data differently. For SSDs, a standard erase is usually enough.
5. Begin the Wipe Process
After selecting your options, click Erase.

The process may take a few minutes to several hours, depending on:
- Drive size
- Type (HDD vs SSD)
- Number of overwrite passes selected
![erase HFS+ on Mac]()

6. Confirmation
- Once the process is complete, Disk Utility will notify you.
- If you wish to use the drive again immediately, format it to the desired file system (HFS+, APFS, exFAT).
- If this was your internal boot drive, you may now proceed to reinstall macOS via macOS Recovery (Command + R at startup for Intel-based Mac).
Pros
- Simple graphical interface
- Built-in and free
- Offers secure erase for HDDs
Cons
- The erased data still can be recovered by data recovery software.
- Secure erase not available for SSDs
- Not as flexible as Terminal for scripting or automation
Method 2: Wipe HFS+ Drive Using Terminal
For power users and advanced operations, Terminal offers more control.
Steps:
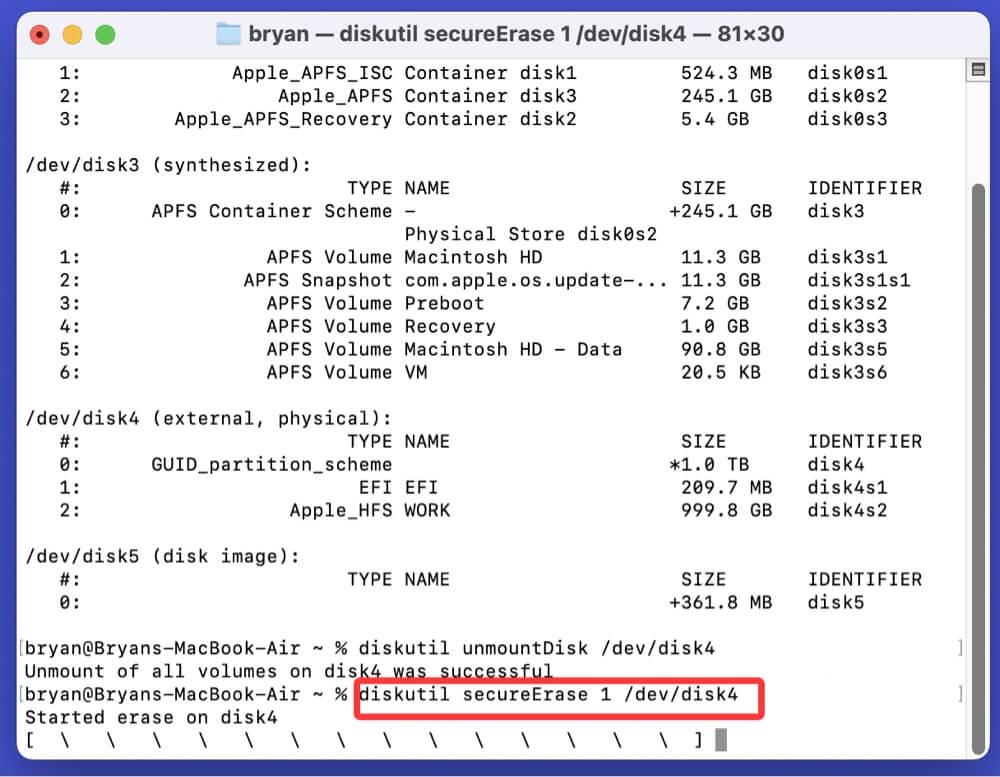
Step 1. Open Terminal: Go to Applications > Utilities > Terminal. Open Terminal application.

Step 2. List All Disks
diskutil list
Note your target drive's identifier (e.g., /dev/disk4)

Step 3. Unmount the Drive (Optional)
diskutil unmountDisk /dev/disk4

Step 4. Use Secure Erase Command
diskutil secureErase LEVEL /dev/disk2
Replace LEVEL with:
- 0: Single-pass zeros (fast)
- 1: Single-pass random
- 2: 7-pass erase (DoD compliant)
- 3: 35-pass (Gutmann)
- 4: Secure erase by writing zeros (HFS+ only)
Example:
diskutil secureErase 1 /dev/disk4
Note:
- Only works on rotational hard drives (HDDs), not SSDs
- SSDs ignore most overwrite commands due to wear leveling
Pros
- Full control over erasure method
- Scripting-friendly for admins
Cons
- Not user-friendly
- Mistakes can wipe the wrong drive
- Data still can be recovered.
Method 3: Wipe HFS+ Drive Using Third-Party Disk Wipe Tool
If Disk Utility or Terminal feels limiting, third-party disk wipe software can securely erase drives on Mac.
Donemax Data Eraser for Mac is one of the best Mac disk wipe software. It can securely and easily wipe hard drives, SSDs, USB flash drives, memory cards on Mac, ensure no data is recoverable.
Now, let's see how to use this disk wipe software to wipe a HFS+ drive on Mac:
Step 1. Download and install Donemax Data Eraser for Mac on your Mac, run it from Launchpad.
Step 2. After launching Donemax Data Eraser for Mac, choose Erase Hard Drive mode. Then select the HFS+ drive you want to wipe.

Step 3. Click on Erase Now button. You can choose a data erasure standard, then click on Continue button.

It will securely format and wipe the selected HFS+ drive. All data stored on the drive will be erased permanently, no trace left behind.

💡 Note: Once the process gets finished, all data including existing data, hidden data, deleted/formatted/lost data stored on the HFS+ drive is lost for good, can't be recovered by any method.
Wiping HFS+ Drive on Mac Tips and FAQs
What to Do After Wiping the Drive
Once the drive has been wiped, you'll need to prepare it for use again.
1. Reformat the Drive
Choose a file system depending on your use case:
- APFS: Best for macOS SSDs
- HFS+: For compatibility with older Macs
- ExFAT: For cross-platform usage with Windows
2. Reinstall macOS (if internal drive)
- Boot into macOS Recovery using Command + R (for Intel-based Mac)
- Choose Reinstall macOS
3. Eject and Reconnect (if external drive)
After erasing and formatting, your external drive is ready to be used as storage, a bootable disk, or for backups
Troubleshooting Tips
Drive Doesn't Show in Disk Utility
- Check System Information > USB/SATA
- Try reconnecting or using another port
- Reset NVRAM/PRAM or SMC
Erase Button Grayed Out
- Boot into macOS Recovery
- Use Terminal to unmount the drive before erasing
Terminal Error: "Permission Denied"
- Add sudo before the command:
sudo diskutil secureErase 0 /dev/disk2
Wiping Fails Repeatedly
- Try First Aid in Disk Utility
- If that fails, run:
sudo diskutil repairDisk /dev/disk2
FAQs About Wiping HFS+ Drive on Mac
1. Can I recover data after wiping an HFS+ drive?
If you used a secure erase (multi-pass overwrite), recovery is virtually impossible. However, if you only reformatted the drive without overwrite, some professional tools may recover parts of it.
2. Is Disk Utility's "Erase" secure enough?
It depends. For HDDs, use the "Security Options" to perform multi-pass erasure. For SSDs, standard erase suffices, as data is harder to recover due to TRIM and wear leveling.
3. Should I switch to APFS after wiping?
If the drive is internal or an SSD used with macOS High Sierra or later, APFS is recommended. Otherwise, use HFS+ for older Macs or exFAT for cross-platform use.
Conclusion
Wiping an HFS+ drive on a Mac is a simple but powerful action that protects your privacy, restores drive health, or prepares your device for new tasks. Whether you use Disk Utility, Terminal, or a third-party tool, always back up your data first and ensure you select the correct drive.
For most users, Disk Utility offers a safe and easy method. Power users may prefer Terminal for deeper control. For enterprise environments or enhanced erasure standards, third-party tools like Donemax Data Eraser for Mac or AweEraser are solid investments.
By following this guide, you can confidently and securely wipe any HFS+ drive on your Mac - ensuring peace of mind and data integrity.
Donemax Data Eraser for Mac
100% safe and powerful Mac data erasure program. It offers certified data erasure standards including U.S. Army AR380-19, DoD 5220.22-M ECE to help in securely and permanently erase data from Mac HDD/SSD and external storage device, making data recovery be impossible.
Related Articles
- Jun 16, 2026Wipe Everything on macOS Ventura: Factory Reset macOS Ventura
- Apr 20, 2026How to Erase a Drive Using Terminal on Mac: Diskutil Guide (2026)
- Jan 07, 2026How to Erase Data in macOS Big Sur Permanently?
- Apr 09, 2026How to Factory Reset macOS Monterey: The Easy Erase Assistant Way
- Apr 08, 2024How to Wipe Everything on MacBook Air with Apple Silicon Chip?
- Apr 15, 2025How to Wipe APFS Volume on Mac: A Complete Guide

Contributing Writer
Steven
Steven has been a senior writer & editor of Donemax software since 2020. He's a super nerd and can't imagine the life without a computer. Over 6 years of experience of writing technical solutions and software tesing, he is passionate about providing solutions and tips for Windows and Mac users.

Editor in chief
Gerhard Chou
In order to effectively solve the problems for our customers, every article and troubleshooting solution published on our website has been strictly tested and practiced. Our editors love researching and using computers and testing software, and are willing to help computer users with their problems