
Written byChristinaUpdated on Jun 03, 2026
How to Migrate Data from Old Mac to M5 Mac via Disk Clone?
Approved byGerhard Chou
Before we start: By creating an exact, 1:1 copy of your old Mac's hard drive onto an external drive, you create an unbeatable backup and a straightforward bridge to your next-generation computer. Donemax Disk Clone for Mac is the most reliable cloning software for Mac. By using the software, it's easy to create a bootable and full clone backup for your Mac.
PAGE CONTENT:
Getting a brand-new Mac with the lightning-fast M5 chip is incredibly exciting. But before you can enjoy your new machine, there is one big task ahead: moving your life over from your old computer.
Many people turn to cloud backups or basic file sharing, but these options can take hours or even days to complete over a Wi-Fi connection. If you want the absolute safest, fastest, and most seamless transition, the best strategy is to migrate data from old Mac to M5 Mac via disk clone.

In this friendly, step-by-step guide, we will walk you through exactly how to make this move. We will explore the most reliable ways to migrate your files, show you how to build a fully functional, bootable clone using Donemax Disk Clone for Mac, and explain how to use that cloned drive directly on your shiny new M5 Mac.
Reliable Solutions to Migrate Data from Old Mac to M5 Mac
There are several reliable paths to get your data over to the new M5 architecture. Depending on your technical comfort level and what tools you have available, you can choose the option that feels easiest for you.
Solution 1: Standard Apple Migration Assistant
Apple built a native tool called Migration Assistant into every macOS system. This tool is designed to read data from an old Mac, a Time Machine backup, or an external cloned hard drive and transfer it directly onto a new machine. When you use a disk clone with Migration Assistant, the process is incredibly fast because a wired external SSD can transfer data at massive speeds compared to local Wi-Fi.
Step 1: Open Migration Assistant on your new Mac. You can find it by going to Applications > Utilities, or by searching for it using Spotlight (Command + Space). Click Continue. When asked how you want to transfer your information, select: "From a Mac, Time Machine backup, or startup disk". Click Continue.
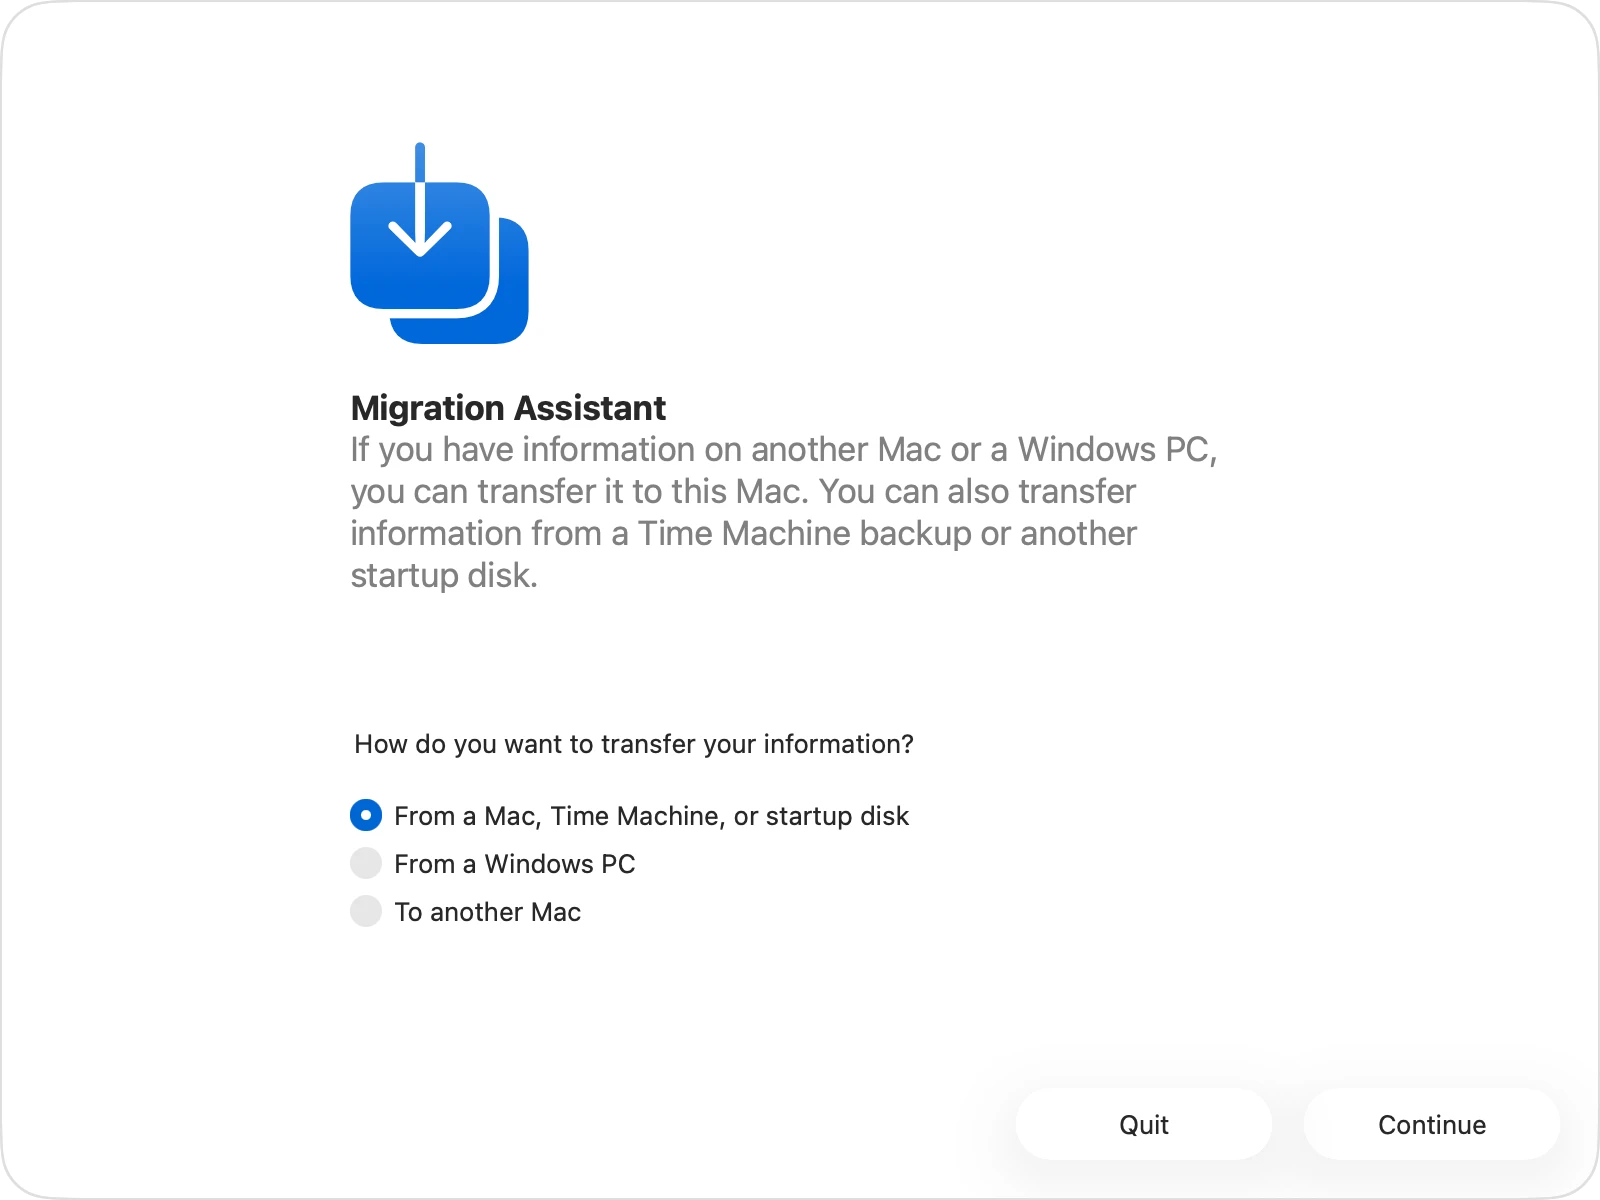
Step 2: Open Migration Assistant on your old Mac. Click Continue. When asked how you want to transfer your information, select: "To another Mac". Click Continue.
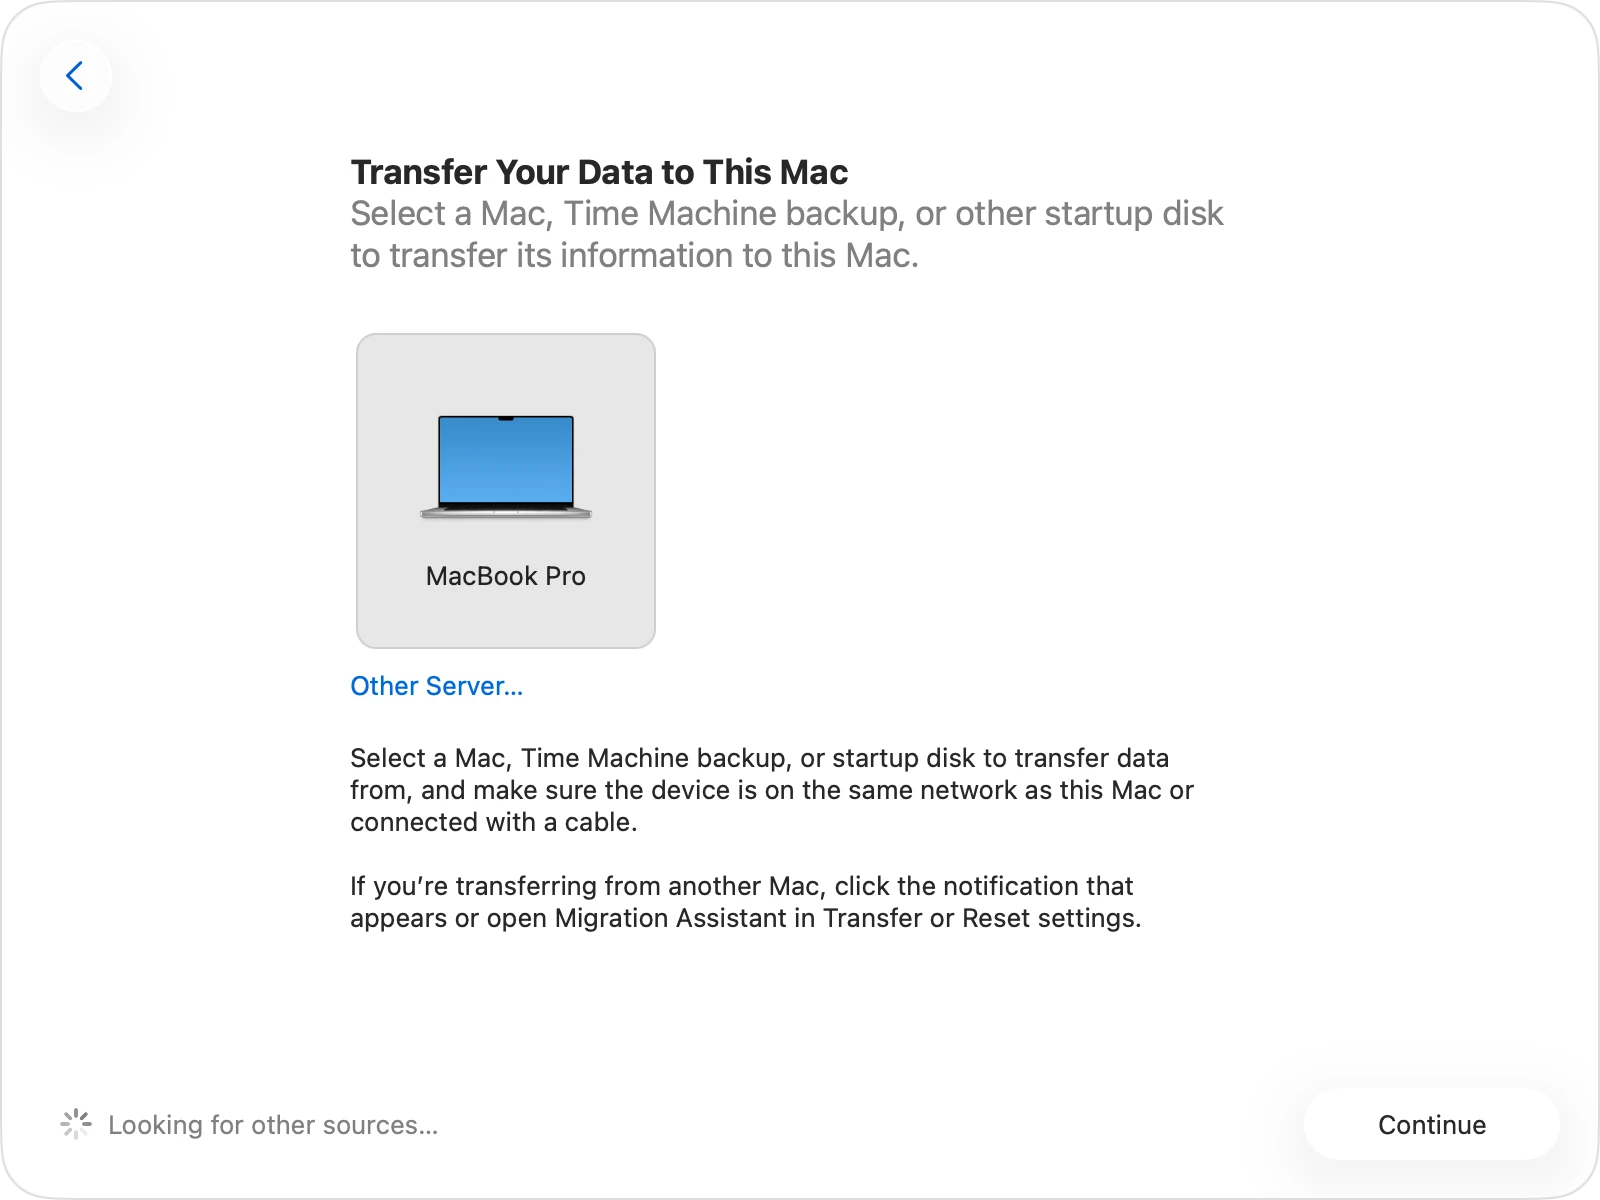
Step 3: On your new Mac, select the icon representing your old Mac. Click Continue. A security code (a string of numbers) will appear on one or both screens. Verify that the numbers match exactly on both Macs. Click Continue on your old Mac.
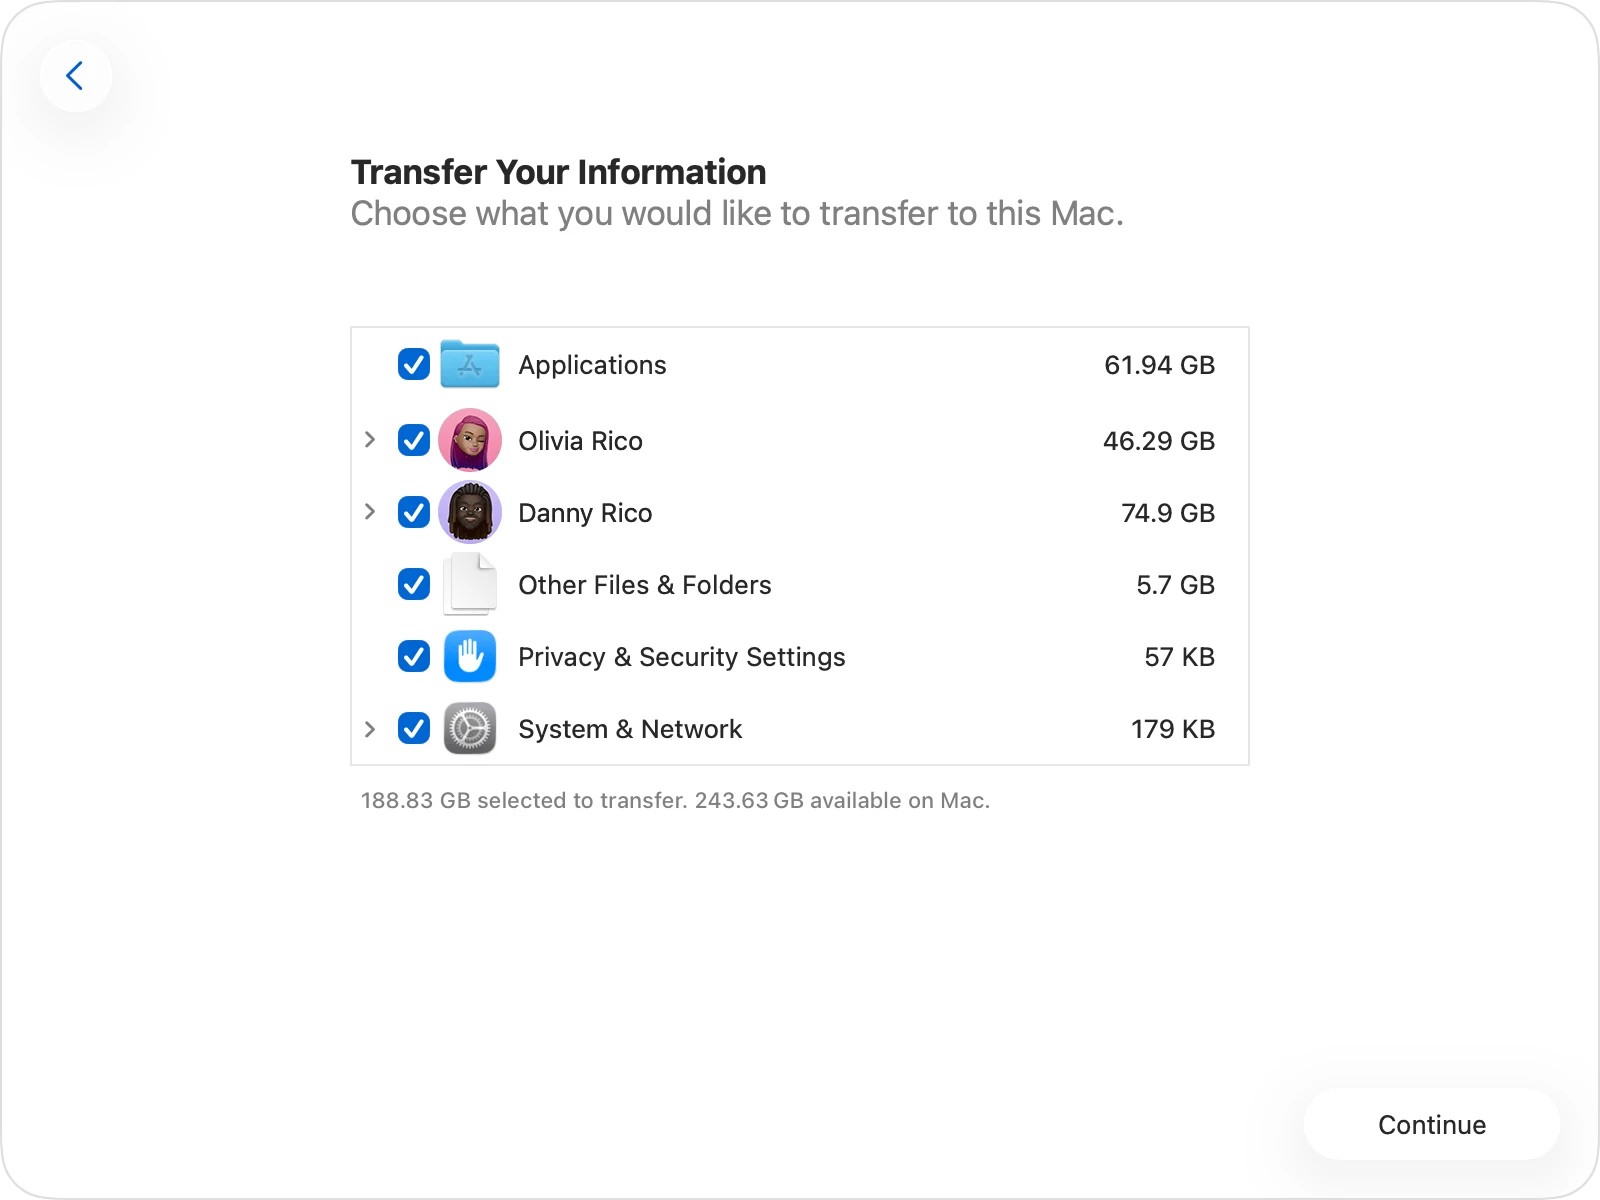
Step 4: Your new Mac will spin for a minute or two while it calculates how much data is on your old Mac. Once it's ready, you will see a list of checkboxes. You can choose to transfer:
- Applications
- User Accounts (Your documents, desktop files, pictures, etc.)
- Other Files & Folders
- System & Network Settings
💡 Tip: If your old Mac has a different username than what you already set up on your new Mac, Migration Assistant will ask if you want to rename the old account or replace the current one.
Step 5: Click Continue on your new Mac to begin the migration. Leave both computers alone. Large transfers can take anywhere from 30 minutes to several hours depending on how much data you have and whether you are using Wi-Fi or a cable.
Once the progress bar fills up, a completion message will appear. Log into your new Mac, and you'll find everything exactly where you left it!
Solution 2: Manual File Drag-and-Drop
If you do not want to bring over old system junk, temporary cache files, or outdated apps, you can migrate manually.
- First, you need to manually copy the files from the old Mac to an external drive.
- By plugging your external drive into your M5 Mac, the drive appears just like a regular folder.
- You can browse through your old desktop, documents, pictures, and downloads.
- Pull over only what you truly need to keep your new M5 system ultra-clean.
Solution 3: Booting Clone Drive of Old Mac on M5 Mac
For the ultimate power user experience, you can create a full, bootable clone of your old Mac using specialized software like Donemax Disk Clone for Mac. Once completed, you can plug this drive into your new M5 Mac, boot directly into your old environment, and access your entire operating system exactly as it was on your old computer. This is an amazing option if you need to run specific old configurations without cluttering your new internal drive.
Important Note: Apple silicon chips (like M1, M2, M3, M4, and the new M5 series) use a unique startup security architecture. To boot your old system on an M5 Mac, your old Mac must have been running an operating system fully compatible with Apple silicon, and you will need to grant permission in your new Mac's Startup Security Utility.
Why Choose a Disk Clone for Your New M5 Mac?
When setting up a new Apple silicon computer, you might wonder why disk cloning stands out among so many options. Cloning goes a step beyond typical copy-and-paste methods. Instead of just copying files, a disk clone replicates everything—hidden system files, user account settings, preferences, app data, and your unique file structure.
Here is why cloning is the ultimate choice for your M5 upgrade:
- Complete Safety Net: If anything goes wrong during setup, your old Mac is perfectly preserved on an external drive.
- Zero Data Loss: It catches hidden library files, local emails, and software configurations that standard backups often miss.
- External Booting Capability: With the right tools, you can run your old environment directly from the external drive without changing the internal SSD of your new M5 Mac.
The Best Method: Make a Full and Bootable Clone with Donemax Disk Clone for Mac
To easily migrate data from old Mac to M5 Mac via disk clone, you need a software tool that is both highly secure and incredibly simple to operate. Donemax Disk Clone for Mac is specifically optimized for both Intel-based and Apple silicon Macs. It features a clean, user-friendly interface that lets home users create flawless 1:1 drive copies with just a few clicks.
Follow these simple steps on your old Mac to create your full, secure clone before moving over to your new M5 machine.
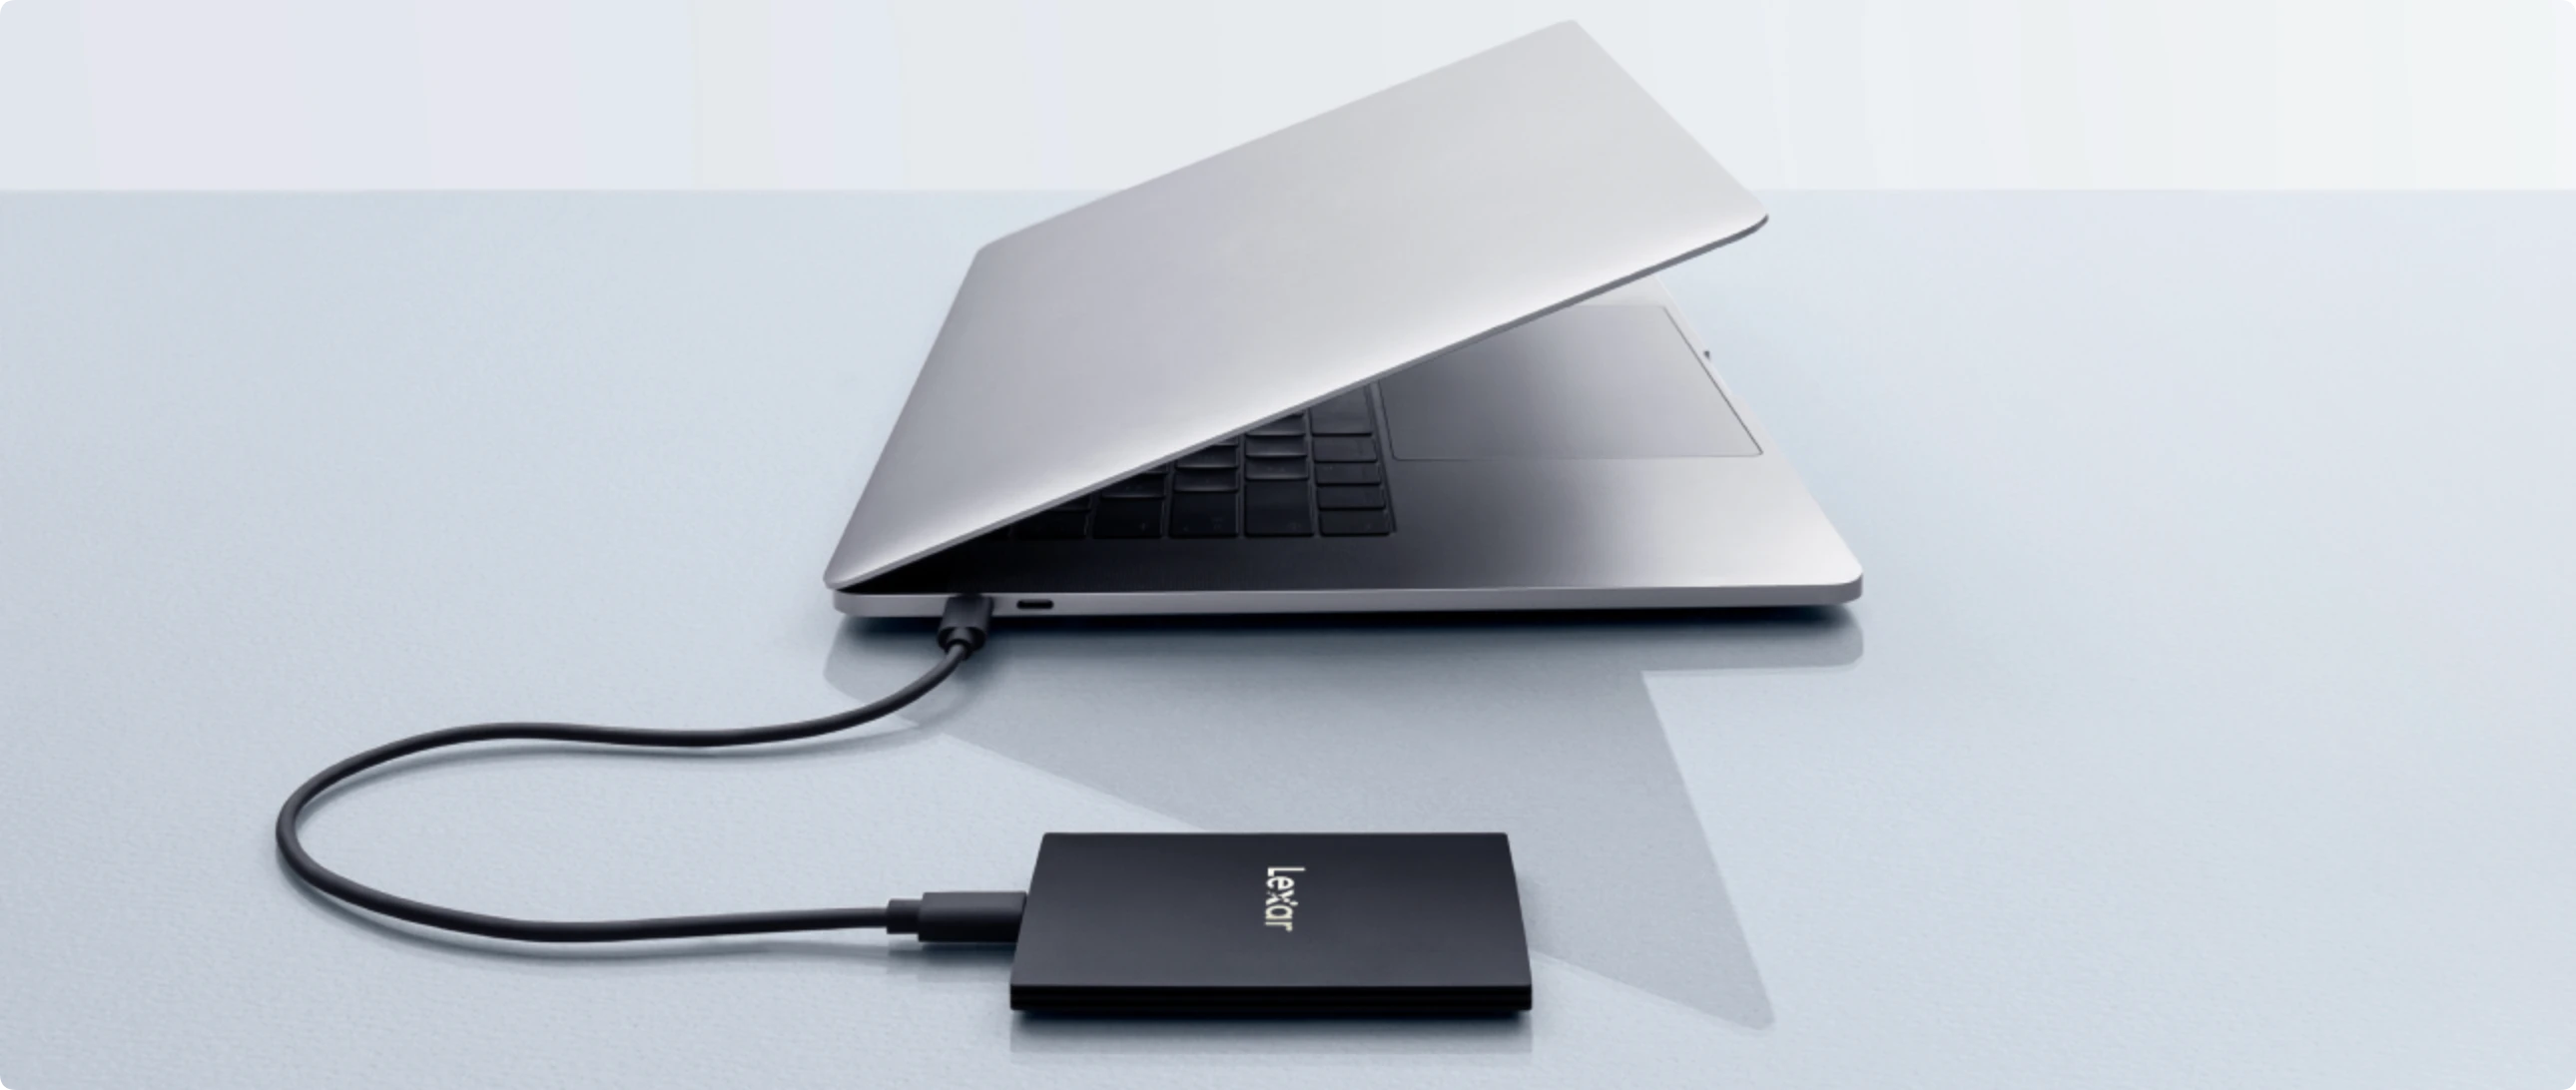
Step 1: Find a reliable external hard drive or high-speed external SSD that has equal or greater storage capacity than the internal drive of your old Mac. Plug it into your old Mac using a reliable cable. Keep in mind that cloning will erase everything currently on this external drive, so ensure there are no important files left on it.
Step 2: Download Donemax Disk Clone for Mac. Install it by dragging the icon to your Applications folder, then launch the software. You will see a simple main window with a few straightforward options.
Download Donemax Disk Clone for Mac.
- The best disk cloning software for macOS.
- Make 1:1 copy of the macOS system, settings, apps and data.
- Create bootable clone backup for Mac system drive.
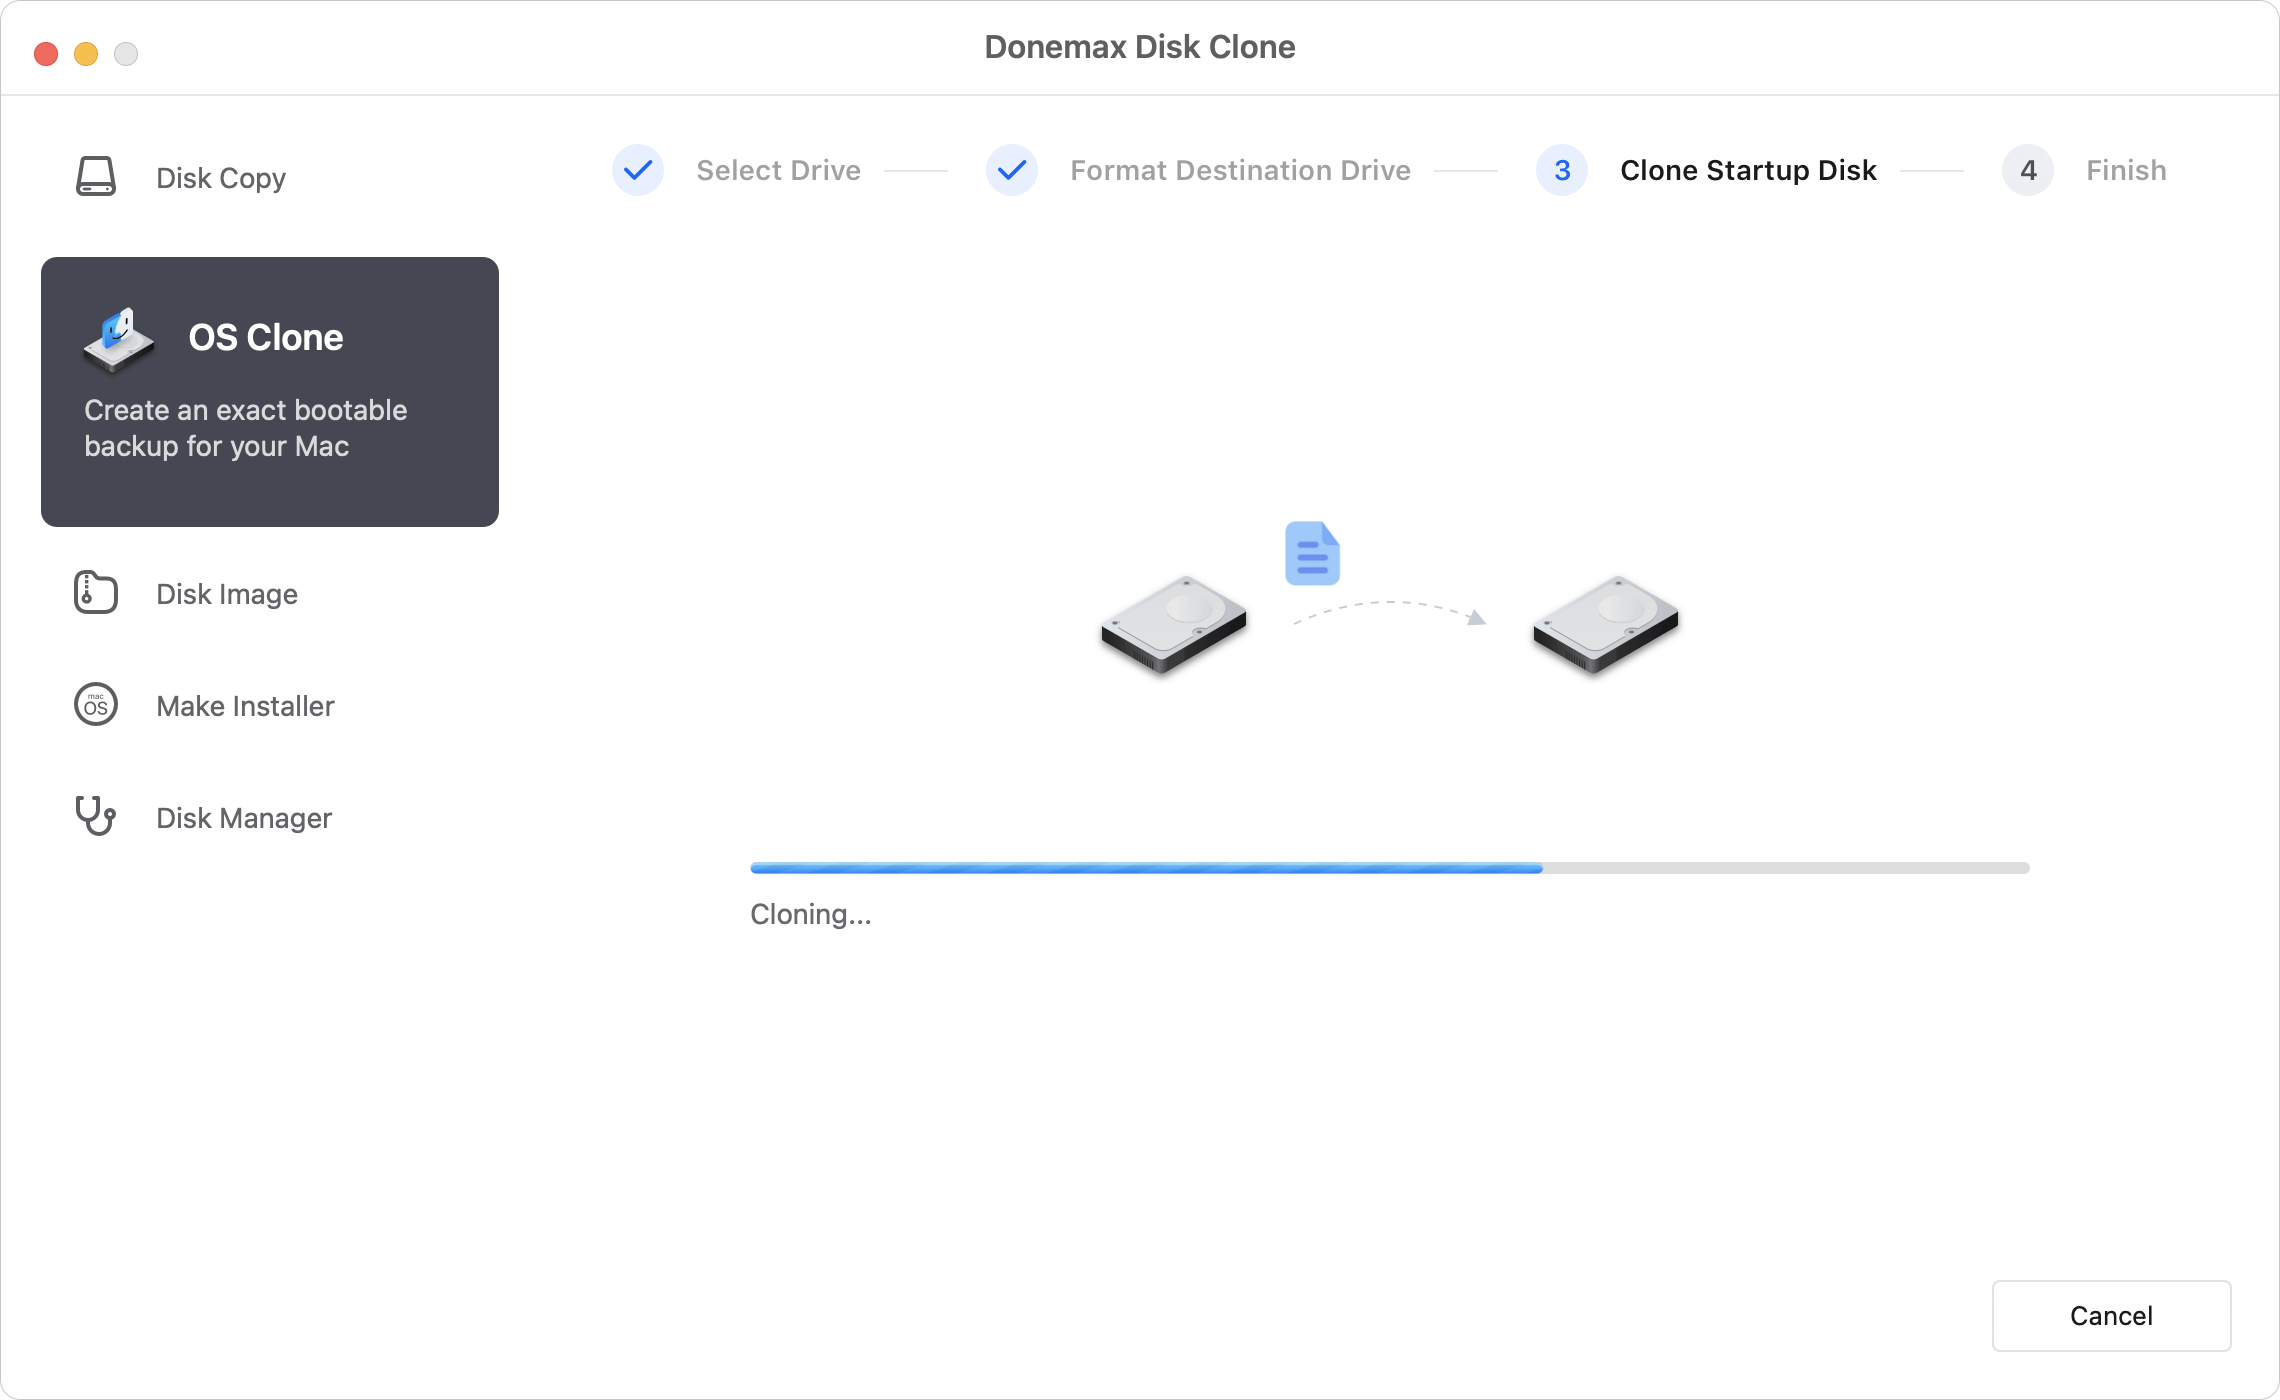
Step 3: From the main menu sidebar, click on the OS Clone option. This tool is designed to duplicate your entire macOS system drive perfectly. In the 'Source' field, the internal hard drive of your old Mac (usually called Macintosh HD) will be selected automatically. In the 'Destination' field, you need to manually select the connected external drive.

Step 4: Execute the Clone Operation
Double-check that you have chosen the correct source and destination drives. Once you are certain, click the Clone Now button at the bottom right. Donemax Disk Clone for Mac will begin transferring all your data safely. Make sure to leave your Mac alone and keep it plugged into power until the process reports a complete success.
How to Boot and Use the Cloned Drive on Your M5 Mac
Now that Donemax Disk Clone for Mac has finished creating a perfect mirror of your old computer, it is time to move over to your new M5 system. If you want to use the cloned drive as a bootable environment on your new M5 Mac, follow this simple procedure:
- Completely turn off your new M5 Mac.
- Connect your cloned external drive to one of the high-speed ports on the M5 Mac.
- Press and hold down the Power button on your M5 Mac. Do not let go until you see the 'Loading startup options' text appear on the screen.
- The screen will show your internal Macintosh HD alongside your external cloned drive. Use your mouse or arrow keys to select the external drive, then click Continue.
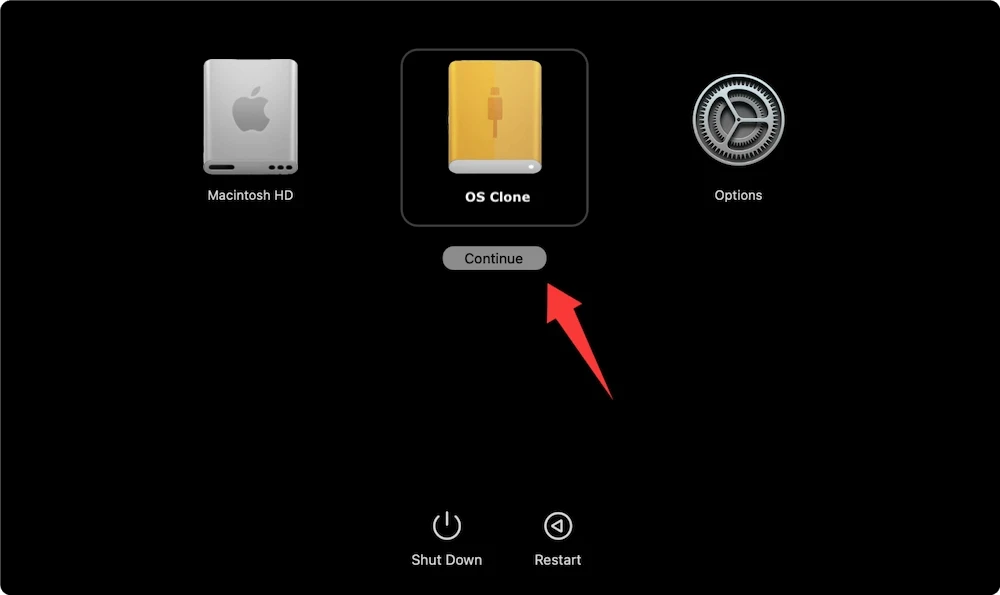
Your M5 Mac will now boot using the operating system, file layout, and applications preserved on the cloned drive. You can work out of this environment freely, test old software, or use it as a data repository to slowly move files to your internal drive over time.
FAQs About Mac Data Migration & Cloning
Because Intel chips and Apple silicon M5 chips use completely different hardware languages, an older operating system built for an Intel processor cannot boot an M5 Mac directly. However, you can still plug that clone into your M5 Mac and use Apple Migration Assistant or manual file dragging to easily pull 100% of your data, documents, and apps over.
Yes, absolutely! Donemax Disk Clone for Mac is an excellent choice for routine backups. By making regular clones of your system, you protect yourself against unexpected hardware failures, accidental file deletions, or macOS update issues.
Not at all. The cloning process only reads the information from your old Mac's drive and copies it onto the external drive. Your original computer remains completely unchanged and safe.
The overall speed depends entirely on how much data you have and the type of external drive you use. If you use a modern external Solid State Drive (SSD) with a high-speed USB-C or Thunderbolt cable, a full clone can take less than an hour. Traditional mechanical hard drives will take significantly longer.
Conclusion
Upgrading to a next-generation M5 Mac is a huge step forward for your daily productivity and entertainment. You do not have to let the fear of data loss or complicated transfers slow you down. Choosing to migrate data from old Mac to M5 Mac via disk clone gives you a fast, secure, and stress-free path forward.
With a powerful and intuitive tool like Donemax Disk Clone for Mac, creating an exact replica of your old digital life takes only a few simple steps. Whether you intend to boot your old environment directly or use the drive to supercharge Apple's Migration Assistant, you can move forward with absolute peace of mind. Download Donemax Disk Clone for Mac today and make your transition to your new M5 Mac smoother than ever before!
Donemax Disk Clone for Mac
An award-winning disk cloning program to help Mac users clone HDD/SSD/external device. It also can create full bootable clone backup for Macs.
Related Articles
- Feb 22, 2024How to Clone Mac SSD to A HDD?
- Jun 25, 2023How to Clone an SSD on Mac?
- Jan 26, 2026How to Clone Hard Drive on macOS High Sierra?
- Apr 07, 2024How to Clone Mac Data To WD My Passport External Hard Drive?
- Dec 17, 2024Create Bootable Clone Backup for macOS High Sierra
- Sep 22, 2025How to Back Up Mac Under macOS Tahoe?

Contributing Writer
Christina
Christina is the senior editor of Donemax software who has worked in the company for 4+ years. She mainly writes the guides and solutions about data erasure, data transferring, data recovery and disk cloning to help users get the most out of their Windows and Mac. She likes to travel, enjoy country music and play games in her spare time.

Editor in chief
Gerhard Chou
In order to effectively solve the problems for our customers, every article and troubleshooting solution published on our website has been strictly tested and practiced. Our editors love researching and using computers and testing software, and are willing to help computer users with their problems