
Written byStevenUpdated on Jun 23, 2026
External Hard Drive is Read-Only on macOS 27 Golden Gate: How to Fix It?
Approved byGerhard Chou
Before we start: When you use NTFS drive on macOS 27 Golden Gate, you will find it's read-only. You can open and copy files from it to your Mac, but you cannot add, change, or delete anything on the drive. It can be incredibly frustrating, especially if you rely on that drive for your daily work. Donemax NTFS for Mac and solve it easily and make the NTFS drive writable on macOS 27 within a few clicks.
PAGE CONTENT:
Upgrading your Mac to the brand-new macOS 27 Golden Gate brings an incredible, super-smooth user experience. With its redesigned Liquid Glass interface, intelligent Siri AI, and blazing-fast Apple silicon optimizations, it represents a massive leap forward for Apple desktop computing. However, major system upgrades can sometimes introduce unexpected bumps along the road. One common headache that many users face after updating is finding that their reliable external hard drive or SSD has suddenly become read-only.
Don't panic! This is a very common issue on Apple's latest operating system, and your precious data is completely safe. In this comprehensive guide, we will break down exactly why your external hard drive is read-only on macOS 27 Golden Gate and walk you through 4 easy, step-by-step methods to fix it and restore full read-and-write permissions.
Why an External Drive Is Read-Only on macOS 27
Before jumping into the quick fixes, it helps to understand why your Mac is restricting write permissions. When macOS 27 Golden Gate encounters an external storage device, it analyzes the drive's file structure and internal properties. There are four primary culprits behind the 'you can only read' status:
- The Drive File System is NTFS: If your hard disk was formatted for Windows using the Microsoft NTFS file system, macOS Golden Gate will only let you look at the files. By default, Apple operating systems do not natively support writing data to NTFS volumes.
- Misconfigured Sharing and Security Permissions: Sometimes, your Mac or specific user accounts lack the explicit security ownership permissions required to modify contents on the drive. This frequently happens if the drive was previously used on another computer.
- Minor Hard Drive Corruption or Formatting Errors: If the drive was disconnected improperly without being safely ejected first, its file allocation architecture can become corrupted. To protect your data from further damage, macOS will automatically lock the drive in a safe read-only safety mode.
- Incompatible Legacy Storage Drivers: macOS 27 Golden Gate officially drops all legacy support for vintage Intel CPUs and old networking storage layers like Apple Filing Protocol (AFP). Changes to the system core can cause old external accessory software drivers to fail, locking up your connected storage.
💡 Quick Tip: To verify your drive's format type, right-click the drive icon on your desktop or inside Finder, and choose 'Get Info'. Look under the 'General' section to find the 'Format' label.
Fix Read-Only External Drive on macOS Golden Gate
Depending on what is causing your storage drive to lock up, choose one of the following official tested solutions to regain full write capabilities.
Method 1: Change Read-Only Storage Permissions on your Mac
If your external hard drive is formatted in a native Apple layout (like APFS or Mac OS Extended) or a universal layout (like exFAT), but you still can't save files, the culprit is a basic permissions mismatch. You can easily modify your account access privileges through the system setup interface.
- Connect your external hard drive to your Mac running macOS 27 Golden Gate.
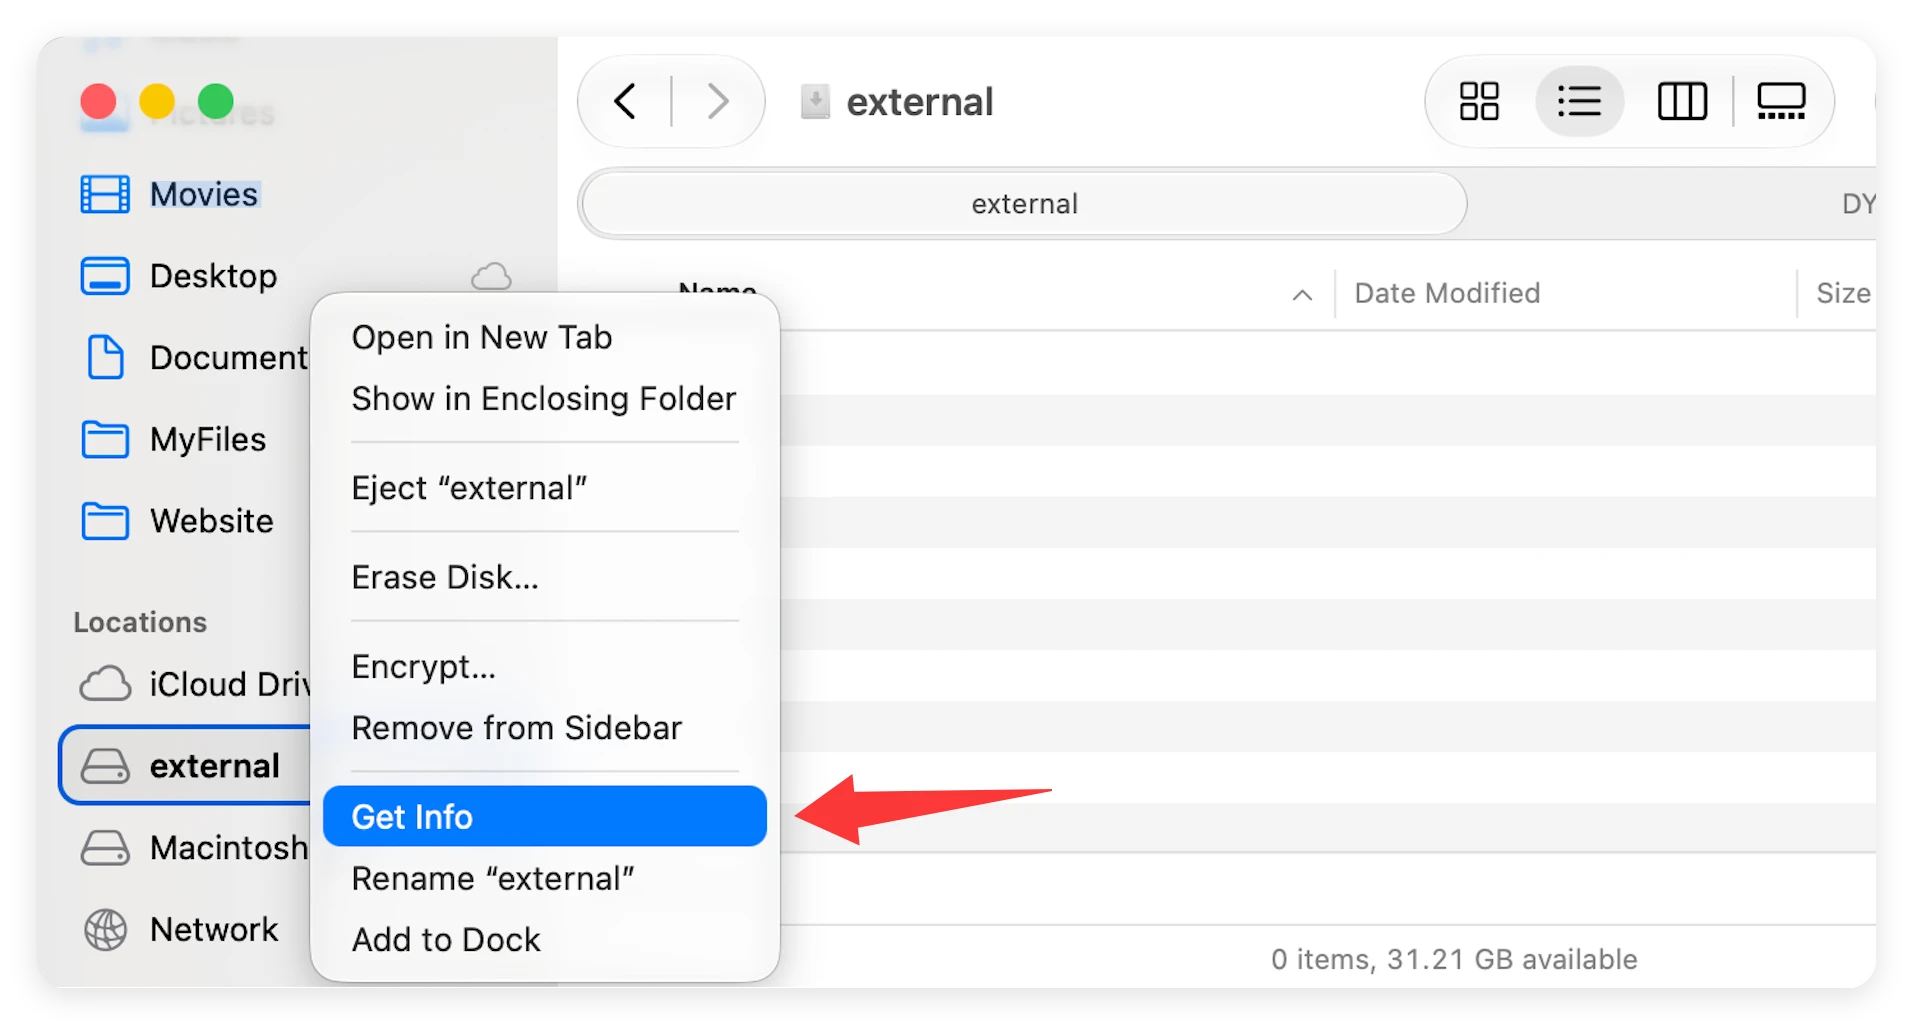
- Open Finder, locate your external drive icon in the sidebar, right-click it, and select Get Info from the contextual menu.
![external hard drive read only macos 27 golden gate fix]()
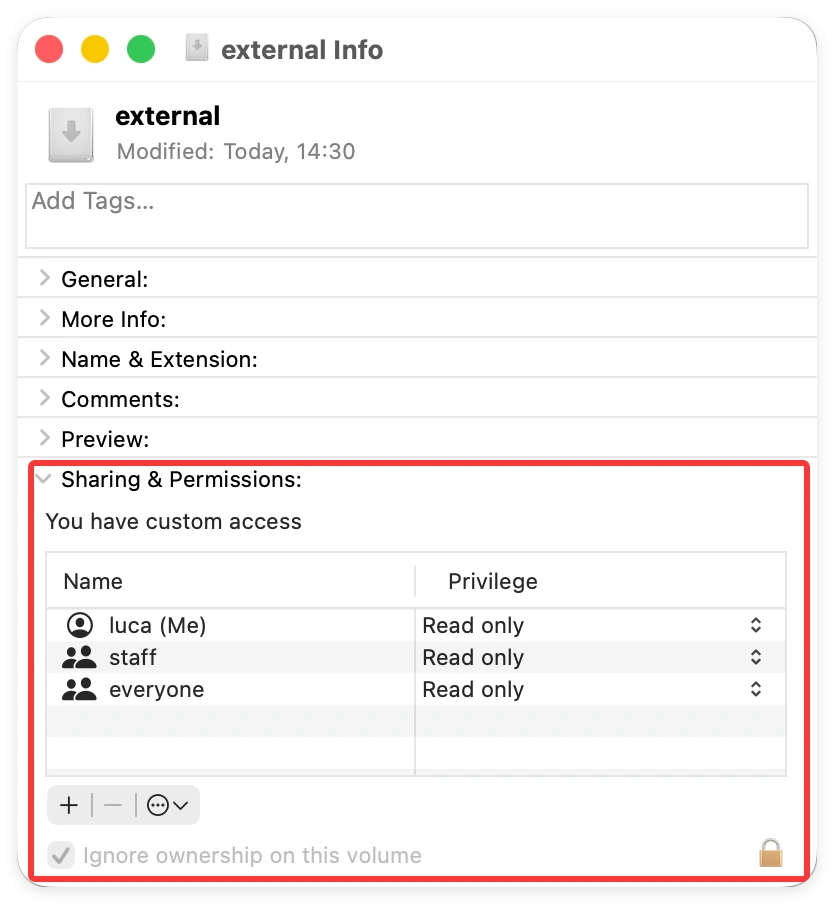
- In the info panel that flies out, scroll down to the very bottom and click the tiny arrow next to Sharing & Permissions to open the access panel.
![external hard drive read only macos 27 golden gate fix]()
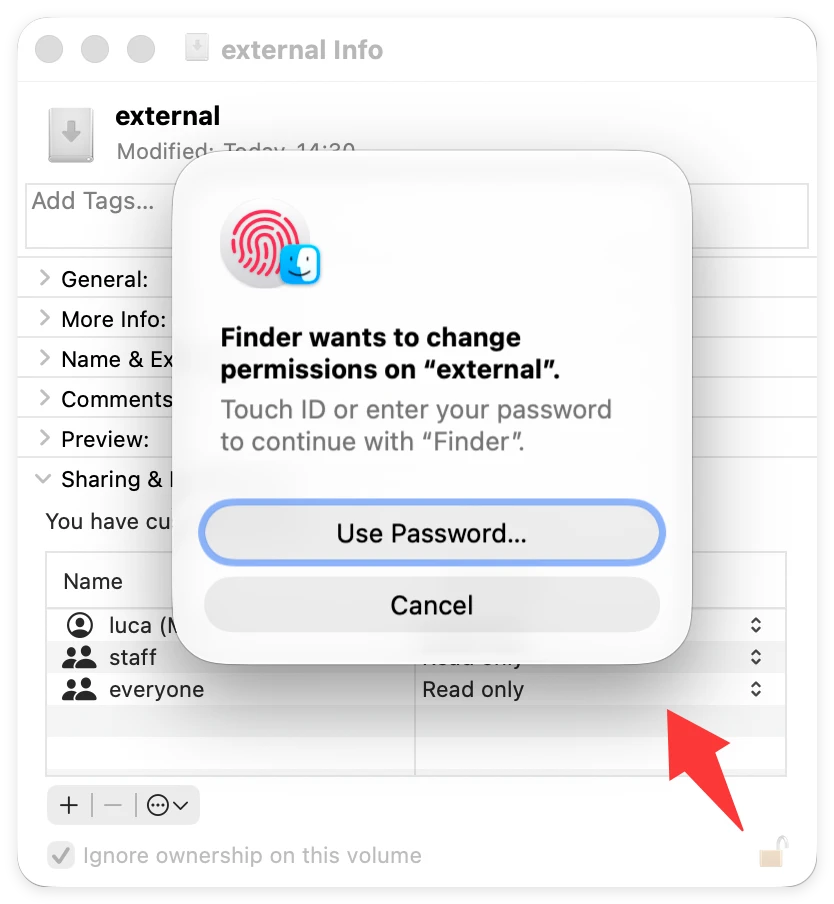
- Click the gold padlock icon in the bottom corner of the window to authenticate changes. Type in your Mac administrator password or use Touch ID to unlock settings.
![external hard drive read only macos 27 golden gate fix]()
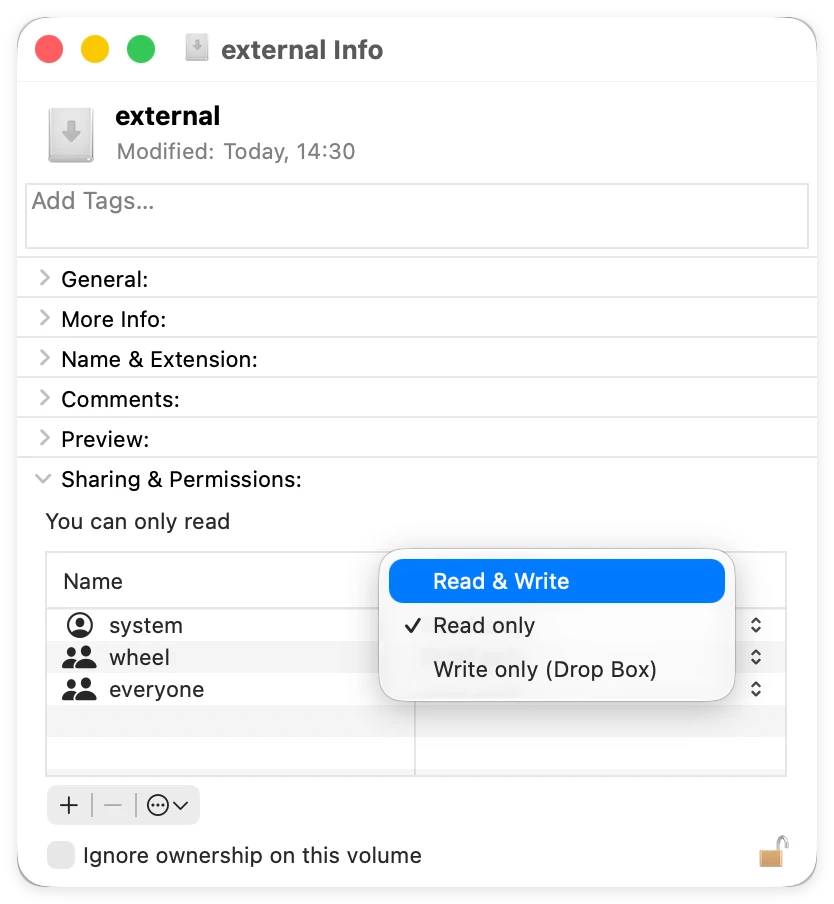
- Locate your current account name under the Name column. Click the menu next to it under the Privilege column and change it from Read Only to Read & Write.
![external hard drive read only macos 27 golden gate fix]()
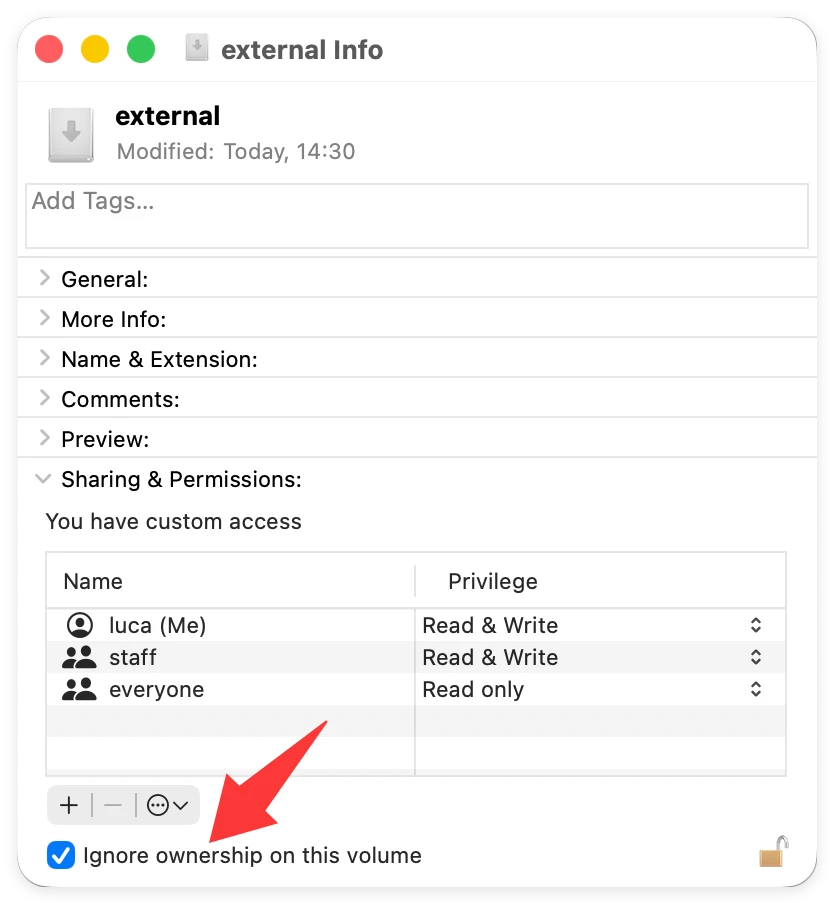
- Additionally, you can check the box at the very bottom that says Ignore ownership on this volume. This ensures your Mac treats all files on this drive as universally accessible, completely bypassing restrictive permission conflicts.
![external hard drive read only macos 27 golden gate fix]()
Method 2: Use Donemax NTFS for Mac (Best Data-Safe Solution for NTFS Drives)
Did your 'Get Info' check reveal that your external hard drive is formatted as a Windows NT File System (NTFS) drive? If so, editing native Mac settings won't solve the problem. Because macOS 27 Golden Gate does not contain default code to write files onto NTFS systems, you need a smart helper app to bridge the gap.
Many guides suggest reformatting the drive to solve this, but formatting completely wipes away all your files! The ultimate data-safe alternative is to use Donemax NTFS for Mac. This professional utility runs flawlessly alongside macOS 27 Golden Gate's Apple silicon architecture, granting you instant, lightning-fast read-and-write permissions on all NTFS external disks without touching or endangering your existing files.
Why choose Donemax NTFS for Mac for your storage workflow?
- One-Click Mount: Mounts and unmounts your external storage devices safely from the Mac menu bar with a single touch.
- Blazing-Fast Read/Write Speed: Read and write to any NTFS external drive at peak speeds, exactly as if it were a native Apple hard drive.
- Apple Silicon Native Support: Fully optimized to support the M1, M2, M3, and latest M4/M5 generation Apple silicon chips powering macOS 27 Golden Gate.
- Zero Risk of Data Loss: Keeps your photos, documents, and business files entirely safe while managing disk connectivity.
Follow these simple steps to make your NTFS external hard drive writable:
Step 1. Download, install, and open Donemax NTFS for Mac on your computer. Plug your read-only NTFS external hard drive into an available USB or Thunderbolt port.
Step 2. Donemax NTFS for Mac will instantly recognize the connected drive. Select your hard drive from the left sidebar menu.
Step 3. Click the Enable Writable button on the top toolbar. Donemax will immediately configure the system layout to allow full write support.

That is it! You can now open Finder, drag new files onto the NTFS drive, rename folders, and edit files seamlessly.
Method 3: Run Disk Utility First Aid to Repair Corrupted Drives
If your drive's permission screen displays that you already have 'Read & Write' privileges, but the system still blocks you from modifying data, your drive's directory structure may have minor system corruption. This often triggers a safety lockdown where macOS protects your drive from worsening structural damage. You can easily fix this using Apple's built-in repair tool called First Aid.
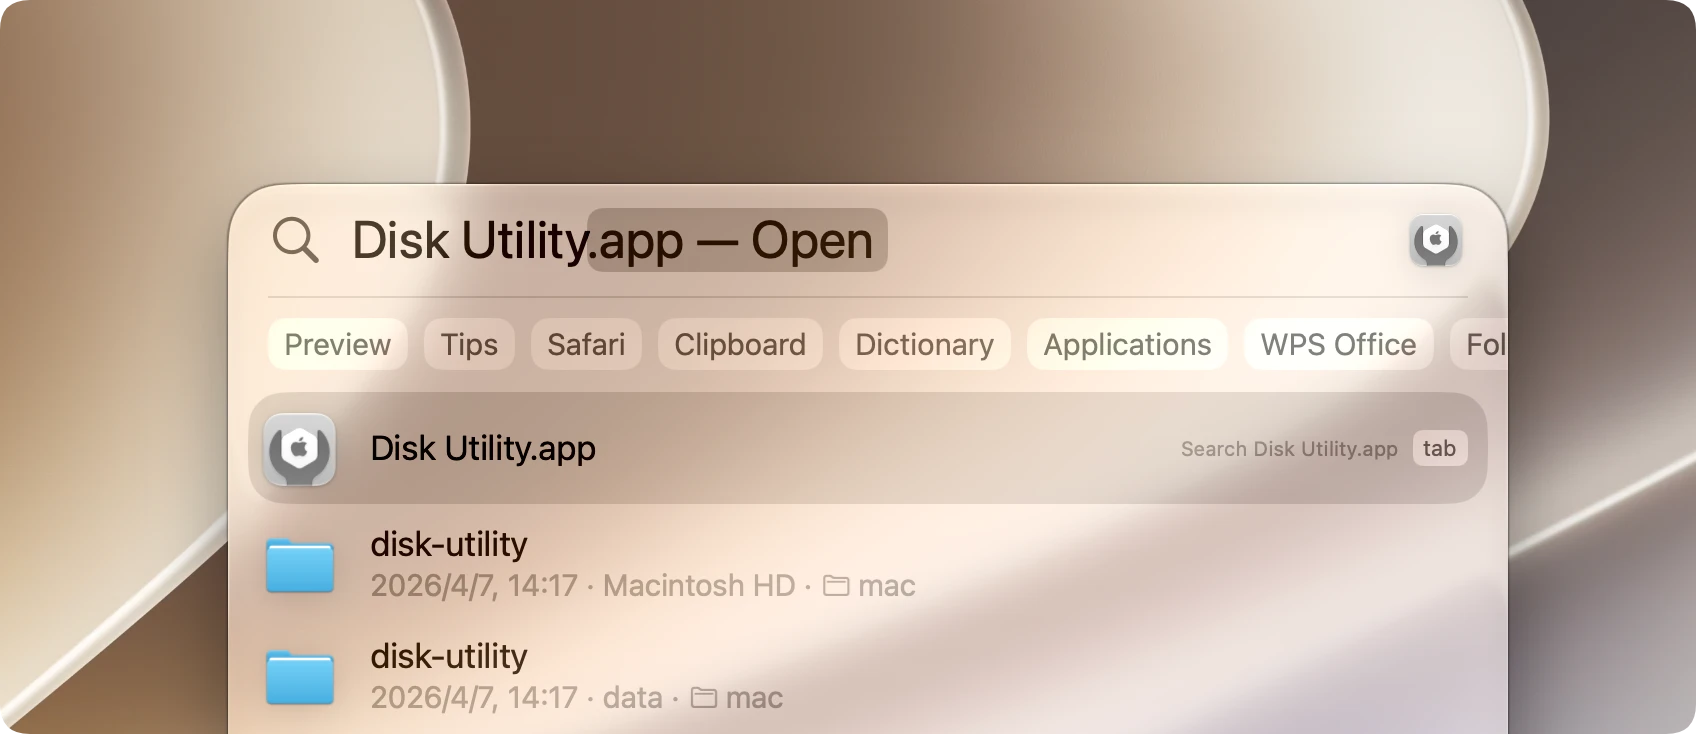
- Press the Command + Spacebar shortcut to pull up the system Spotlight search box, type in Disk Utility, and press Enter to launch the app.
![external hard drive read only macos 27 golden gate fix]()
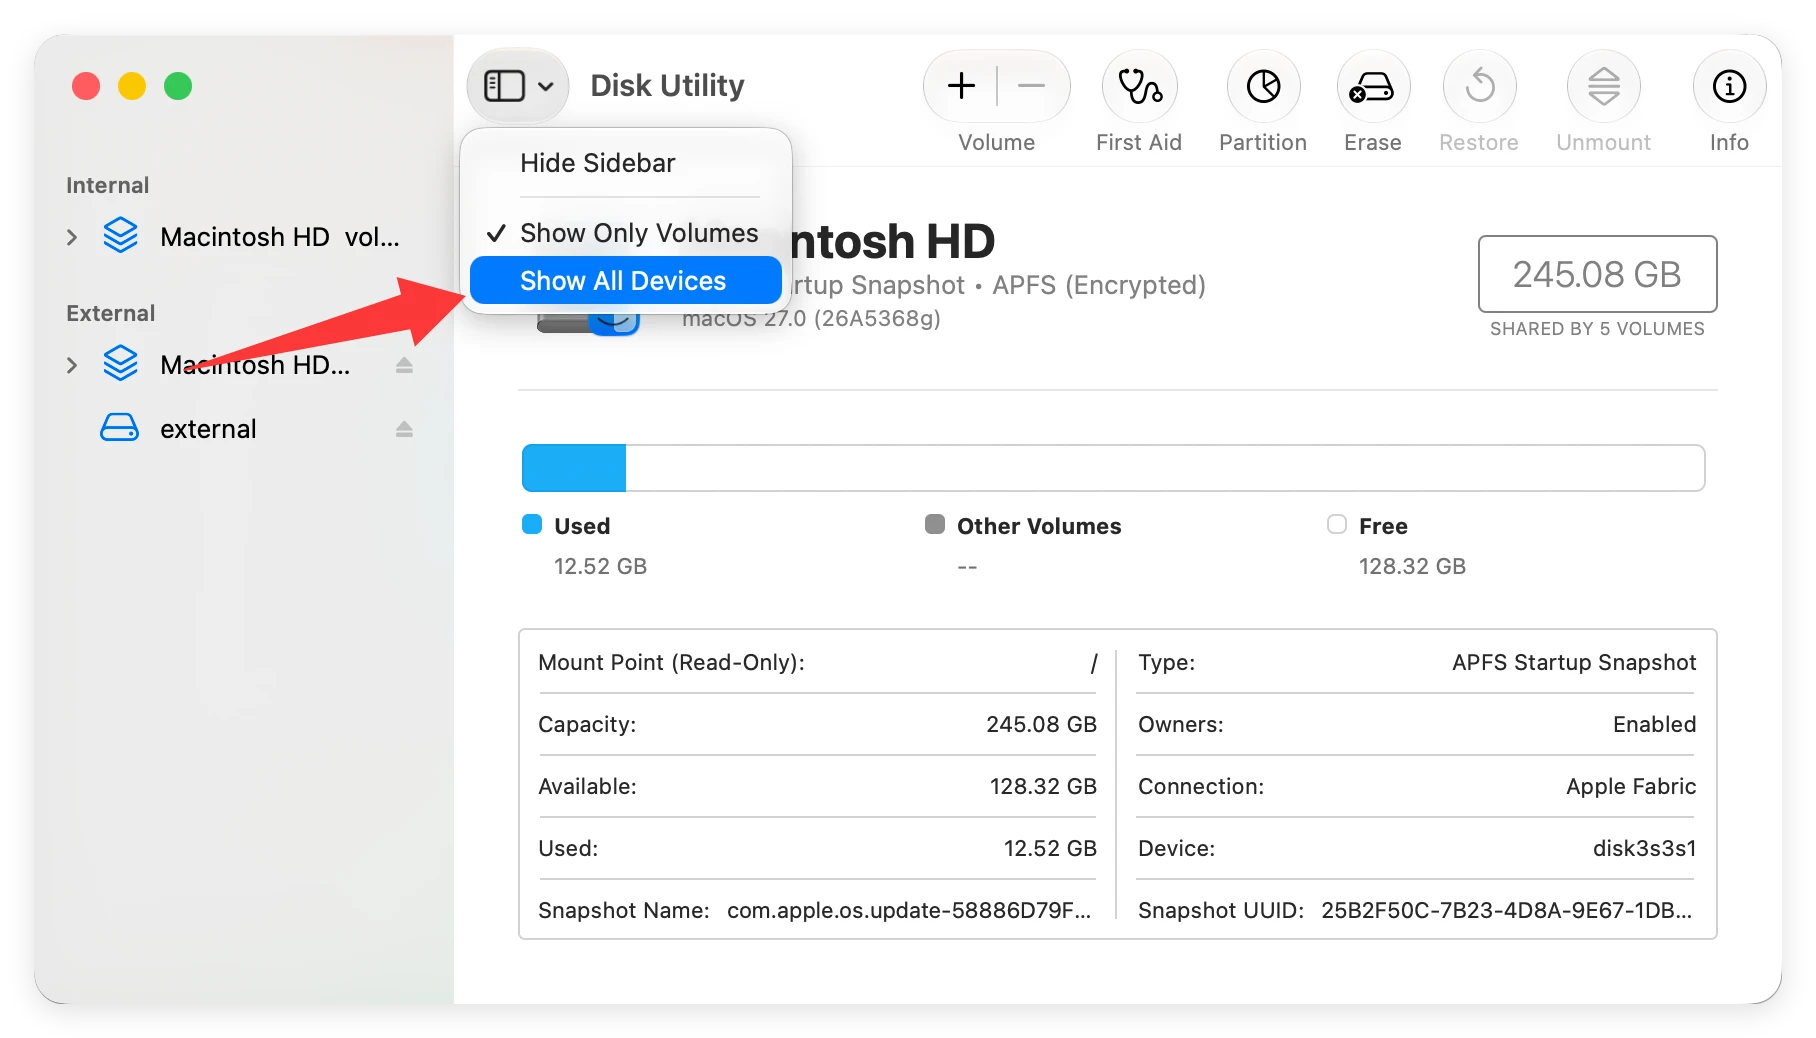
- Click the View icon located at the top-left section of the window and select Show All Devices. This ensures you see the actual physical hardware drives.
![external hard drive read only macos 27 golden gate fix]()
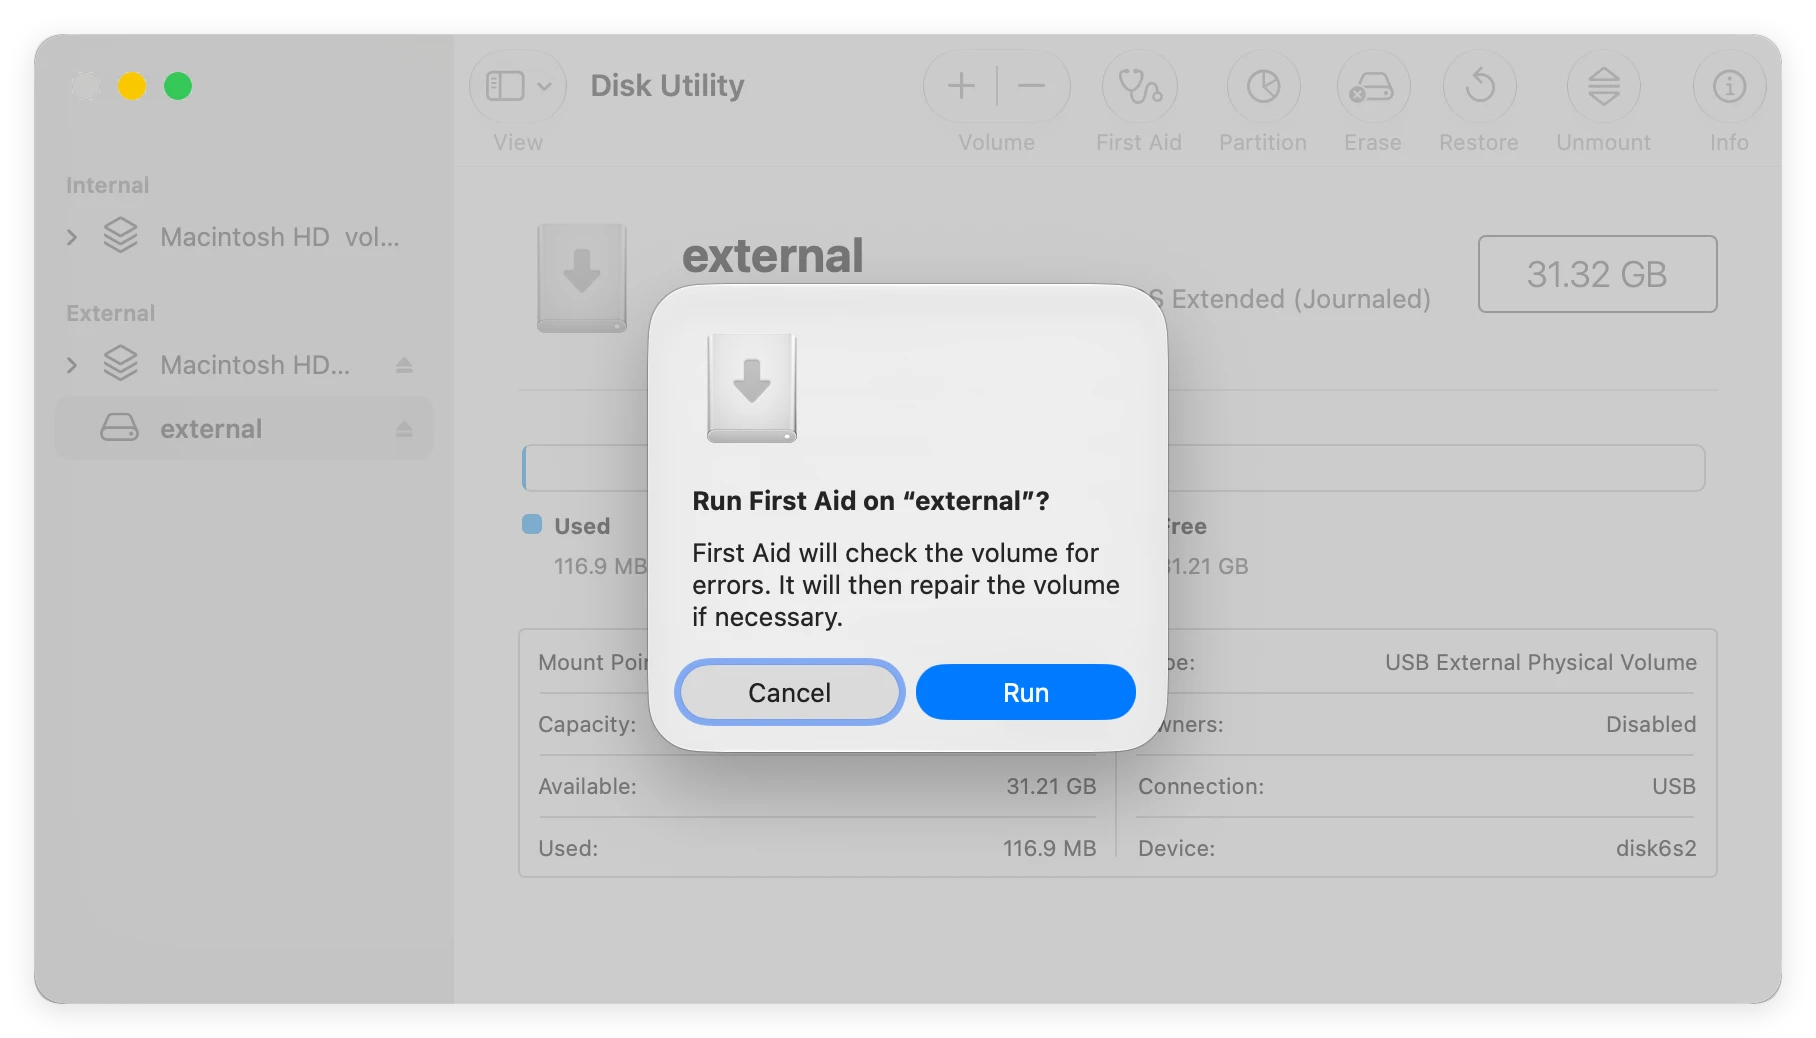
- Look at the left-side list and select the corrupted, read-only external hard drive. Click on the First Aid button on the top menu bar, then click Run in the confirmation dialogue box that pops up.
![external hard drive read only macos 27 golden gate fix]()
The system will automatically run a deep diagnostic scan, search for sector errors, and patch underlying formatting flaws. Once the task finishes successfully, check if your drive is writable again.
Method 4: Reformat the Incompatible File System Drive
If your external hard drive is empty, or if you have already safely copied and backed up all its contents to another storage location, you can choose to completely erase and reformat the drive. Reformatting changes the drive's file system layout into a format that macOS 27 Golden Gate fully reads and writes to naturally.
⚠️ WARNING: Reformatting a storage drive will permanently delete all existing files currently saved on it. Always double-check that you have a secure backup copy before proceeding with this method.
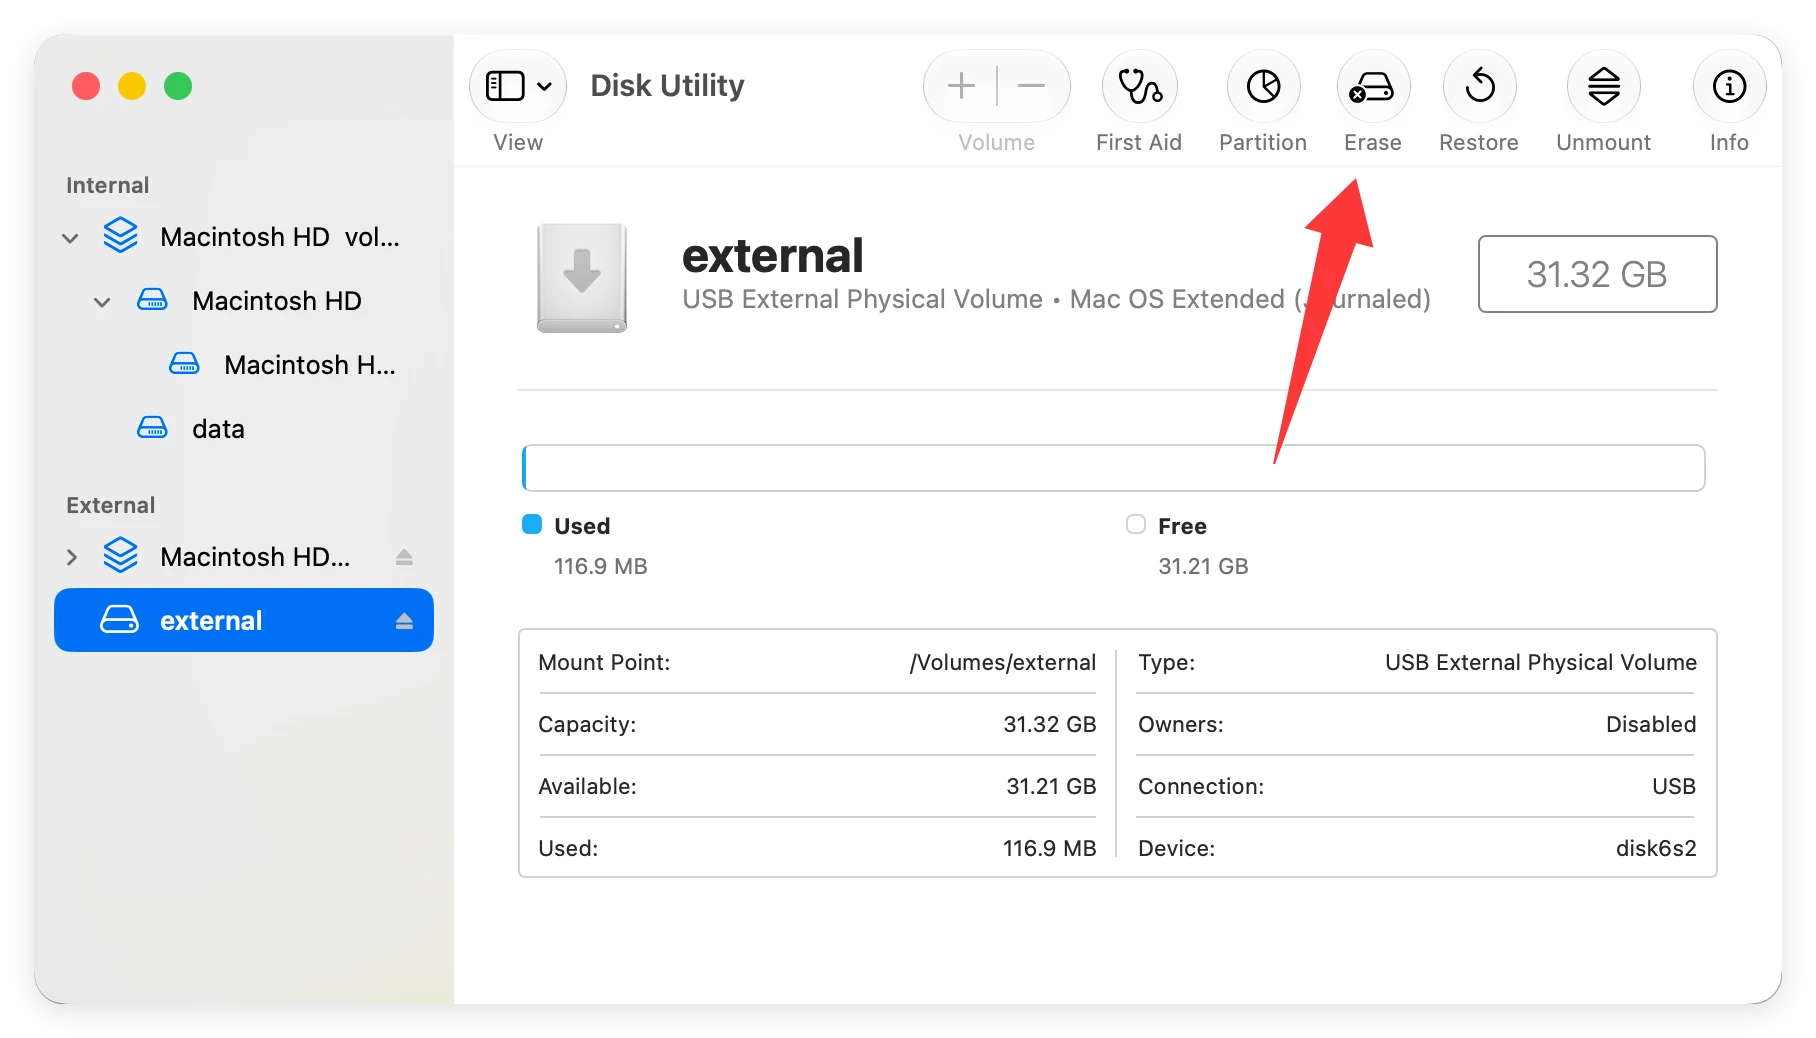
- Launch your Mac's built-in Disk Utility tool (Finder > Applications > Utilities > Disk Utility). Choose your external hard drive from the device tree listed on the left panel. Click the Erase icon located along the top dashboard option bar.
![external hard drive read only macos 27 golden gate fix]()
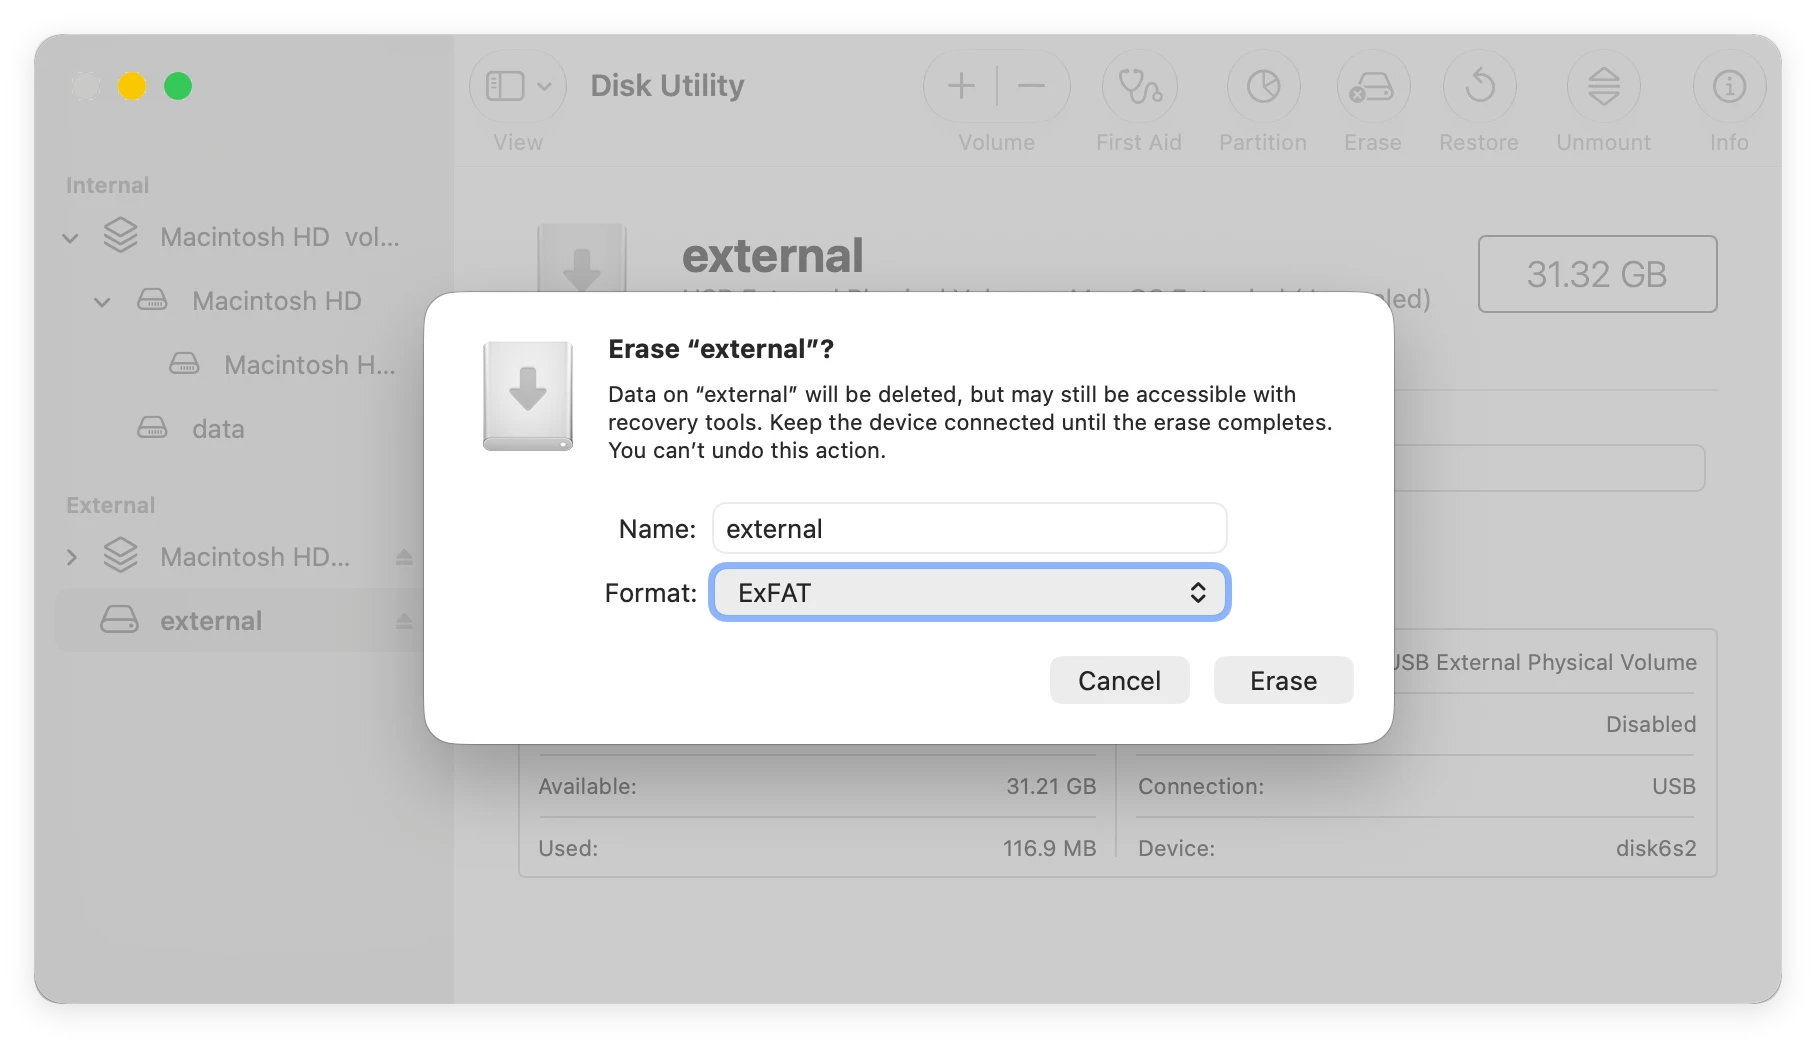
- In the configuration pop-up box, type in a custom name for your hard drive. Open the Format dropdown list and choose a Mac-compatible layout. If you intend to use this drive only on Mac computers, choose APFS. If you need the drive to work seamlessly on both Windows PCs and Mac laptops, select exFAT.
![external hard drive read only macos 27 golden gate fix]()
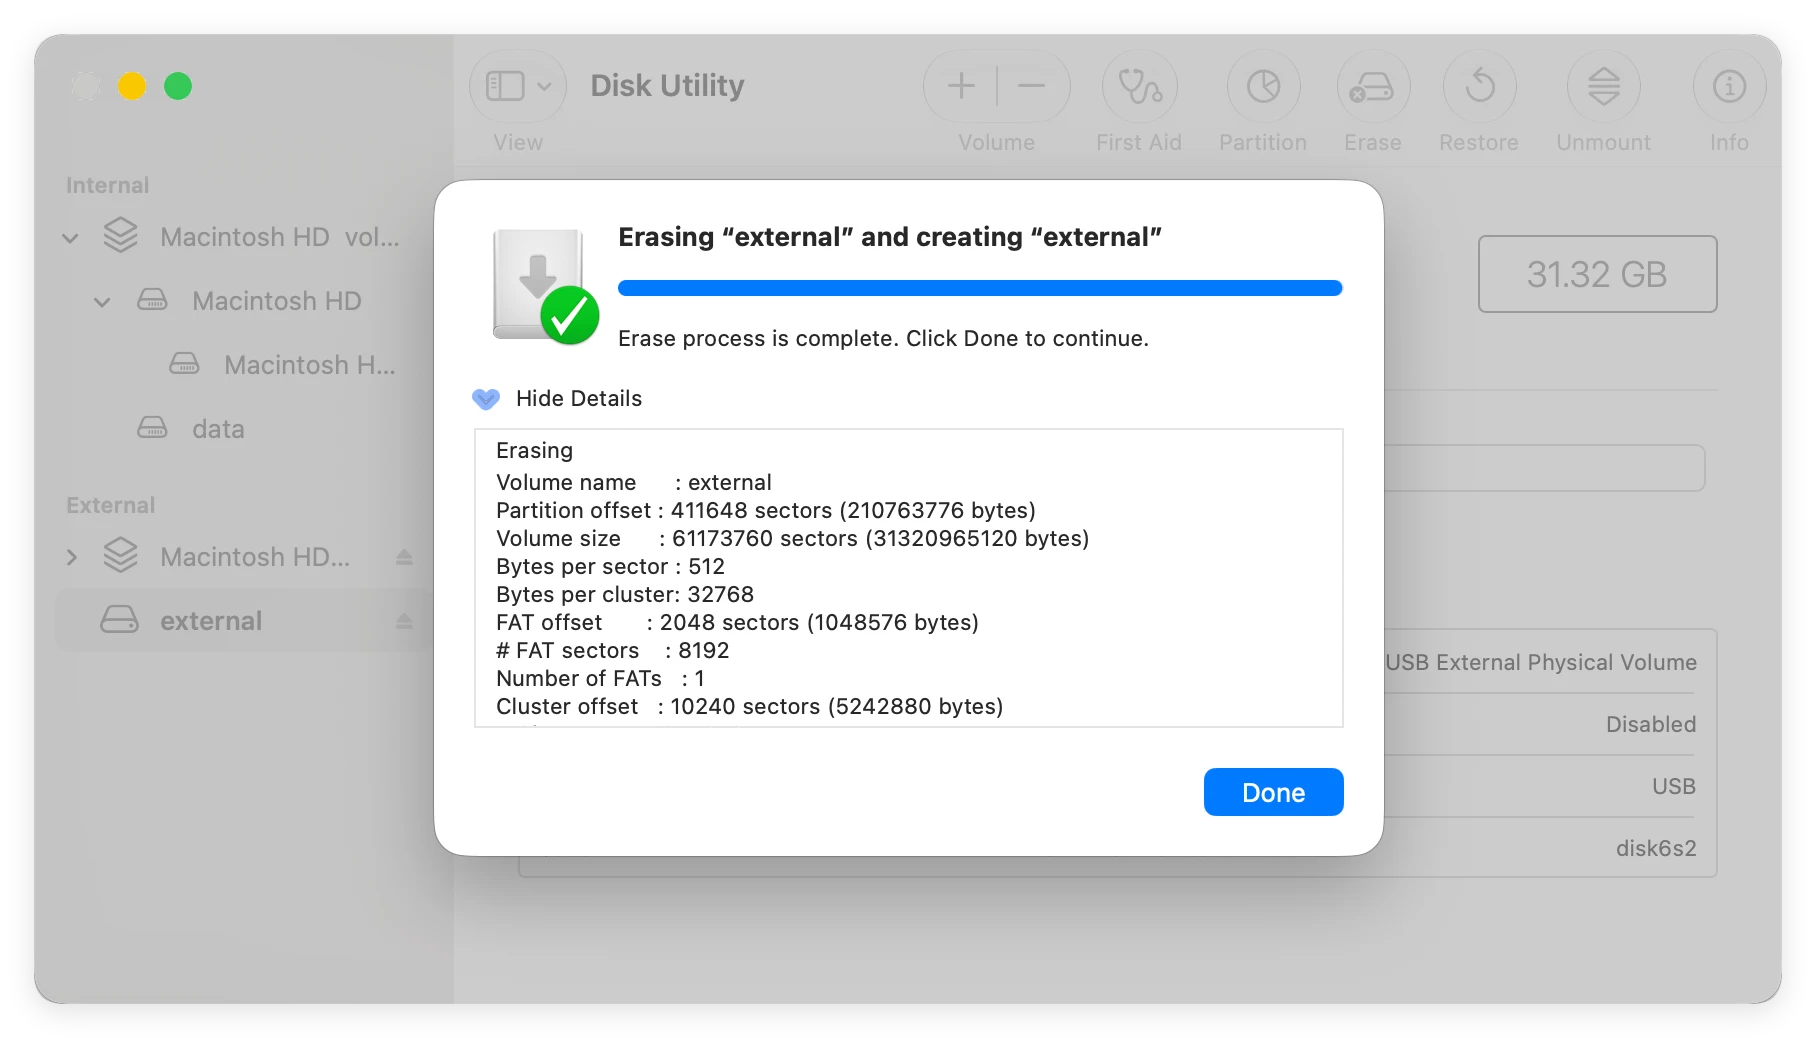
- Click the Erase button at the bottom right. Disk Utility will reformat the storage space in a few seconds, leaving you with a freshly cleared, fully writable drive.
![external hard drive read only macos 27 golden gate fix]()
FAQs About Read-Only Hard Drives on macOS 27
A1: Major macOS upgrades like Golden Gate rebuild core operating files and drop outdated legacy drivers. If your drive is formatted as NTFS, or if it uses old file system drivers, the new operating layout locks the drive to prevent accidental file corruption, reverting its status to read-only.
A2: Yes! Built-in Mac tools like Disk Utility will force you to erase your files to change formats. However, by installing a professional application like Donemax NTFS for Mac, you can instantly unlock full read-and-write permissions on your NTFS drive without erasing a single byte of your data.
A3: Yes, macOS Golden Gate fully supports exFAT and FAT32 formats with complete read-and-write capabilities. If an exFAT drive shows up as read-only, it means the drive was either pulled out safely without being unmounted, or it has minor sector errors that need to be fixed using Disk Utility First Aid.
A4: If you only plan to connect the external drive to Apple devices, APFS is the best choice because it is fast and optimized for modern solid-state storage. If you constantly swap the drive between Windows computers and Macs, choose exFAT so both systems can read and write to it natively.
Conclusion
Encountering a read-only external hard drive on macOS 27 Golden Gate is a common but easily solvable issue. If the trouble is caused by system permission errors, adjusting the 'Get Info' options or running First Aid will usually patch things up instantly. For those using Windows-formatted NTFS drives, you don't have to go through the painful process of formatting your drive and wiping out data. Simply download Donemax NTFS for Mac to bypass file format restrictions safely, keeping your workflows completely smooth and uninterrupted on Apple's latest operating system.
Related Articles
- Apr 18, 2025How to Boot into macOS Recovery Mode on Mac Studio?
- Oct 28, 2024How to Delete Other Volumes in Container on Mac: A Comprehensive Guide
- Nov 27, 2024How to Add or Delete Photos on Mac?
- Dec 26, 2024How to Format an NTFS Drive to APFS, HFS+, ExFAT, or FAT32 on Mac?
- Oct 16, 2024Can't Open Trash on Mac? Here's How to Fix It
- Jul 15, 2025How to Enable and Disable Built-in Camera on Mac (Complete Guide)

Contributing Writer
Steven
Steven has been a senior writer & editor of Donemax software since 2020. He's a super nerd and can't imagine the life without a computer. Over 6 years of experience of writing technical solutions and software tesing, he is passionate about providing solutions and tips for Windows and Mac users.

Editor in chief
Gerhard Chou
In order to effectively solve the problems for our customers, every article and troubleshooting solution published on our website has been strictly tested and practiced. Our editors love researching and using computers and testing software, and are willing to help computer users with their problems