Powerful, safe and easy-to-use disk cloning software for disk clone, partition clone and digital device clone.
Microsoft has released the latest operating system, Windows 11, which brings a lot of new experiences. The new operation and interface interaction make many users want to upgrade to Windows 11. Generally speaking, there is no problem with a new computer upgrading the Windows 11 system. If you are unsure whether your computer is available for Windows11, you can try the free Windows 11 upgrade checker - DMWin11Checker. This freeware detects your device for system requirements and will tell you what to do for a smooth Windows 11 system update.
Free Download and install DMWin11Checker freeware. Run and click the Execute button.
What is TPM 2.0?
We must first start with TPM, or Trusted Platform Module, which is an international standard for secure cryptographic processors. It handles encryption in devices through dedicated security hardware integrated into the machine. The technical specifications of TPM are written by TCG (Trusted Computing Group), which currently includes a large number of familiar members, such as Intel, AMD, Microsoft, Dell, HP, IBM, Cisco, Huawei, and Lenovo, etc. industry-related manufacturers.
TPM mainly uses security-proven encryption keys to bring more robust security to the device. It is the core of many security applications. For example, the BitLocker function integrated by Microsoft in Windows Server 2008/Windows Vista and later versions need to be used. When using the BitLocker function, BitLocker will encrypt the Windows hard disk partition and save the key on the TPM. Due to the characteristics of the TPM, this key will not be exposed to the outside world, and there is a unique encryption key to Protect this key, so the security of TPM can be said to be very high.
After the launch of TPM, the TCG organization has been continuously revising the relevant specifications of TPM. The revised version of TPM 1.2 was released on March 3, 2011, while TPM 2.0 was officially released in April 2014 and has been modified since then. Updated and standardized on June 29, 2015, by the International Organization for Standardization (ISO) and the International Electrotechnical Commission (IEC) as ISO/IEC 11889:2015.
How to Enable TPM 2.0 Function?
The current mainstream PC already supports the TPM 2.0 function, but it is turned off by default in most cases. The following two methods are used to check whether it is enabled.
Method 1: Use the Windows Security app
1. Run Settings > Update & Security > Windows Security > Device Security
A. If you don't see the Secure Processor section on this screen, your PC may have a disabled TPM. See How to Enable TPM or check your PC manufacturer's support information for instructions for more information. Enable TPM. If you could enable the TPM, complete the next step to verify that it is TPM 2.0.
B. If you see the Security Processor Details option under Security Processor, select that option and verify that your Specification Version is 2.0. If it is lower than 2.0, your device is not Windows 11 compliant.
Method 2: Use the Microsoft Management Console
1. Press [Windows key] + R or select Start > Run.
2. Type "tpm.msc" (without the quotation marks) and select OK.
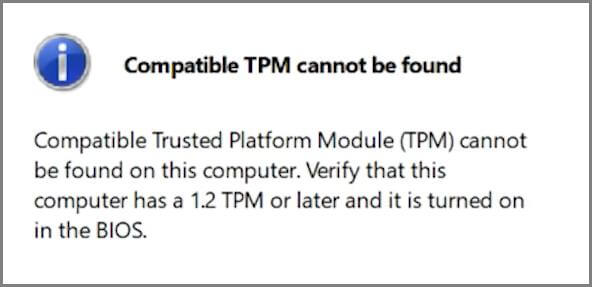
A. If you see a message saying "No compatible TPM found," your PC may have a disabled TPM. To enable TPM, you can check your PC manufacturer's support information for instructions on enabling TPM. If you could allow the TPM, complete the next step to verify that it is TPM 2.0.
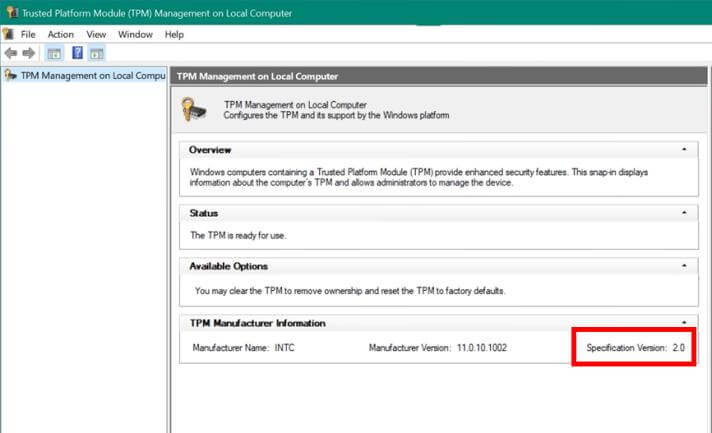
B. If you see a message confirming that the TPM is ready to use, check the specification version under the TPM manufacturer information to verify that it is 2.0. If it is lower than 2.0, your device is not Windows 11 compliant.
Detailed steps are as follow:
If you do not have a TPM 2.0 module on your motherboard, the situation is as follows:
If you have a TPM 2.0 chip and it is enabled, you will see the following message:
If you need to enable TPM, these settings will be managed through the UEFI BIOS (PC firmware) and vary by device. You can access these settings by selecting: Settings > Update & Security > Recovery > Restart now.
Select Troubleshoot > Advanced Options > UEFI Firmware Settings > Reboot to make changes on the next screen. These settings are sometimes contained in a submenu in the UEFI BIOS labeled Advanced, Security, or Trusted Computing. Options to enable TPM may be marked as Secure Device, Secure Device Support, TPM Status, AMD Switch, AMD PSP fTPM, Intel PTT, or Intel Platform Trust Technology.
Check out your PC manufacturer's support information or contact them on how to do this. Here are some links to information provided by your PC manufacturer to help you get started:
Asus:https://www.asus.com/support/FAQ/1046223
Dell:https://www.dell.com/support/kbdoc/en-us/000189676
HP: https://support.hp.com/us-en/document/ish_4300937-4295746-16?openCLC=true
Lenovo:https://support.lenovo.com/us/en/solutions/ht512598
Microsoft Surface:https://support.microsoft.com/surface/0f5953d2-befa-3617-a0e5-9735945af774
The following is an excerpt of the method of enabling TPM introduced by Asus. How to enable TPM in UEFI BIOS?
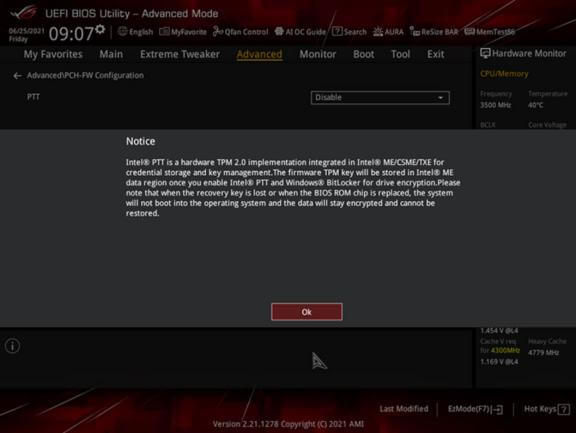
Intel motherboard (take ROG Z590-A GAMING WIFI as an example)
1. Press "Del" when the ASUS or ROG logo appears to enter the BIOS.
2. Go to Advanced\PCH-FW Configuration page and enable "PTT".
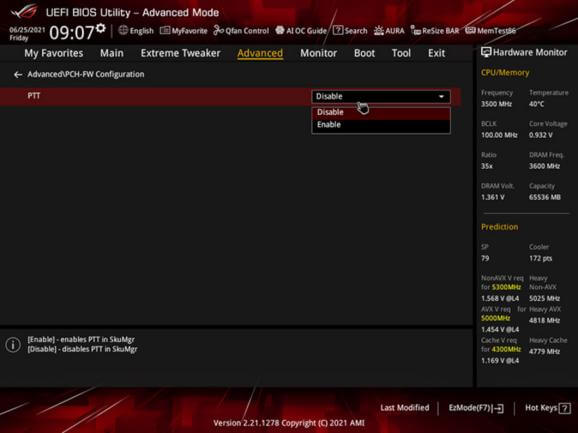
3. Once you try to make changes in the BIOS, a notification box will appear (see below). Just click the OK button, then press F10 to save the changes and restart the PC.
AMD motherboard (take ROG X570-E GAMING as an example)
1. Press "Del" when the ASUS or ROG logo appears to enter the BIOS.
2. Go to the Advanced\AMD fTPM configuration page and switch the "TPM Device Selection" option to "Firmware TPM".
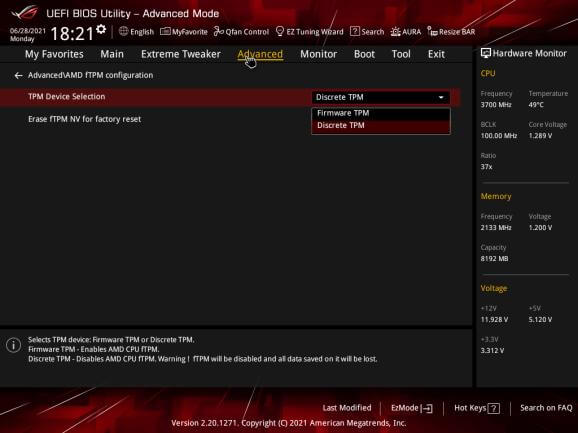
3. Press F10 to save changes and reboot.
Windows 11 Upgrade Checker
Hot Articles
- The Difference between Windows 11 and Windows 10| Windows 11 VS Windows 10
- Should You Upgrade to Windows 11? What Benefits of Windows 11?
- TPM for Windows 11 Update | Windows 11 Download Without TPM 2.0
- Windows 11 Home VS Professional: The Differences and Similarities
- What to Do When Windows 11 Not Booting|Fixes to Get Your PC Running
- How to Enable TMP 2.0 for Windows 11 Upgrade
- Solutions to Fix 'Cannot Download Windows 11' Issue
- Reinstalling Windows 11 Without Data Loss (Best Solution)
- Optimize Windows 11 for Gaming(7 Effective Ways)
- How to Fix 100% Disk Usage in Windows 11