Written byCharlesUpdated on Jun 06, 2025
How to Use KIOXIA Portable SSD on Mac?
Approved byGerhard Chou
Before we start: If you want to use a KIOXIA portable SSD on Mac, you can download and install Donemax NTFS for Mac on your Mac. This tool can help you mount KIOXIA portable SSD on Mac, repair damaged KIOXIA portable SSD on Mac, reformat KIOXIA portable SSD on Mac and allow your Mac to read-write an NTFS KIOXIA portable SSD without any limitation.
PAGE CONTENT:
- Compatibility Check: Is the KIOXIA SSD Compatible With Your Mac
- Unboxing and Physical Setup
- Initial SSD Recognition on macOS: Check the KIOXIA SSD
- Formatting the KIOXIA SSD for macOS
- Using the KIOXIA SSD for Different Purposes on Mac
- How to Use an NTFS KIOXIA SSD on Mac Without Formatting?
- Protect KIOXIA SSD on Mac and Fix Common Issues
- FAQs About Using KIOXIA SSD on Mac
- Conclusion
KIOXIA, formerly Toshiba Memory, is a trusted name in storage technology known for offering fast, durable, and compact SSDs. Mac users, particularly creatives, professionals, and students, often rely on portable SSDs for their speed, convenience, and portability. Whether you're using your KIOXIA SSD for Time Machine backups, media editing, or simple file transfers, setting it up properly on macOS is key.
In this guide, we'll walk you through everything you need to know to get your KIOXIA portable SSD working smoothly with your Mac. From connecting and formatting the drive to optimizing performance and resolving common issues, you'll find comprehensive steps here.
Compatibility Check: Is the KIOXIA SSD Compatible With Your Mac
Before plugging in your KIOXIA SSD, confirm that it is compatible with your Mac system.
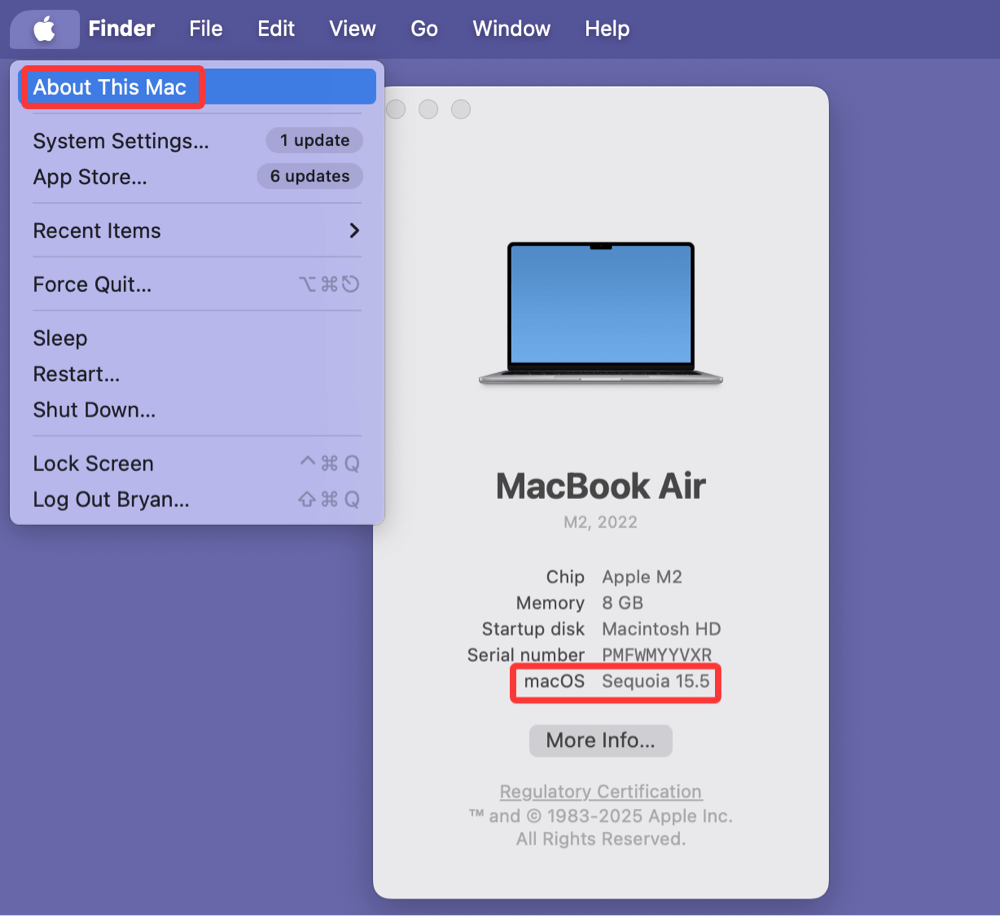
macOS Version
KIOXIA SSDs typically support macOS versions from macOS 10.12 (Sierra) onwards. Check your Mac's version by going to Apple Menu > About This Mac.
Interface and Port Type
Most KIOXIA portable SSDs use a USB 3.2 Gen 2 interface via a USB-C or USB-A cable. If your MacBook has Thunderbolt 3 or Thunderbolt 4/USB-C ports, you can connect directly. Otherwise, use a USB-A adapter.
Supported Devices
KIOXIA SSDs work with:
- MacBook Pro and MacBook Air (2016 or newer)
- iMac (2017 or newer)
- Mac mini (2018 or newer)
- Mac Studio, Mac Pro
Always ensure you're using the provided cable or a high-quality one to avoid power or data issues.
Unboxing and Physical Setup
What's in the Box
A typical KIOXIA portable SSD package includes:
- The SSD unit
- A USB-C to USB-A cable (or USB-C to USB-C)
- Quick start guide
- Warranty documentation
Connecting the SSD
- Plug the USB cable into your Mac.
- Connect the other end to your SSD.
- The SSD should power on, and its LED indicator will light up.
LED Indicator Meaning
- Solid Light: SSD is connected and idle
- Blinking Light: Data transfer is in progress
- No Light: No connection or power issue
Initial SSD Recognition on macOS: Check the KIOXIA SSD
Once connected, your Mac should recognize the SSD automatically.
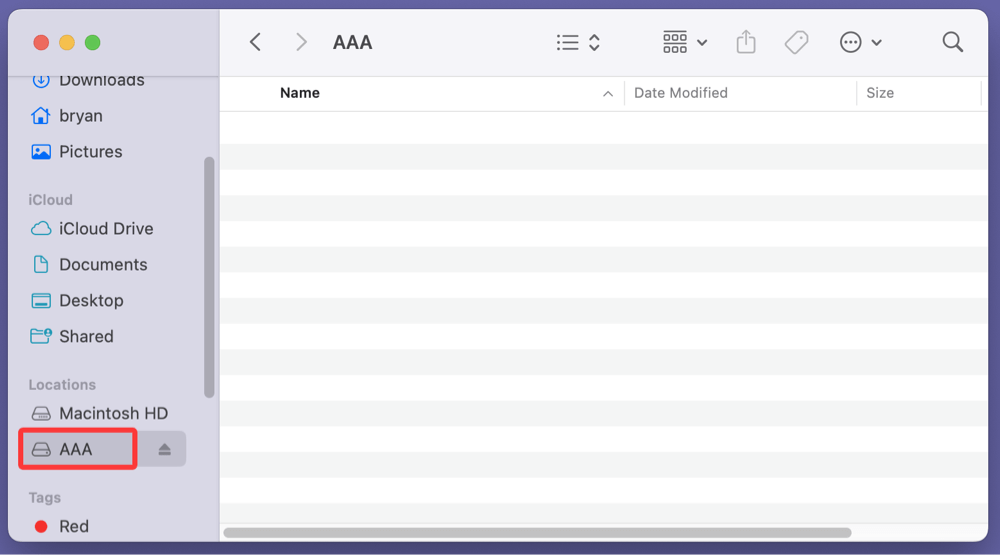
Check in Finder
Open Finder. Look under "Locations" in the sidebar. If the SSD appears here, it’s ready to use.
Check in Disk Utility
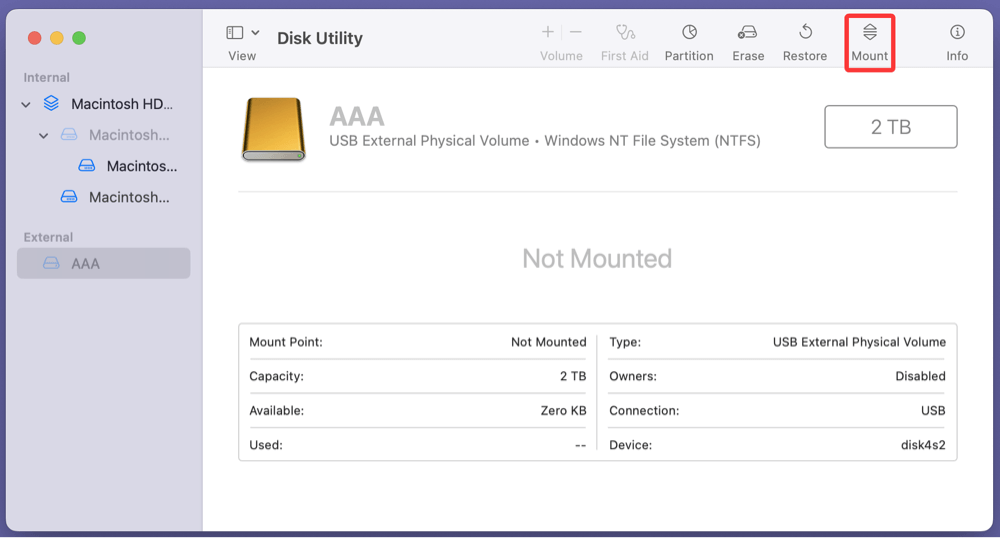
If it doesn't appear in Finder:
- Go to Applications > Utilities > Disk Utility
- Look for the SSD in the left sidebar
- If it shows up as "Untitled" or "Not Mounted," select it and click Mount
![Using a KIOXIA portable SSD with your Mac]()
If your Mac still doesn't recognize the drive, refer to the troubleshooting section below.
Formatting the KIOXIA SSD for macOS
Properly formatting your KIOXIA Portable SSD ensures optimal performance and compatibility with your Mac. This step is especially important if the drive came pre-formatted in NTFS (commonly used for Windows) or if you plan to use the SSD with specific macOS features like Time Machine or booting macOS.
Why Formatting Matters
When you first connect your SSD, macOS may detect it as "read-only" if it's using a Windows-native file system like NTFS. Formatting not only removes this limitation but also allows you to choose the best file system for your intended use. For example:
- APFS (Apple File System): Best for macOS users who want speed and efficiency. Required for macOS High Sierra and later for internal and external SSDs.
- Mac OS Extended (Journaled): Also known as HFS+, this format is ideal for compatibility with older Macs or when using the SSD as a Time Machine backup disk.
- ExFAT: The best option if you need cross-platform compatibility (macOS and Windows). It handles large files and is better than FAT32, which is outdated and has a 4GB file size limit.
💡 Caution: Formatting erases all data on the SSD. Make sure to back up any important files before proceeding.
Step-by-Step Guide to Format Your KIOXIA SSD on macOS
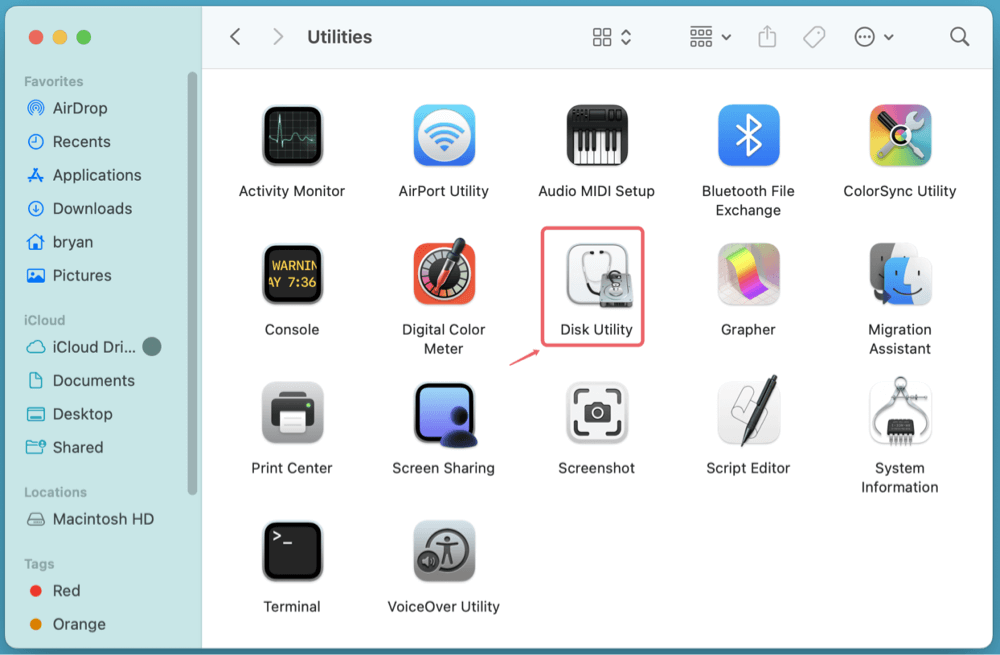
1. Launch Disk Utility
- Click on Finder > Applications > Utilities > Disk Utility, or press Command + Space and search "Disk Utility."
![Using a KIOXIA portable SSD with your Mac]()
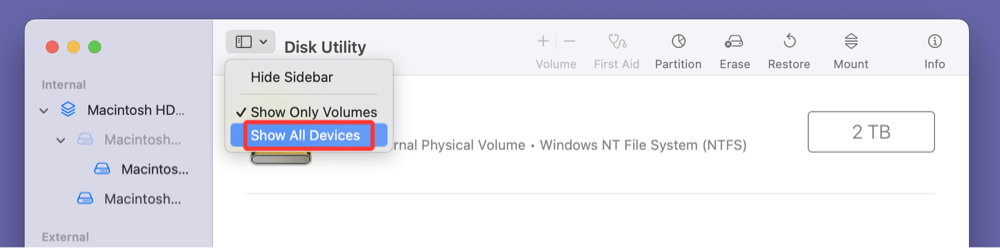
- Once open, select View > Show All Devices (important for seeing the full SSD and its partitions).
![Using a KIOXIA portable SSD with your Mac]()
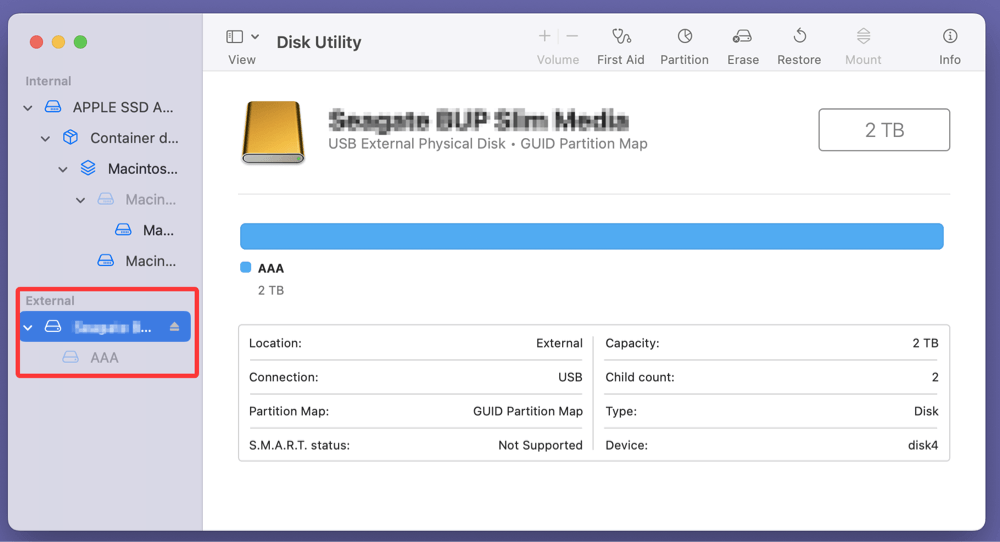
2. Select the Drive
In the left sidebar, find your KIOXIA SSD under "External." Select the top-level item (not just the volume name beneath it).
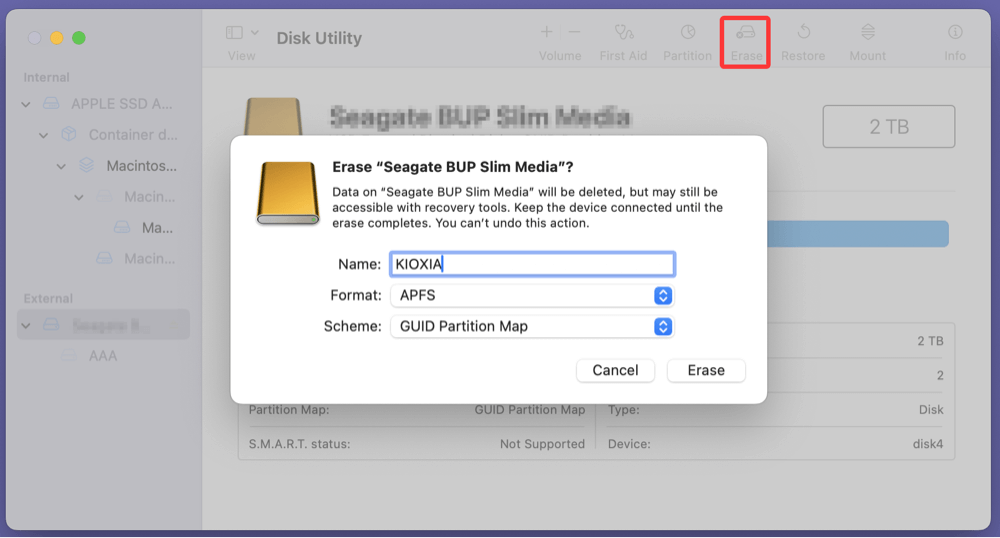
3. Erase and Format the Drive
Click the Erase button at the top toolbar. You'll be prompted with several fields:
- Name: Give your SSD a recognizable name (e.g., “KIOXIA SSD”).
- Format Options:
- APFS – Ideal for general macOS users and SSD performance
- Mac OS Extended (Journaled) – Choose this if using for Time Machine
- ExFAT – Choose if you want the drive usable on both Mac and Windows
- Scheme: Always select GUID Partition Map (essential for macOS boot and Time Machine compatibility)
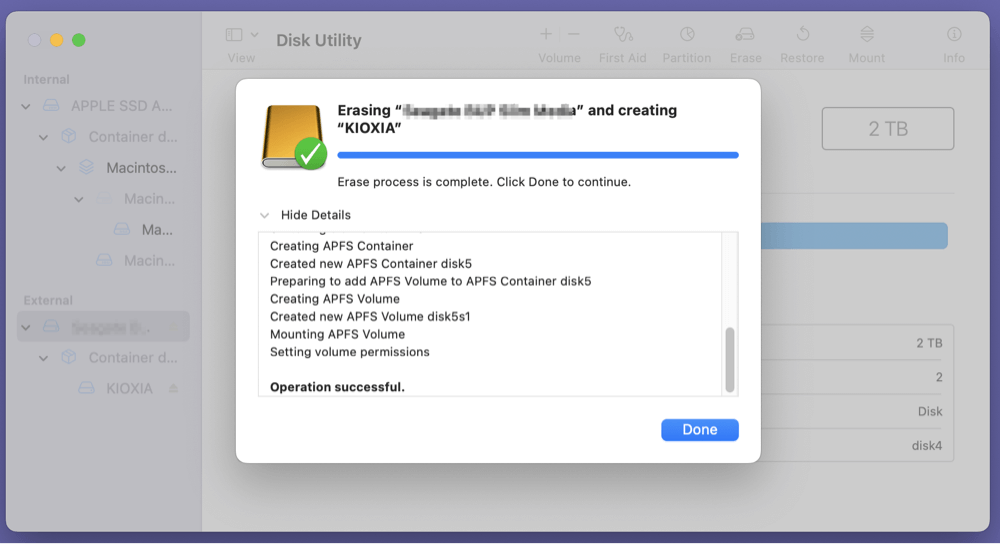
4. Confirm and Erase
Click Erase. The process will take a few seconds to a minute, depending on the drive size. When done, click Done and close Disk Utility.
Advanced Formatting (Optional)
If you want to create multiple partitions on your KIOXIA SSD - for example, one for Time Machine and one for file storage - you can do this in Disk Utility by clicking on Partition instead of Erase.
Steps to Partition:
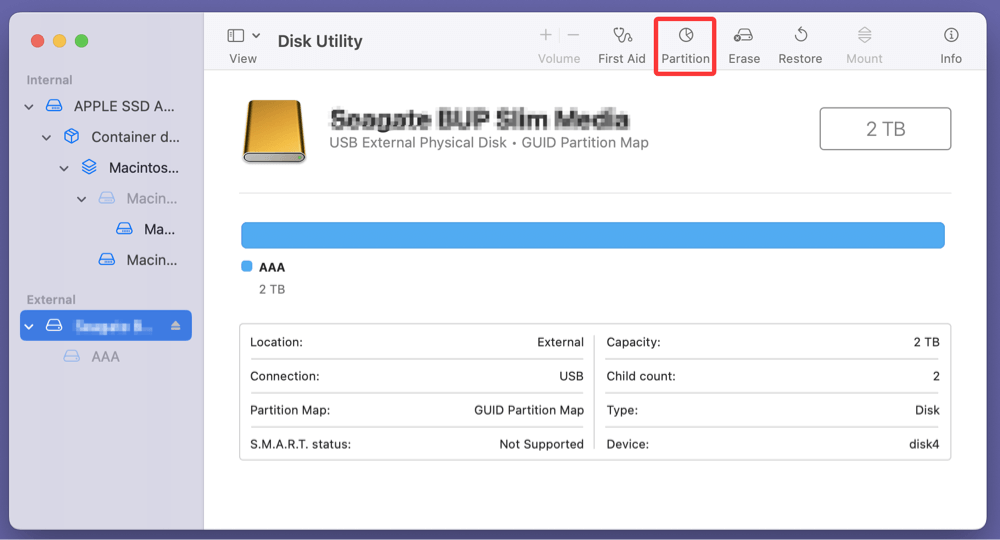
- Select the top-level SSD device
- Click Partition
![Using a KIOXIA portable SSD with your Mac]()
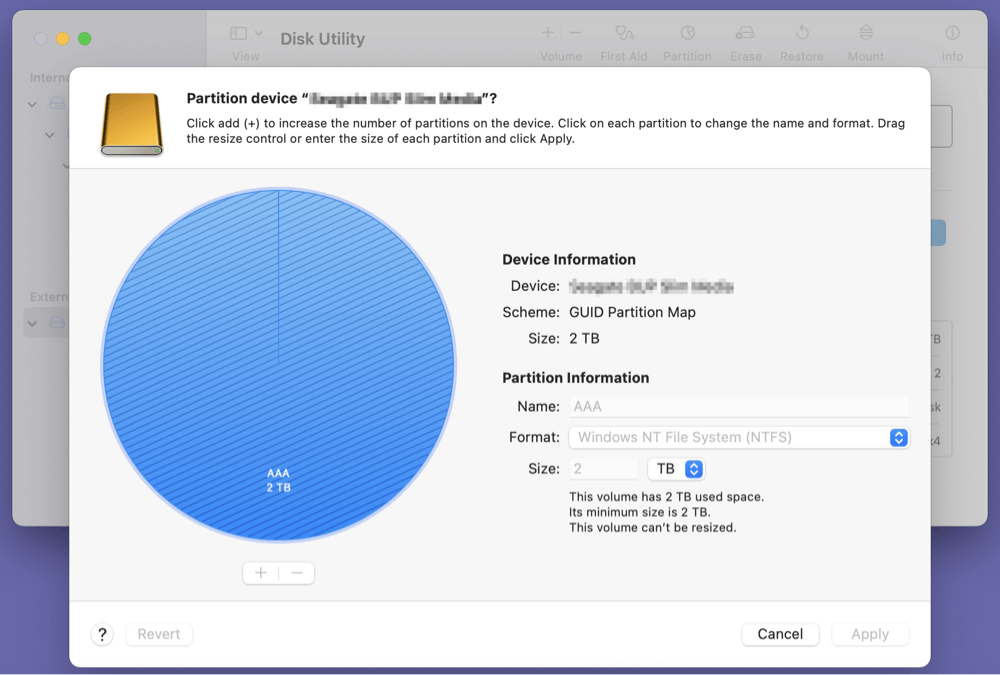
- Use the "+" button to create new partitions
- Assign names, sizes, and formats to each
- Click Apply
![Using a KIOXIA portable SSD with your Mac]()
Partitioning can be useful but may slightly reduce total usable space.
💡 Note: If you have lost data due to formatting or partitioning your KIOXIA portable SSD on Mac, just use data recovery software - such as Donemax Data Recovery to recover the lost data.
Using the KIOXIA SSD for Different Purposes on Mac
Once formatted, your KIOXIA SSD can be used in various ways depending on your needs.
1. Time Machine Backup
macOS's built-in Time Machine tool is a powerful backup solution.
Setup Steps:
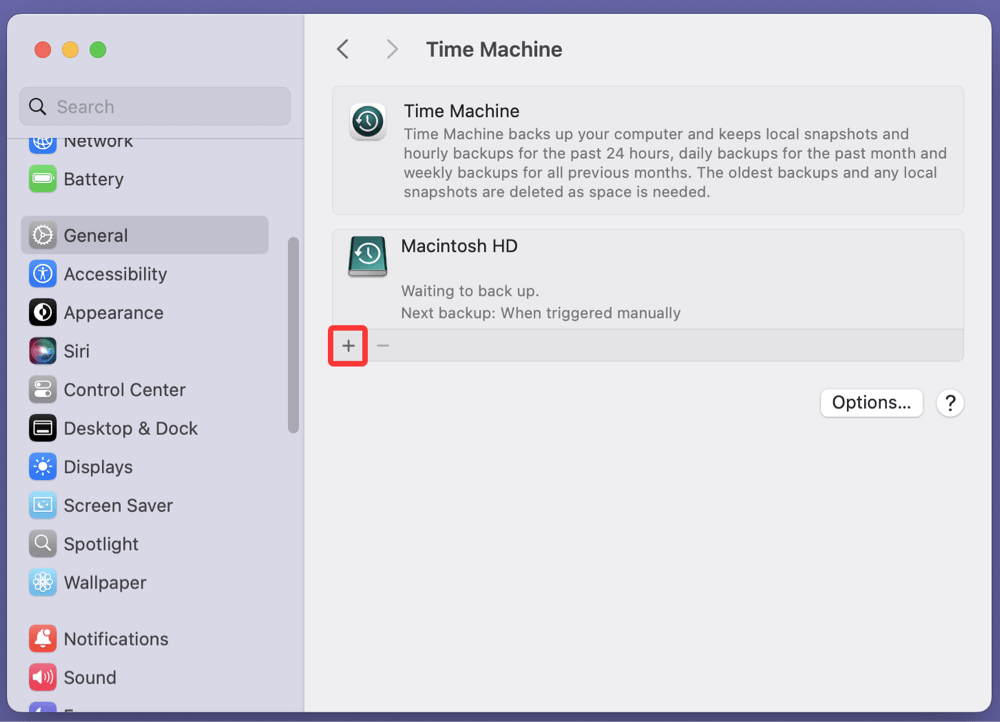
- Go to System Settings > General > Time Machine
- Click +
![Using a KIOXIA portable SSD with your Mac]()
- Select your KIOXIA SSD, click Set Up Disk.
![Using a KIOXIA portable SSD with your Mac]()
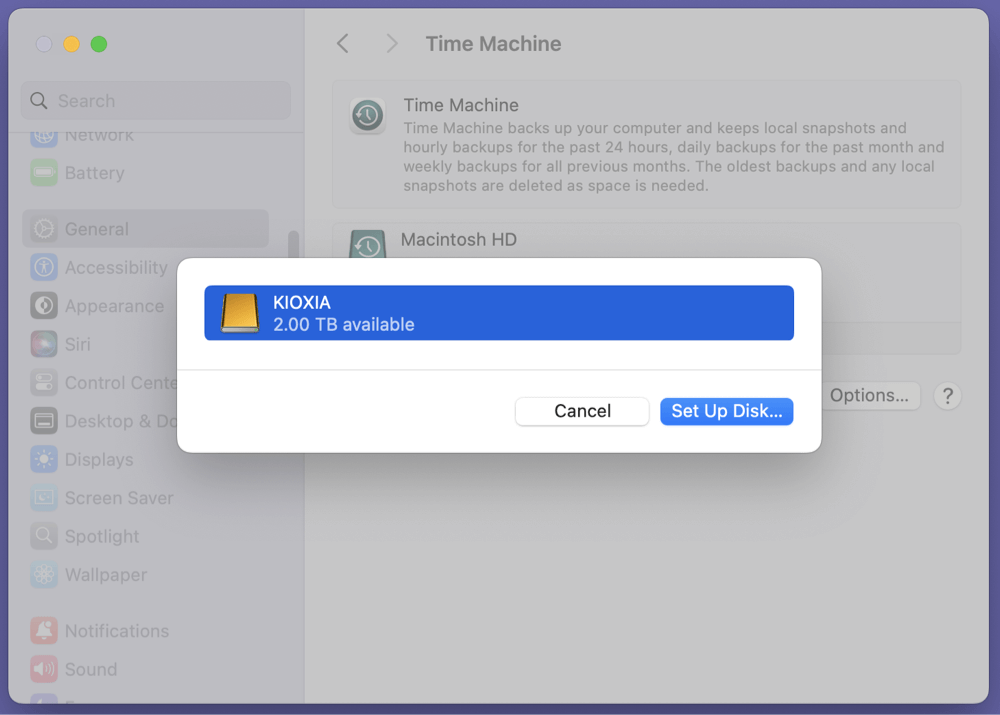
Time Machine will start backing up your Mac at scheduled intervals.
2. File Storage & Media Editing
Use your SSD to store:
- Large video files
- Raw images
- Music libraries
- Project folders
Apps like Final Cut Pro, Logic Pro, and Adobe Premiere Pro benefit greatly from the speed of SSDs during real-time editing and rendering.
3. Bootable macOS Installer (Advanced)
You can create a bootable macOS installer for system recovery.
Steps:
- Download macOS from the App Store
- Format your KIOXIA SSD as APFS or HFS+
- Use Terminal with the createinstallmedia command
Example for macOS Sonoma:
sudo /Applications/Install\ macOS\ Sonoma.app/Contents/Resources/createinstallmedia --volume /Volumes/KIOXIA
How to Use an NTFS KIOXIA SSD on Mac Without Formatting?
If the KIOXIA portable SSD has been formatted to NTFS file system and you don't want to reformat it, just try third-party NTFS for Mac software. These NTFS for Mac tools allow Mac users to write data to NTFS drives without any limitation.
Step 1. Download and install the reliable NTFS for Mac software - Donemax NTFS for Mac. It is 100% safe and very easy-to-use.
Step 2. Open Donemax NTFS for Mac, under NTFS disk, select the KIOXIA portable SSD. Click on Mount button.
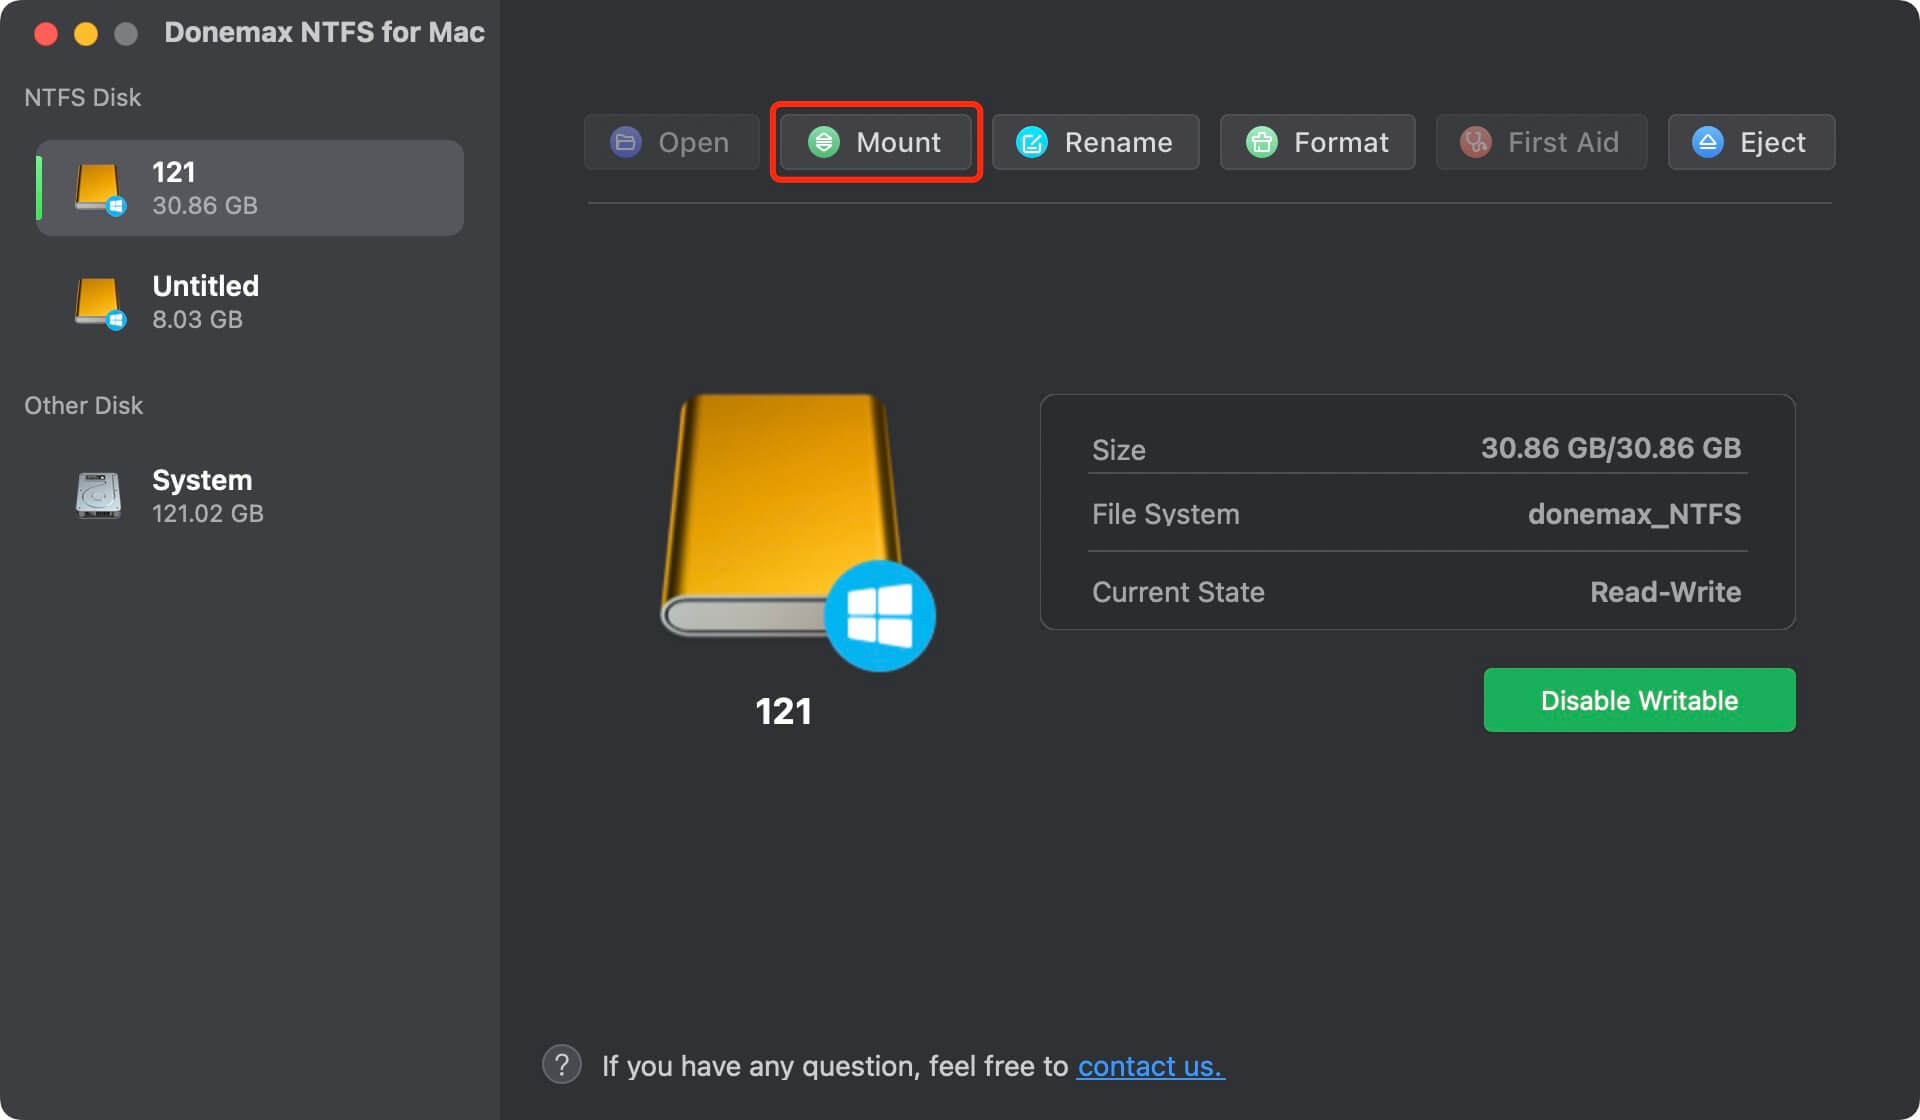
Step 3. Click Enable Writable so that your Mac can read-write the NTFS KIOXIA portable SSD without any limitation.

Protect KIOXIA SSD on Mac and Fix Common Issues
Performance Tips & Maintenance
1. Safely Eject the SSD
Before unplugging:
- Right-click the SSD in Finder and click Eject
- Or drag the SSD icon to the Trash
This prevents data corruption.
2. Keep SSD Cool
Avoid placing the SSD on hot surfaces or under direct sunlight during long usage periods.
3. Monitor SSD Health
You can use third-party tools to check the SSD's condition:
- DriveDx
- Smartmontools
These tools show drive temperature, wear level, and remaining life.
4. Firmware Updates
Occasionally, KIOXIA may release firmware updates. Visit the KIOXIA Support Page to check if your model has updates and follow their instructions for macOS.
Troubleshooting Common Issues
1. KIOXIA SSD Not Showing Up on Mac
- Try a different USB port or cable
- Restart your Mac
- Open Finder Settings, click Sidebar and General, ensure External disks is selected.
- Open Disk Utility > View > Show All Devices
- Try on another Mac to isolate the issue
2. KIOXIA SSD is Read-Only on Mac
This happens if it's formatted in NTFS.
Solution:
- Reformat to APFS or exFAT using Disk Utility.
- Use third-party NTFS for Mac tool to enable writable for the NTFS KIOXIA SSD.
3. Slow Transfer Speeds
- Use a high-speed USB 3.2 or Thunderbolt port
- Ensure no other high-bandwidth devices are connected
- Test with different files and sizes
4. Disk Errors
If you receive error messages like "Disk Not Ejected Properly":
- Use Disk Utility > First Aid to scan and repair
- Check for background apps using the drive
- Avoid unplugging while data is transferring
FAQs About Using KIOXIA SSD on Mac
1. Can I use this KIOXIA SSD on both Mac and Windows?
Yes. Format it in ExFAT to maintain compatibility with both systems.
2. Does the KIOXIA SSD come with encryption?
KIOXIA portable SSDs typically don't come pre-encrypted, but you can enable macOS's built-in FileVault or use Disk Utility > Encrypt.
3. Does KIOXIA offer software for macOS?
KIOXIA's SSD Utility is mostly Windows-based. However, most drive maintenance functions are available via macOS's native tools.
4. Is the SSD water-resistant or shockproof?
Some models, like the KIOXIA EXCERIA PLUS Portable SSD, offer drop resistance (up to 2 meters) and some splash protection. Check the product specifications for your model.
Conclusion
Using a KIOXIA portable SSD with your Mac is straightforward, but optimizing the setup ensures better performance, compatibility, and longevity. From formatting your SSD in the right file system to using it for Time Machine backups or demanding media work, your KIOXIA SSD can become an essential part of your workflow.
If the KIOXIA SSD is an NTFS drive, you can reformat it to Apple file system or install an NTFS driver on your Mac so that you can read-write NTFS drives without formatting.
Always remember to eject safely, monitor performance occasionally, and format it appropriately for your needs. With these practices in place, your KIOXIA SSD will serve you reliably for years.
Donemax NTFS for Mac
An easy-to-use NTFS for Mac tool to help you enable writable for NTFS drives on Mac so that you can read-write NTFS drives on Mac without any limitation. It also can help you mount, format, repair, rename, open drive on your Mac.
Related Articles
- Mar 27, 2026Format an External Hard Drive Using CMD (2026 New)?
- Jan 02, 2025Disk is OFF or Offline on Mac, Fix It Now
- Mar 21, 2025How to Use Seagate Game Drive for Xbox: A Complete Guide
- Dec 05, 2024How to Use Samsung Portable SSD T5 EVO on Mac
- Jul 08, 2024Seagate External SSD Not Mounting on Mac, Fix It With These Methods
- Apr 25, 2025Fix ADATA External Hard Drive Not Working (such as not mounting, not detected, being read-only) on Mac

Contributing Writer
Charles
Charles, who lives in Sydney, Australia, is an editor & writer of Donemax Team. He is good at writing articles related with Apple Mac computers, Windows operating systems, data recovery, data erasure, disk clone and data backup, etc. He loves reading and playing tennis in his spare time and is interested in testing new digital devices such as mobile phones, Macs, HDDs, SSDs, digital cameras, etc.

Editor in chief
Gerhard Chou
In order to effectively solve the problems for our customers, every article and troubleshooting solution published on our website has been strictly tested and practiced. Our editors love researching and using computers and testing software, and are willing to help computer users with their problems