Written byCharlesUpdated on Jul 29, 2026
How to Factory Reset an iMac Safely (Intel & Apple Silicon)
Approved byGerhard Chou
Before we start: It's important to back up data first before factory reset the iMac. Then you can erase the drive and reinstall the macOS to finish the factory reset. If you will sell or give away the iMac, you also need to wipe the data permanently with Donemax Data Eraser for Mac.
PAGE CONTENT:
Factory resetting an iMac can breathe new life into your device, solve stubborn issues, or prepare it for resale. Whether you're experiencing persistent performance problems or simply passing your iMac on to someone else, restoring it to factory settings ensures your personal data is completely erased and macOS is reinstalled fresh. This comprehensive guide walks you through every step of the process—from preparation and data backup to entering macOS Recovery, erasing your disk, and reinstalling the operating system.

Why Factory Reset an iMac?
There are several reasons you might need to factory reset your iMac:
- Selling or Giving It Away: Ensure your personal data is completely erased and the new user gets a clean machine.
- System Performance Issues: Resetting can resolve major software glitches, malware, or sluggish performance.
- Start Fresh: Sometimes it's easier to start from scratch rather than troubleshoot ongoing issues.
- Return to Default Settings: If your settings and configurations are too out of whack, a reset helps return everything to its default state.
Regardless of the reason, factory resetting an iMac is a powerful tool—but it must be done carefully to avoid data loss or installation problems.
Prepare for the iMac Factory Reset
Before diving into the reset process, preparation is critical. Here's what you should do first.
1. Back Up Your Data
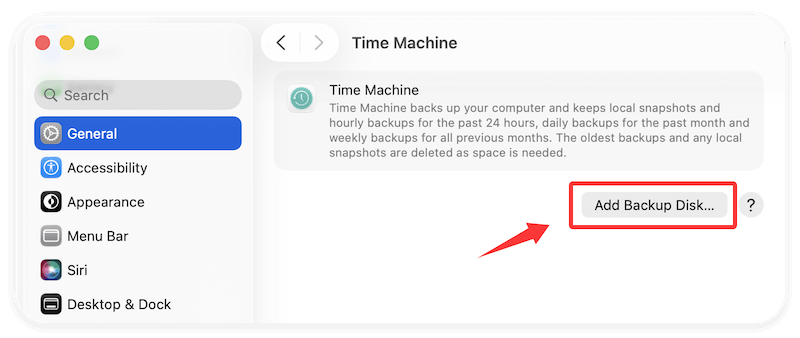
A factory reset will erase everything on your iMac. That means documents, photos, videos, apps, settings—everything. Backing up is your safety net. You can use Time Machine to back up the data:
- Attach a hard disk externally.
- Select Time Machine under System Settings.
- Select your external drive by clicking Add Backup Disk.
- Turn on Time Machine and wait for the backup to complete.
Alternatively, you can manually copy important files to an external drive or use any cloud service.
2. Sign Out of Apple Services
If you're preparing your iMac for resale, sign out of all Apple services to avoid Activation Lock issues for the next user.
- iCloud: Go to System Preferences > Apple ID > Overview, then click Sign Out.
- iTunes (macOS Mojave or earlier) or Music: Open iTunes or Music, click Account > Authorizations > Deauthorize This Computer.
- iMessage: Open Messages > Preferences > iMessage, then click Sign Out.
3. Disconnect Devices and Peripherals
Unplug external drives, printers, accessories, and other connected hardware. This reduces the risk of errors during formatting.
4. Note Your Apple ID and macOS Version
Keep your Apple ID and password handy—you'll need them during reinstallation. Also, jot down your macOS version so you know what you're reinstalling.
Steps to Factory Reset an iMac
Now, you can start to reset the iMac by following the steps below:
Entering macOS Recovery on iMac
Once you're ready, it's time to enter macOS Recovery, the utility that lets you erase and reinstall macOS.
For Intel-based iMacs:
- Start your iMac again.
- Press and hold Command (⌘) + R right away until you see a spinning globe or the Apple logo.
- When the macOS Utilities window appears, let go of the keys.
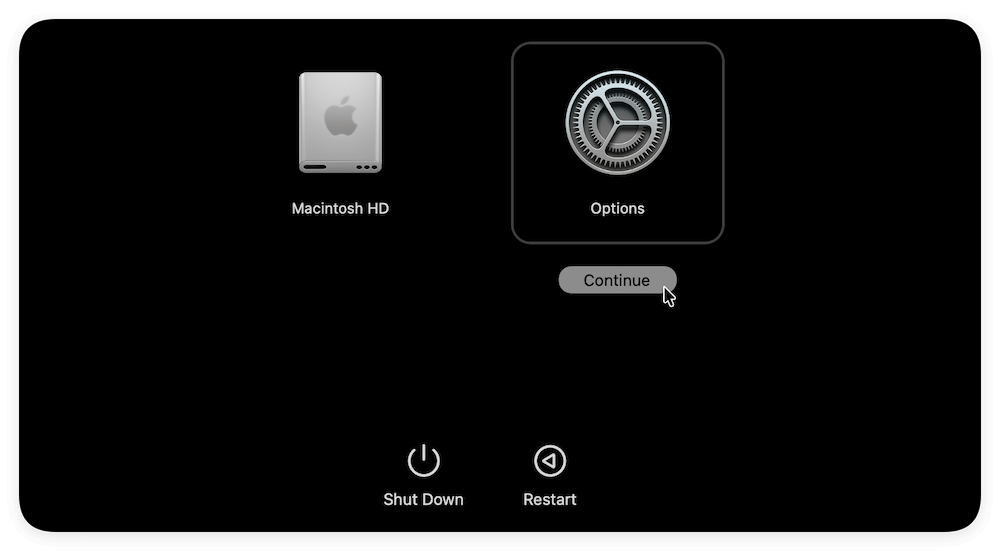
For Apple Silicon iMacs:
- Turn Off your iMac.
- Hold down the power button until the message "Loading startup options" shows up.
- Click Continue after selecting Options.
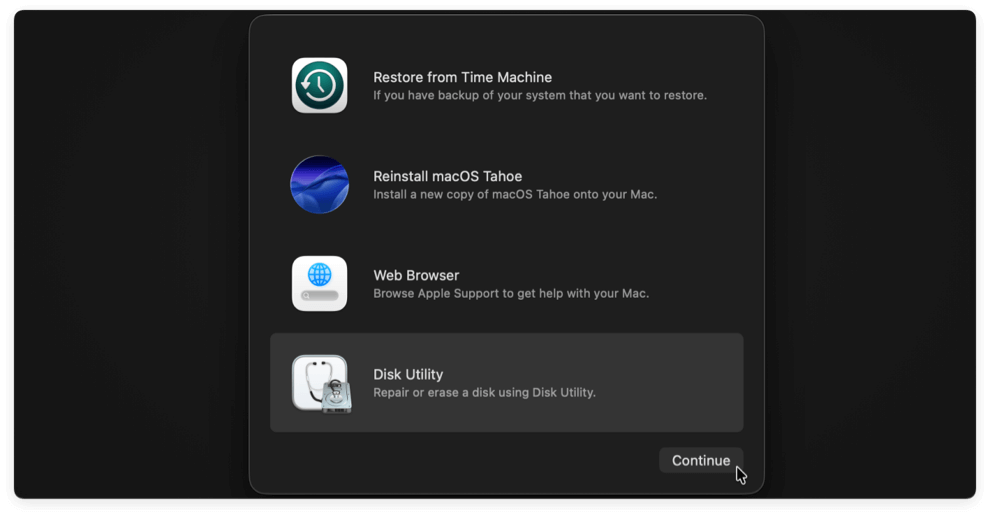
Once in recovery mode, you'll have access to a few key tools: Disk Utility, Reinstall macOS, Safari, and Time Machine.
Erase Your iMac Hard Drive Using Disk Utility
Once you've successfully booted into macOS Recovery Mode, the next critical step is to completely erase the internal drive—this wipes all user data and macOS itself. You'll do this using Disk Utility, a powerful tool that manages storage devices on a Mac.
Step 1: Launch Disk Utility
After entering Recovery Mode, you'll see a window titled macOS Utilities. Click on Disk Utility and then hit the Continue button. Wait a few moments while Disk Utility loads the available storage devices.
Step 2: View All Storage Devices
By default, Disk Utility may only show volumes instead of the full storage hierarchy. To ensure you erase the correct disk completely, select the View menu located in the upper-left corner. Select "Show All Devices".
This will display a full list of all physical drives and their respective volumes/containers. This view is critical because it lets you erase the entire disk—not just a partition—ensuring a true factory reset.
Step 3: Select Your Startup Disk
Select the top-level disk (not the indented volume) that represents your iMac's internal storage. For instance, if "Macintosh HD" is under a drive labeled "APPLE SSD", select "APPLE SSD".
Step 4: Confirm and Erase
With the correct disk selected. Click the Erase button in the toolbar. A dialog box will pop up asking for details. After configuring the options, click Erase. Wait for Disk Utility to complete the process. It might take a few minutes, depending on disk size and speed.

💡 Important: If your iMac uses a Fusion Drive (a combo of SSD and HDD), you may see multiple internal disks. If Fusion has been split or corrupted, you might need to use Terminal to re-create the Fusion Drive before proceeding.
Once it's done, you'll see a confirmation message. If the erase was successful, the volume will remount.
Reinstall macOS
Now that your disk is wiped, it's time to reinstall the operating system.
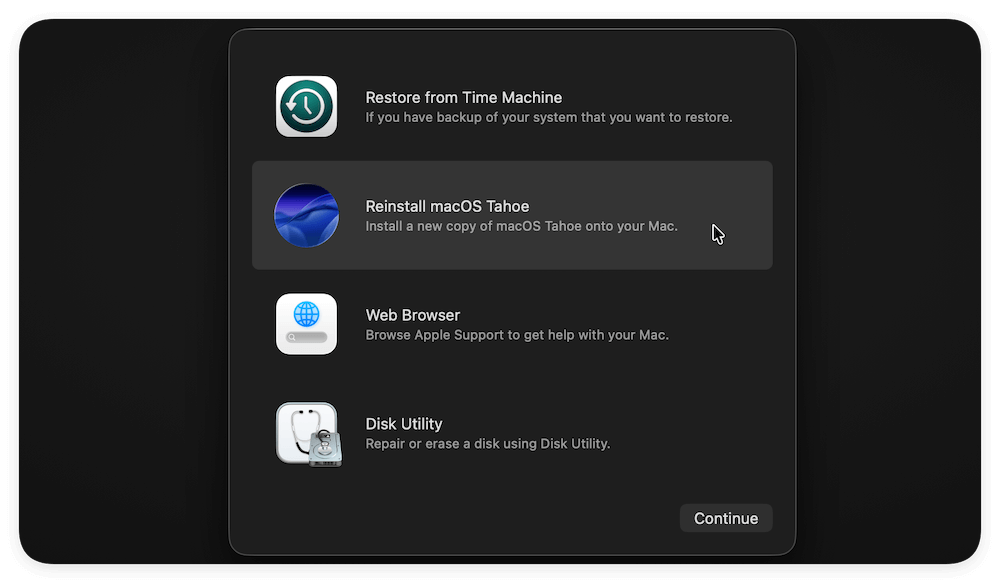
- In the macOS Utilities window, click Reinstall macOS and hit Continue.
- Follow the prompts, agree to the terms, and select the newly erased Macintosh HD as the install location.
- Wait for macOS to download and install. This can take 20 - 60 minutes depending on internet speed.
Your iMac will restart several times. Once finished, you'll land on the Setup Assistant screen.
💡 Extra Tip: macOS Won't Reinstall?
- Ensure you're connected to the internet.
- If servers are overloaded or your network is slow, try again later.
- Use a different recovery method (Internet Recovery or bootable USB installer).
Tips after Restore iMac to Factory Settings
Once your iMac is restored and you will keep it for further use, follow these best practices to keep it running smoothly:
1. Keep Software Updated - Go to System Settings > General > Software Update and enable automatic updates for the OS and apps.
2. Reinstall Apps Selectively - Avoid restoring everything if you're trying to start fresh. Instead, reinstall apps from the App Store or trusted sources.
3. Set Up iCloud and Find My Mac - Ensure your iMac is connected to iCloud and Find My Mac is enabled in case of future theft or loss.
4. Optimize Startup Items - Avoid reinstalling unnecessary login items or background processes that could slow down your iMac.
5. Run Regular Backups - Now that your system is fresh, establish a regular backup routine using Time Machine or cloud services to prevent data loss.
Erase iMac after Factory Reset [Optional]
If you will sell or donate the iMac after a factory reset, then you need to do another thing - wiping the data permanently. It can help you protect your privacy information from falling into the wrong hands.
Why it's necessary to wipe data after a factory reset? You may think all your personal data was removed completely from the iMac after a factory reset. Actually, the data can still be recovered with professional recovery methods. To prevent the removed data from being recovered, you can use the software Donemax Data Eraser for Mac. The software can help you wipe data permanently and no recovery methods can recover the wiped data.
Donemax Data Eraser for Mac
- Permanently wipe data to protect privacy information safe.
- Three modes to shred files/folders or wipe data completely.
- 100% safe and easy-to-use data erasure software for Mac.
To wipe the data after a factory reset on iMac, you can just wipe the free space of the iMac drive directly. It can ensure the removed data is gone forever. Here are the steps:
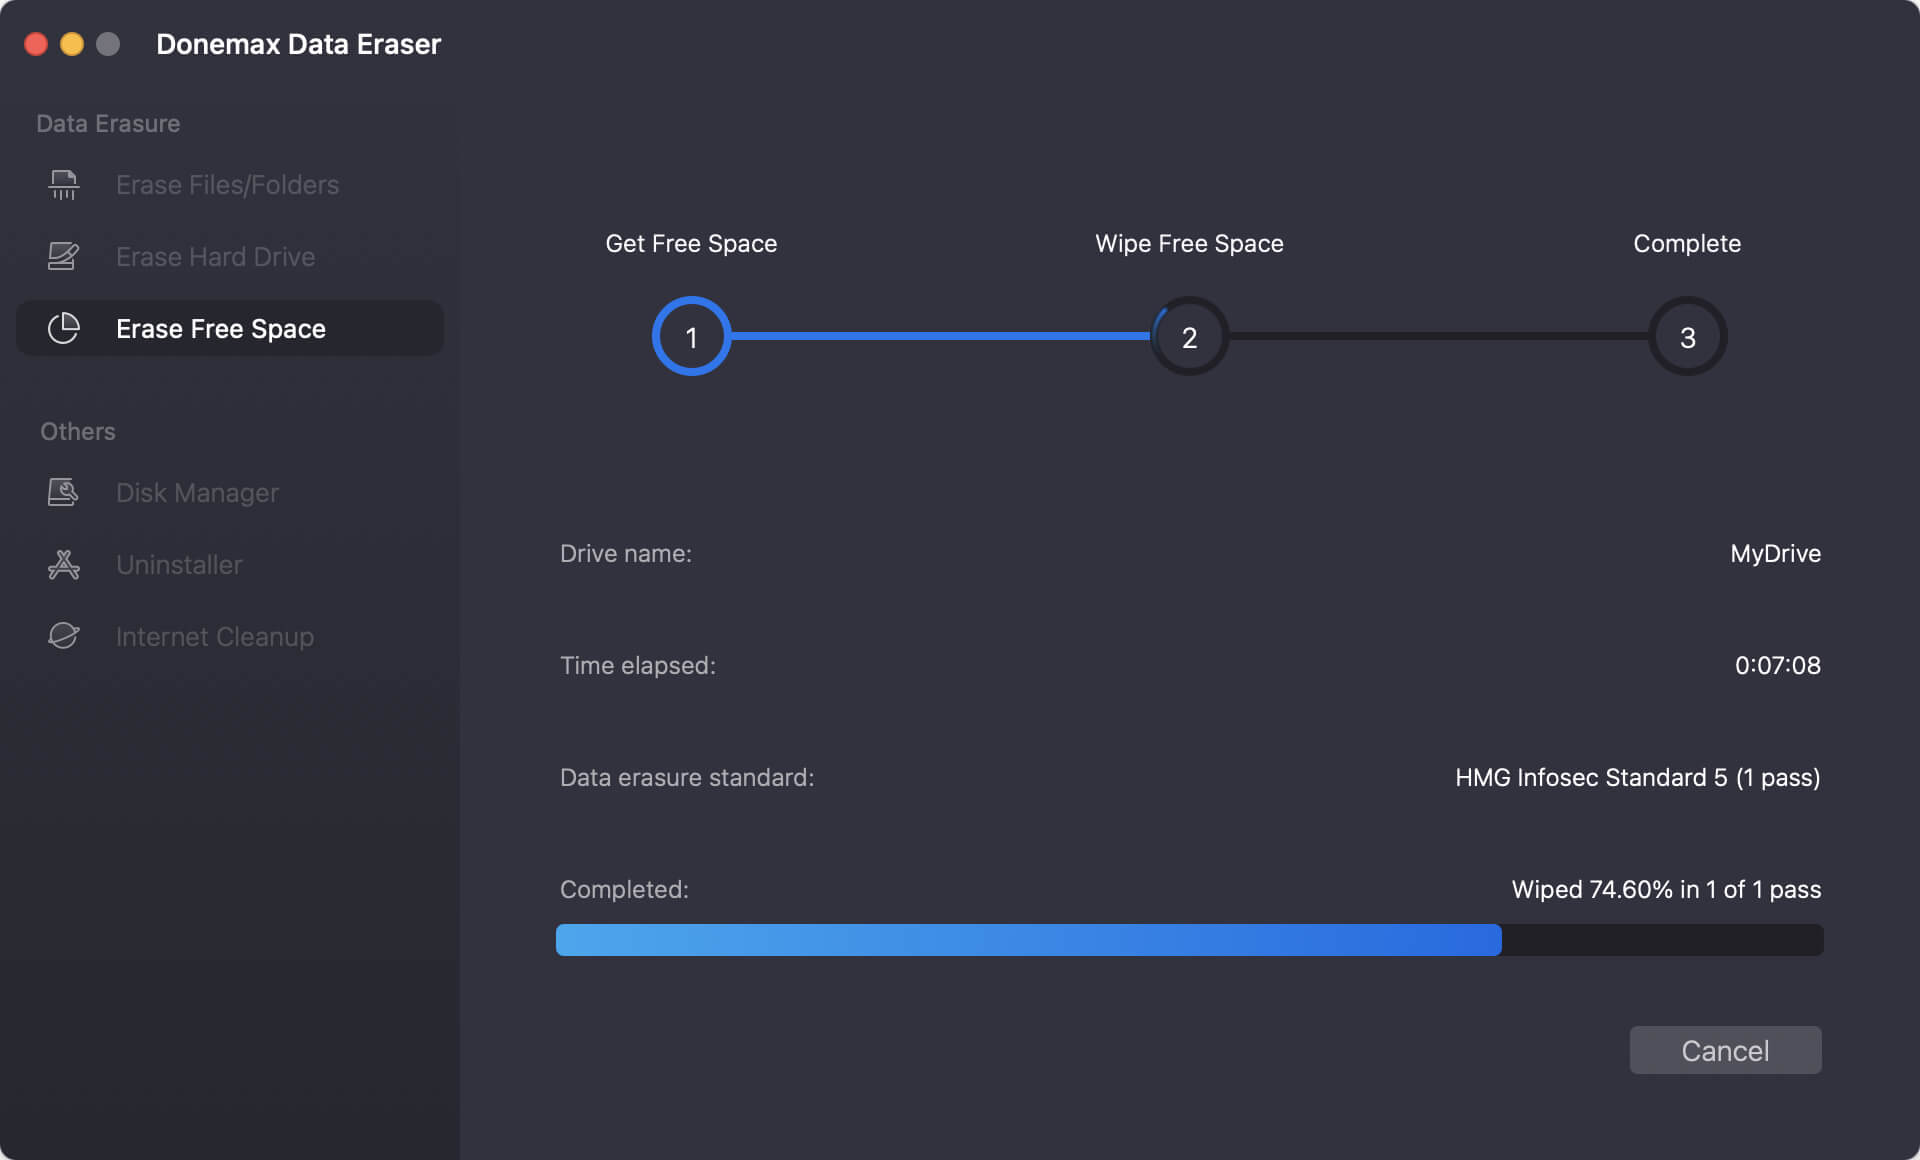
Step 1. Install and run the software on your iMac. Choose the Erase Free Space mode and select the iMac hard drive. Click Erase Now button to continue.
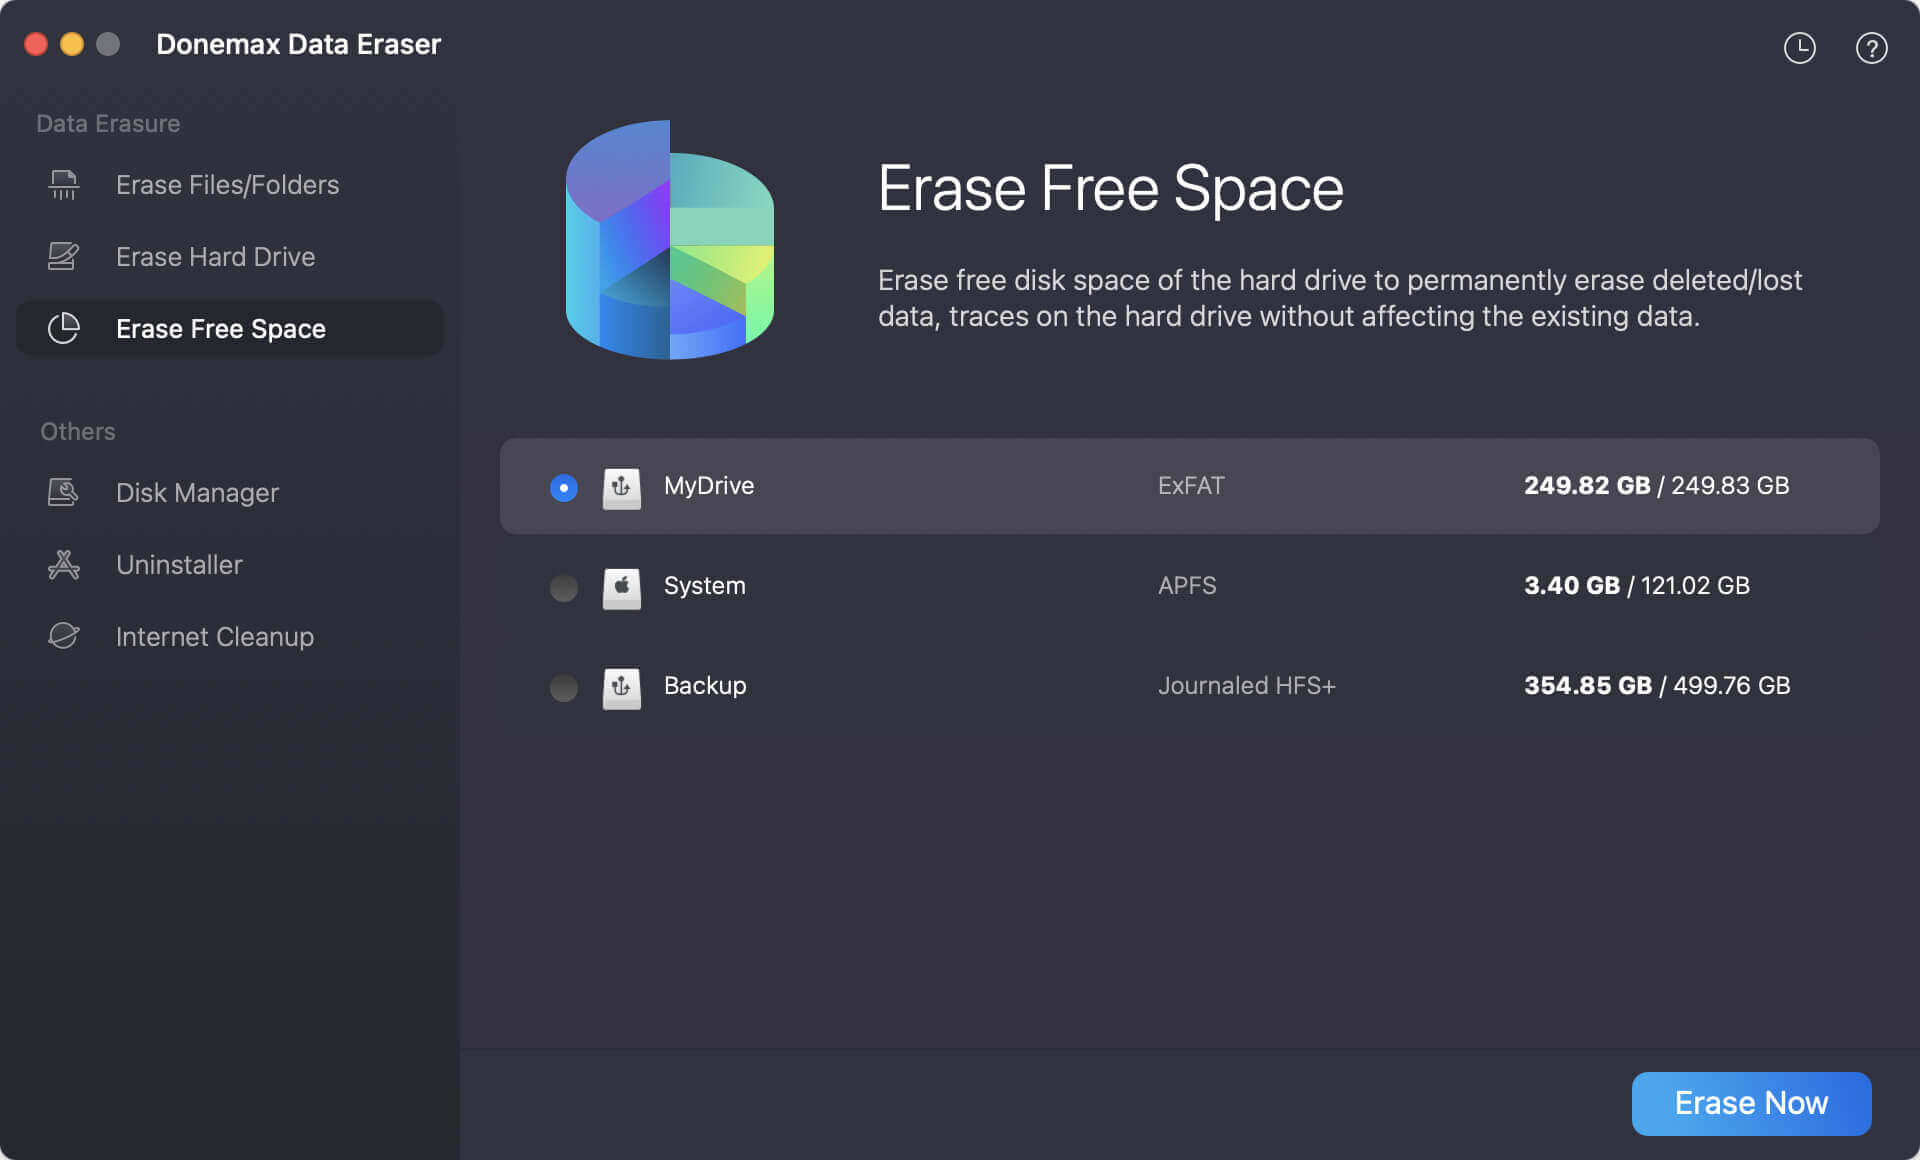
Step 2. Select a data erasure standard from the list to wipe data. Any of the data erasure standards can ensure to wipe data permanently.

Step 3. Start the data wiping process. Once it's done, all the removed data on the free space of the iMac drive is gone for good. There is no chance to recover the data in any way.
Conclusion
Factory resetting your iMac is a powerful way to solve system problems, protect personal data before resale, or simply start over. By carefully backing up your data, signing out of Apple services, and following the reset steps via macOS Recovery, you ensure a smooth, secure, and clean restoration process.
Whether you're troubleshooting or preparing your iMac for a new owner, the key is to take your time and follow each step thoroughly. With this guide, you're well-equipped to handle a factory reset like a pro.
Donemax Data Eraser for Mac
100% safe and powerful Mac data erasure program. It offers certified data erasure standards including U.S. Army AR380-19, DoD 5220.22-M ECE to securely and permanently erase data from Mac HDD/SSD and external storage devices, making data recovery impossible.
Related Articles
- Jul 15, 2026How to Wipe Everything on macOS 27 Golden Gate?
- May 27, 2024How to Wipe All Data Before Selling or Donating iMac?
- Apr 27, 2026How to Factory Reset macOS Sierra (10.12) & Speed Up Your Mac
- Aug 21, 2023How to erase your Mac with Disk Utility & What to do if Disk Utility can't Erase a Drive?
- Aug 25, 2023How to Permanently Wipe Old Intel Mac Data before Selling or Donating?
- Apr 20, 2026How to Factory Reset macOS Tahoe: 2 Easy & Secure Ways (2026)

Contributing Writer
Charles
Charles, who lives in Sydney, Australia, is an editor & writer of Donemax Team. He is good at writing articles related with Apple Mac computers, Windows operating systems, data recovery, data erasure, disk clone and data backup, etc. He loves reading and playing tennis in his spare time and is interested in testing new digital devices such as mobile phones, Macs, HDDs, SSDs, digital cameras, etc.

Editor in chief
Gerhard Chou
In order to effectively solve the problems for our customers, every article and troubleshooting solution published on our website has been strictly tested and practiced. Our editors love researching and using computers and testing software, and are willing to help computer users with their problems