
Written byMariaUpdated on Aug 14, 2025
3 Methods to Downgrade from macOS Ventura to Monterey?
Approved byGerhard Chou
Before we start: By using Donemax Disk Clone, you can create bootable clone backup for macOS. Also, it can help you create bootable USB installer for different macOS versions. You can use it to install old or new macOS system on Mac.
PAGE CONTENT:
Downloading the latest version of macOS, which is brimming with cutting-edge features and updates, is always alluring. Even so, you could find that your system isn't operating correctly following the upgrade.
Fortunately, you may go back to the previous macOS version you were using if necessary. Downgrading, however, is more difficult now than it formerly was. We'll demonstrate how to downgrade from macOS Ventura to Monterey?
Why You Might Want to Downgrade macOS?
Although Apple makes every effort to make its macOS releases backward-compatible, there are always some edge cases. After an update, some hardware and software may no longer operate as intended.
This is especially true for equipment and software used in the audio, video, and graphics industries. As a result, a lot of vendors of this kind of software will give you the advice to never switch your operating system while working on a project. Even so, you can discover that you need to return to a project because the most recent macOS version is incompatible with it.
You should think twice if you're thinking about downgrading your macOS Ventura to macOS Monterey version because your computer is running slowly. Even while this could solve your performance problem, you can go to all of this trouble only to find that your Mac is still slow. To start, decrease the number of beginning programs on your Mac and clean up your hard disk.
Back Up Your Data Before You Downgrade!
Whatever method you use to downgrade your macOS version Ventura, you will wipe everything on your hard drive. The best technique to make sure you don't lose any crucial data is to back up your whole hard drive.
You can use Time Machine on macOS Ventura to back up the data. Then you can feel free to downgrade to macOS Monterey in different ways which will be introduced in this page.

The built-in Time Machine service may be used for backups, but you must exercise caution if you do. To downgrade, you may use a previous Time Machine backup as a backup (if you have one available). If you do this and then decide to restore a recent backup, be sure to just recover your personal data in order to prevent the downgrading from happening.
How to downgrade macOS Ventura to MacOS Monterey?
Here are methods for downgrading your Mac after making a backup.
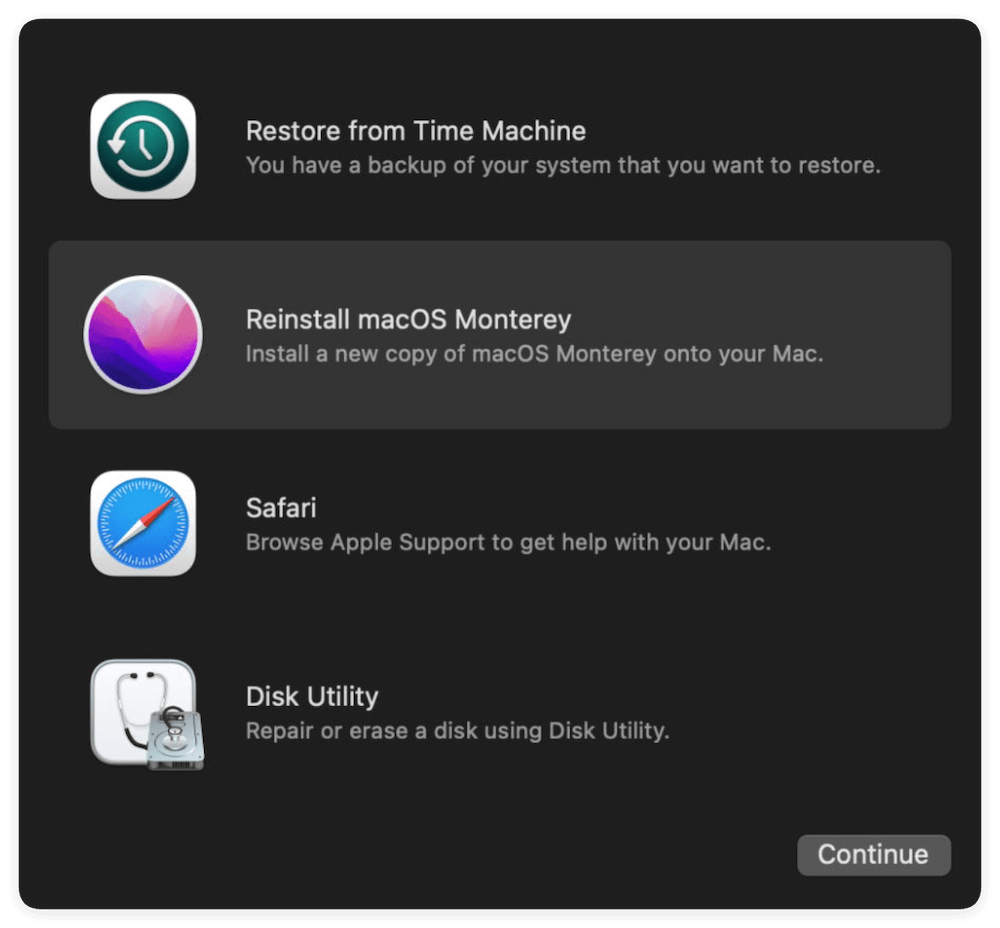
Method 1. Downgrade from macOS Recovery
💡 Note: This method is applicable for Intel-based Mac which has macOS Monterey original installed when shipped.
Downgrading is easy if your Mac came with an earlier version of macOS installed. Use the built-in macOS Recovery software to downgrade. Just make sure you have internet access because the software will download an earlier version of macOS during installation.
The steps are the same as for reinstalling macOS, except that your computer will download the original version of macOS. This will instead download the most recent version that is accessible if your computer is quite old.
Before continuing, make sure you have a complete backup because doing so will destroy your starting disk:
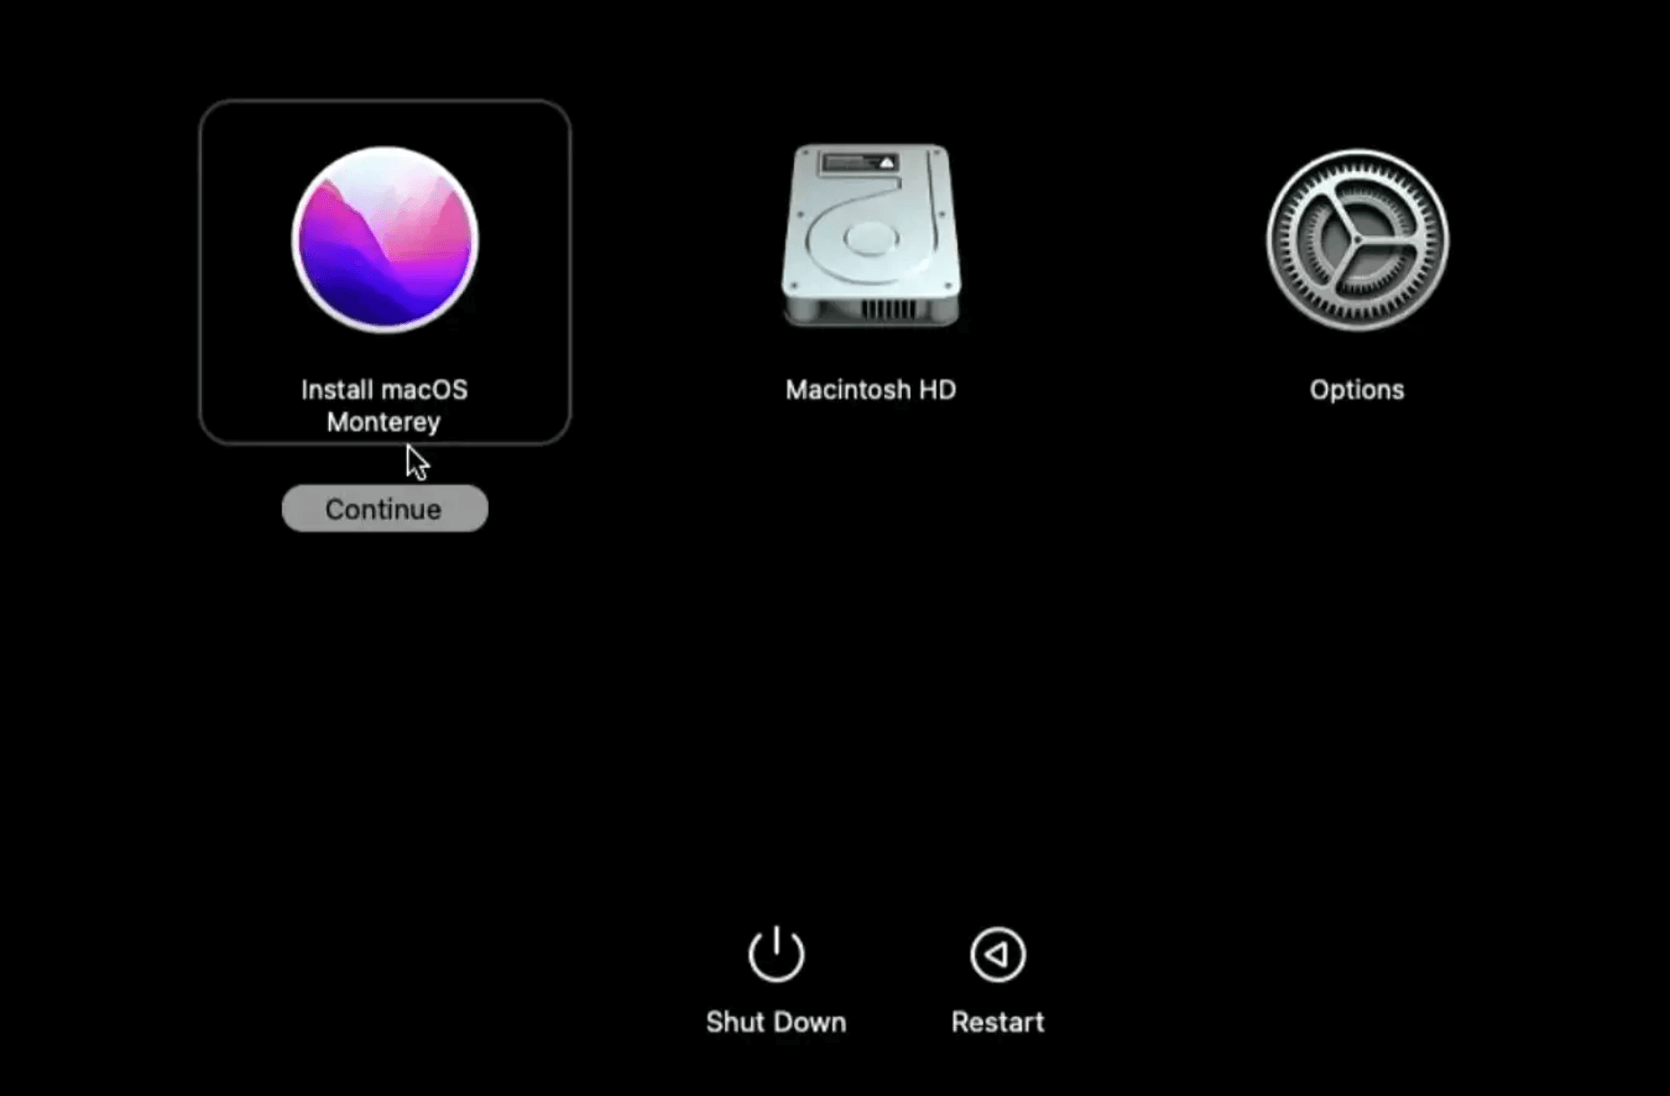
- Hold Shift + Option + Cmd + R when turning on your laptop. It will require more time to start than normal as macOS Recovery loads.
- Select Reinstall macOS Monterey and click Continue when the macOS Utilities screen displays.
- To choose your beginning disk, adhere to the on-screen instructions.
- To finish the installation, adhere to the onscreen instructions.
- Use your backup to restore your files when the installation is complete.
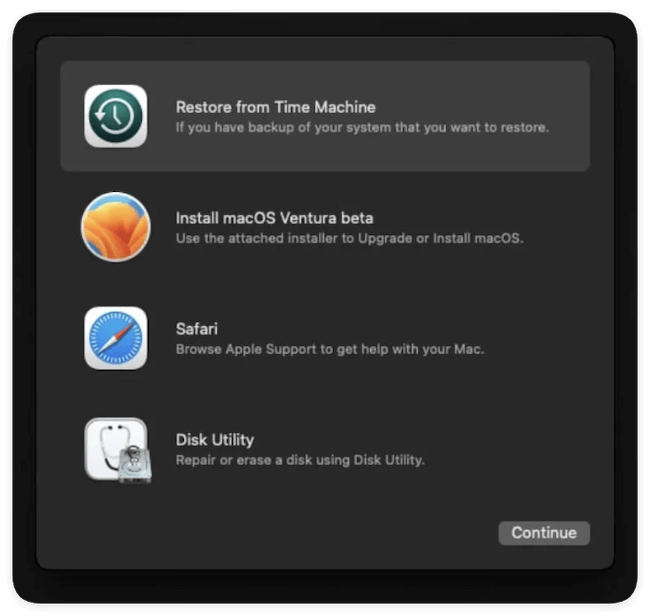
Method 2. Downgrade making Use of a Time Machine Backup
Utilizing a Time Machine backup is an additional straightforward method for installing an earlier version of macOS. Naturally, this assumes that you created the backup on a previous version of macOS Monterey.
- Put your Time Machine disk into your Mac and shut it down or restart it to downgrade using an earlier Time Machine backup.
- On your Mac, go into recovery mode. Hold down the Power button on Macs with the M1/M2/M3/M4 processor until the message "Loading Startup Options" appears. Select Options to launch Recovery mode. (On an Intel Mac, press Cmd + R to launch macOS Recovery. )
- When the macOS Utilities screen appears, select Restore From Time Machine Backup and then press Continue.
![downgrade from macOS Ventura to Monterey]()
- On the following screen, carry on as before. Select a restore source. That would be the backup disk that you previously plugged in.
- Choose the backup you want to restore from. Which version of macOS was used to create the backup will be clear.
- Once the reinstallation is complete, follow the on-screen directions to restore your data from the backup you created.
Method 3. Use a bootable USB installer
At last, you can also create a bootable USB installer for macOS Monterey directly. Then you can use the bootable USB installer to boot the Mac and install macOS Monterey over the new version macOS Ventura to downgrade.
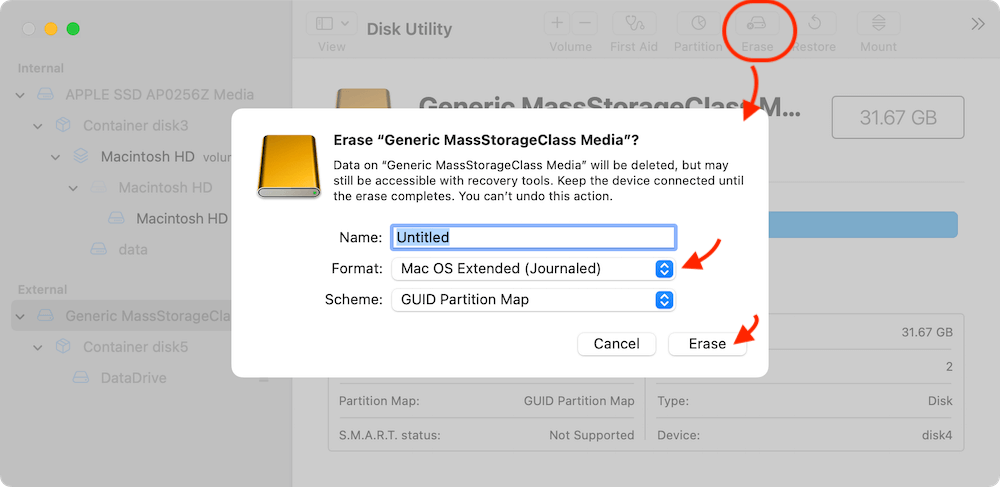
Before building the installer for macOS Monterey, you must get a USB disk and format it. If you've already formatted your drive, you may skip this step. Now use the drive in the following manner to format it:
- Connect the USB drive to Mac and ensure it's detected normally.
- Launch the Disk Utility app. You can find it by using Spotlight (Cmd + Space) or by going to the Applications folder in Finder, selecting the Utilities menu, and double-clicking on the app.
- Click the Erase button at the top of the window after selecting your USB disk from the External list on the left.
- Under Format, choose between the HFS+ or APFS file systems. Your demands will determine the best Mac file system to use.
- Once the process is complete, click Erase and then Done.
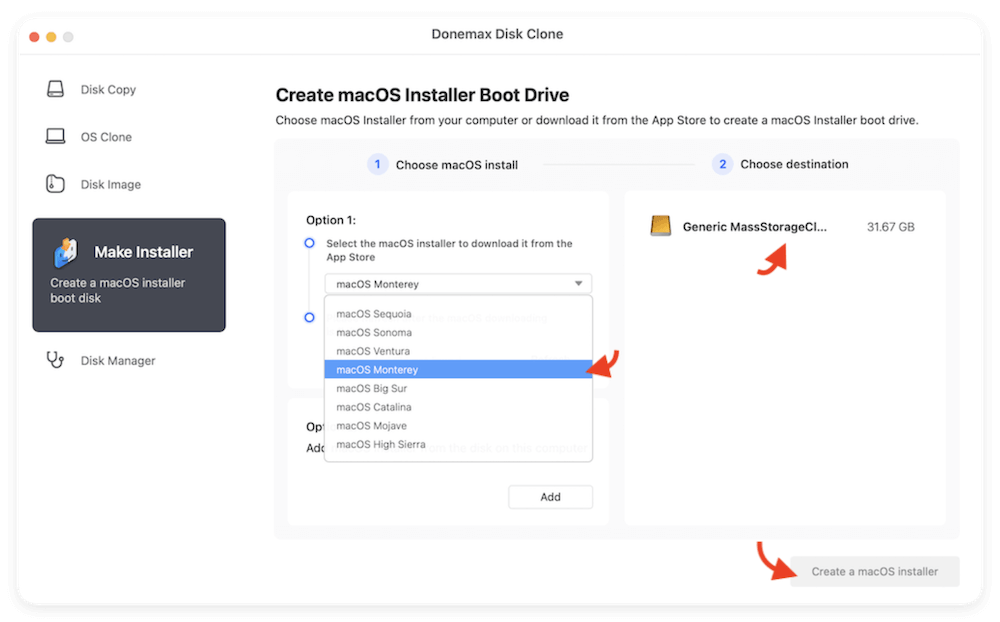
Then you can create a bootable installer for macOS Monterey. How to make the installer? Here is a quick and simple way - using Donemax Disk Clone for Mac.
Donemax Disk Clone for Mac
- Make a bootable clone for your Mac.
- Clone SSD, HDD, external hard drive on Mac.
- Create bootable USB installer for macOS.
With the software, it's easy to make a bootable USB installer for macOS Monterey and other versions. Just following the below instructions:
- Download and install Donemax Disk Clone for Mac. Run the software and change to Make Installer.
- If you haven't downloaded installation file for macOS Monterey, you can use the Option 1 to select the system and download it first. Otherwise, just select the Option 2 and choose the downloaded file.
- Choose an empty USB flash drive or external drive as the destination. Click Create a macOS installer button. Then the software will create a bootable installer for macOS Monterey.
After creating the bootable installer, you can then use it to boot Mac and install the macOS. Restart Mac and immediately hold Power button (or Option key) to get into startup options screen. choose the bootable installer drive and continue the installation.
How to Make A Bootable Clone Backup for Mac?
Donemax Disk Clone for Mac is a powerful disk cloning software. It will help you quickly create a full copy of your Mac and make it be bootable. Before or after downgrading from macOS Ventura to Monterey, you can run this app to clone your Mac startup disk to an external hard drive.
Now, follow the steps below to create a bootable clone for your Mac:
Step 1. Open Donemax Disk Clone for Mac on Mac, connect an external hard drive to your Mac. Choose disk cloning mode - OS Clone. Select the external hard drive as the destination drive.

Step 2. Click on Clone Now button to securely and easily clone Mac startup disk to the external hard drive.
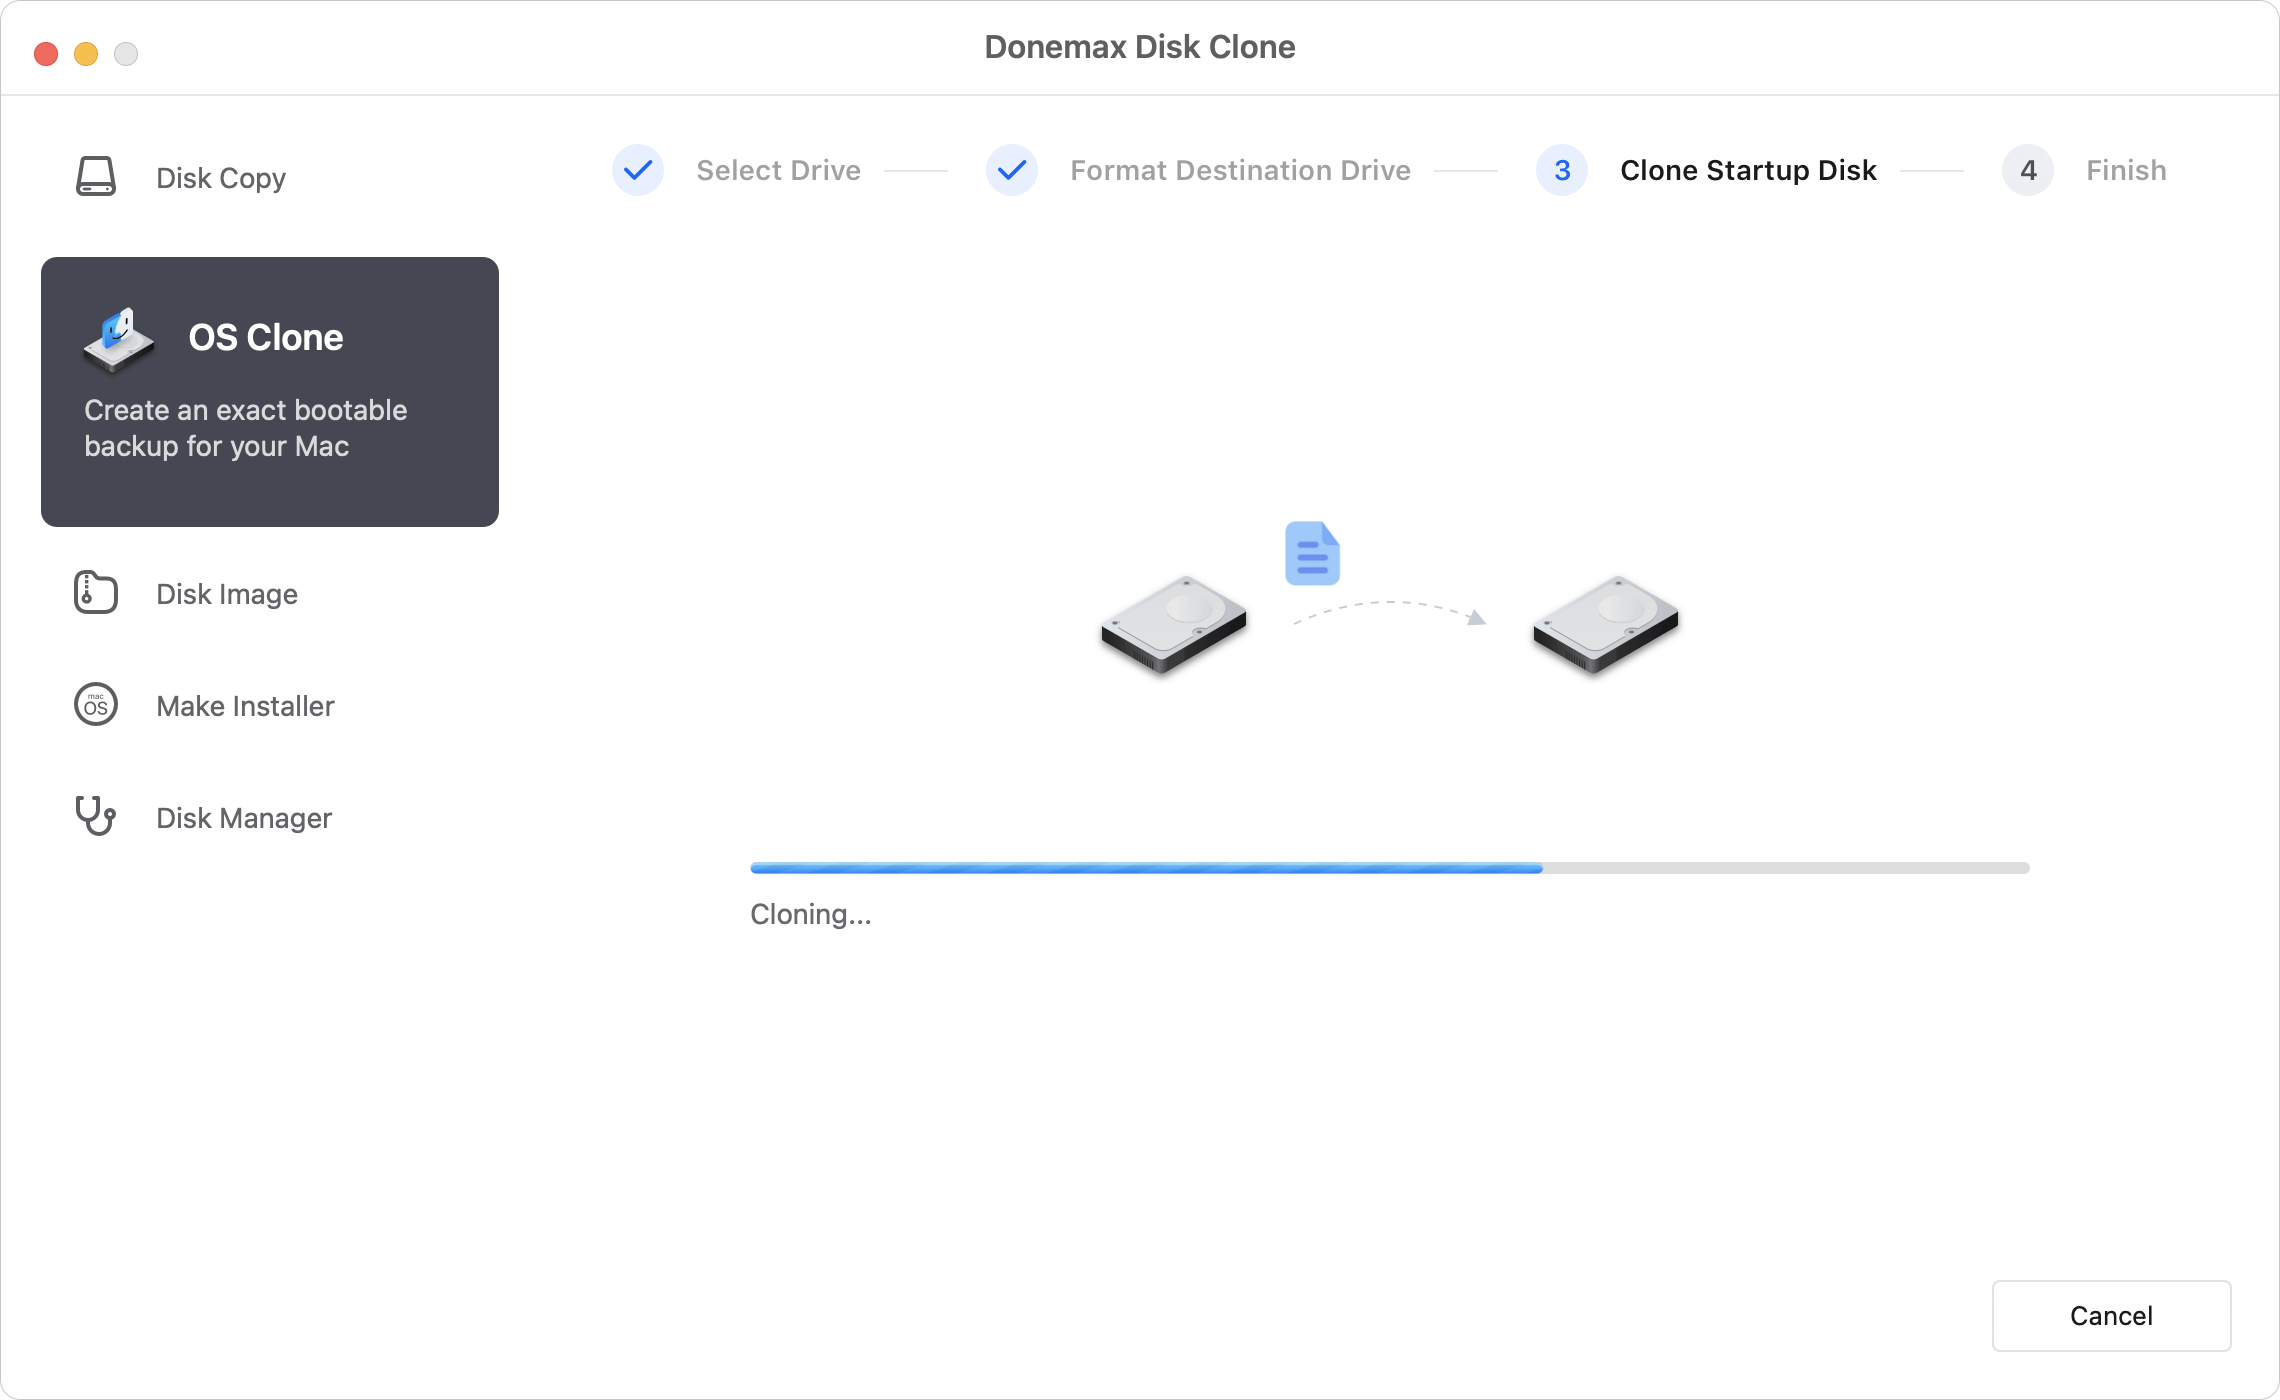
Step 3. Once the process gets finished, you can use the external hard drive as a bootable disk on any Mac.

Conclusion:
There are different methods to download from macOS Ventura to macOS Monterey. However, some methods can only work in specified situations. For example, If you wan to download macOS by restoring from a Time Machine backup, you should have a backup created before.
You can also create a bootable macOS installer for any version to download or upgrade. It's more flexible to do the job in this way. You can use Donemax Disk Clone for Mac to create a macOS installer easily. Besides, always keep a bootable clone backup of macOS is useful in some cases.
Donemax Disk Clone for Mac
An award-winning disk cloning program to help Mac users clone HDD/SSD/external device. It also can create full bootable clone backup for Macs.
Related Articles
- Aug 11, 2025How to Use Disk Cloning Software for T2 Chip Mac?
- May 13, 2025How to Clone a M1 Chip Mac to an External Hard Drive?
- Dec 17, 2024Create Bootable Clone Backup for macOS High Sierra
- Jun 16, 2023How to Clone Mac Hard Drive to External SSD? 2 Methods to Try
- May 28, 2025How to Clone a Hard Drive on M2 Chip Mac?
- Jul 17, 2025Best Mac Cloning Software for Disk Replacement and Backup

Contributing Writer
Maria
Maria is one of the senior writers & editors of Donemax who lives and works in Sydney, Australia. She loves PC, Mac and Internet Technology. She has 6 years of writing articles about data recovery on PC/Mac, disk cloning solution, data eraser and computer OS optimization, etc. She is also interested in testing various software and digital products.

Editor in chief
Gerhard Chou
In order to effectively solve the problems for our customers, every article and troubleshooting solution published on our website has been strictly tested and practiced. Our editors love researching and using computers and testing software, and are willing to help computer users with their problems