Written byCharlesUpdated on Aug 12, 2025
Set Up Time Machine on macOS Ventura
Approved byGerhard Chou
Before we start: Besides using Time Machine to back up macOS Ventura, you can also use Donemax Disk Clone for Mac to clone the Mac hard drive. The software provides another layer to protect your data and it can generate a bootable clone backup for macOS Ventura.
PAGE CONTENT:
Automatically back up your apps, music, photographs, emails, and documents with Time Machine, a function integrated into every Mac. With a backup, you can get back any files you accidentally deleted or couldn't get to for whatever reason.
Maintaining a backup of your computer's data is essential. If you use a Mac, you'll be relieved to know that the company includes a backup utility called Time Machine. Here, you'll learn how to set up Time Machine on macOS Ventura, including prepare a drive for Time Machine, install and use Time Machine, and recover from a Time Machine backup.

How to Set Up Time Machine on macOS Ventura?
Plug in a backup storage device:
A USB or Thunderbolt drive can be used as an external storage device, and both can be connected to a Mac.
This disk is for Time Machine backups and should not be used for other purposes.
Your backup disk's capacity should be double that of each disk or volume you're replicating. Time Machine will warn you if your backup disk is too small to hold a full backup.
Set Time Machine backup on external hard drive:
- Move the mouse pointer to the upper left of your desktop to initiate the backup process from your Mac to the external disk. To access the settings menu, look for the Apple icon and press it and choose System Settings > General.
- When you enter your computer's choices, you'll see several different settings. "Time Machine" sits at the bottom of the list. If you click that, you'll proceed to the screen to configure the Time Machine backup.
- Tap Add Backup Disk within the Time Machine box to pick an external hard drive on your Mac to store backups. Choose the external disk you want to use and click Set Up Disk.
![set up Time Machine on macOS Ventura]()
- Encrypting your backups is an option that should be used to protect your data from prying eyes.
- If you want to protect your backup with a password, you'll be prompted to do so. Your backups will be inaccessible if you lose your password, so keep it safe. To proceed, select Encrypt Backup from the menu.

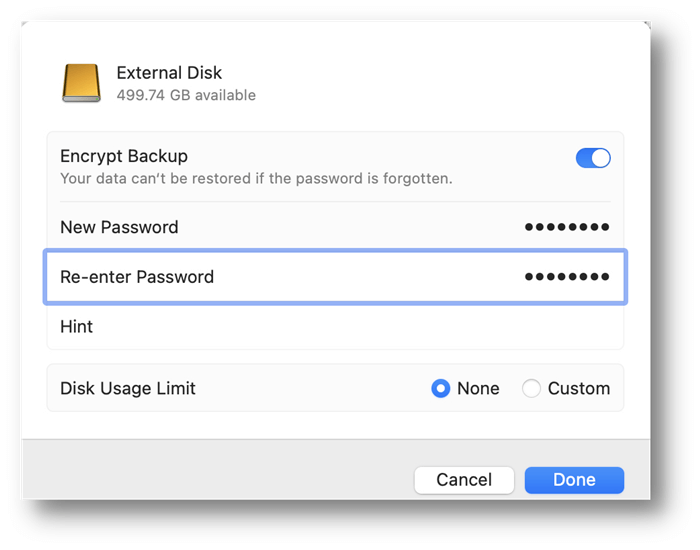
Once you've encrypted your drive, Time Machine will bring you back to its main panel. You can tell that Time Machine is getting ready to back up your data since the option to do so automatically is selected in the window's right pane.
There is no action required on your part at this time. Time Machine will back up your Mac automatically and keep you updated on its progress. If you finished backup, You'd see a pop-up alert in the top right corner of your screen.
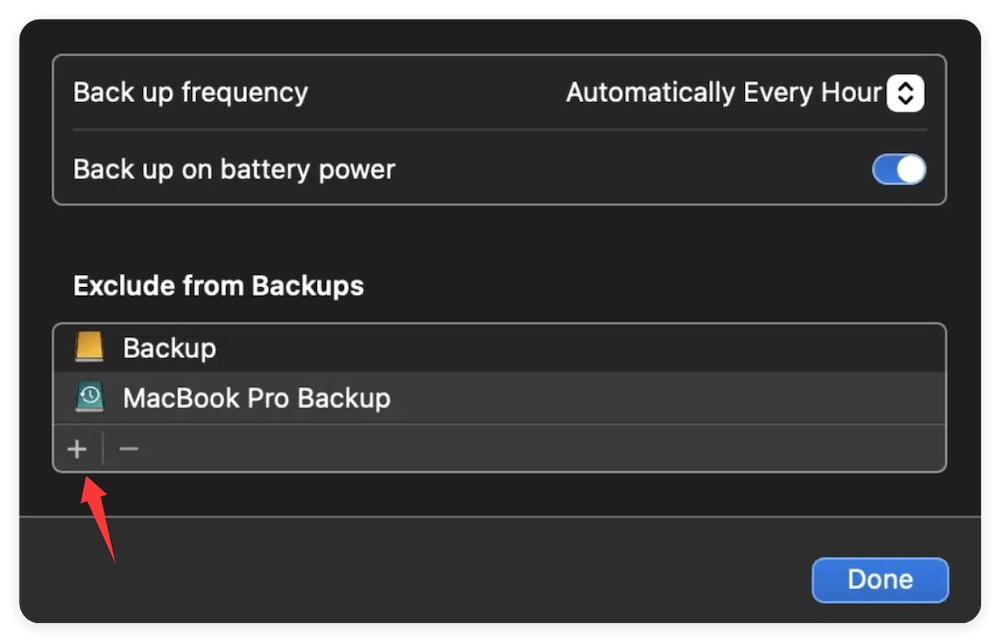
Exclude Data from Time Machine Backups:
Choose which individual files and folders macOS should leave out of your backups before you begin your first backup. For example, you might have some enormous or insignificant files and directories you don't need to back up.
- Select Open Time Machine Preferences from the Time Machine menu or by heading to Apple Menu > System Settings > General > Time Machine. Choose the Options button.
- Click the + sign to add a device, file, or folder to the "Exclude from Backups" list.
- The backup disk and any other external disks are automatically disregarded. All Time Machine backup disks are subject to the same exclusions list.
- Once you've finished adding new items, make sure to click the Done button.
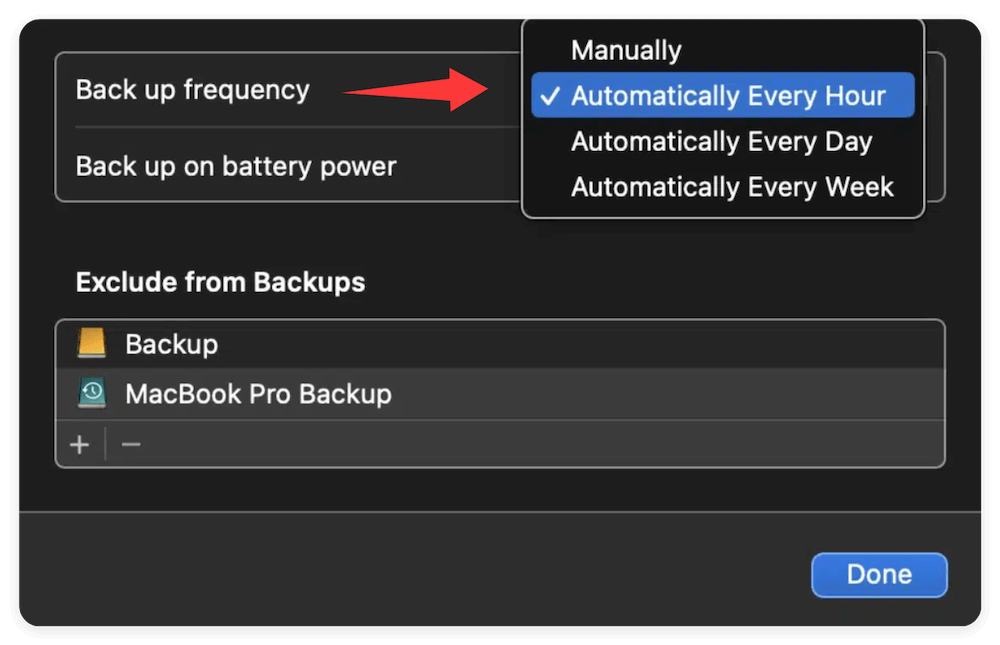
Backup frequency and duration:
Time Machine backs up the last 24 hours hourly, the last month daily, and all previous months monthly. Full backup disks remove older backups.
MacOS Ventura lets you customize backup frequency: Choose a backup frequency from Time Machine's Options menu.
You can use your Mac while the initial backup is running. Future backups are faster because Time Machine only backs up modified files.
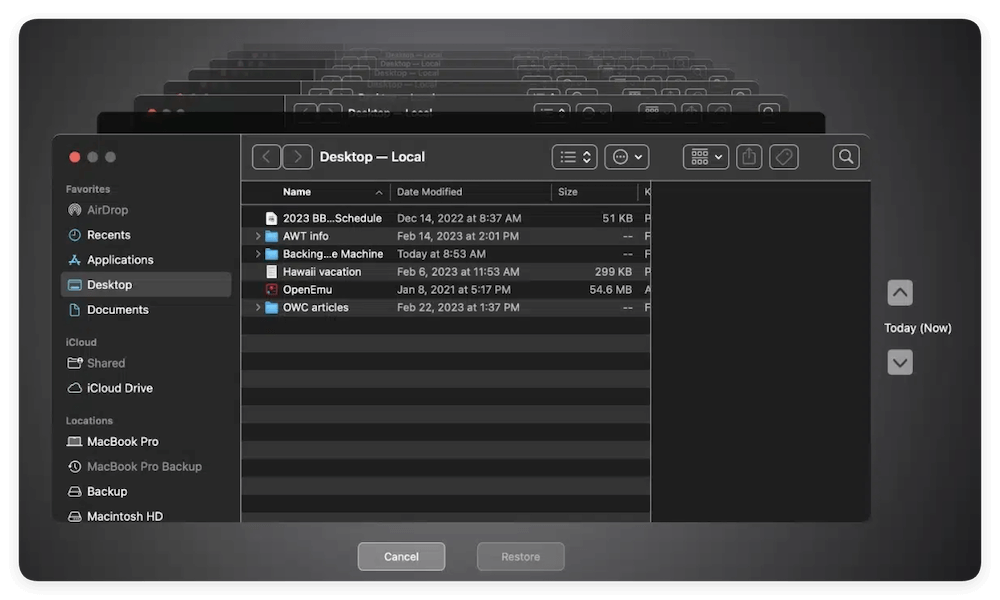
Time Machine Restore Process:
Launch Time Machine by going to Finder, then Applications, then Time Machine.
The doors to the Time Machine swing open. The following are the steps for using Time Machine:
- Just to the right of the Time Machine window is a graphical timeline.
- Directional arrows up and down to locate the files or folders you want to restore, and then pick them.
- To bring things back to original location, click on the Restore button. Reply to on-screen instructions as they arise.
Back Up macOS Ventura with Disk Cloning Software
Time Machine is a great built-in tool for regularly backing up your Mac, so you never have to worry about losing important data. However, it's not the only Mac-compatible option. You can find a few if you'd like an alternative to Time Machine for backing up your data.
For example, you can use Mac disk cloning software to make clone backup for macOS Ventura. Donemax Disk Clone for Mac is a powerful, safe and easy-to-use disk cloning application for macOS Ventura. It supports to securely and easily back up macOS Ventura.
Donemax Disk Clone for Mac
- Create a bootable clone backup for macOS Ventura.
- Create disk image for macOS Ventura.
- Clone HDD, SSD and external storage device on macOS Ventura.
Different from Time Machine, Donemax Disk Clone for Mac will create a full and bootable clone backup directly for macOS Ventura. It will clone everything including macOS system data, installed applications, users files and settings to the destination drive. You can boot from the cloned drive directly with everything exact the same.
You can follow the steps below to create a bootable copy of macOS Ventura easily:
Step 1. Run Donemax Disk Clone for Mac and change to OS Clone mode. The startup disk will be selected as the source drive automatically. You can just select the other drive as the destination disk.

Step 2. Click on Clone Now button and the software will start to copy everything from the Mac startup disk to the destination disk. It will take some time depending on the data size on the startup disk.
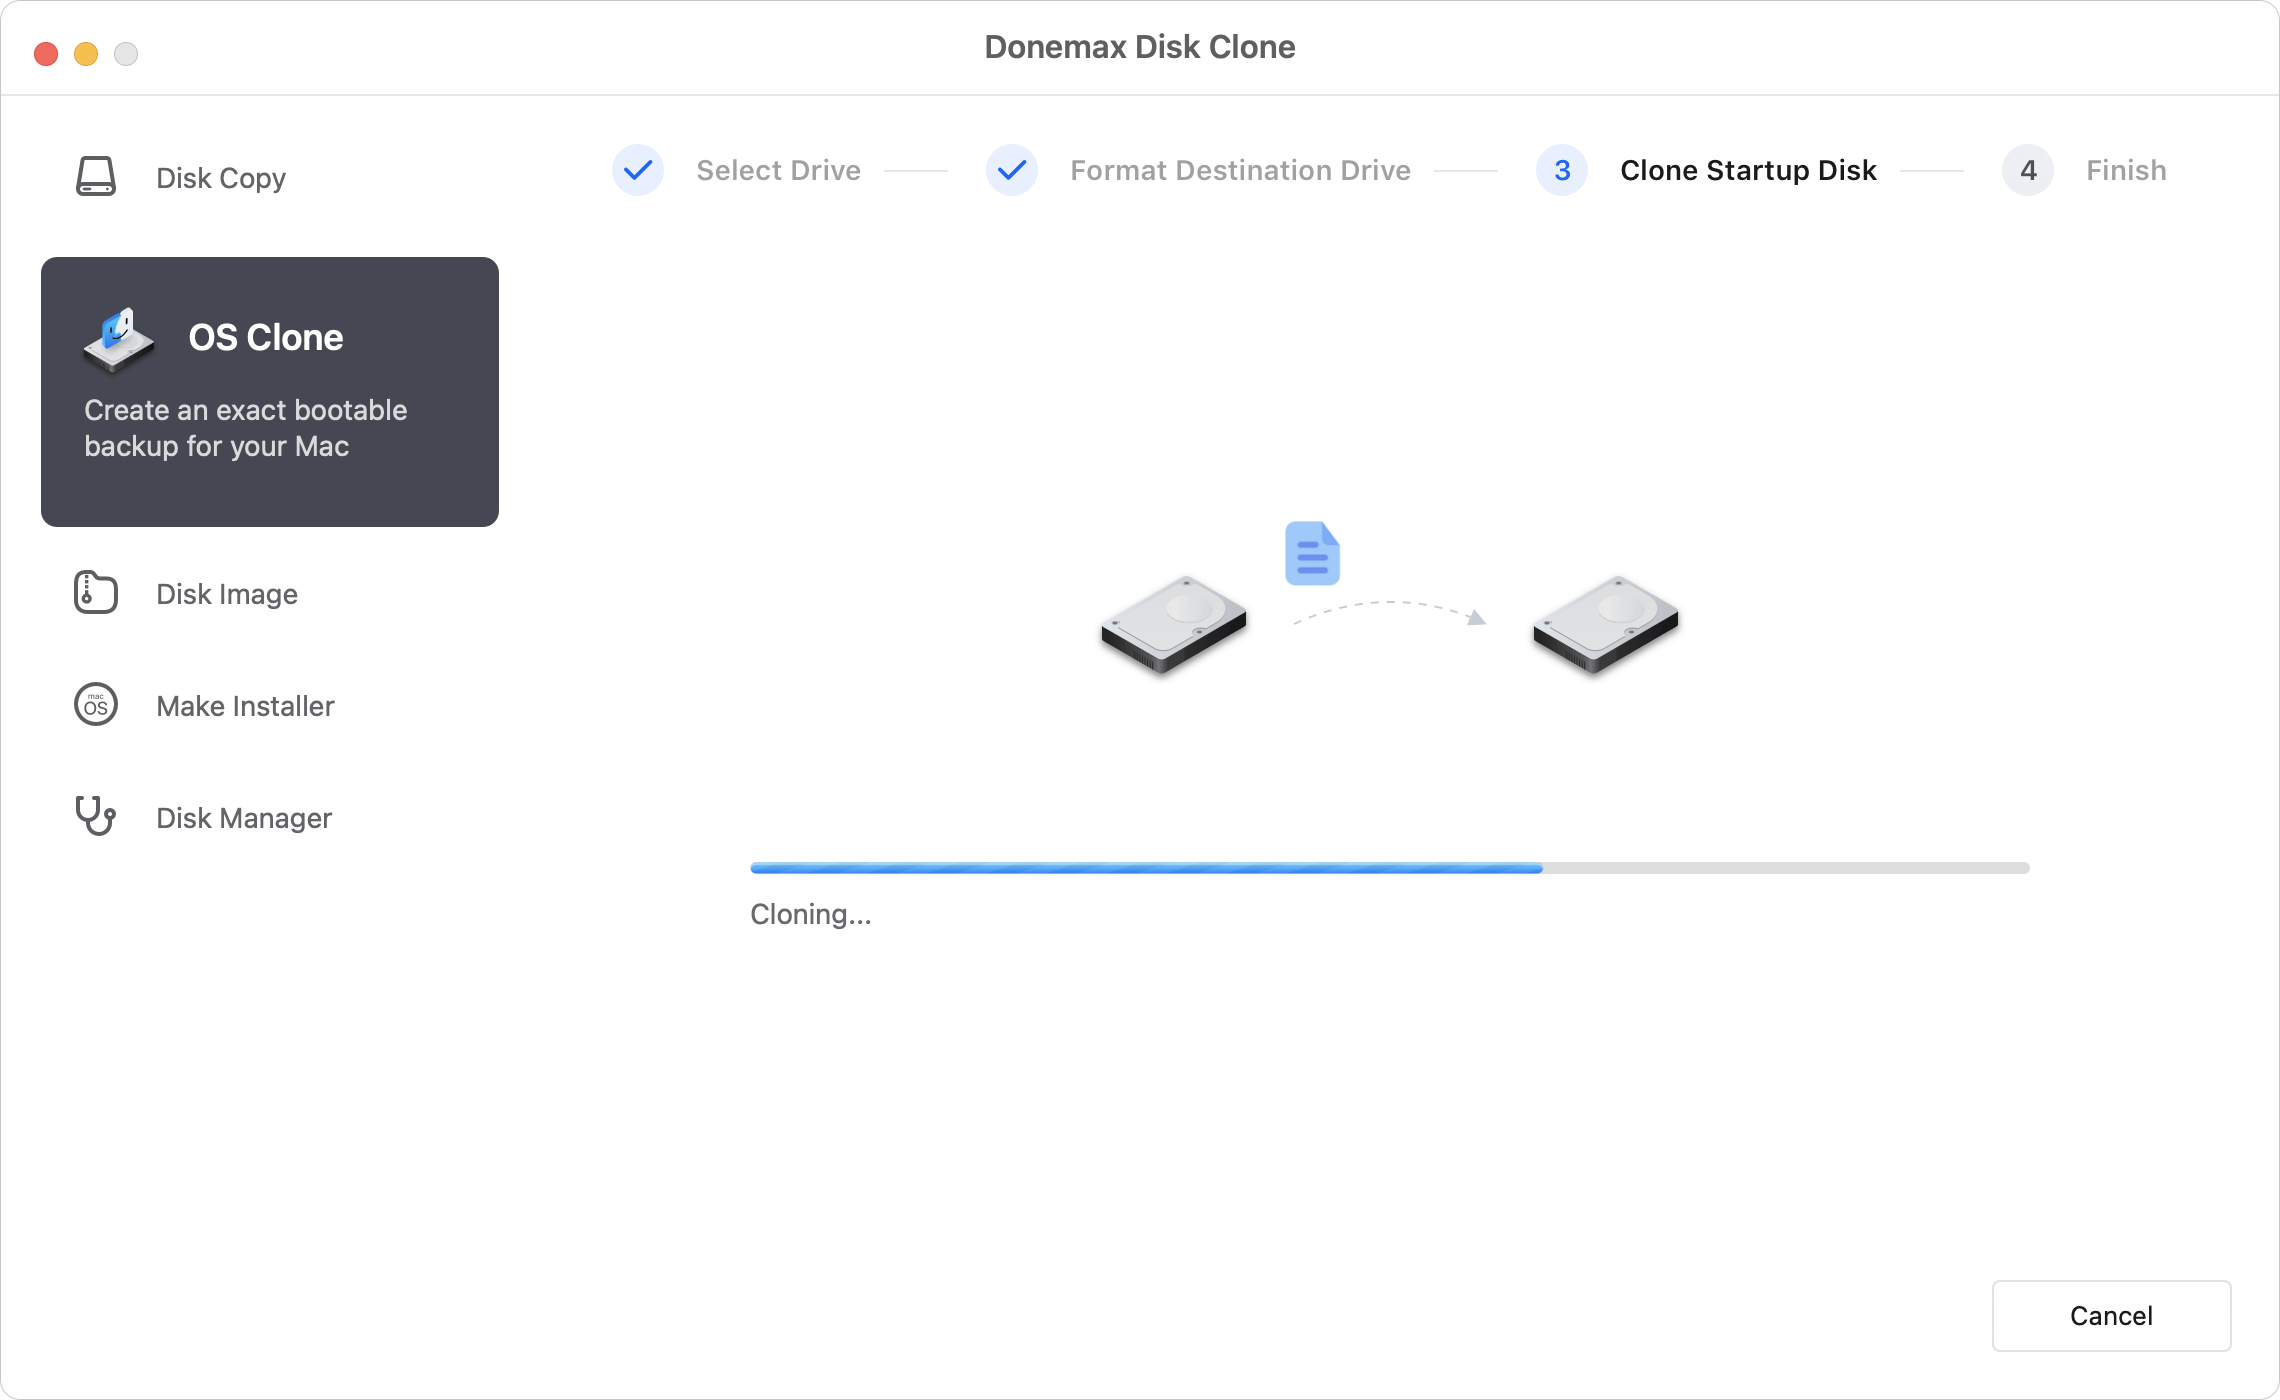
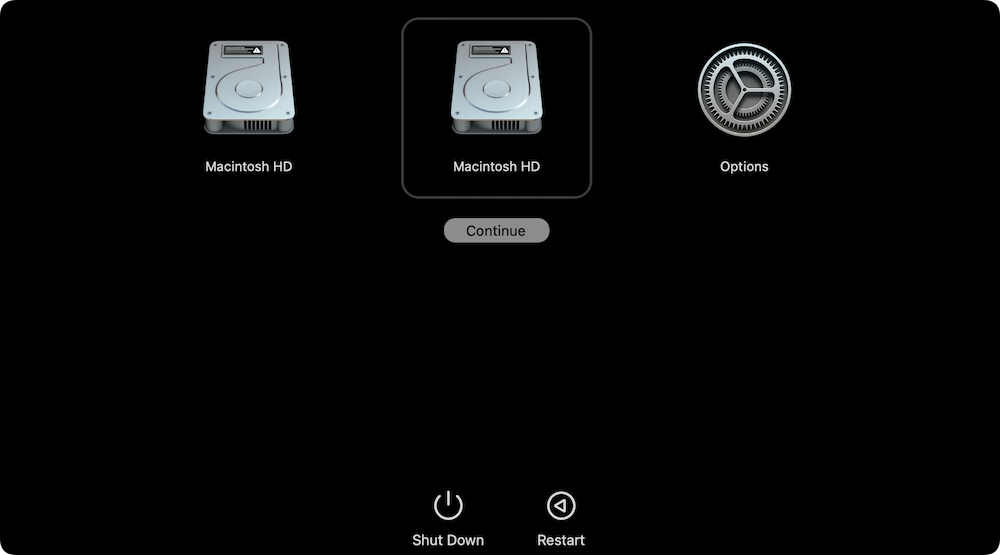
Step 3. Before you save the cloned drive as offline backup, you can first validate if it's bootable. You can reboot the Mac and hold the Power button (or Option key) immediately. Once the startup options show up, select the cloned drive on the screen to continue. Then the Mac will boot from the cloned drive.
Conclusion:
Time Machine is a reliable data backup software for macOS Ventura and other versions. The software can back up everything on Mac and it's flexible to restore files, programs, settings, etc with Time Machine. To set up Time Machine properly, the first thing is use an external hard drive with enough space to hold all the future backups. Then you can follow the guide to configure the settings and back up macOS Ventura using Time Machine to protect your Mac data.
Even though Time Machine provides full features to back up Mac data, there is limit with the tool. For example, it cannot provide a bootable backup solution. You can only use it to restore the data but cannot make a bootable restore directly. It may take some time to restore you Mac and make it bootable in some cases.
Donemax Disk Clone for Mac is a strong supplementary plan for Time Machine. The software can directly create a full and bootable clone. If there are issues with the main system disk on Mac, you can use the cloned drive to boot the Mac. It's a fast way to make your Mac working again to reduce the down time.
FAQs about Setting Up Time Machine on macOS Ventura
- Connect an external drive (USB, Thunderbolt, or network drive).
- Go to System Settings (formerly System Preferences) > General > Time Machine.
- Click Add Backup Disk and select your drive.
- Enable automatically option to start regular backups.
Apple recommends at least twice the storage of your Mac’s internal drive for full backups and version history.
Yes, click Options in Time Machine settings, then click the + button to add folders/files to exclude.
Yes, enable Encrypt Backup when selecting the backup disk.
Yes, you can add multiple disks, but only one will be used at a time.
- Open Finder, navigate to the folder you want to restore.
- Click the Time Machine icon in the menu bar and select Browse Time Machine Backups (or Enter Time Machine).
- Browse backups and select the files you want to restore.
- Click Restore and the selected files will be restored to the original location(s).
Change Automatically option to Manually in Time Machine settings or disconnect the backup drive.
Time Machine deletes older backups to make space for new ones.
Donemax Disk Clone for Mac
An award-winning disk cloning program to help Mac users clone HDD/SSD/external device. It also can create full bootable clone backup for Macs.
Related Articles
- Jun 24, 2025How to Use Time Machine on macOS Sequoia?
- Feb 12, 2026How to Clone Hard Drive on Mac Server?
- Jan 20, 2026Easy Ways to Back up Mac Startup Disk
- Jun 05, 2026Carbon Copy Cloner Can't Clone on M5 Mac, Which Software Can?
- Aug 08, 2025How to Restore Mac from A Backup?
- Jul 29, 2025Create DMG Disk Image on Mac [Apple Silicon Supported]

Contributing Writer
Charles
Charles, who lives in Sydney, Australia, is an editor & writer of Donemax Team. He is good at writing articles related with Apple Mac computers, Windows operating systems, data recovery, data erasure, disk clone and data backup, etc. He loves reading and playing tennis in his spare time and is interested in testing new digital devices such as mobile phones, Macs, HDDs, SSDs, digital cameras, etc.

Editor in chief
Gerhard Chou
In order to effectively solve the problems for our customers, every article and troubleshooting solution published on our website has been strictly tested and practiced. Our editors love researching and using computers and testing software, and are willing to help computer users with their problems