Before we start: Mac has limited support for Windows NTFS external hard drive, which can only be read but not operated. Donemax NTFS for Mac was released precisely to solve this problem and make NTFS drive writable on Mac.
PAGE CONTENT:
Can I Use a Windows NTFS Drive on Mac? When it comes to cross-platform compatibility between Windows and macOS, one of the most common concerns is whether a Windows NTFS (New Technology File System) drive can be used on a Mac. NTFS is the default file system for Windows, while macOS uses APFS (Apple File System) or HFS+ (Hierarchical File System Plus). In fact, you can't directly use NTFS external hard drive on Mac for it's read-only. This article explores how you can use NTFS drive on Mac, the limitations you may encounter, and the solutions available to overcome them.

Understanding NTFS and macOS File System Compatibility
What is NTFS?
Microsoft created the proprietary file system known as NTFS, or New Technology File System. Since Windows NT 3.1, it has been the standard file system for Windows operating systems. It gives better performance, security, and support for large file sizes compared to its predecessor, FAT32. NTFS is commonly used on internal and external drives formatted on Windows systems.
macOS File Systems: APFS and HFS+
macOS, on the other hand, primarily uses two file systems:
- APFS (Apple File System): Introduced in macOS High Sierra, APFS is optimized for solid-state drives (SSDs) and flash storage. It offers enhanced performance, encryption, and reliability.
- HFS+ (Hierarchical File System Plus): Before APFS, HFS+ was the standard file system used on macOS devices. Although APFS has largely replaced it, HFS+ is still used on some older Mac devices.
Compatibility Issues Between NTFS and macOS
While Windows and macOS can both read and write to FAT32 and exFAT file systems, NTFS poses a challenge. By default, macOS can only read NTFS-formatted drives but cannot write to them. This limitation can be frustrating for users who need to use NTFS external hard drive to transfer files between Windows and Mac devices frequently.
Solutions for Using NTFS Drives on Mac
Fortunately, there are several methods available to enable read and write access to NTFS external hard drives on a Mac. These include using third-party software, enabling experimental support through macOS, or reformatting the drive.
Solution 1. Third-Party NTFS Drivers for Mac
One of the most reliable and user-friendly solutions is to use NTFS for Mac software. These tools enable full read and write access to NTFS hard drives on macOS.
Popular NTFS for Mac Software
- Donemax NTFS for Mac: Donemax NTFS for Mac is one of the best Microsoft NTFS for Mac Software to enable full NTFS read-write support on Mac just by clicks. The software offers fast performance, seamless integration with macOS. It is regularly updated and supports the latest macOS versions.
- Paragon NTFS for Mac: Paragon NTFS for Mac is also one of the most popular third-party NTFS drivers, which offers unlimited read/write access to Microsoft NTFS hard drives.
- Tuxera NTFS for Mac: Another widely used NTFS driver, Tuxera NTFS for Mac, provides reliable read and write access to NTFS drives and includes additional tools for disk management and repair.
- Mounty for NTFS: Mounty for NTFS is a free and simple tool that allows you to mount NTFS drives in read/write mode. It leverages Apple's built-in NTFS support but enables write access, making it a cost-effective solution for occasional use.
How to Use Donemax NTFS for Mac?
Steps 1. Download and Install: Download the NTFS for Mac driver, and follow the installation instructions.
Donemax NTFS for Mac
- Best and most reliable Microsoft NTS driver for Mac.
- Use NTFS drive on Mac without limitations.
- Enable fully writable access to NTFS drive on Mac.
Steps 2. Connect the NTFS Drive to Mac: Plug in your NTFS-formatted drive to your Mac. Donemax NTFS will automatically mount the drive, allowing you to read and write files.
Steps 3. Manage the Drive: You can use your NTFS drive just like any other drive on your Mac such as writing, mounting, copying, editing, deleting or adding files to NTFS drive. Donemax NTFS integrates with macOS Finder, providing a seamless experience.

Solution 2. Enabling NTFS Write Support via Terminal (Experimental)
macOS includes experimental support for NTFS write access, which can be enabled via the Terminal. However, this method is not recommended for regular use as it can be unstable and may result in data corruption.
Steps to Enable NTFS Write Support on macOS
- Connect the NTFS Drive: Plug in your NTFS drive to your Mac.
- Open Terminal: Go to Applications > Utilities > Terminal to launch the Terminal.
- Identify the Drive: Type diskutil list in the Terminal to list all connected drives. Note the identifier for your NTFS drive (e.g., /dev/disk2s1).
- Create a Mount Point: Enter the following command to create a mount point for the drive:
sudo mkdir /Volumes/NTFS
- Mount the Drive with Write Access: Use the following command to mount the drive with write access:
sudo mount -t ntfs -o rw,auto,nobrowse /dev/disk2s1 /Volumes/NTFS
- Access the Drive: You can now access the drive in Finder under the "Go" menu by selecting "Go to Folder" and typing /Volumes/NTFS.

Solution 3. Reformatting the Drive
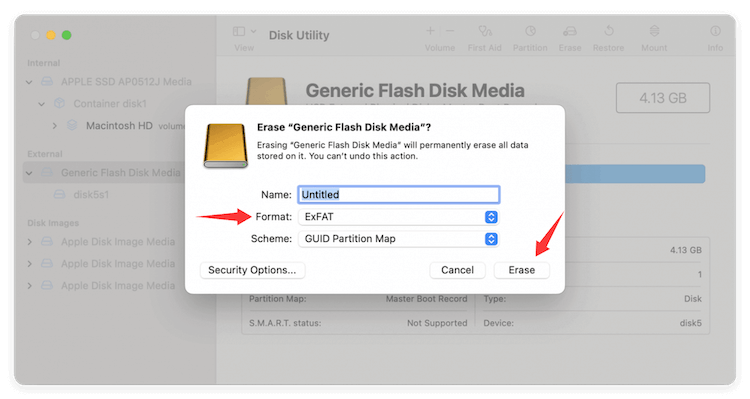
If you don't require NTFS and are willing to reformat the drive, you can convert it to a macOS-compatible file system such as APFS or exFAT, which is supported by both Windows and macOS.
Steps to Reformat the Drive
- Back Up Your Data: Since reformatting a drive would remove all data, make sure you have a backup of any crucial files.
- Go to Applications > Utilities >Disk Utility
- Choose the NTFS drive in Disk Utility by selecting it from the list on the left.
- Erase and Format: Click "Erase" and choose a file system format, such as exFAT or APFS. Give the drive a name and click "Erase" to format the drive.
- Transfer Data Back: Once the formatting is complete, transfer your data back to the drive.

Solution 4. Using Virtual Machines or Boot Camp
Another approach is to use a virtual machine (VM) or Apple's Boot Camp to run Windows on your Mac. This method allows you to access the NTFS drive through a native Windows environment, ensuring full compatibility without the need for third-party software.
Using Boot Camp to Access NTFS Drives (Not supported on Apple Silicon Macs)
- Set Up Boot Camp: Use the Boot Camp Assistant in macOS to create a partition and install Windows on your Mac.
- Access NTFS Drives in Windows: Once Windows is installed, you can boot into it and access your NTFS drives as you would on a regular Windows PC.
- Transfer Files: After accessing the NTFS drive in Windows, you can transfer files to a shared folder or another drive that is compatible with both macOS and Windows.
Solution 5. Network Solutions: Using a Network-Attached Storage (NAS)
If you regularly need to access an NTFS drive on both Windows and macOS systems, a Network-Attached Storage (NAS) device might be a good solution. NAS devices allow you to store files centrally and access them over a network from any device, regardless of the operating system.
Advantages of Using NAS
- Cross-Platform Compatibility: NAS devices are made to function with a variety of operating systems.
- Centralized Storage: Store all your files in one location and use any networked device to access them.
- Backup and Redundancy: RAID (Redundant Array of Independent Disks) is a feature that NAS devices frequently have for data redundancy and backup.
How to Set Up NAS for NTFS Access
- Choose a NAS Device: Select a NAS device that supports NTFS and is compatible with both macOS and Windows.
- Connect and Configure: Follow the manufacturer's instructions to connect and configure your NAS device on your network.
- Access Files Remotely: Once set up, you can access your NTFS drive from your Mac over the network using the NAS interface.
Pros and Cons of Different Methods
Each method for using NTFS drives on Mac has its own advantages and disadvantages. Here's a quick comparison:
| Method | Pros | Cons |
|---|---|---|
| 1. NTFS for Mac Software | Full read/write access, user-friendly, reliable | Paid software, potential for performance issues |
| 2. Enabling NTFS via Terminal | Free, no additional software required | Unstable, risk of data corruption, not recommended for regular use |
| 3. Reformatting the Drive | Full compatibility with macOS | Erases all data, not compatible with Windows NTFS |
| 4. Virtual Machines/Boot Camp | Native Windows environment, full NTFS support | Requires additional setup, dual-booting, or VM software |
| 5. Network Solutions (NAS) | Centralized access, cross-platform compatibility | Requires additional hardware, network setup |
Additional Tips for Using NTFS Drive on Mac
Using NTFS drives on a Mac can be a smooth experience if managed correctly. Here are some additional tips to help you get the most out of your cross-platform file management:
1. Regular Backups
Regardless of the method you choose, it is always advisable to maintain regular backups of your data, especially when dealing with NTFS drives on macOS. This will help prevent data loss in case of drive failure or corruption.
2. Keep Software Updated
Make sure your third-party NTFS drivers are always up to date with the most recent version if you use them. Updates are regularly released by developers, particularly for new macOS releases, to enhance compatibility and address bugs.
3. Safely Eject Drives
Always eject your NTFS drives safely before disconnecting them from your Mac. This prevents data corruption and ensures that all files are properly saved.
4. Consider a Dedicated Drive for macOS
If you frequently work with large files or sensitive data, it may be worth investing in a dedicated drive formatted for macOS (APFS or HFS+). This will ensure maximum performance and compatibility with macOS features like Time Machine.
Conclusion
Using a Windows NTFS drive on a Mac is entirely possible, but it comes with some challenges. What works best for you will depend on what you need and how frequently it is needed to transfer files between Windows and macOS. For regular use, third-party NTFS drivers like Donemax NTFS for Mac or Paragon offer the most reliable and seamless experience to install NTFS drivers on Mac. If you prefer a free solution, enabling write access through Terminal is an option, albeit a risky one. Alternatively, you can reformat the drive to a more compatible file system or use network solutions like NAS for cross-platform access.
Whatever method you choose, understanding the limitations and capabilities of NTFS and macOS file systems will help you make the best decision for your workflow.


Donemax NTFS for Mac
An easy-to-use NTFS for Mac tool to help you enable writable for NTFS drives on Mac so that you can read-write NTFS drives on Mac without any limitation. It also can help you mount, format, repair, rename, open drive on your Mac.
Related Articles
- May 22, 20257 Solutions to Fix Files Not Copying from Mac to External Drive or USB Drive
- Jul 12, 2024EaseUS NTFS For Mac Review And Best Alternatives
- Dec 05, 2024Can't Mount NTFS Volume on Mac? Fix It Now
- May 19, 2025Fix External Hard Drive Read-Only on M1 Chip Mac
- Aug 15, 2023Fixed: Can't Delete Files from An USB Flash Drive on Mac
- Aug 15, 2023How to Use Seagate External Hard Drive on Mac without Formatting?

Christina
Christina is the senior editor of Donemax software who has worked in the company for 4+ years. She mainly writes the guides and solutions about data erasure, data transferring, data recovery and disk cloning to help users get the most out of their Windows and Mac. She likes to travel, enjoy country music and play games in her spare time.

Gerhard Chou
In order to effectively solve the problems for our customers, every article and troubleshooting solution published on our website has been strictly tested and practiced. Our editors love researching and using computers and testing software, and are willing to help computer users with their problems