
Written byChristinaUpdated on Apr 10, 2026
How to Safely Factory Reset macOS Big Sur: Wipe Data for Resale
Approved byGerhard Chou
🔖 Tip: If you will sell or donate your Mac which is running macOS Big Sur, you'd better factory reset it first. Then use disk wipe software - such as Donemax Data Eraser for Mac - to erase all sensitive data permanently, making data recovery impossible. Also, factory reset can fix bugs or issues for macOS Big Sur.
PAGE CONTENT:
Whether you're troubleshooting a persistent problem or preparing to sell or give away your Mac, performing a factory reset on macOS Big Sur is a straightforward process. However, it's crucial to follow the right steps to avoid data loss and ensure the reset process goes smoothly. This comprehensive guide walks you through the process, from preparing your Mac to reinstalling macOS Big Sur, so you can start fresh or hand off your Mac with peace of mind.
Why Factory Reset macOS Big Sur?
A factory reset restores your Mac to its original state, removing all personal data and installed apps. There are several reasons to perform a factory reset macOS Big Sur, including:
- Resolving performance issues or bugs.
- Removing malware or resetting system settings.
- Preparing the Mac for resale or gifting.
- Clearing out clutter and starting fresh.
Before diving into the reset process, let's start with some essential preparation steps to ensure your data and accounts are secure.
Back Up Your Data
Backing up your data is the most critical step before performing a factory reset, as the factory reset process will erase everything on your Mac. Taking time to back up your files ensures that you can retrieve important documents, photos, and apps after the reset. You can back up the macOS Big Sur with the following options:
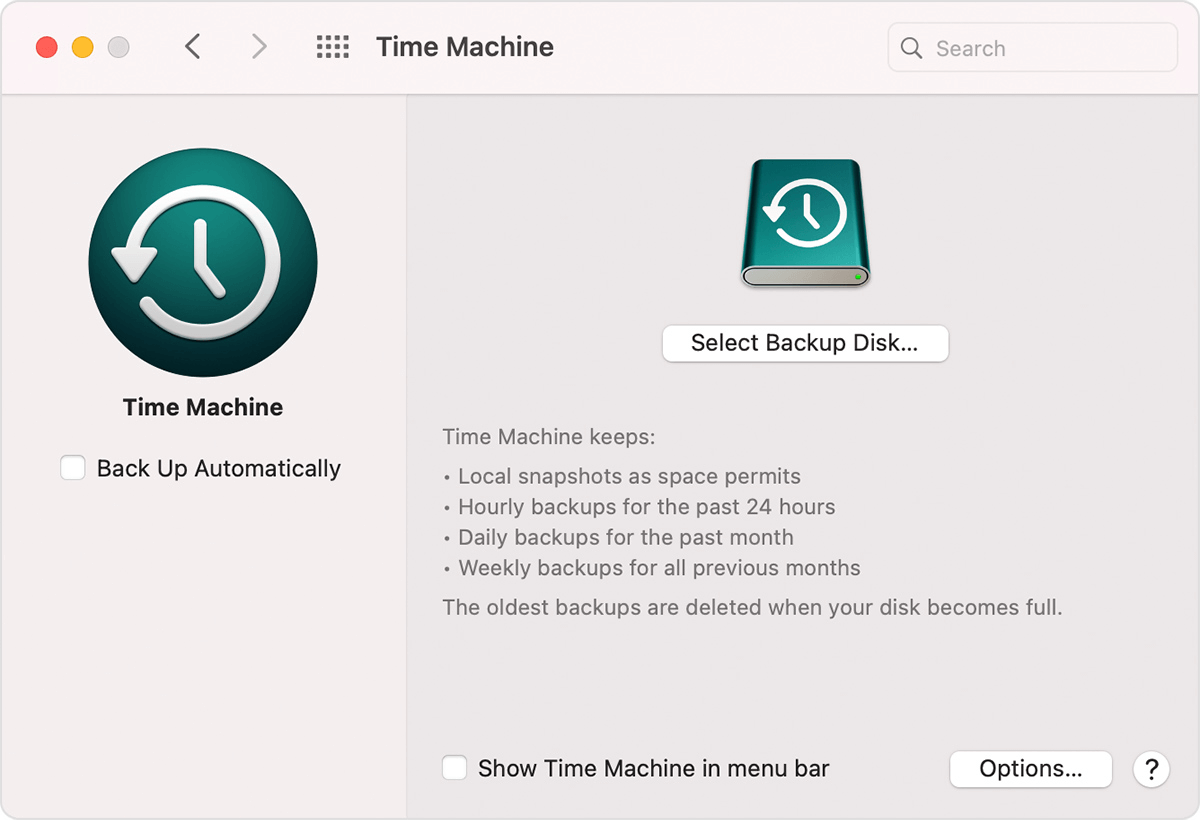
Option 1. Time Machine Backup:
- Connect an external hard drive to your Mac.
- Open System Preferences and click on Time Machine.
- Turn on Time Machine and select the external drive as your backup destination.
![factory reset on macOS Big Sur]()
- Time Machine will begin creating a full backup, including your system files, apps, and personal data.
💡 Pro Tip: Time Machine allows you to restore your Mac to a previous state. This is especially helpful if you're resetting due to performance issues and want to quickly get back to work after the macOS Big Sur factory reset.
Option 2. Manual Backup:
If you prefer a more selective approach, manually copying essential files to an external storage device or cloud service is a good option. Focus on folders like:
- Documents: Save work files, contracts, or other important documents.
- Pictures: Back up photos and videos stored in the Photos app or custom folders.
- Downloads: Check for any files you've saved temporarily that need to be preserved.
Popular cloud storage options include iCloud Drive, Google Drive, Dropbox, and OneDrive. These services not only save space on your local drive but also make files accessible across multiple devices.
Option 3. Third-Party Tools:
Use tools like Donemax Disk Clone for Mac to create bootable backups of your system. (Check how to create bootable clone backup for macOS Big Sur >>)
Having a backup ensures that your data is safe. Also, you can restore the data after the factory reset of macOS Big Sur if needed. For users who want additional functionality, third-party tools like Donemax Disk Clone for Mac, are excellent choices. These apps allow you to create a bootable cloned backup, meaning you can start your Mac directly from the cloned backup drive if needed.
Steps to Factory Reset macOS Big Sur
#1 Sign Out of Apple Services
Apple's ecosystem ties multiple services to your Mac, and failing to sign out before resetting can cause problems, especially for the next user. Here's why and how to complete this step:
- Why Sign Out?
- Services like iCloud and Find My Mac are linked to your Apple ID, making it impossible for the new user to access them unless you sign out.
- Not signing out may trigger Apple's Activation Lock, requiring your Apple ID credentials even after a factory reset.
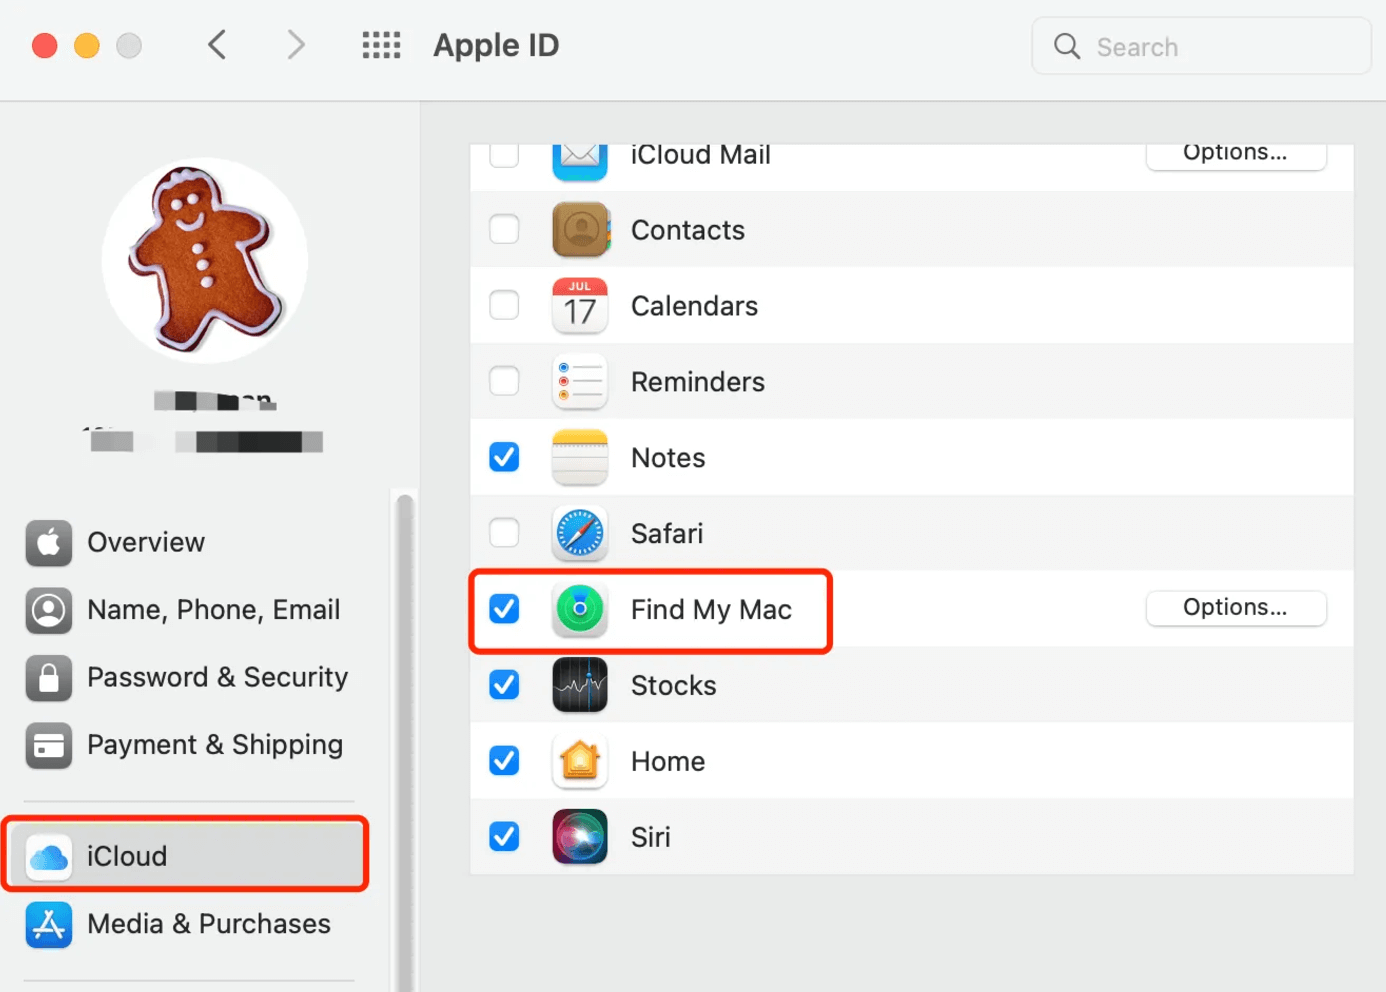
- Disable Find My Mac:
- Go to iCloud from Apple ID via System Preferences.
- Uncheck Find My Mac and enter your Apple ID password to confirm.
![factory reset on macOS Big Sur]()
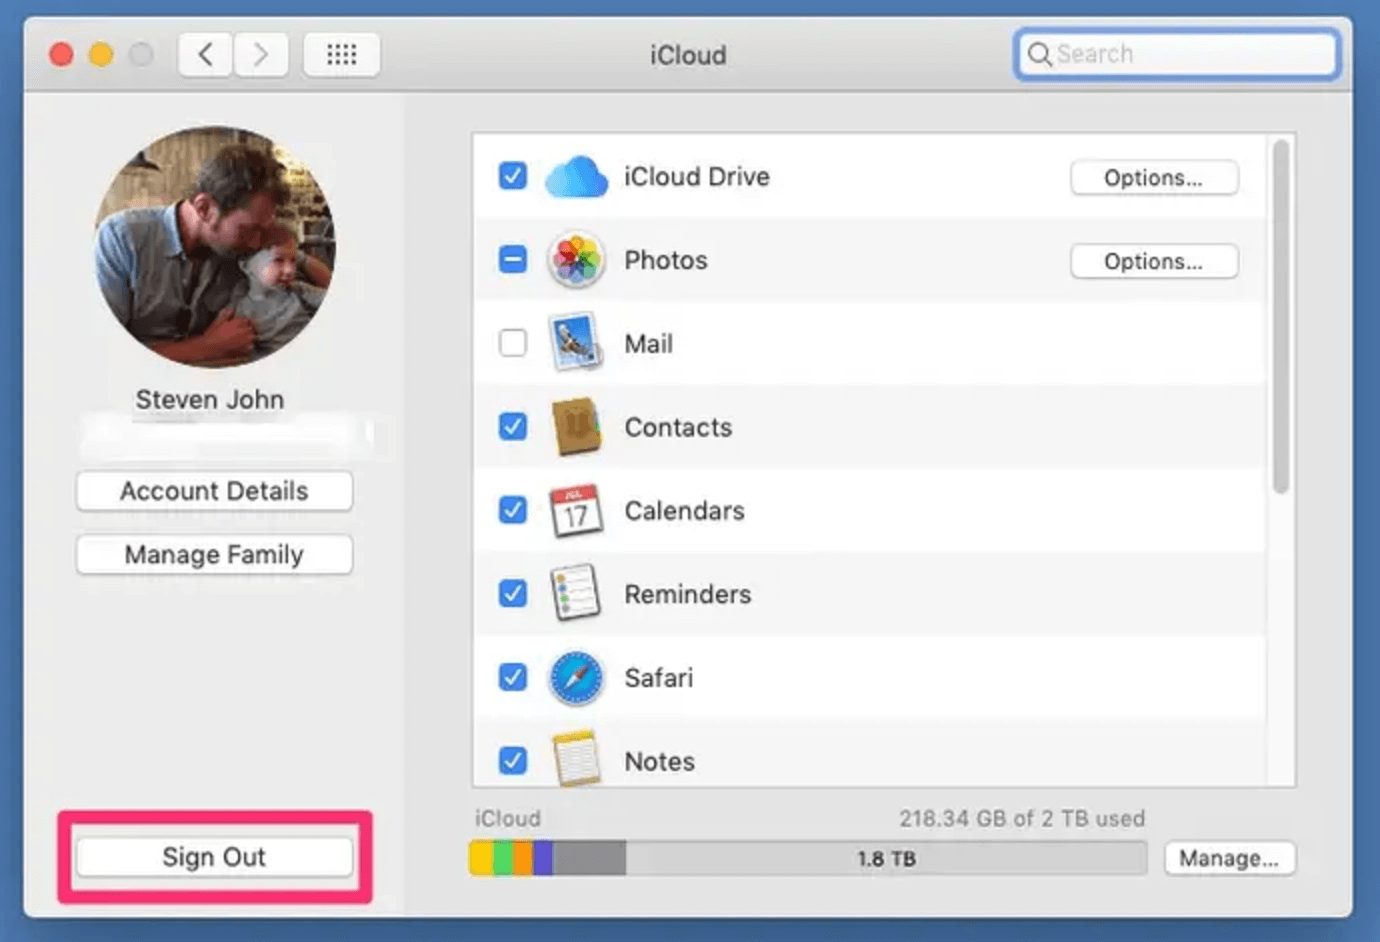
- Sign Out of iCloud:
- In the Apple ID settings, click Sign Out at the bottom.
- Follow the prompts to remove iCloud from the Mac.
![factory reset on macOS Big Sur]()
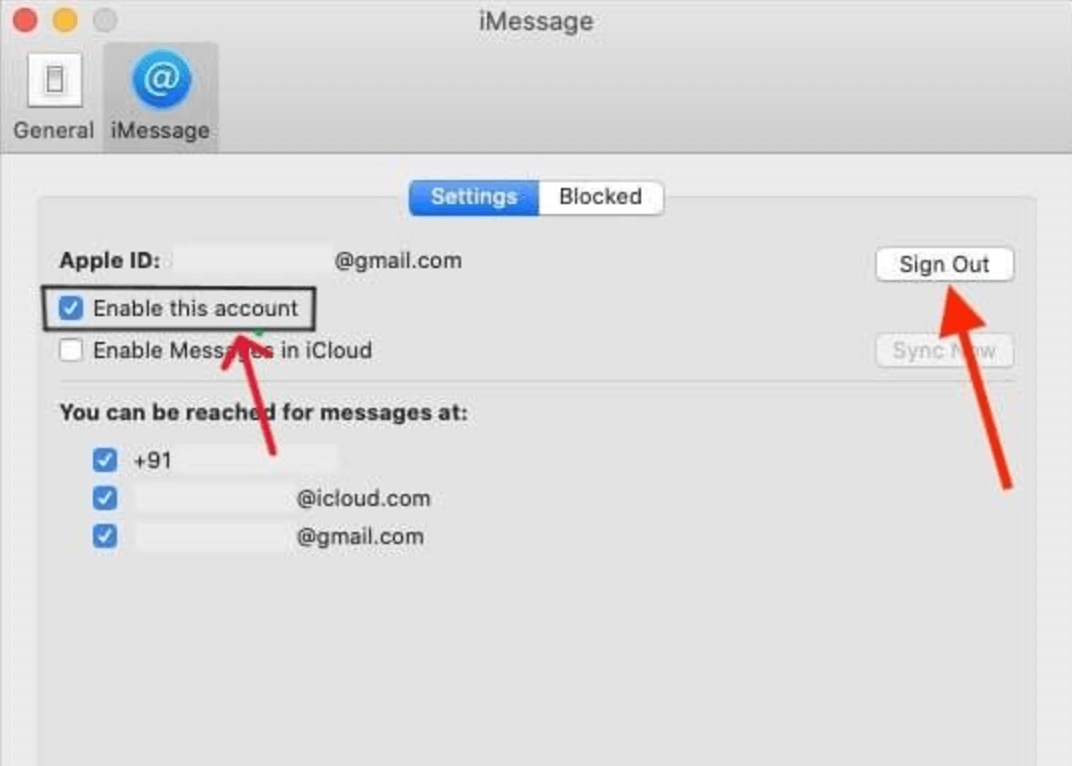
- Sign Out of iMessage:
- Open the Messages app and go to Messages > Preferences.
- Select the iMessage tab and click Sign Out.
![factory reset on macOS Big Sur]()
- Sign Out of Other Accounts:
- Don't forget to sign out of secondary services like iMessage, FaceTime, and any email accounts linked to the Mail app.
- For apps with unique licenses or accounts (e.g., Adobe Creative Cloud, Microsoft Office), log out to avoid potential conflicts when reinstalling on the same or another device.
Proper preparation eliminates the risk of losing important files. Also, it can avoid running into issues with account management after the reset. By taking these steps, you set yourself up for a smooth and stress-free factory reset experience.
#2 Boot into macOS Recovery Mode
The next step is accessing Recovery Mode, where you'll erase the disk and reinstall macOS. The method differs on an Intel-based Mac and Apple Silicon Mac.
For Intel-Based Macs:
- Restart your Mac.
- As the Mac restarts, press and hold Command (⌘) + R until the Apple logo or spinning globe appears.
- Release the keys to enter Recovery Mode.
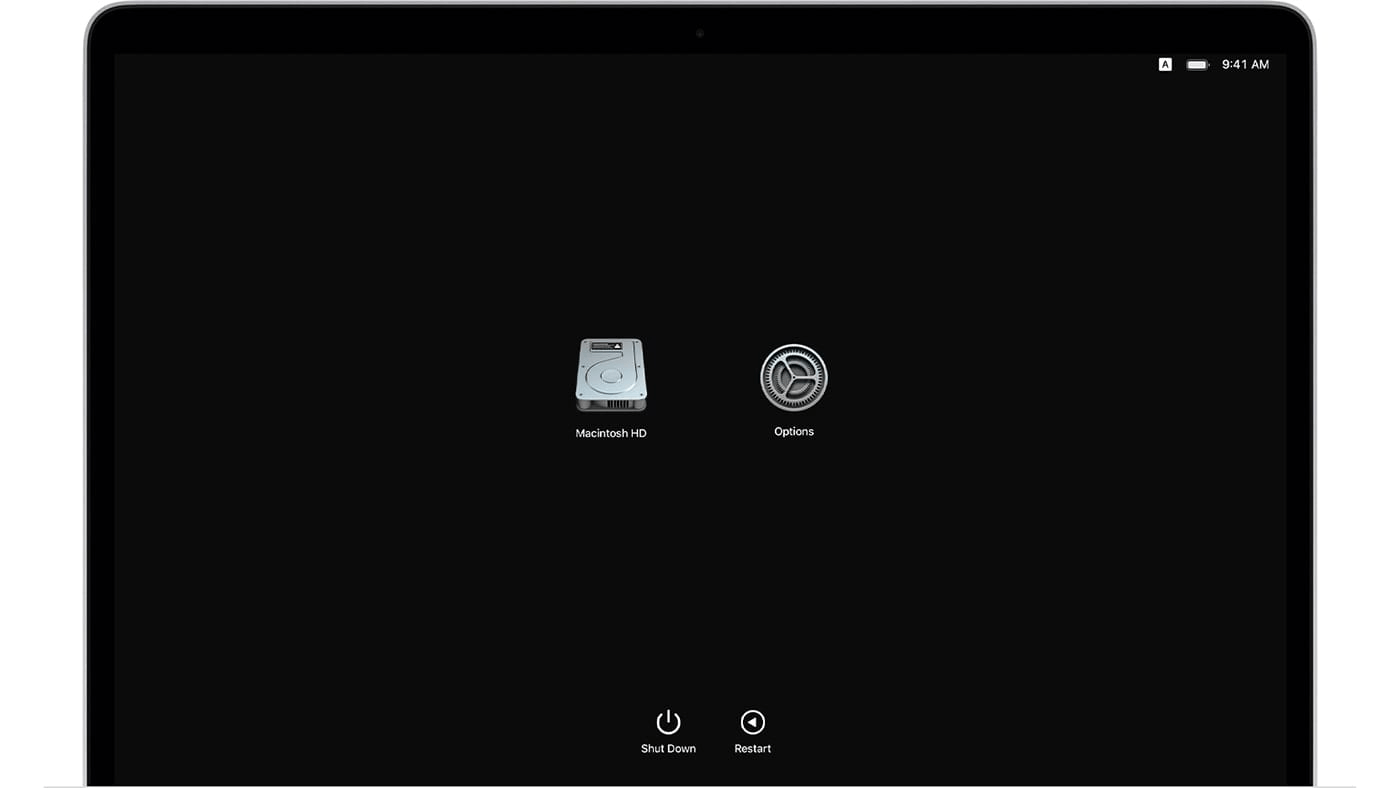
For Apple Silicon Macs:
- Shut down your Mac.
- Press and hold the Power button until the startup options screen appears.
- Click Options, then click Continue to access Recovery Mode.
![factory reset on macOS Big Sur]()
Once in Recovery Mode, you'll see a macOS Utilities menu.
#3 Erase the Disk
Erasing the disk using Disk Utility removes all data, leaving the drive ready for a fresh installation of macOS Big Sur. Follow these steps:
- Open Disk Utility:
- In the macOS Utilities menu, select Disk Utility and click Continue.
- Select Your Startup Disk:
- In the left sidebar, choose the startup disk (usually named "Macintosh HD").
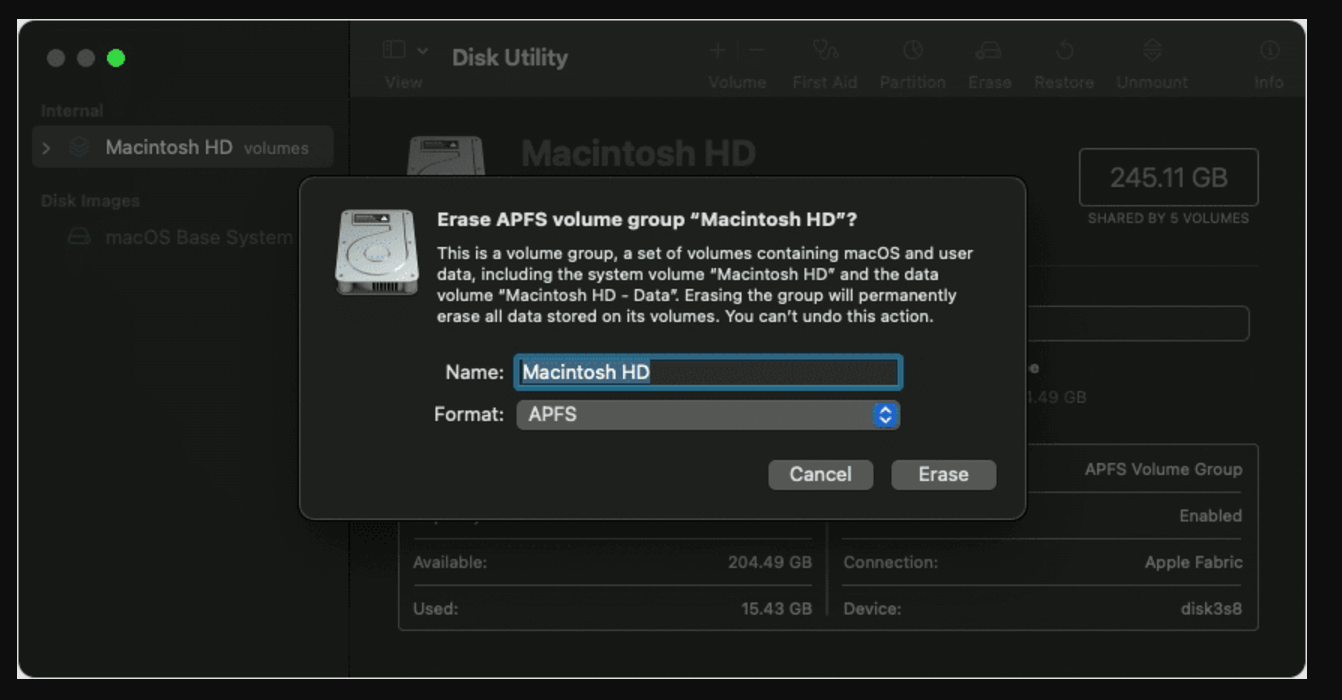
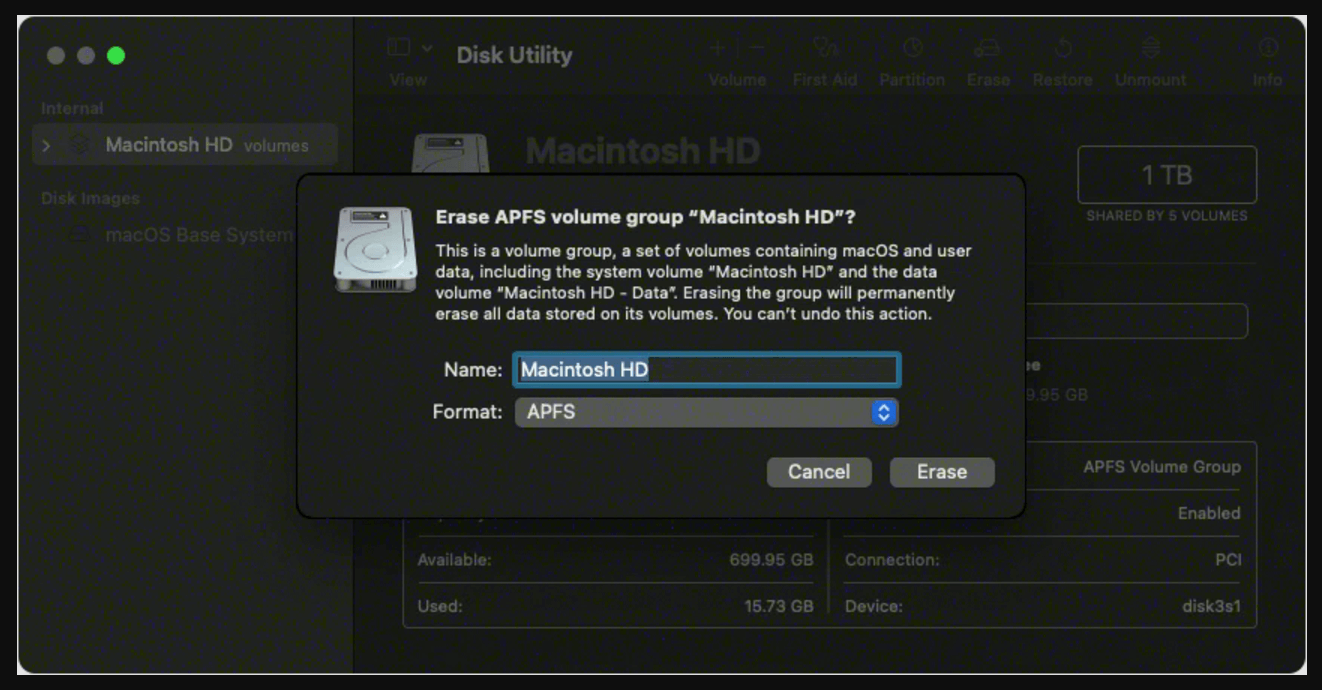
- Erase the Disk:
- Click Erase at the top of the Disk Utility window.
- Choose the format: APFS for Macs running Big Sur and later.
- Enter a name for the disk (e.g., "Macintosh HD") if you want. Otherwise, just leave it as what was.
![factory reset on macOS Big Sur]()
- Confirm and Erase:
- Click Erase to begin the process.
- Wait for Disk Utility to finish erasing the disk.
- Exit Disk Utility:
- Close Disk Utility to return to the macOS Utilities menu after erasing the disk successfully.
#4 Reinstall macOS Big Sur
After erasing the disk in Disk Utility, you're ready to reinstall macOS Big Sur.
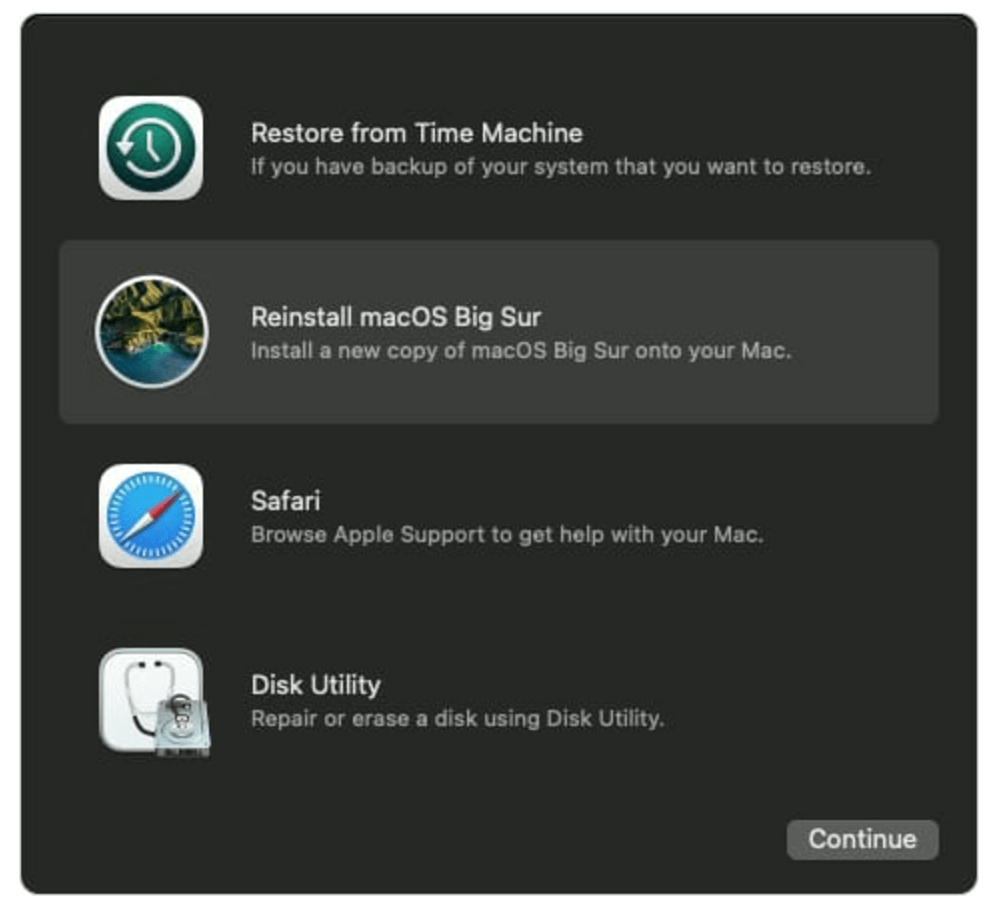
- Select Reinstall macOS:
- In the macOS Utilities menu, choose Reinstall macOS and click Continue.
![factory reset on macOS Big Sur]()
- In the macOS Utilities menu, choose Reinstall macOS and click Continue.
- Follow the On-Screen Instructions:
- Agree to the terms and conditions.
- Choose the disk where macOS will be installed (e.g., "Macintosh HD").
- Start the Installation:
- Click Install and wait for macOS to download and install.
- Ensure a stable internet connection during this process, as macOS Big Sur requires downloading files from Apple's servers.
- Complete the Setup:
- Once you complete the macOS installation, your Mac will restart and display the setup assistant.

#5 Set Up as New or Restore Backup
After the factory reset for macOS Big Sur, you can choose to set up the Mac as new or restore your data from a backup.
Set Up as New:
- Follow the prompts in the setup assistant to create a new user account, set up preferences, and configure Apple services.
Restore from Backup:
If you created a Time Machine backup:
- Connect the external drive containing your backup.
- During setup, choose the option to Restore from Time Machine Backup.
- Select the backup drive and follow the prompts to restore your data.
Troubleshooting Common Issues
Here are solutions to some common problems you might encounter during the factory reset process:
Problem Entering Recovery Mode:
- Intel Macs: If Command + R doesn't work, try Option + Command + R to access internet recovery.
- Apple Silicon Macs: Ensure the power button is held long enough for the startup options to appear.
Disk Not Erasing in Disk Utility:
- Check if any volumes are mounted and unmount them first.
- If the disk is still locked, use the Erase Volume Group option.
![factory reset on macOS Big Sur]()
macOS Installation Fails:
- Ensure you have a stable internet connection.
- Restart the process by returning to Recovery Mode.
- Use Option + Command + R to download the latest compatible macOS version.
Tips for a Smooth Factory Reset
- Double-Check Backups:
- Ensure to back up all important files before erasing the disk.
- Verify the integrity of the backup by restoring a test file.
- Keep Login Information Handy:
- Note down your Apple ID and password, as the setup process may require these information.
- Secure Your Mac:
- If you're selling or giving away the Mac, consider enabling FileVault encryption before erasing the disk to protect your data.
📌 Note: The data which is erased by Disk Utility is not lost for good and can be recovered by data recovery software.
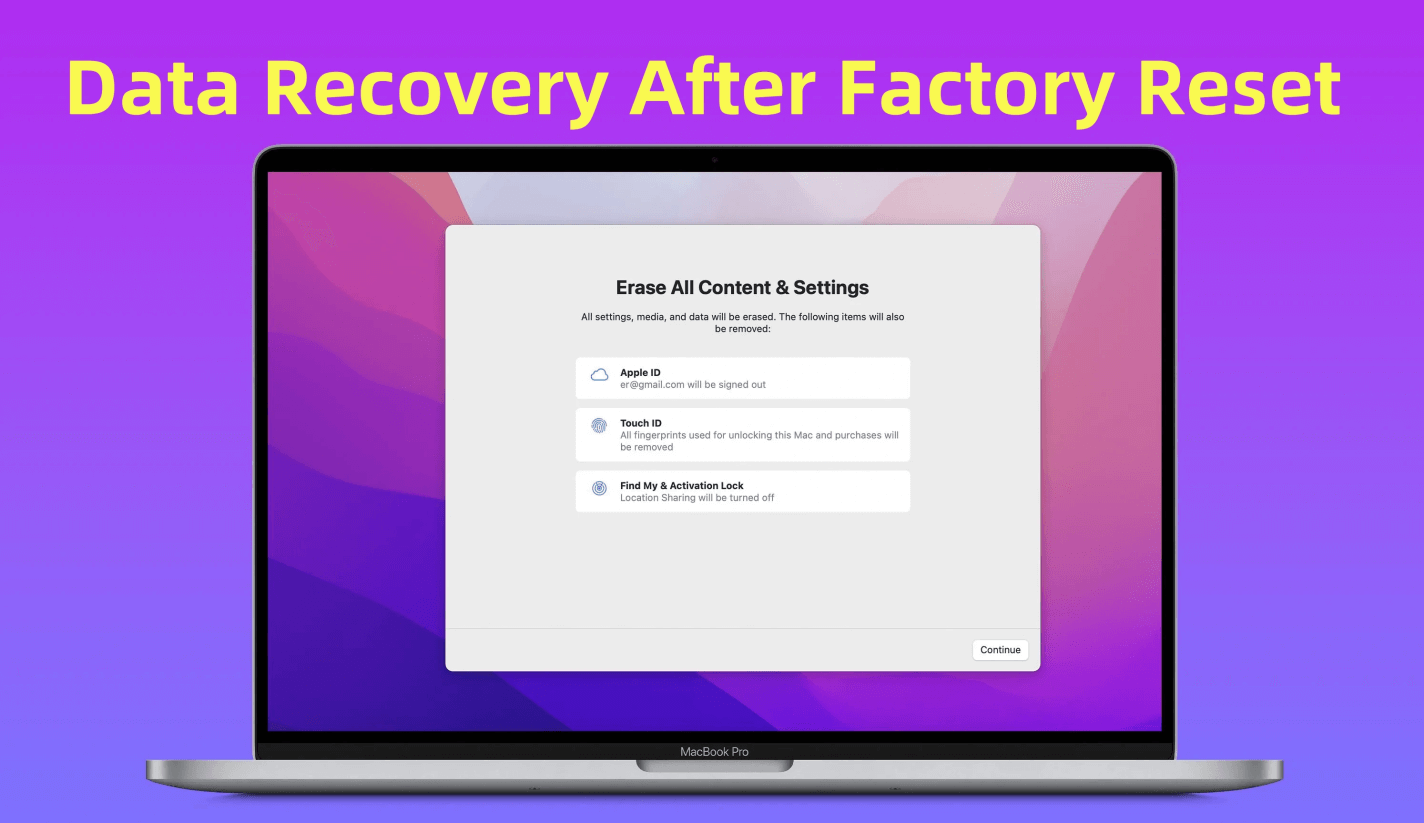
Rover Lost Data After Factory Reset macOS Big Sur
Mac data recovery software can deeply scan the internal SSD and find all deleted/formatted/lost files after factory reset macOS Big Sur.
Permanently Wipe Data on macOS Big Sur
If you will sell or donate your Mac, it's essential to permanently wipe all deleted/erased/lost data off the drive after factory reset. The further data wiping operation will ensure the data is unrecoverable. Mac disk wipe software can wipe free disk space of your Mac and permanently erase all removed data from the internal drive, making data recovery impossible.
Step 1. Download and install Donemax Data Eraser for Mac - one of the best Mac disk wipe software.
Donemax Data Eraser for Mac
- Shred files/folders, wipe free space or entire hard drive.
- International data erasure standards ensure the wiped data unrecoverable.
- 100% safe and very easy to use.
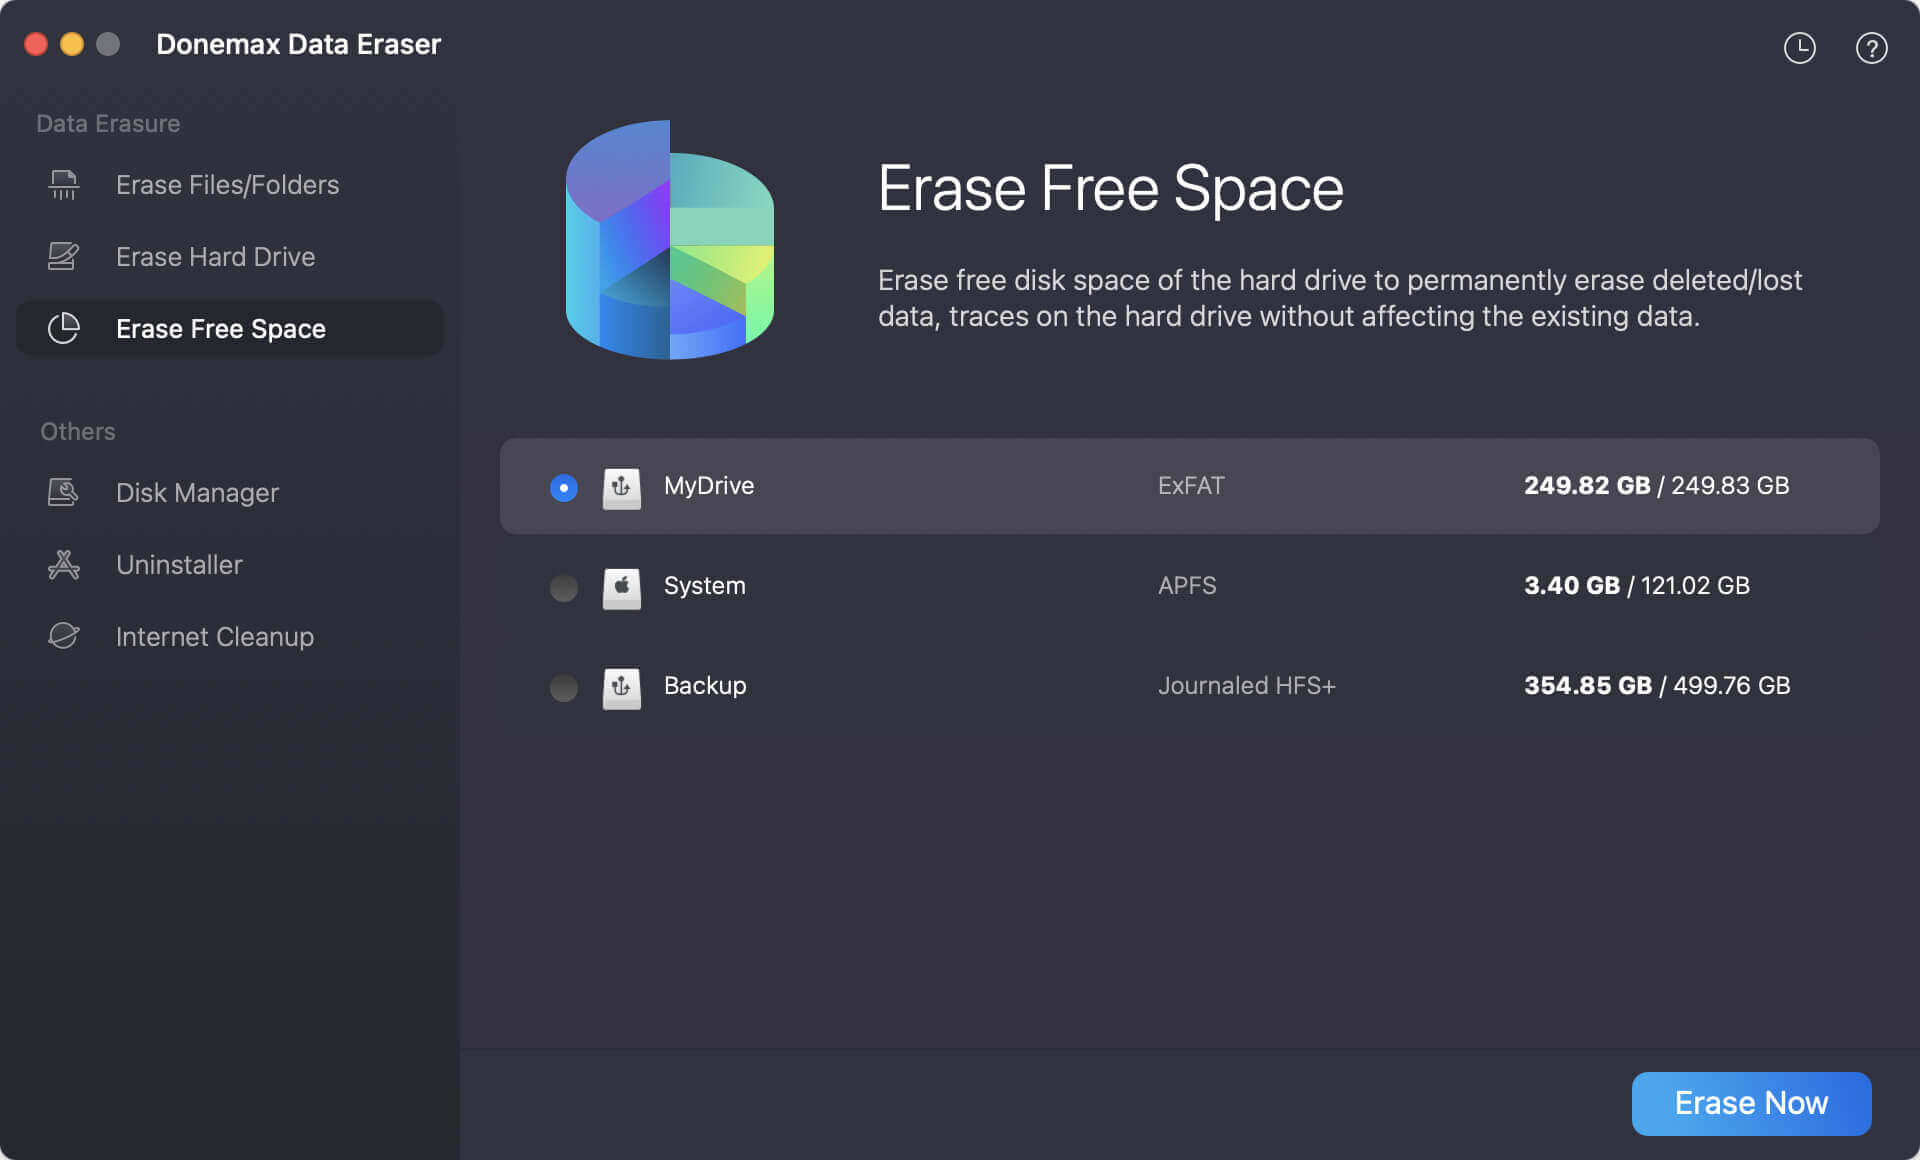
Step 2. Open Donemax Data Eraser for Mac, choose Wipe Free Space mode. Then select the Macintosh HD and click on Erase Now button.
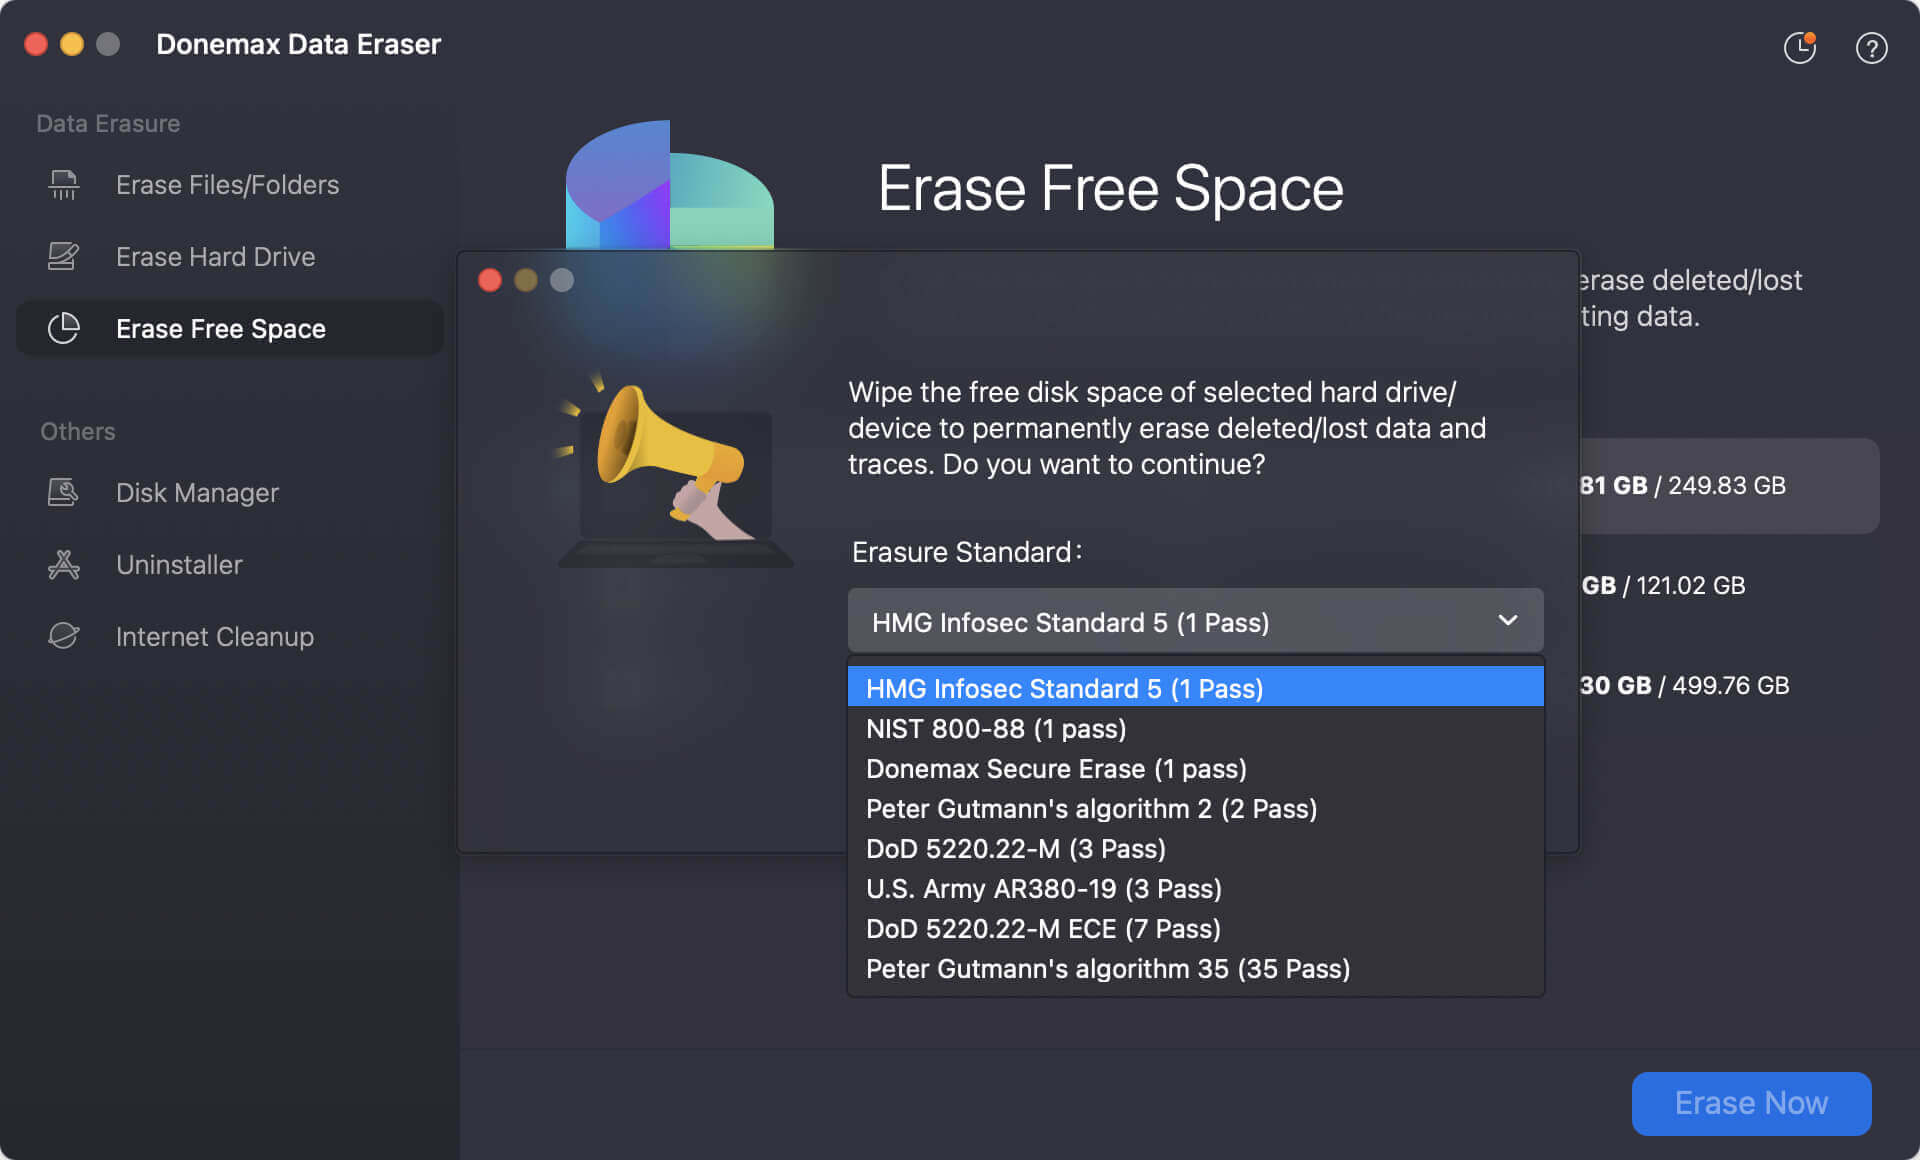
Step 3. Then select a data erasure standard to permanently wipe the data from the free space on the drive.
Step 4. At last, the software will start to wipe the free space from the drive. Wait patiently as it may take some time to complete.
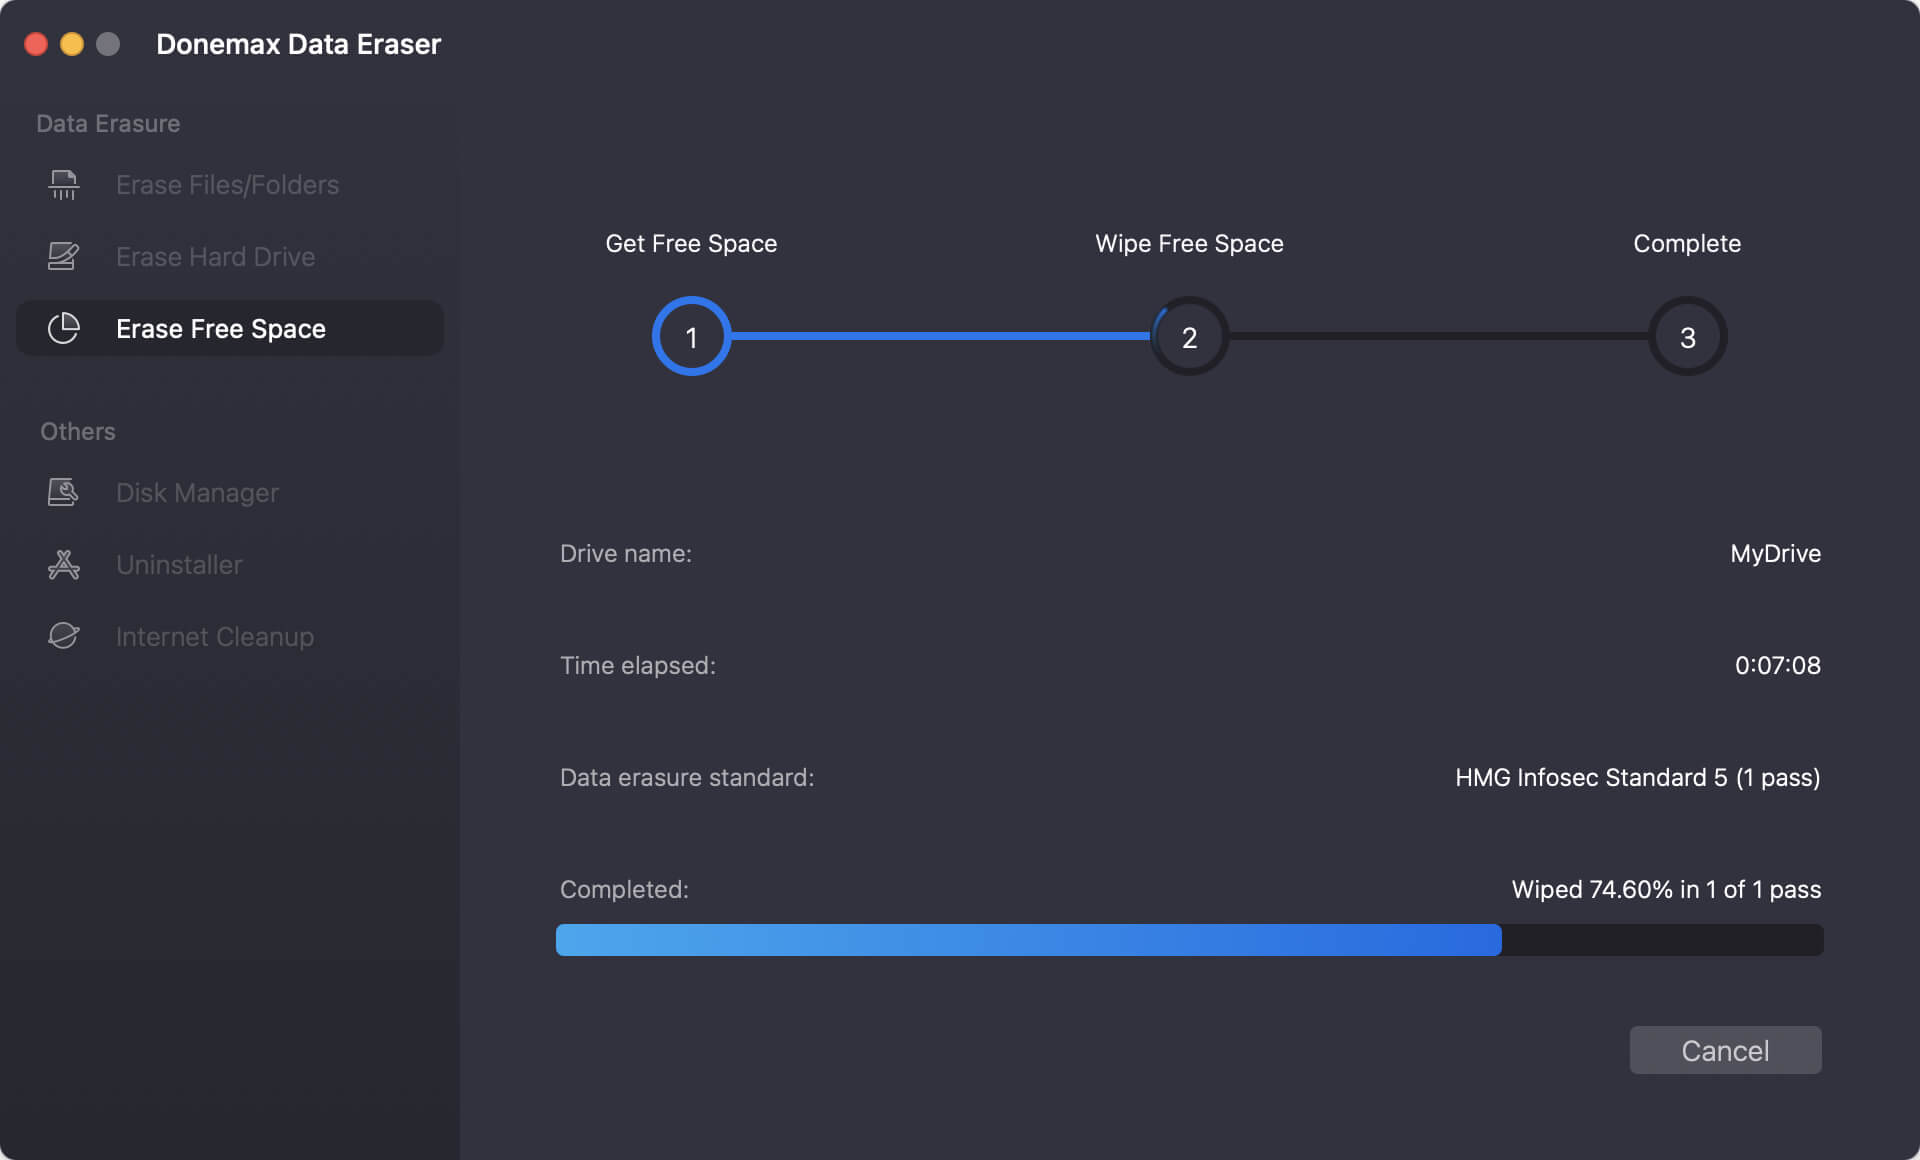
It will wipe free disk space of the internal drive and permanently erase all deleted/erased/lost data, ensure no data is recoverable.
Conclusion
A factory reset of macOS Big Sur is an effective way to resolve issues, clear out old data, or prepare your Mac for a new user. By following the steps outlined in this guide - backing up data, signing out of Apple services, erasing the disk, and reinstalling macOS - you can reset your Mac with confidence.
Remember, preparation is key. Double-check your backups and account sign-outs to avoid complications. Once reset, you'll have a clean slate to enjoy macOS Big Sur or pass on your Mac knowing it's ready for its next chapter.
For further assistance or troubleshooting, refer to Apple's official support pages or consult an expert. Resetting your Mac doesn't have to be frightenin - with this guide, you're well-equipped to handle the process smoothly.
Donemax Data Eraser for Mac
100% safe and powerful Mac data erasure program. It offers certified data erasure standards including U.S. Army AR380-19, DoD 5220.22-M ECE to securely and permanently erase data from Mac HDD/SSD and external storage devices, making data recovery impossible.
Related Articles
- May 10, 2024How to Erase SD Card on Mac?
- Apr 01, 2026Factory Reset macOS High Sierra: 3 Easy Steps to Erase & Reinstall
- Jan 07, 2026How to Erase Data in macOS Big Sur Permanently?
- Feb 19, 2024How to Permanently Delete or Shred Files on Mac?
- Apr 18, 2025How to Factory Reset an M3-Chip Mac?
- Dec 30, 2025How to Erase Startup Disk on macOS Ventura?

Contributing Writer
Christina
Christina is the senior editor of Donemax software who has worked in the company for 4+ years. She mainly writes the guides and solutions about data erasure, data transferring, data recovery and disk cloning to help users get the most out of their Windows and Mac. She likes to travel, enjoy country music and play games in her spare time.

Editor in chief
Gerhard Chou
In order to effectively solve the problems for our customers, every article and troubleshooting solution published on our website has been strictly tested and practiced. Our editors love researching and using computers and testing software, and are willing to help computer users with their problems