![macOS Monterey Data Recovery]()
How to recover lost data after upgrading to macOS 12 Monterey? When you find your files are lost, just check the recycle bin or Time Machine backup. In this article, you can try the easy methods to quickly restore deleted files and permanently erased data from HDD, SSD, memory card, USB flash drive, digital camera, etc on macOS Monterey.
Files, Photos or Videos Get Lost after Upgrade
During the upgrade process, some problems may occur, at this time, your important data may lose. For example, your desktop becomes empty. It's very terrible when you cannot find your precious files, photos, videos, etc. But, take it easy, your data is not permanently deleted and can be recovered.
Now, let's see some solutions to help you get the lost data back.
Solution 1: Recover Lost Files from Time Machine Backups
Every Mac will routinely perform backups of your computer. When you connect an external hard drive to your Mac, you may see a prompt asking if you want to use the drive with Time Machine. When Time Machine is enabled, it will create one backup every hour.
If you have backed up your Mac with Time Machine, it is very easy to recover your lost files. Now, please follow the steps to get the data back.
Step 1. Connect Time Machine backup external hard drive to Mac.
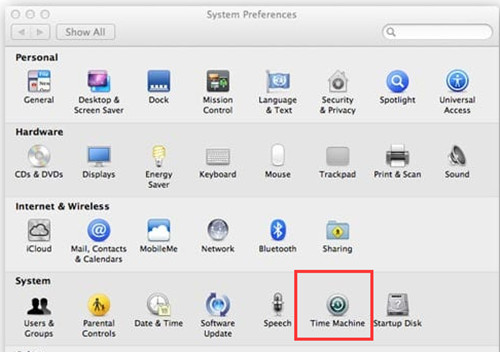
Step 2. Go to System Preferences.
Step 3. Find and open Time Machine, check Show Time Machine in menu bar.
![recover data in macOS Monterey]()
Step 4. Click the menu bar and choose Enter Time Machine.
Step 5. Find Time Machine backup folders and locate the desired files.
Step 6. Click Restore to recover the files you select.
Please note: this solution only works when you set up Time Machine. If you do not use Time Machine to back up your drive, you'd better to recover your lost data with professional data recovery software.
Solution 2: Recover Lost Data from iCloud
If you use iCloud Drive to sync your files or folders, you can find your photos, files, videos and audio easily.
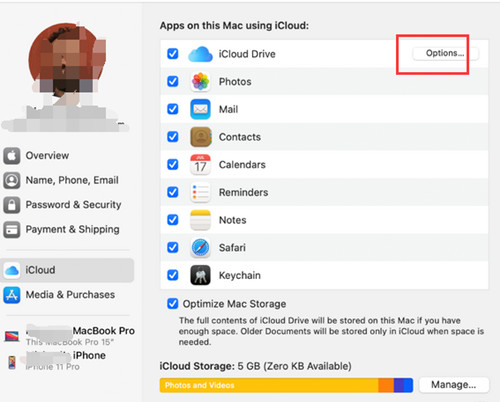
Step 1: Go to System Preferences > Internet Accounts > iCloud.
Step 2. Click Options to see the files and folders.
![recover data in macOS Monterey]()
If you does not set up Time Machine and iCloud Drive, you can try the following solution.
Solution 3. Recover Data with macOS Monterey Data Recovery Software
Deletion, improper operation, unexpected system error, or virus attack often leads to data loss. No matter what reasons cause data loss, Mac data recovery software always gets a method.
If you are looking for a simple way to recover deleted files on your Mac, Donemax Data Recovery for Mac is the best data recovery software for macOS Monterey, which can recover any file format and deal with any data loss situation.
- Recover deleted files in macOS Monterey
- Undelete files after emptying Trash Bin
- Unformat drive in macOS Monterey
- Recover all types of lost data such as photos, videos, documents, etc.
- Recover lost data due to file system crash, re-installation, OS upgrade, etc.
Here are steps to recover lost data with Donemax Data Recovery for Mac:
Step 1. Install and run Donemax Data Recovery for Mac.
Please download and install Donemax Data Recovery for Mac, then launch it on your Mac.
Step 2. Select the drive where you lose the data.
After you launch Donemax Data Recovery for Mac on your Mac, you will see the interface, namely, all hard drives are list here. Then just select the hard drive where you lose your data.
![recover data in macOS Monterey]()
Step 3. Click Scan button to find the lost data.
After you specify the hard drive, please click Scan button to start scanning. Then, you will see lots of found files.
![recover data in macOS Monterey]()
Step 4. Preview and Recover data.
You can preview the found files and select the files you want to recover, then click Recover button. To ensure an actual recovery, you can preview files like photos, videos, music or Word, to make sure that the data are intact and recoverable.
![recover data in macOS Monterey]()
When scan completed, you will find lots of results. At this time, you can use Filter feature. It will help you filter a specific file type and gives you fast access to what you need.
Finally, you will get the lost data back.
Conclusion
Donemax Data Recovery for Mac helps millions to recover lost data in three simple steps: automated scan, preview, and one-click recovery. Due to advanced algorithm, Donemax Data Recovery for Mac can recover any file format (DOC/XLS,XLSX/PPT/PPTX, JPG/JPEG, TIFF/TIF, PNG, AVI, MOV, MP4, MP3 and more) from any Mac devices. Now, it is fully compatible with macOS 12, 11, 10.15, 10.14, 10.13, etc.
Donemax Data Recovery can also support recovering lost data on Windows 11, 10, 8, etc. So you can also unformat SD card and recover data on your PC.
Donemax Data Recovery for Mac
- Recover deleted, formatted and inaccessible data on macOS 12, 11, 10.15, 10.14, 10.13, etc.
- Unformat external hard drive, memory card, HDD, SSD, digital camera, USB flash drive.
- Recover all types of files due to deletion, format, partition loss, OS upgrade, etc.