
Written byMariaUpdated on Aug 18, 2025
Factory Reset a MacBook: How to Wipe Everything from a MacBook
Approved byGerhard Chou
Before we start: If you will sell your MacBook after a factory reset, it's necessary to wipe the data permanently to avoid data leakages. Donemax Data Eraser for Mac can help you wipe all the personal data completely.
PAGE CONTENT:
Whether you're selling your MacBook, handing it down to someone else, or just want a clean slate to improve performance, performing a factory reset is the best way to wipe everything and restore your device to its original state. Factory reset a MacBook will erases all your data, user settings, and installed applications, then reinstalls a fresh version of macOS. This guide walks you through the entire process, step by step, ensuring that your data is safely backed up and your MacBook is completely wiped clean.

Why Factory Reset a MacBook?
There are several reasons to perform a factory reset on a MacBook:
- Selling or giving away the device: Protect your privacy by removing all personal data.
- Performance issues: Over time, MacBooks can slow down due to cluttered files, malware, or software conflicts.
- Software bugs: A fresh installation of macOS can resolve persistent bugs or crashes.
- Personal preference: Starting from scratch can help if you want to reconfigure the device to suit new workflows or users.
However, before you begin the reset process, it's vital to back up your data. Once a factory reset is complete, recovering deleted files becomes nearly impossible.
Preparation for Factory Resetting a MacBook
Before resetting your MacBook, follow these preparation steps:
- Connect to Wi-Fi: macOS installation requires internet access.
- Plug in power: Ensure the MacBook won't shut down mid-reset.
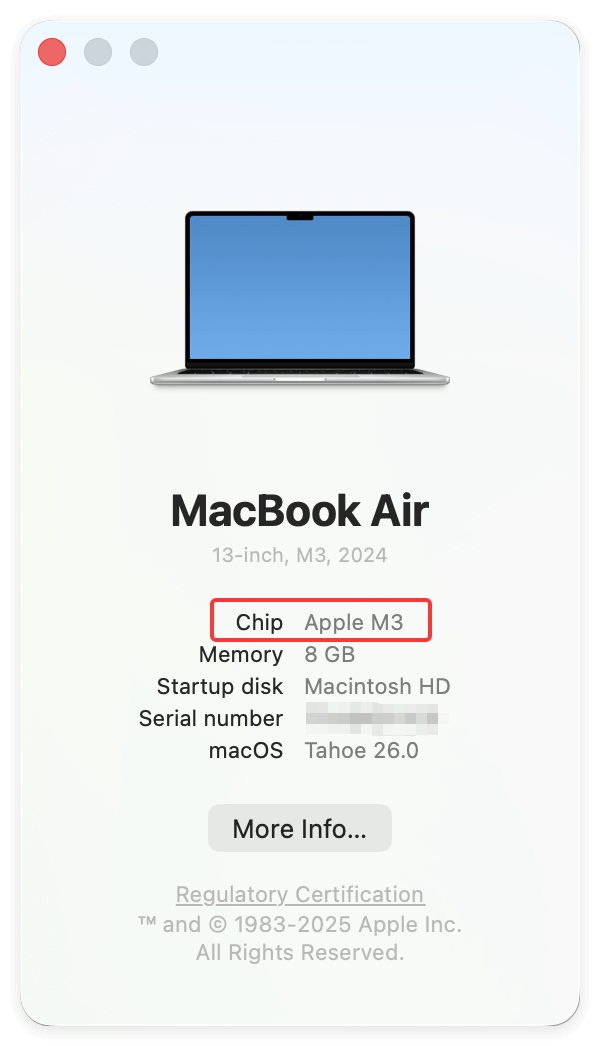
- Determine your Mac type: Apple Silicon Macs use a different reset method from Intel-based Macs. Click the Apple logo > About This Mac. Look for "Chip" (Apple M1, M2, etc.) or "Processor" (Intel).
Backup Your Data First
Before performing a factory reset, it's critical to ensure all your important data is backed up. Resetting your MacBook erases all files on the internal storage, and once that data is gone, it cannot be recovered unless a backup exists. Many users mistakenly skip this step, only to realize too late that cherished photos, critical documents, or personal configurations are gone forever.
Why You Need a Backup
A factory reset doesn't just delete user files—it removes installed applications, preferences, login credentials, and even custom keyboard shortcuts. If you've invested time into personalizing your MacBook or store files locally (rather than in the cloud), this step is non-negotiable. Backups offer a safety net to restore data after the reset—or migrate it to a new Mac.
Backing up also protects against:
- Unexpected failures during macOS reinstallation
- Potential data corruption
- Accidentally resetting the wrong drive
Now, let's explore the best ways to back up your MacBook.
Option 1. Time Machine (Recommended)
Time Machine is Apple's built-in backup solution. It allows you to back up your entire system and easily restore it later.
- Connect an external hard drive.
- Go to System Settings > General > Time Machine.
- Select the external drive and configure the settings. Then the backup will start automatically.

Benefits of Time Machine:
- Easy to restore files individually or restore everything to a new Mac.
- Works seamlessly with Migration Assistant.
- Creates hourly, daily, and weekly snapshots.
- Maintains version history so you can revert to older versions of files.
Option 2. iCloud Drive
iCloud is useful for backing up key documents, photos, and app data.
- Go to System Settings > Apple ID > iCloud.
- Enable iCloud Drive, Photos, and other apps you want to back up.
- Wait for syncing to complete.
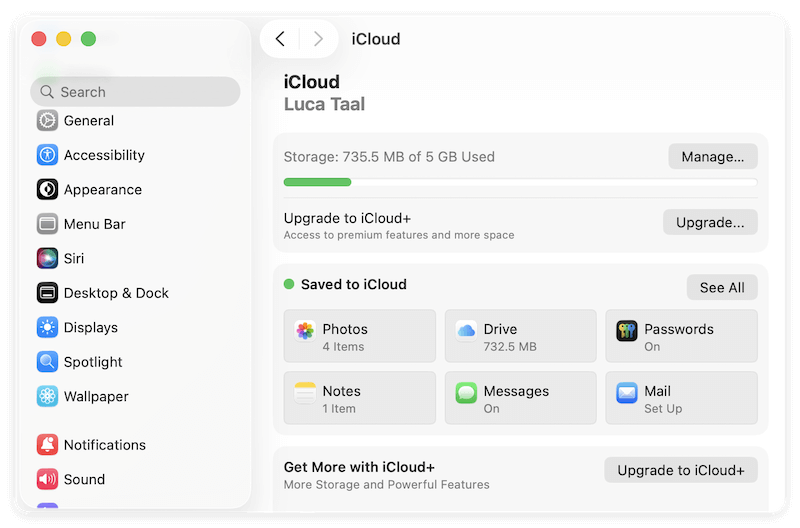
📍 iCloud Storage Tips:
Free iCloud storage is limited to 5GB. You may need to upgrade to a paid plan (50GB, 200GB, or 2TB).
You can check space usage in System Settings > Apple ID > iCloud > Manage Storage.
Limitations:
- iCloud doesn't back up your entire system or third-party apps.
- Large files or videos may take time to upload.
Option 3. Manual Backup to External Drive
For manual control:
- Plug in an external storage device.
- Copy folders like Documents, Desktop, Downloads, Photos, and Music manually.
📍 Pro Tip: Use a file-syncing app like FreeFileSync or ChronoSync to mirror folders and keep copies up-to-date.
Option 4. Third-Party Backup Tools
For advanced users or those who want bootable backups (meaning you can boot your Mac directly from the external drive), third-party tools are a powerful alternative.
- Donemax Disk Clone for Mac: Creates an exact clone of your Mac, even your bootable macOS partition.
- SuperDuper!: Great for creating bootable macOS backups with easy-to-use scheduling options.
- Backblaze (cloud-based): Backs up your files online continuously in the background.
Advantages of Third-Party Tools:
- Bootable backups make recovery faster if your main drive fails.
- More control over what to include/exclude.
- Can schedule backups for convenience.
Verify the Backup
Before moving on to factory resetting, double-check that your backup is complete.
- Open your backup disk and manually confirm that your files are present.
- If using Time Machine, click the Time Machine icon in the menu bar and "Browse Time Machine Backups" to browse previous backups.
- If using iCloud, visit iCloud.com to confirm your files have synced.
Sign Out of Apple Services
Signing out of Apple services ensures that Activation Lock is disabled. If Activation Lock is still enabled after a reset, the next user won't be able to access the device.
1. iCloud and Find My Mac
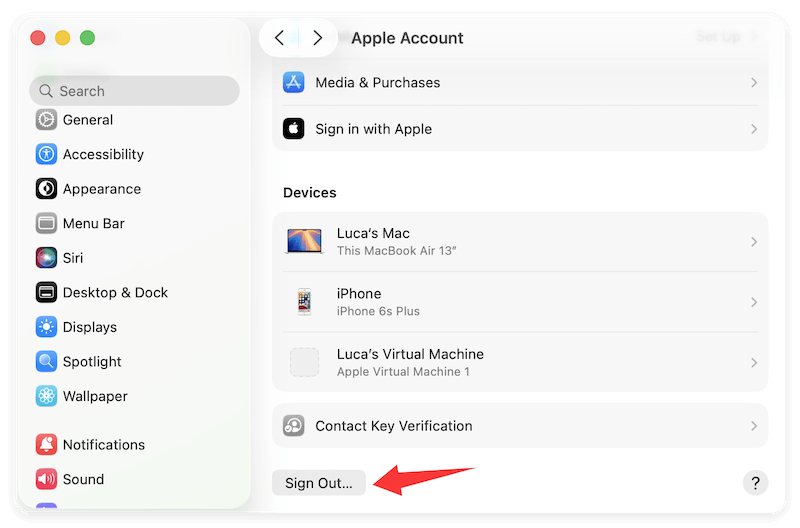
- Go to System Settings > Apple ID > iCloud.
- Scroll down and click Sign Out.
- Enter your Apple ID password when prompted.
2. iMessage
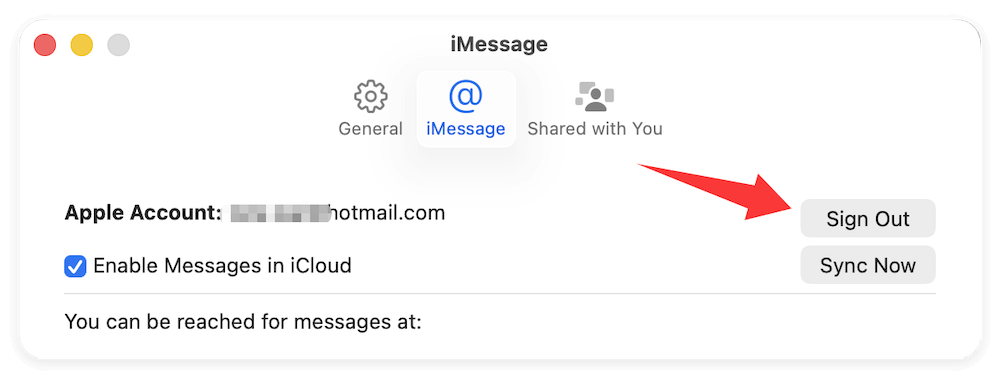
- Open the Messages app.
- Click Messages > Settings > iMessage.
- Click Sign Out.
3. Music/iTunes(macOS Mojave or earlier)
- Open Music (or iTunes), then go to Account > Authorizations > Deauthorize This Computer.
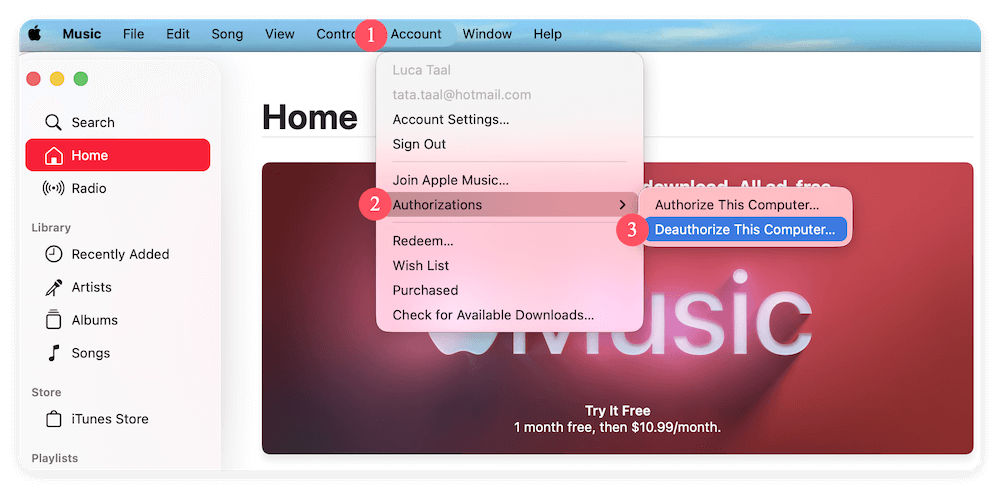
By signing out, you unlink your Apple ID and prevent any issues during reinstallation or future use by someone else.
Steps to Factory Reset a MacBook
Boot into macOS Recovery Mode
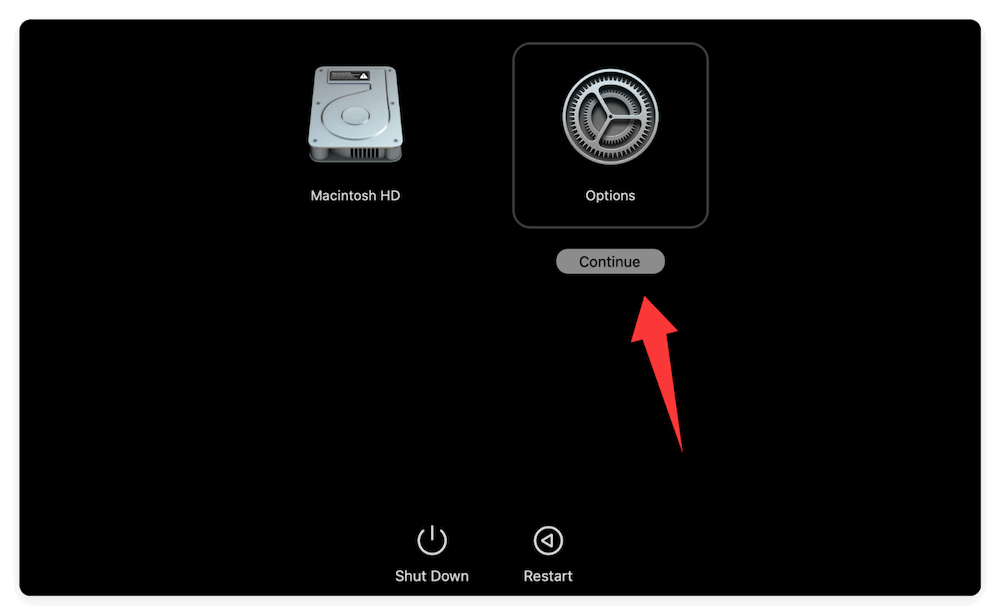
For Apple Silicon Macs (M1, M2...)
- Shut down your Mac completely.
- Press and hold the Power button until "Options" appears on screen.
- Click Options > Continue.
For Intel-based Macs
- Shut down your Mac.
- Turn it back on and immediately hold Command + R until the Apple logo or spinning globe appears.
Once in Recovery Mode, you'll see the macOS Utilities screen.
Erase the Hard Drive
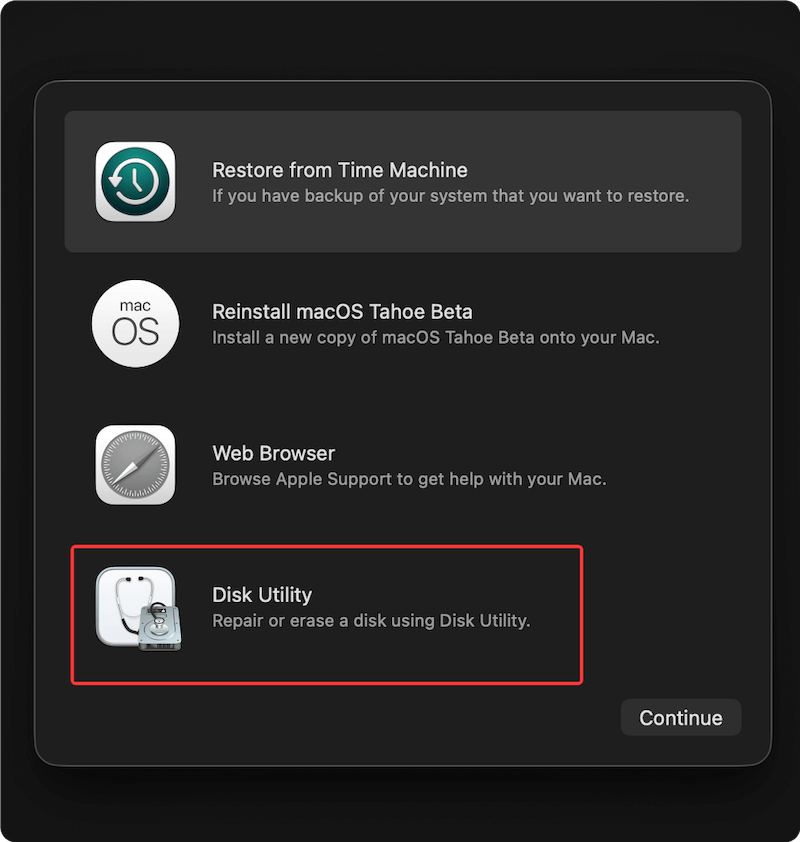
To completely wipe your Mac, use Disk Utility from within Recovery Mode.
- From the Utilities window, choose Disk Utility.
![factory reset a MacBook]()
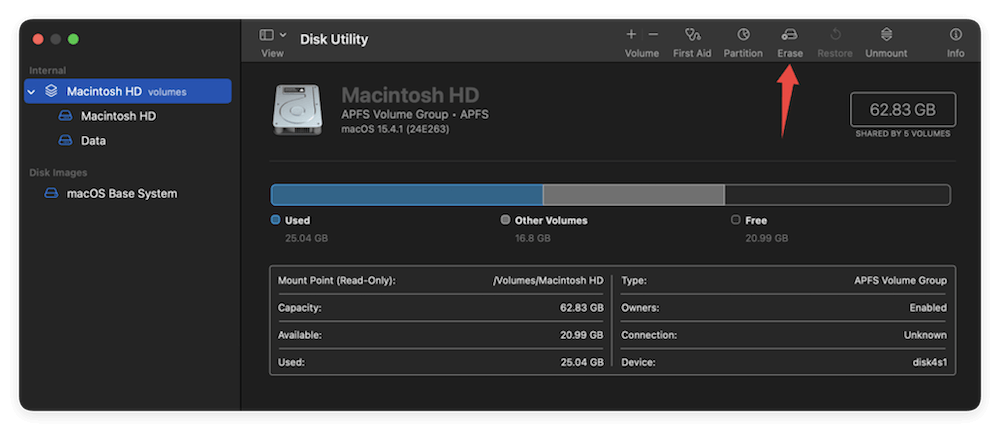
- In the left-hand sidebar, select the internal drive (usually named "Macintosh HD"). For macOS Big Sur or later, also erase the "Macintosh HD - Data" volume. Click Erase in the toolbar.
![factory reset a MacBook]()
- Choose:
- Format: APFS (for macOS High Sierra or later) or Mac OS Extended (Journaled) for older versions.
- Name: You can rename the drive "Macintosh HD" (optional).
- Click Erase button and wait for the process to complete.
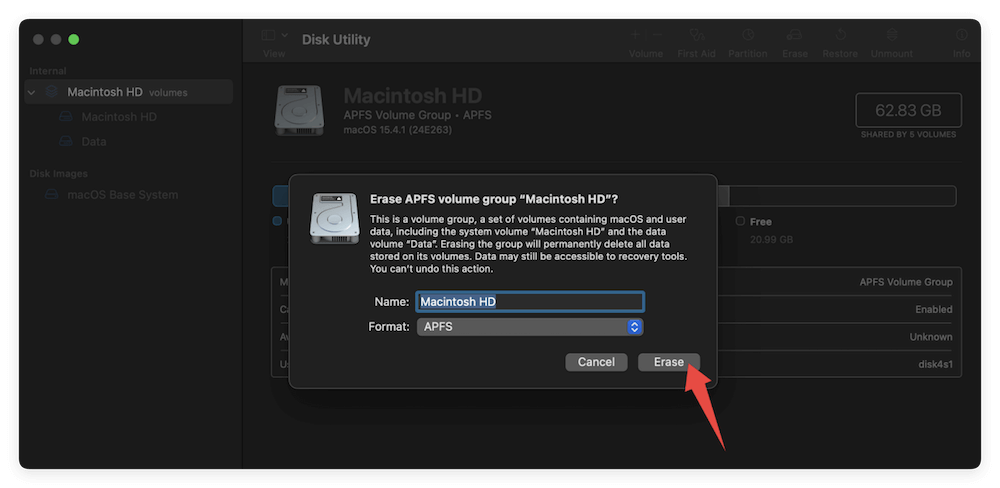
📍 Important: Double-check that you've selected the correct drive. Once erased, the data on the drive will be lost.
Reinstall macOS
After erasing the drive, you'll return to the Recovery menu to reinstall macOS.
Steps to Reinstall macOS
- In macOS Utilities, click Reinstall macOS or Reinstall macOS [version].
- Click Continue, then agree to terms and conditions.
- Choose the newly erased drive (e.g., Macintosh HD).
- Click Install.
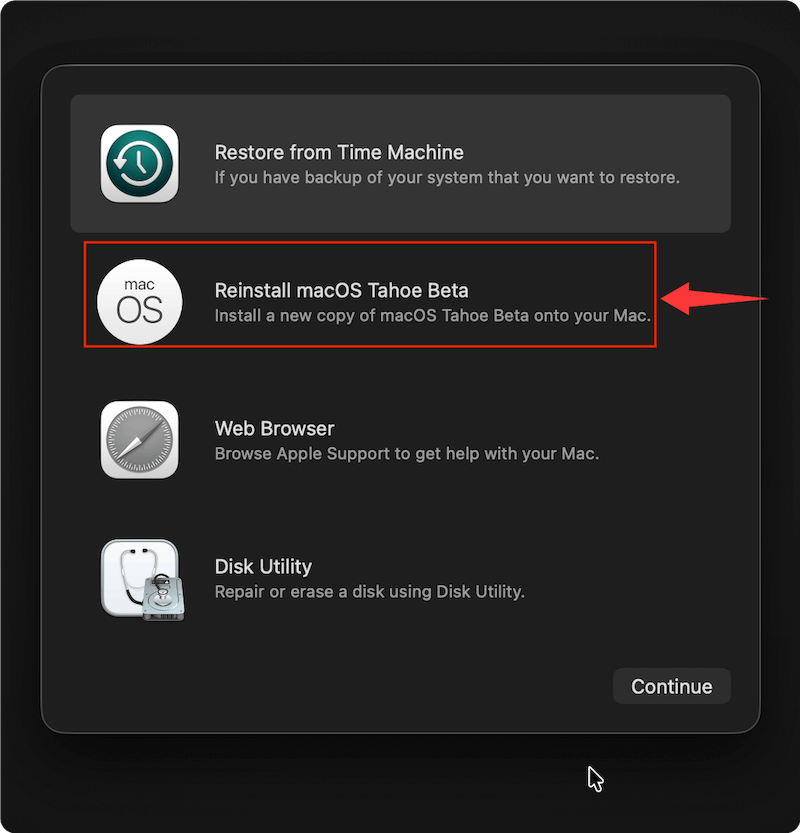
macOS will now download and reinstall the latest compatible version. This process may take anywhere from 20 minutes to over an hour depending on your internet speed and MacBook model.
Set Up or Shut Down
Once installation is complete, your Mac will restart and display the Setup Assistant.
If You're Keeping the Mac
- Proceed with the setup process: language, keyboard, Apple ID, etc.
- Restore your Time Machine backup if desired.
If You're Giving Away or Selling the Mac
- At the welcome screen (the one that says "Hello"), press Command + Q.
- Select Shut Down.
This leaves the Mac in its factory-fresh state, ready for the next user.
Use Erase Assistant for Factory Reset
For Apple Silicon Macs or T2 chip Macs which running macOS Monterey or later, you can also use the system built-in reset feature to do the job simply without manually doing the other tasks.
Just go to Apple menu > System Settings > General. Scroll down on the right and click Transfer or Reset. Click Erase All Content and Settings button.
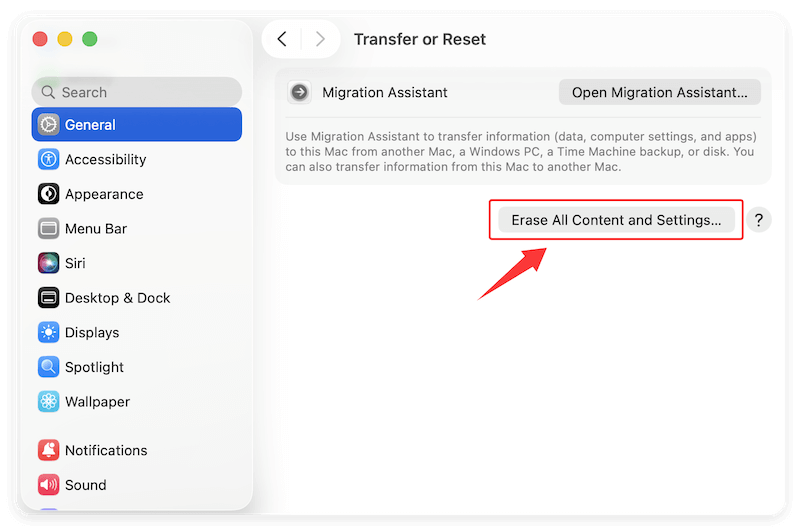
It will sign out services, wipe data/settings automatically. After the process is finished, you will just get a fresh new copy of macOS without manually reinstalling the macOS.
Wipe MacBook Data Permanently after a Factory Reset (Optional)
If you will resell or give away the MacBook, a factory reset is not enough. The data removed while resetting the MacBook can be recovered. With professional data recovery tools, it's able to recover all or at least part of the removed personal files in even after a factory reset.
How to avoid the data be recovered by other hands? You can use the professional data erasure tools. With these tools, you can wipe the removed data after a factory reset and ensure the data cannot be recovered in any way.
Donemax Data Eraser for Mac is such a tool. It can wipe data in different cases and guarantee the wiped data is no longer recoverable. It overwrites data with international data erasure algorithms to ensure data is gone permanently.
Donemax Data Eraser for Mac
- Best data erasure software for macOS.
- Wipe data permanently to avoid data recovery.
- Erase data flexibly with 3 data wiping modes.
After a factory reset on MacBook, you should use Erase Free Space to erase the data removed while factory resetting the Mac. You can do as following steps to do the job:
Step 1. Run Donemax Data Eraser for Mac. Change to Erase Free Space mode. Select the startup disk of MacBook and click Erase Now button to continue.
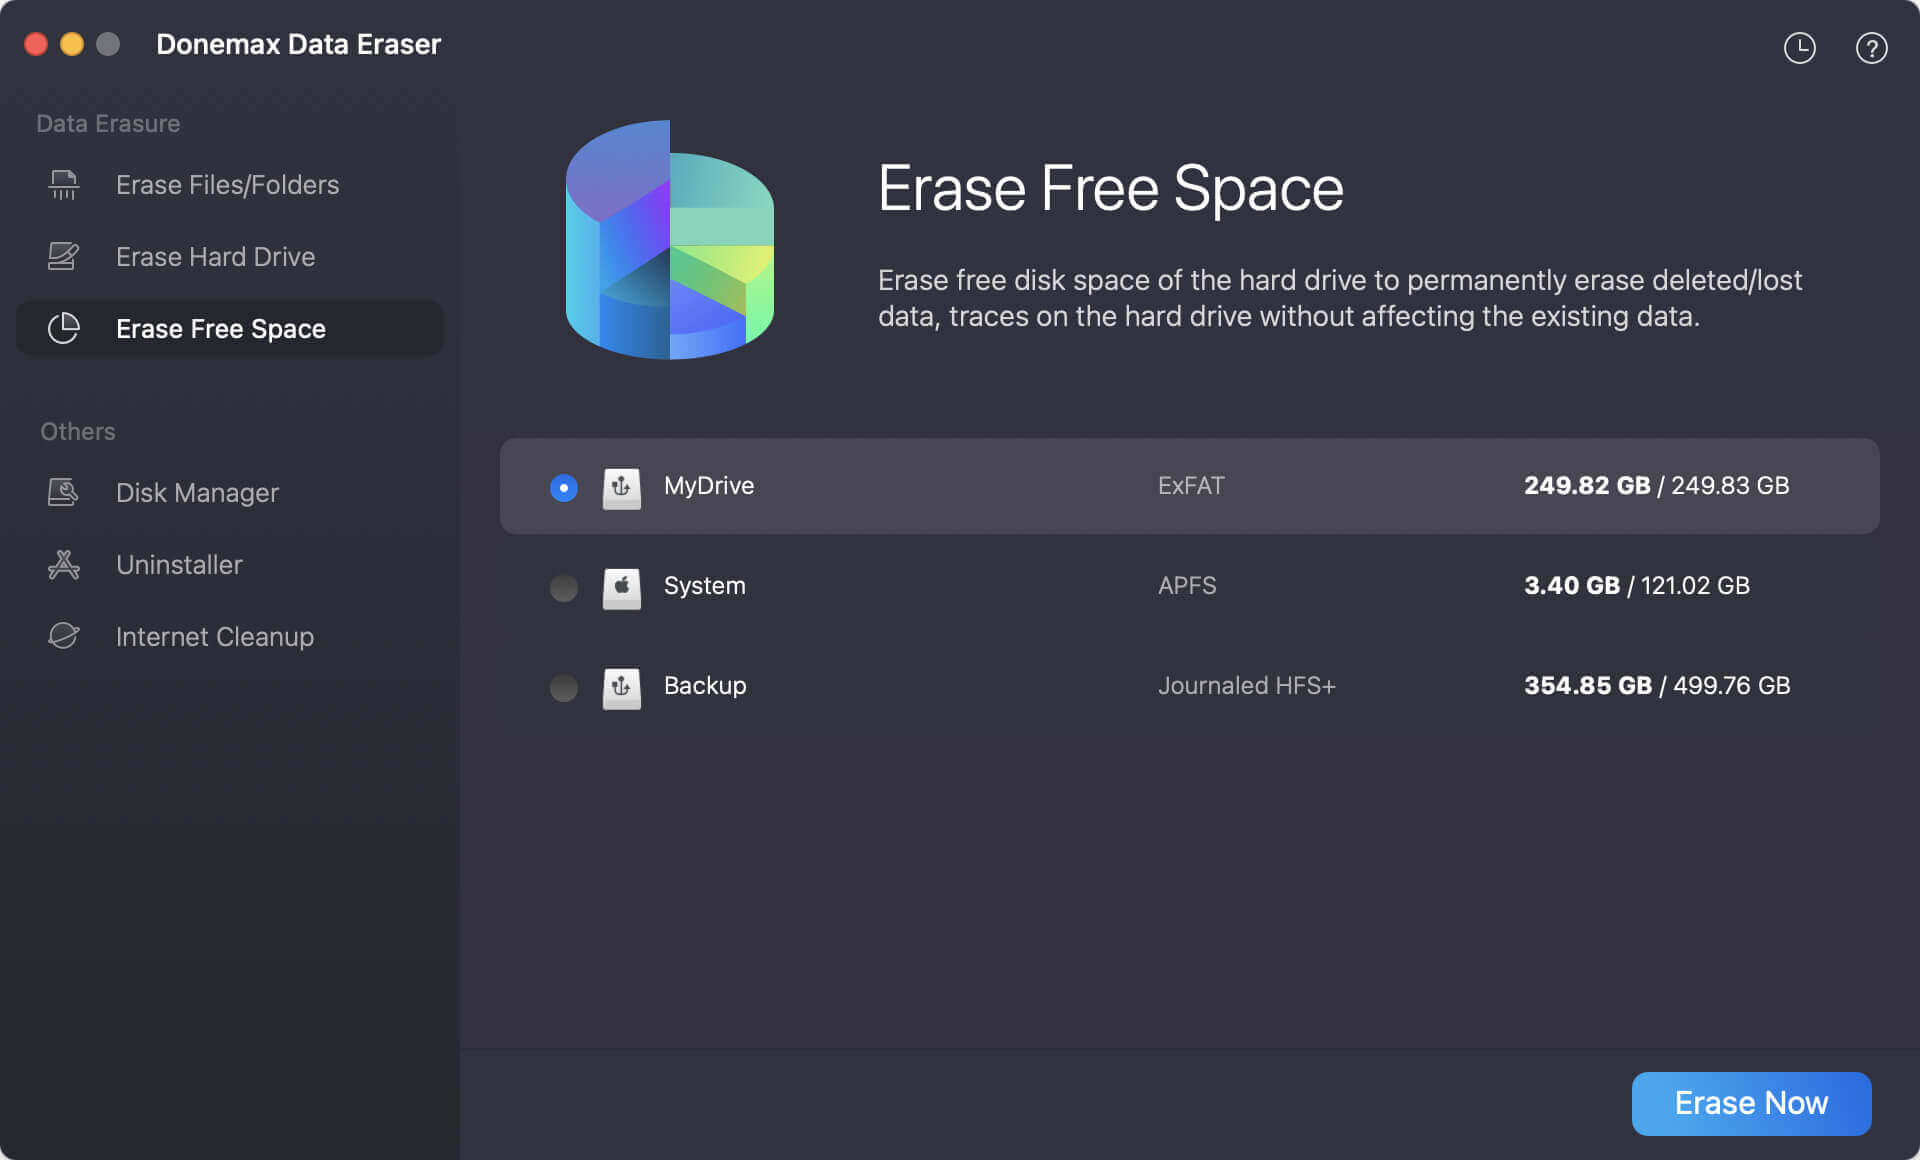
Step 2. Then you will be prompted to select a data erasure standard. There are different data erasure algorithms available in the drop-down menu.

Step 3. After selecting the standard, click on the Continue button and then the software will start to wipe all the removed/lost data from the hard drive.
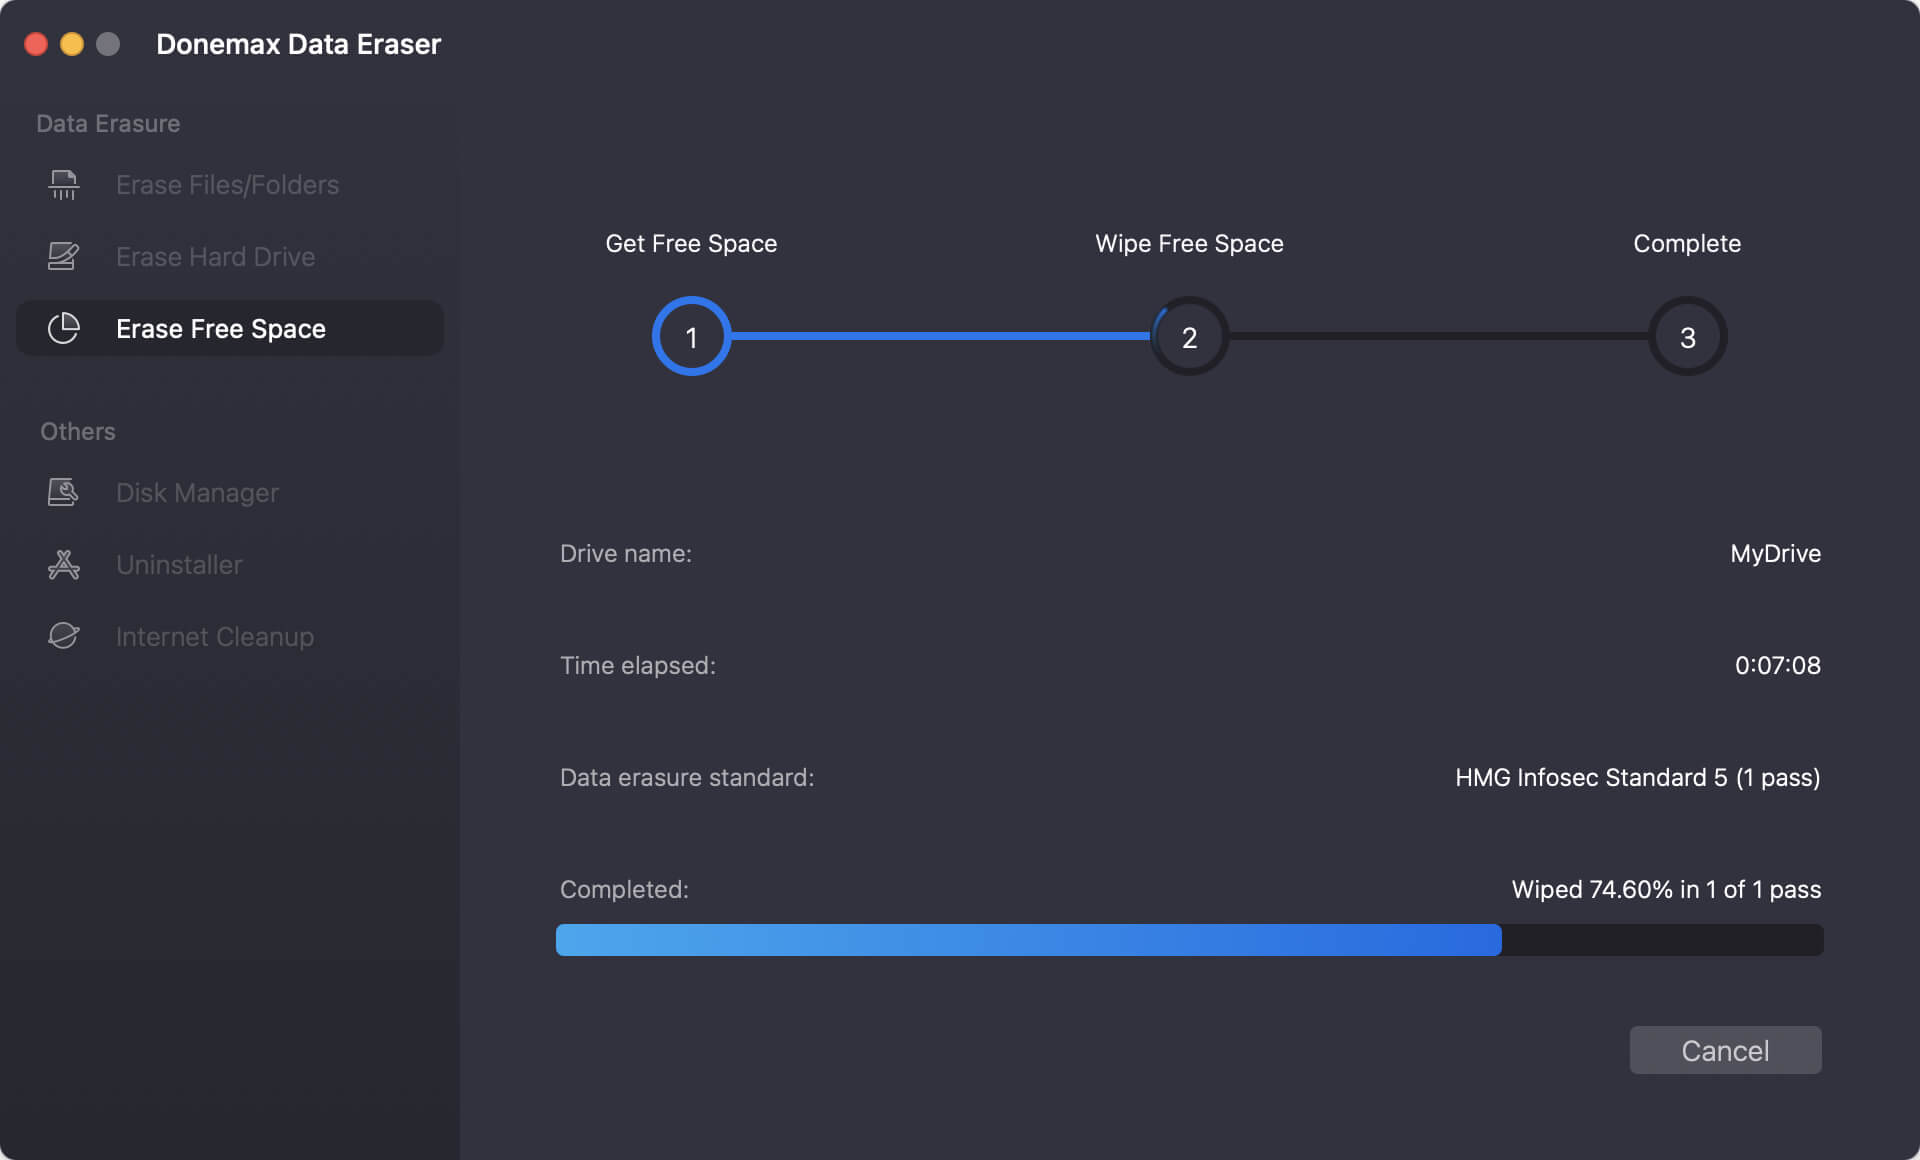
After the process is done, the removed data is completely gone from the MacBook. There will be no way to recover the personal data after a factory reset. You can feel free to sell or donate your MacBook without worrying about data breaches.
Troubleshooting Tips
Factory resetting usually goes smoothly, but here are common issues and how to fix them.
1. Can't Enter Recovery Mode?
- Use macOS Internet Recovery:
- Intel Macs: Hold Command + Option + R during startup.
Apple Silicon Macs: Internet Recovery is accessed the same way as regular Recovery Mode.
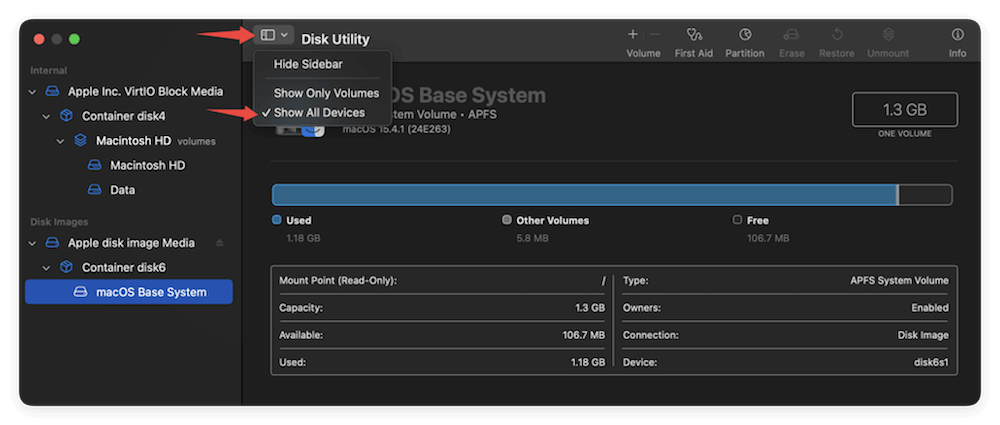
2. Drive Won't Erase?
You might need to erase the entire disk, not just a volume. From Disk Utility, click View > Show All Devices, then select the top-level drive.
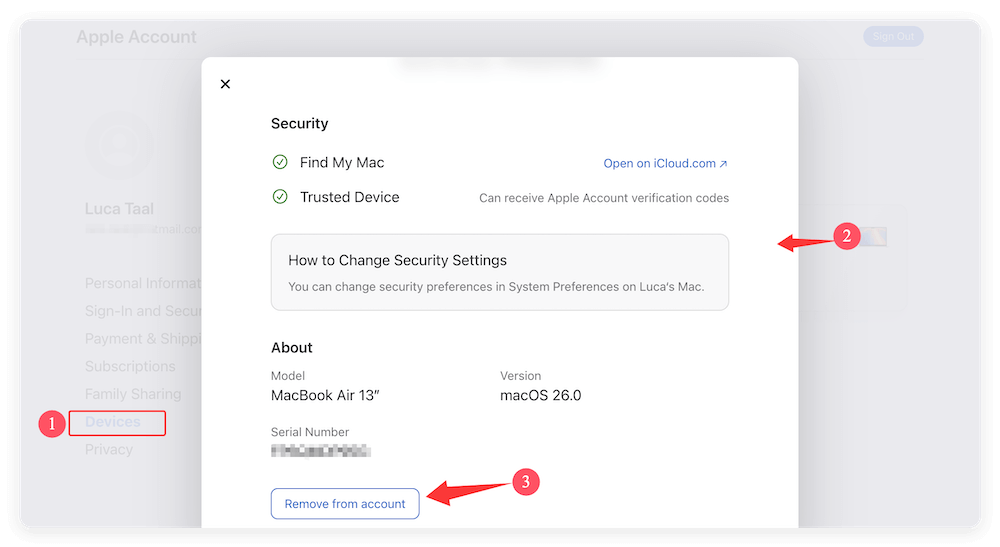
3. Activation Lock Still Enabled?
Double-check that you signed out of iCloud. You can also remove the device from your Apple ID via the iCloud.com website.
- Go to https://www.icloud.com/
- Log in your account with your Apple ID.
- Select Devices and choose your MacBook.
- Click Remove from Account.
4. macOS Won't Reinstall?
- Try restarting and re-entering Recovery Mode.
- Check your Wi-Fi connection.
- Create a bootable USB installer to install the macOS.
- Use another version of macOS by holding Command + Option + R (latest version compatible with your Mac).
Conclusion
Factory resetting your MacBook is an essential process when you're ready to wipe everything clean and start fresh—or pass the device on to someone else. By following the proper steps—backing up your data, signing out of services, erasing the drive, and reinstalling macOS—you can ensure a complete reset without any lingering files or privacy concerns.
Remember to:
- Always back up your data first.
- Fully sign out of your Apple ID to disable Activation Lock.
- Carefully follow the recovery and reinstallation steps based on your Mac model.
A clean Mac is not only more secure but often runs smoother and faster. Whether you're troubleshooting issues or preparing the Mac for a new owner, a factory reset is a reliable way to give your machine a fresh start.
Donemax Data Eraser for Mac
100% safe and powerful Mac data erasure program. It offers certified data erasure standards including U.S. Army AR380-19, DoD 5220.22-M ECE to securely and permanently erase data from Mac HDD/SSD and external storage devices, making data recovery impossible.
Related Articles
- Jun 16, 20257 Reliable Mac Disk Wipe Software – Expert Picks
- Nov 13, 2023How to Permanently Erase Data from Mac Startup Disk?
- Aug 25, 2023How to Permanently Wipe Old Intel Mac Data before Selling or Donating?
- Jul 04, 2025How to Wipe or Format WD External HDD/SSD on Mac?
- Oct 20, 2025How to Permanently Shred A Folder on Mac?
- Feb 19, 2024How to Permanently Delete or Shred Files on Mac?

Contributing Writer
Maria
Maria is one of the senior writers & editors of Donemax who lives and works in Sydney, Australia. She loves PC, Mac and Internet Technology. She has 6 years of writing articles about data recovery on PC/Mac, disk cloning solution, data eraser and computer OS optimization, etc. She is also interested in testing various software and digital products.

Editor in chief
Gerhard Chou
In order to effectively solve the problems for our customers, every article and troubleshooting solution published on our website has been strictly tested and practiced. Our editors love researching and using computers and testing software, and are willing to help computer users with their problems