
Written byStevenUpdated on Jul 30, 2025
Methods to Create macOS Ventura USB Installer
Approved byGerhard Chou
Before we start: Create a macOS Ventura USB installer can help you install the system on a Mac even without internet access. If you find it's hard to make the macOS installer manually using Terminal, download and use the tool Donemax Disk Clone for Mac to do the job easily.
PAGE CONTENT:
Creating macOS Ventura USB installer is helpful, but creating one virtually requires fighting Apple. What you must do is as follows.
In Apple's ideal world, you never have to worry about your Mac updating itself with macOS Ventura. But in practice, Macs sometimes break and having a bootable external installer speeds up download time and allows you to reinstall Ventura more quickly when you're stuck.
Additionally, suppose you're installing Ventura on a dozen Macs. In that case, you probably have better things to do with your time than wait for it to download separately on each one if your network doesn't use content caching.
So, as it has always been, having an external drive that you can use to install a brand-new copy of macOS is convenient and valuable.
Apple, however, believes that permitting external boot discs poses a security concern. Long-time Mac users should enable boot drives because the risk is low, and barring them will be very inconvenient.
What Do You Need for macOS Ventura Installer?
To make bootable USB installer for macOS Ventura, you need to get the following things ready:
An USB external drive
The external drive can theoretically be any hard disc, SSD, or USB flash drive, though USB-C is definitely what you want. NVMe USB-C or Thunderbolt drives produce the most excellent results and acceptable performance. While a hard disc is an option, the speed will be intolerably slow.
In contrast, speed might not be the issue while using a USB device. You can do nothing about it except try another USB flash drive because many USB flash drives will not boot. It doesn't matter what drive you use, it must be formatted as APFS or Mac OS Extended and have enough space to hold the macOS installer.
This indicates that it needs to have at least 14GB of space. However, Apple has previously stated that this only applies to installers for macOS Monterey or earlier. Better is more.
A macOS installer
Before you creating a USB installer for macOS Ventura, you need to working and full installer file for the system. Normally, the installer can be downloaded from App Store, Apple's website or some third-party websites.
Ensure to check and download the file from a trusted source. Otherwise, the downloaded file might be corrupted or virus-infected. Also, if the download installer file is not full, it will fail to create the bootable USB installer for macOS Ventura.
macOS installer creating tool (optional)
If you are familiar with commands, you can use the macOS built-in tool Terminal to make the bootable USB installer for macOS Ventura. However, you should be careful to run the commands in order to successfully accomplish the task.
In the other hand, you can use a third party software to create the macOS installer. For example, you can use Donemax Disk Clone for Mac. The software offers the feature to easily make macOS installer. Download the software and install it on your Mac first.
Steps to Create macOS Ventura Bootable USB Installer Manually
The procedures are the same regardless of the Mac operating system you want to produce a bootable USB installer for (macOS Tahoe, macOS Sonoma, macOS Catalina, macOS Mojave, macOS High Sierra, etc.). The macOS installation is necessary for the first stage, after which you must delete the USB and partition it according to your preferences. The installer must be copied into the USB using the Terminal as the last step.
Step 1. Download macOS Ventura Installer
You can download macOS Ventura from App Store directly. Here is how:
- Open App Store app and enter "macOS Ventura" in the search box.
- Click the macOS Ventura option in the search result.
- To obtain the macOS Ventura installer, Click Get or Download button.
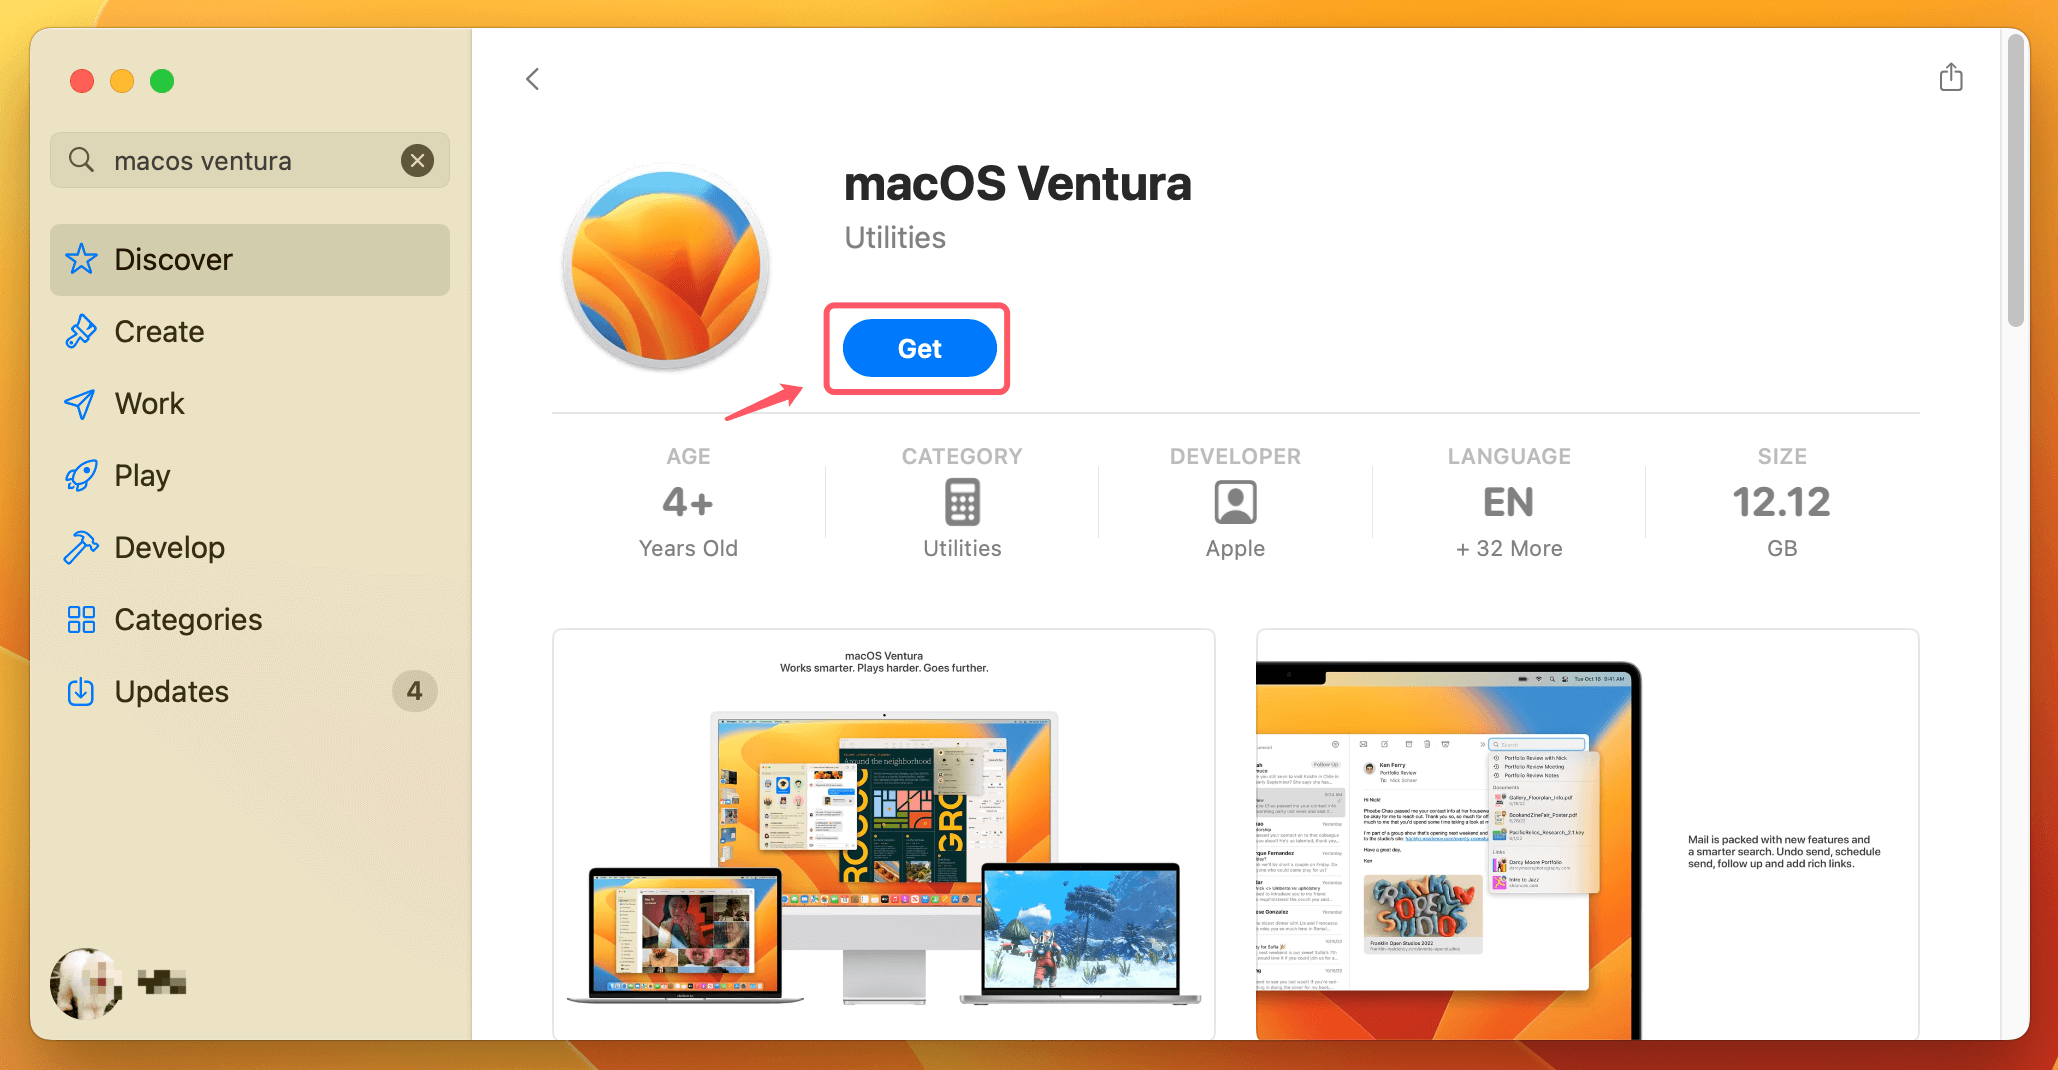
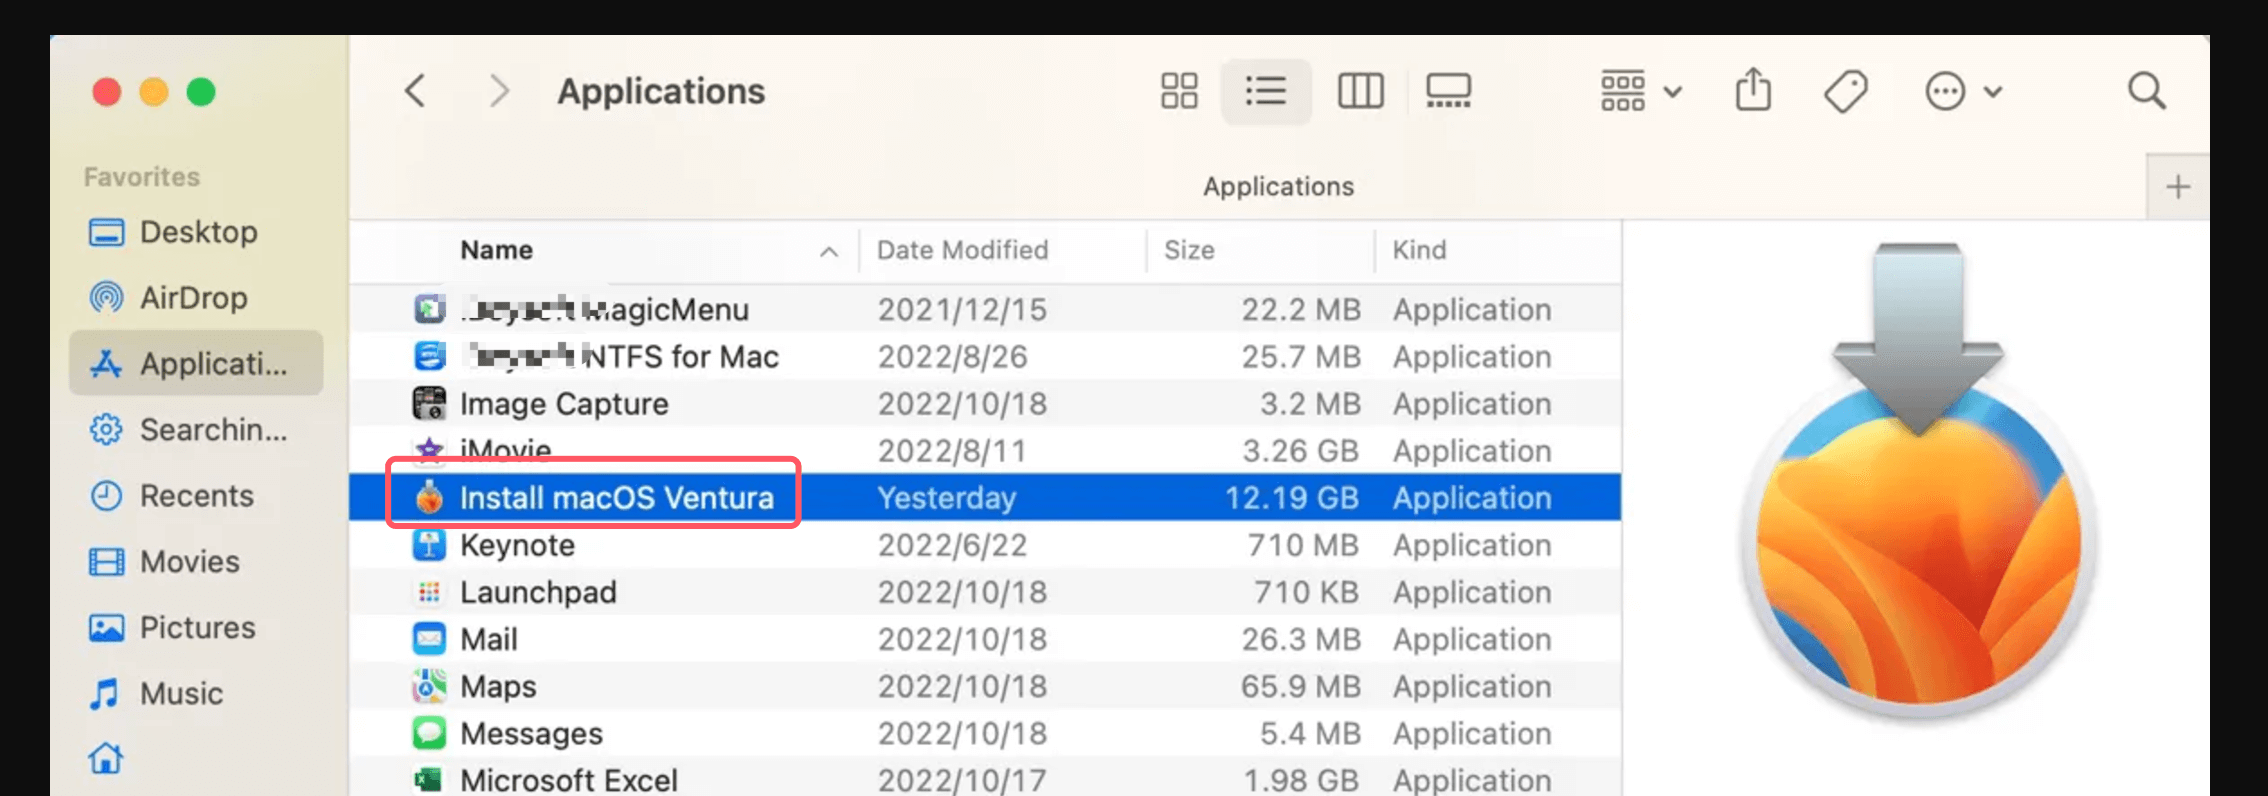
After the macOS Ventura installation file is downloaded successfully, you can verify it first. Normally, you will find the installer (with name "Install macOS Ventura) in Applications folder.
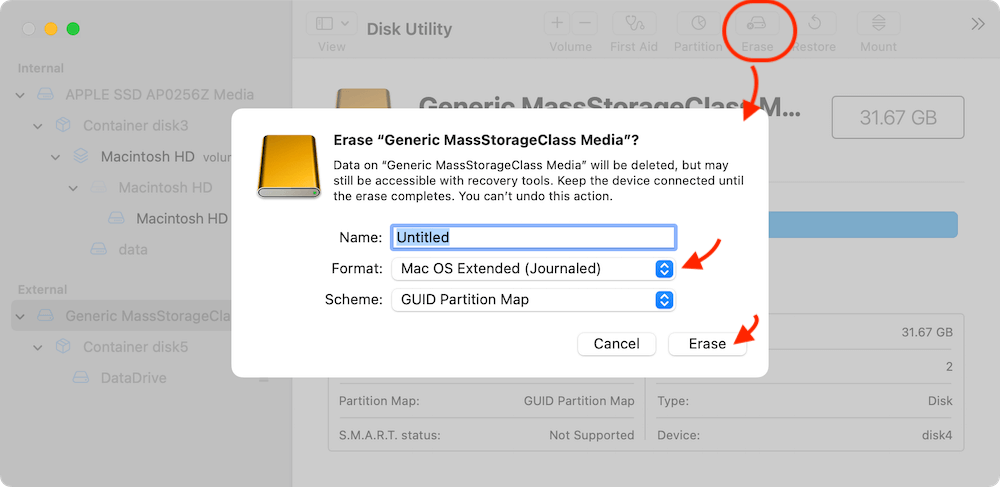
Step 2. Erase the USB Drive
It's crucial to format and delete the USB flash drive in the desired partition or format. The Disk utility is used in this situation, and the parameters must be customized to your needs.
- Connect the computer to the USB drive.
- Locate Disk Utility in Spotlight by opening it.
- Use the Disk utility to view every device.
- Choose the USB drive from the left panel.
- Select Erase from the top-level menu, give the USB a name, choose APFS or Mac OS Extended (Journaled) format, and choose GUID Partition Map as the scheme.
- Select Erase.
Step 3. Create a macOS Ventura Bootable USB drive
Welcome to the last stage of making a bootable USB disk for macOS Ventura. The macOS Ventura installer will also be copied to the USB flash drive during this phase, which involves making a bootable USB. And the Terminal will be used for all of these.
To make a bootable USB installer for Mac OS Ventura, just start the Terminal and run the command below.
createinstallmedia -volume /Volumes/Ventura -nointeraction sudo /Applications/Install macOS Ventura.app/Contents/Resources
This is how the command appears; nevertheless, you might encounter a problem, in which case you must learn how to drag the createinstallmedia into the Terminal.
Go to Application, then "Show Package Content" from the context menu when you right-click on the macOS Ventura Installer. Then, "Open Contents Directory" and "Resources" will appear. Find the createinstallmedia file there and drag it to the Terminal.
Type -volume. After that, drag the formatted USB flash drive.
The small USB flash drive or USB external disk is reasonable to use as your macOS Ventura bootable installer if you want a recommendation. The majority of drives 16GB or greater will function; however, for maximum performance, you'll probably want a USB 3.0 or newer disk. Samsung also offers a new USB Type-C flash drive.
Formatting a new USB flash drive with APFS or Mac OS Extended might be necessary if you buy one. This can be accomplished using the Disk Utility software before attempting to create a bootable installation.
After reading this thorough instruction, perhaps you now completely understand how to construct a macOS Ventura USB installer.
Create macOS Ventura USB Installer with Donemax Disk Clone for Mac?
There is another way to easily make a bootable USB installer for macOS Ventura - using third-party tools. Donemax Disk Clone for Mac is a professional Mac disk cloning software, which also provides the option to create macOS installer easily.
Donemax Disk Clone for Mac
- Make bootable USB installer for macOS
- Create full and bootable clone for Mac.
- Create disk image backup for Mac.
To create macOS Ventura USB installer is simple with the software. Just follow the wizard step by step, you can make a bootable macOS installer within a few clicks. The process will not involve complex operations, like using Terminal commands. Here we will show you the steps:
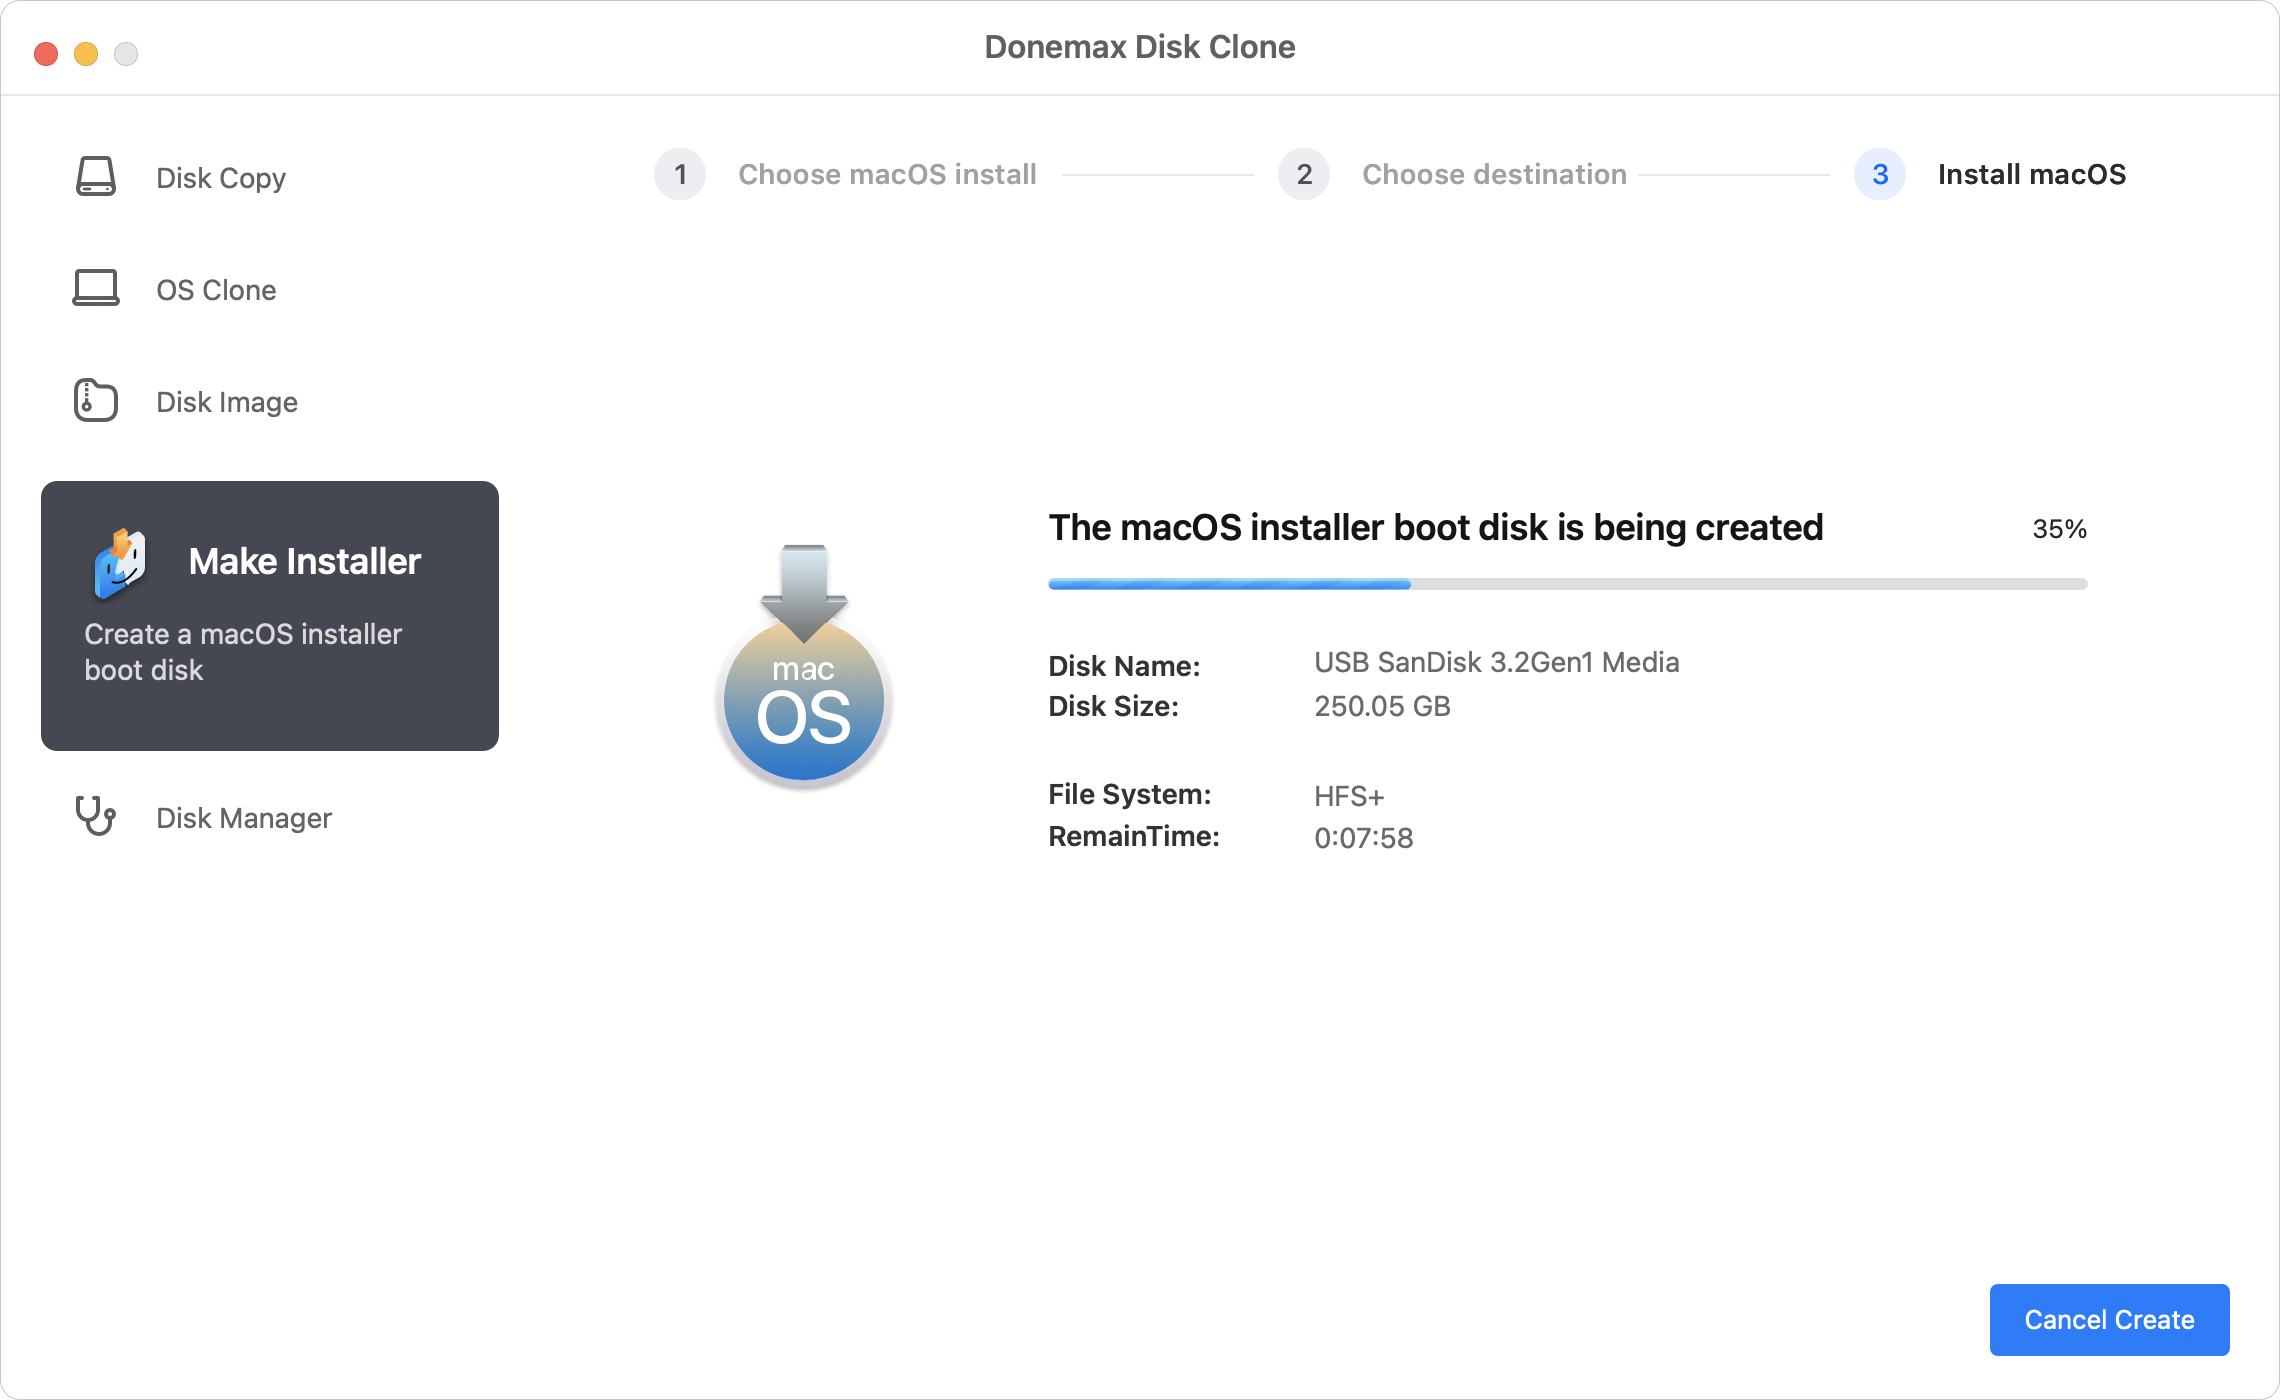
Step 1. Run Donemax Disk Clone for Mac and change to the mode Make Installer. The feature will help you create a bootable installer USB for macOS, including Ventura or other macOS systems.
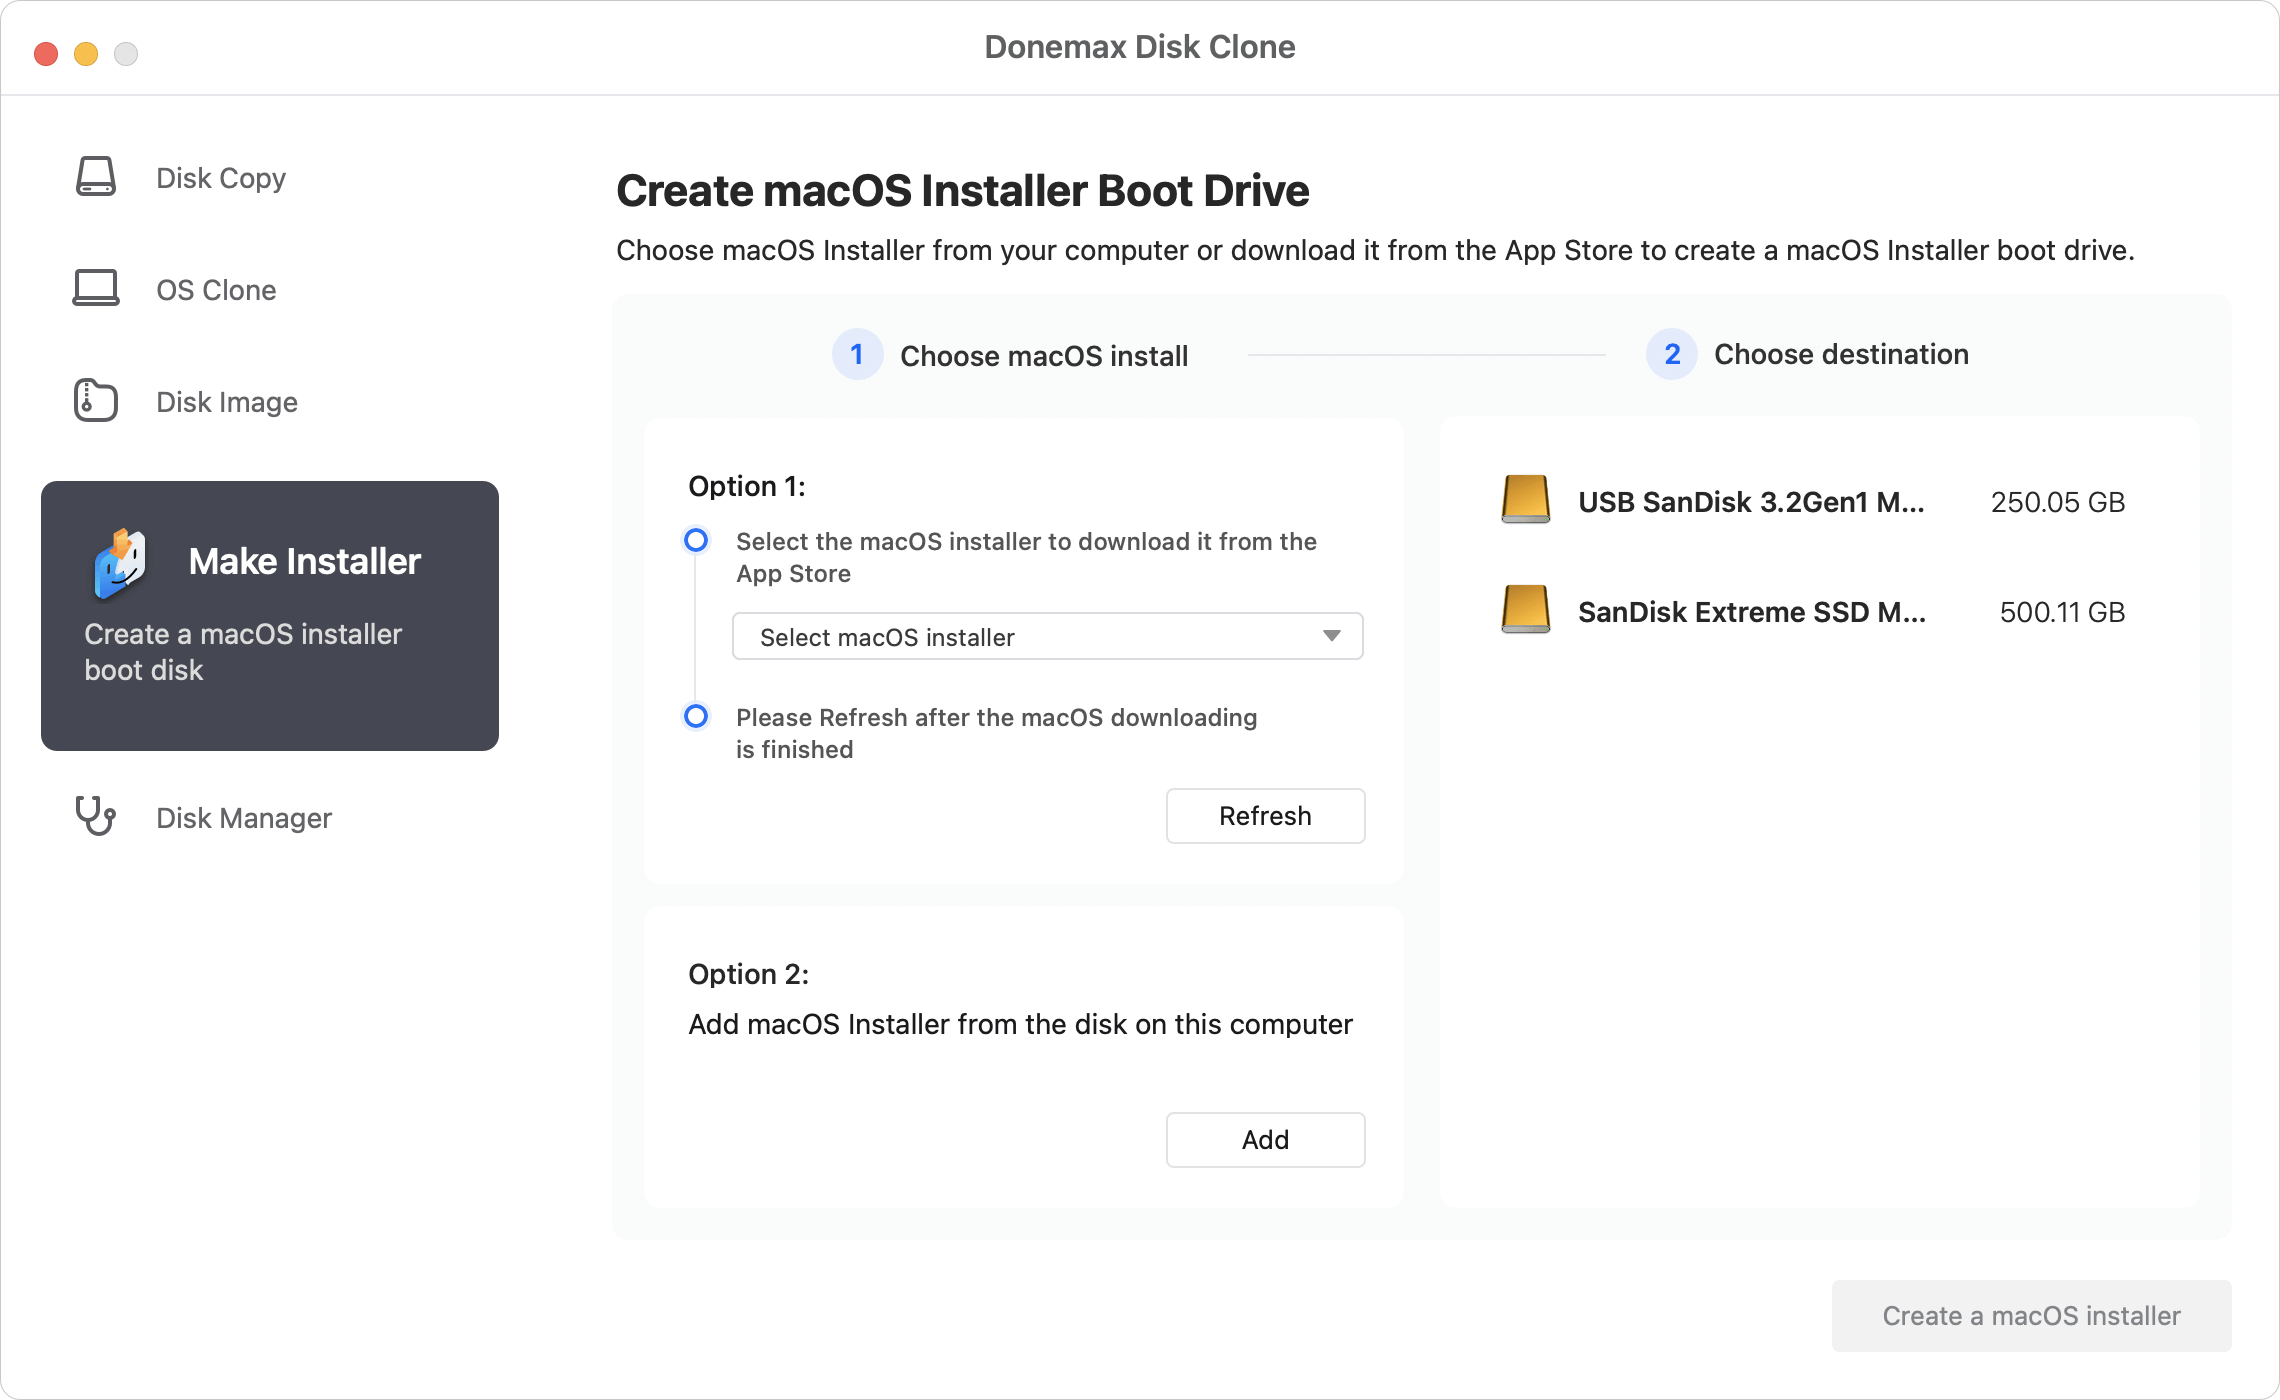
Step 2. To make a bootable installer USB for macOS Ventura, ensure to select the right version of macOS from the drop-down list.

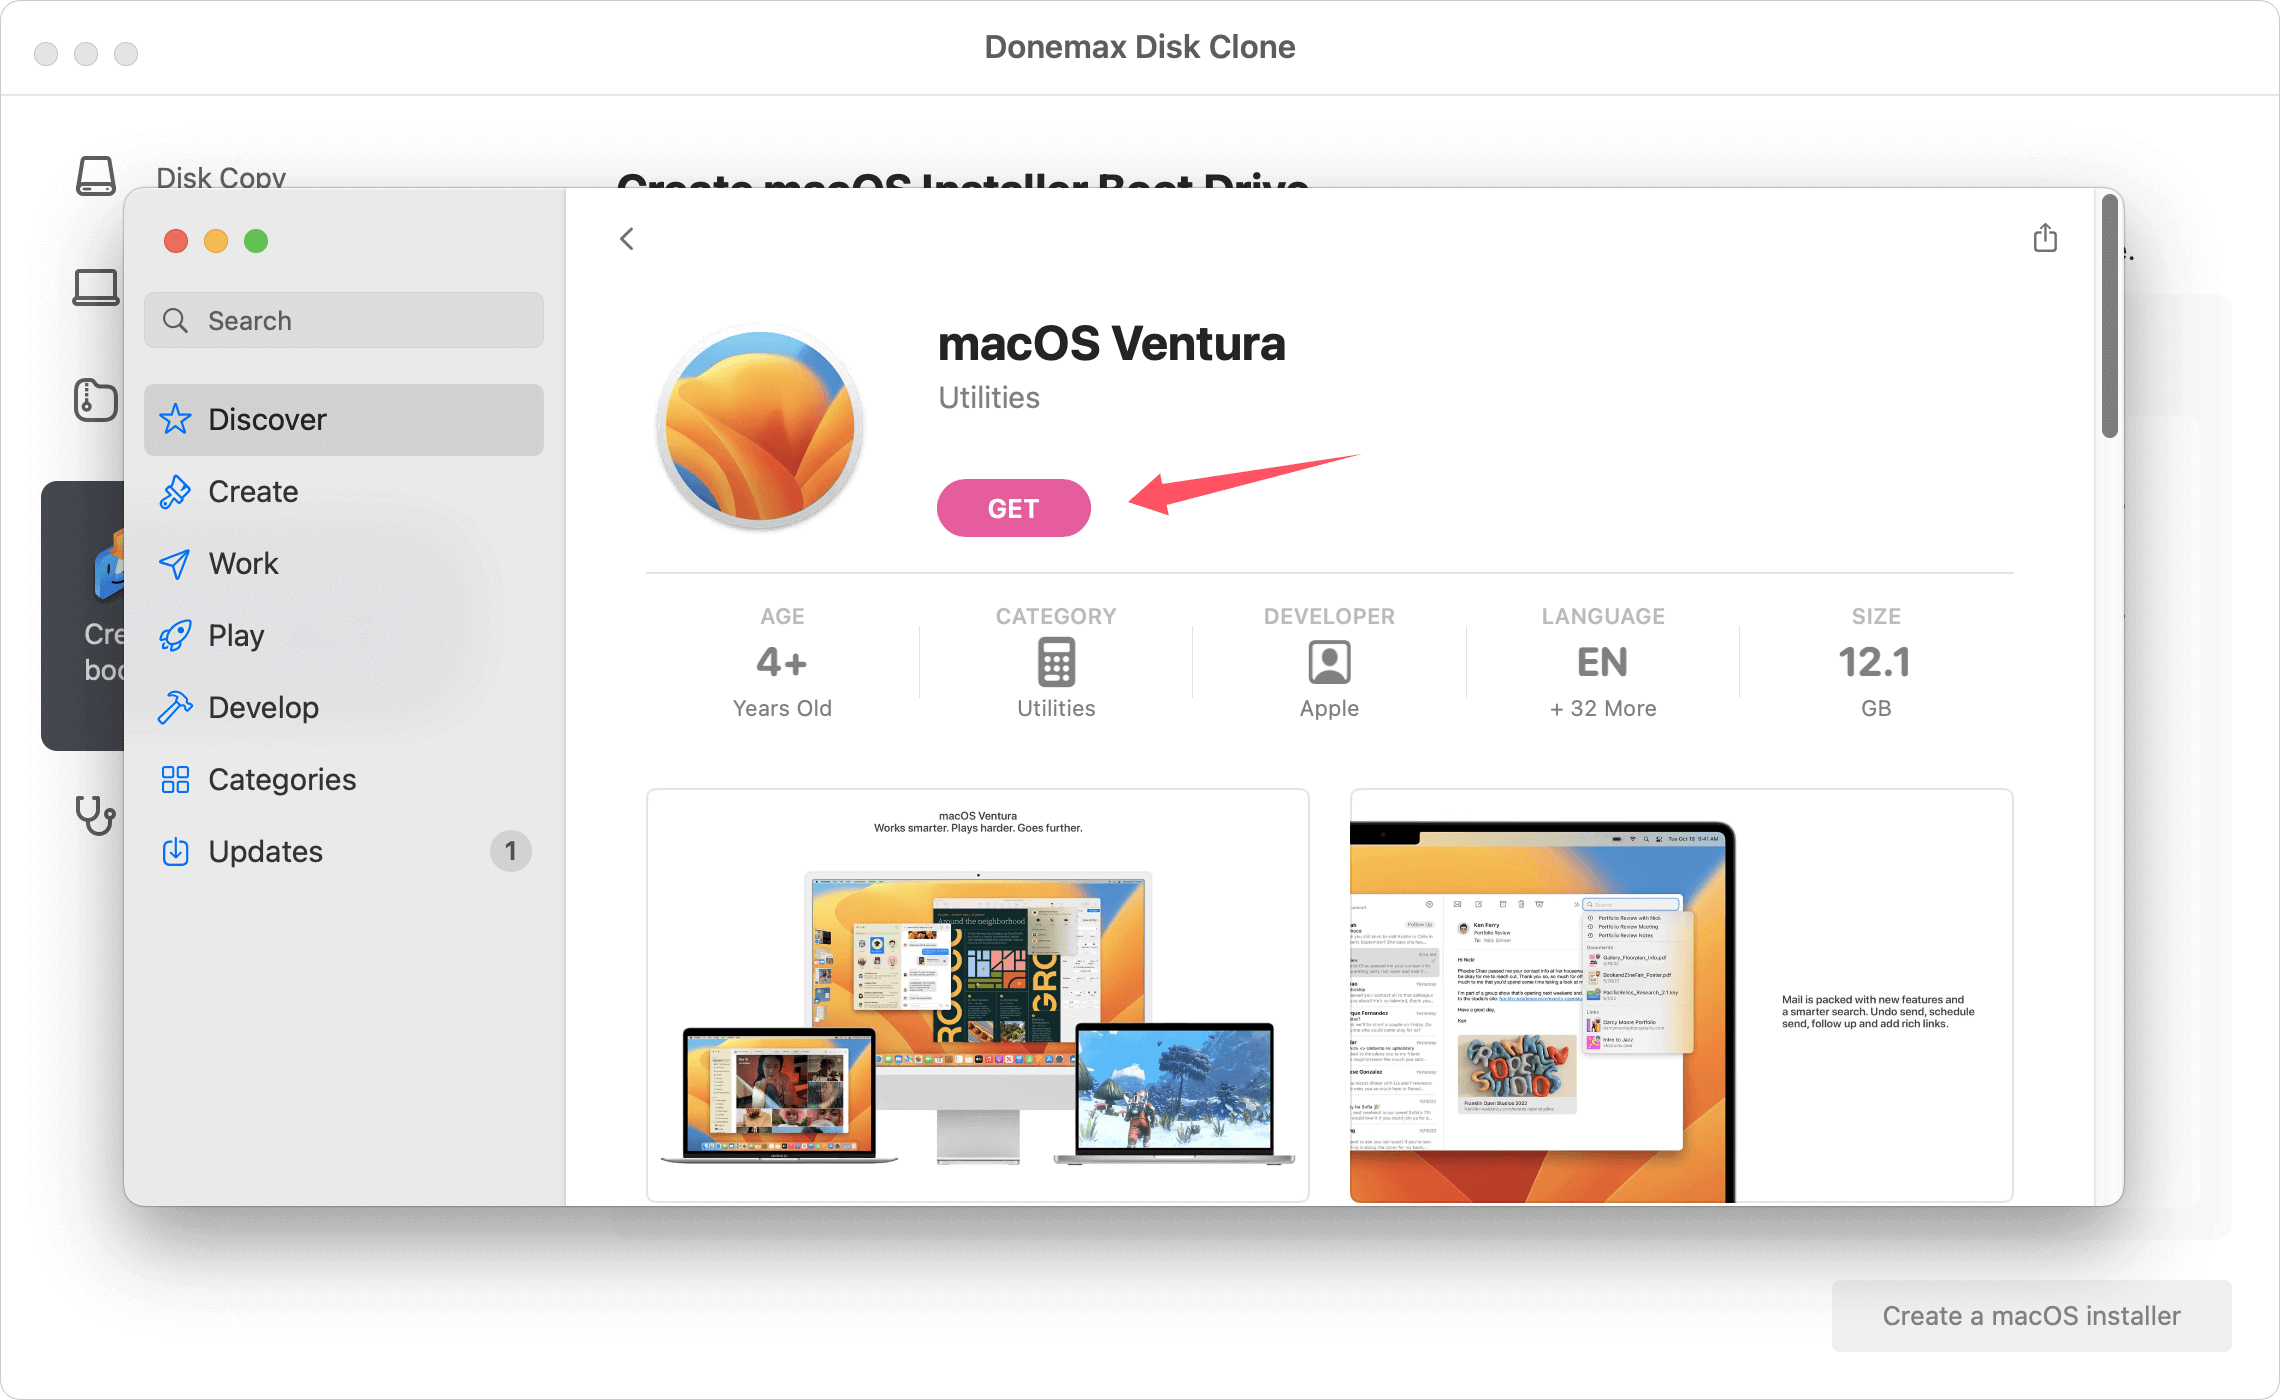
Step 3. Then it will jump to App Store, there you can click Get to download the installation file for macOS Ventura.
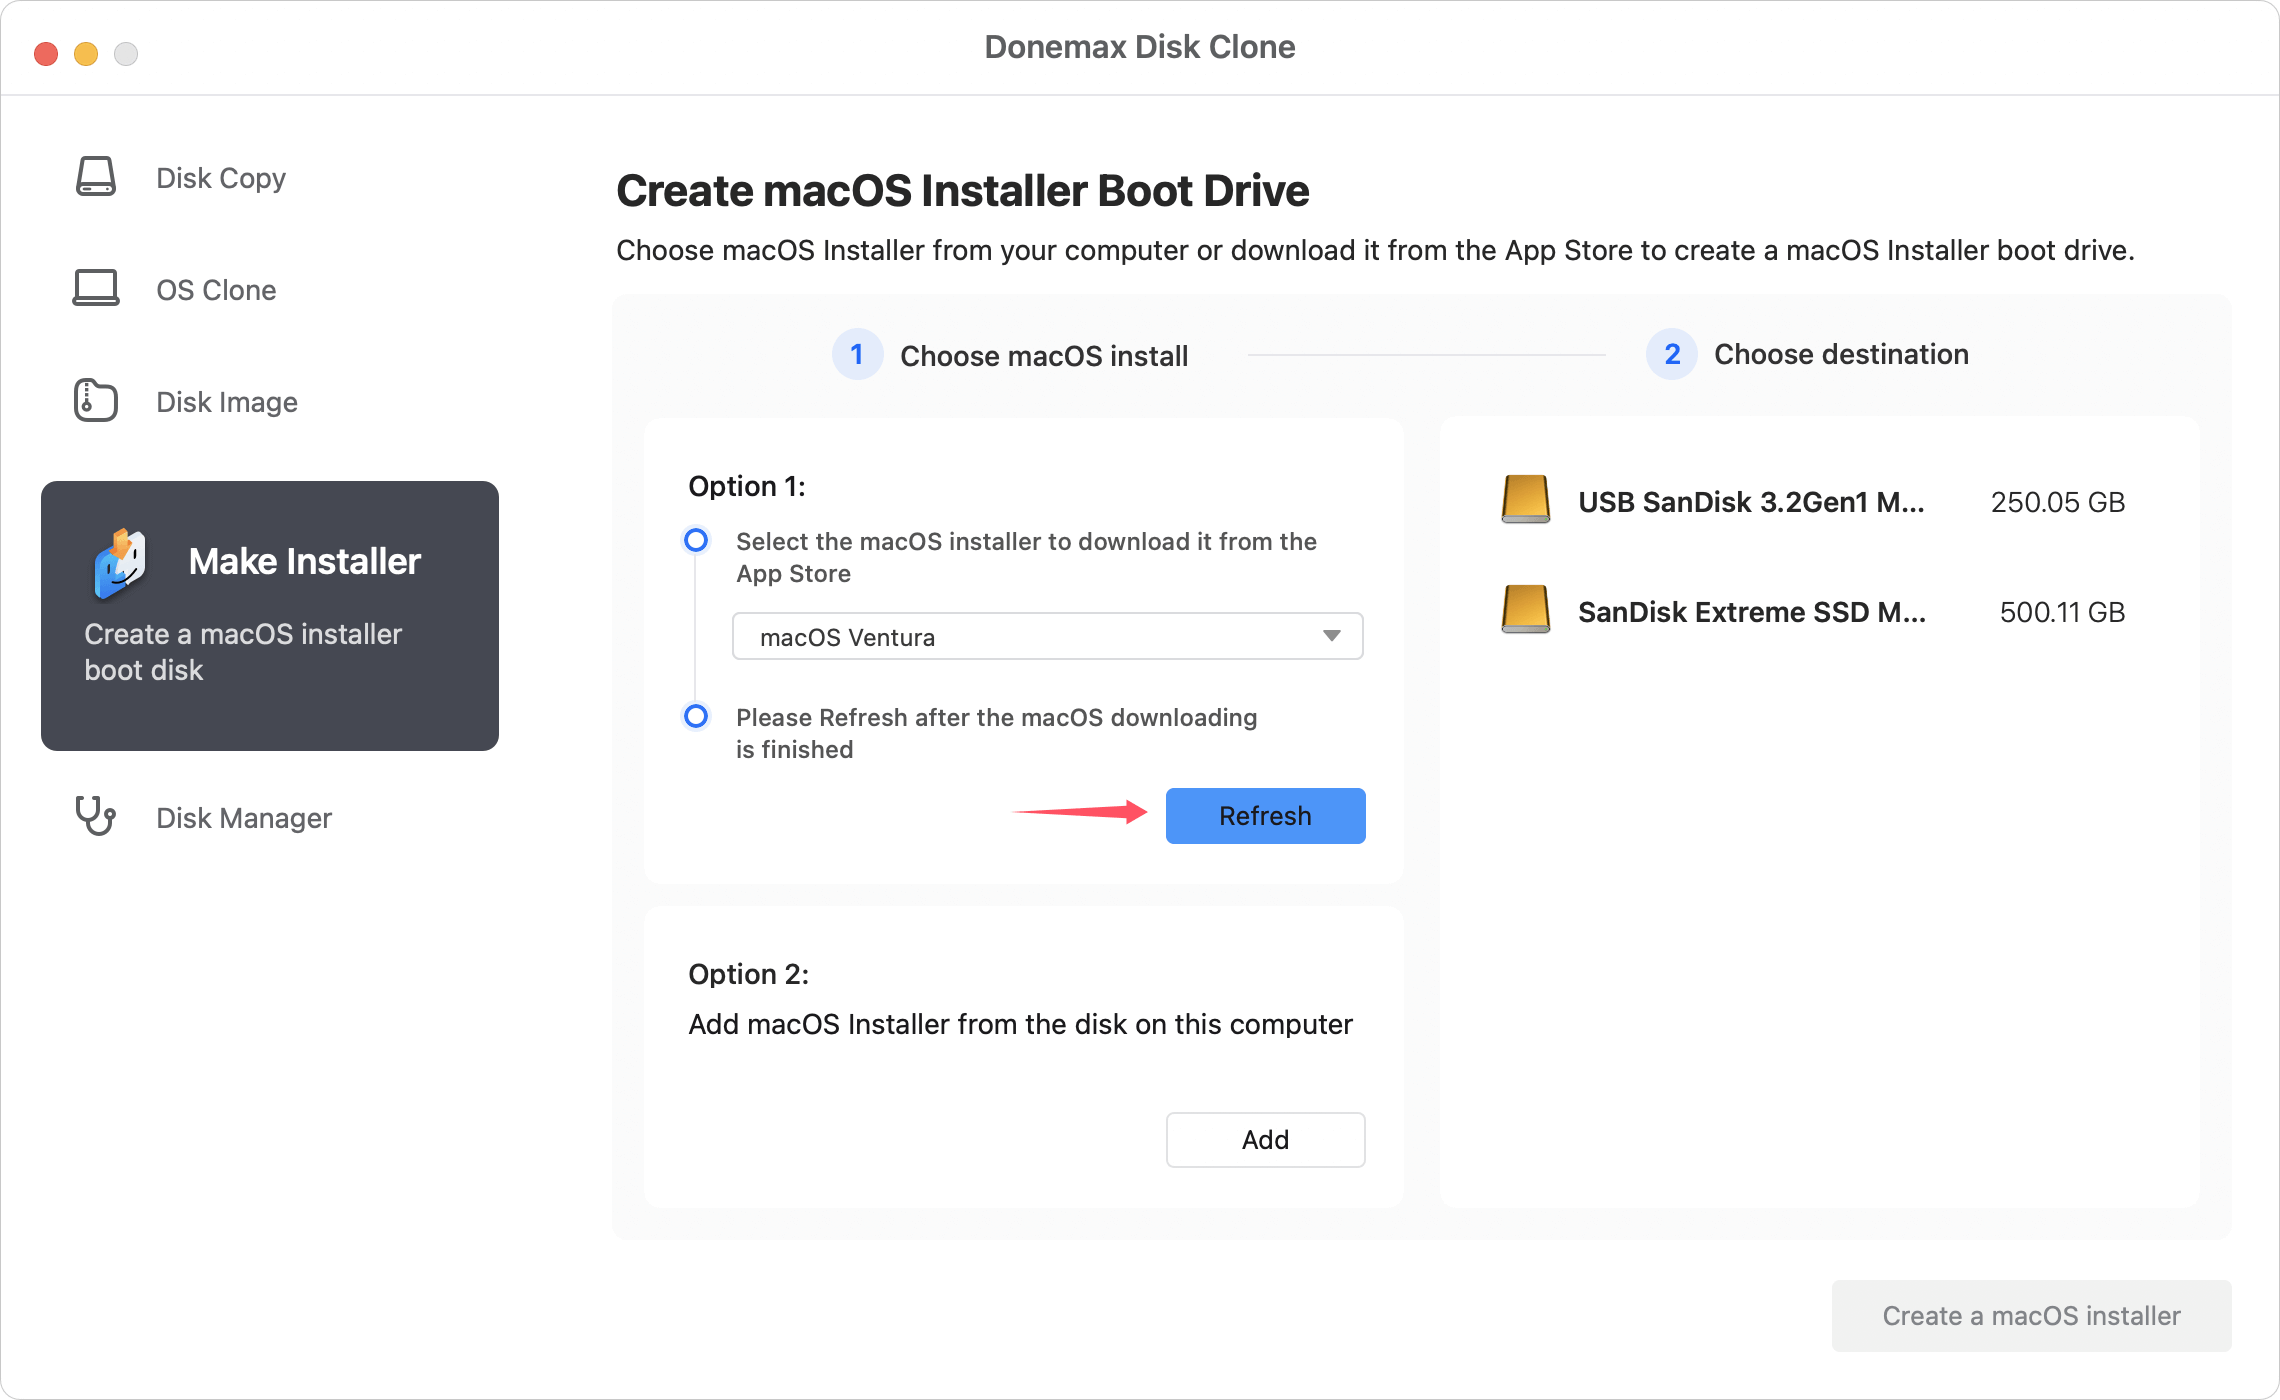
Step 4. After the download is completed, click the Refresh button in the software. Then it will show the downloaded macOS Ventura.
Step 5. Select the external or USB drive which will be used to create the bootable installer media.
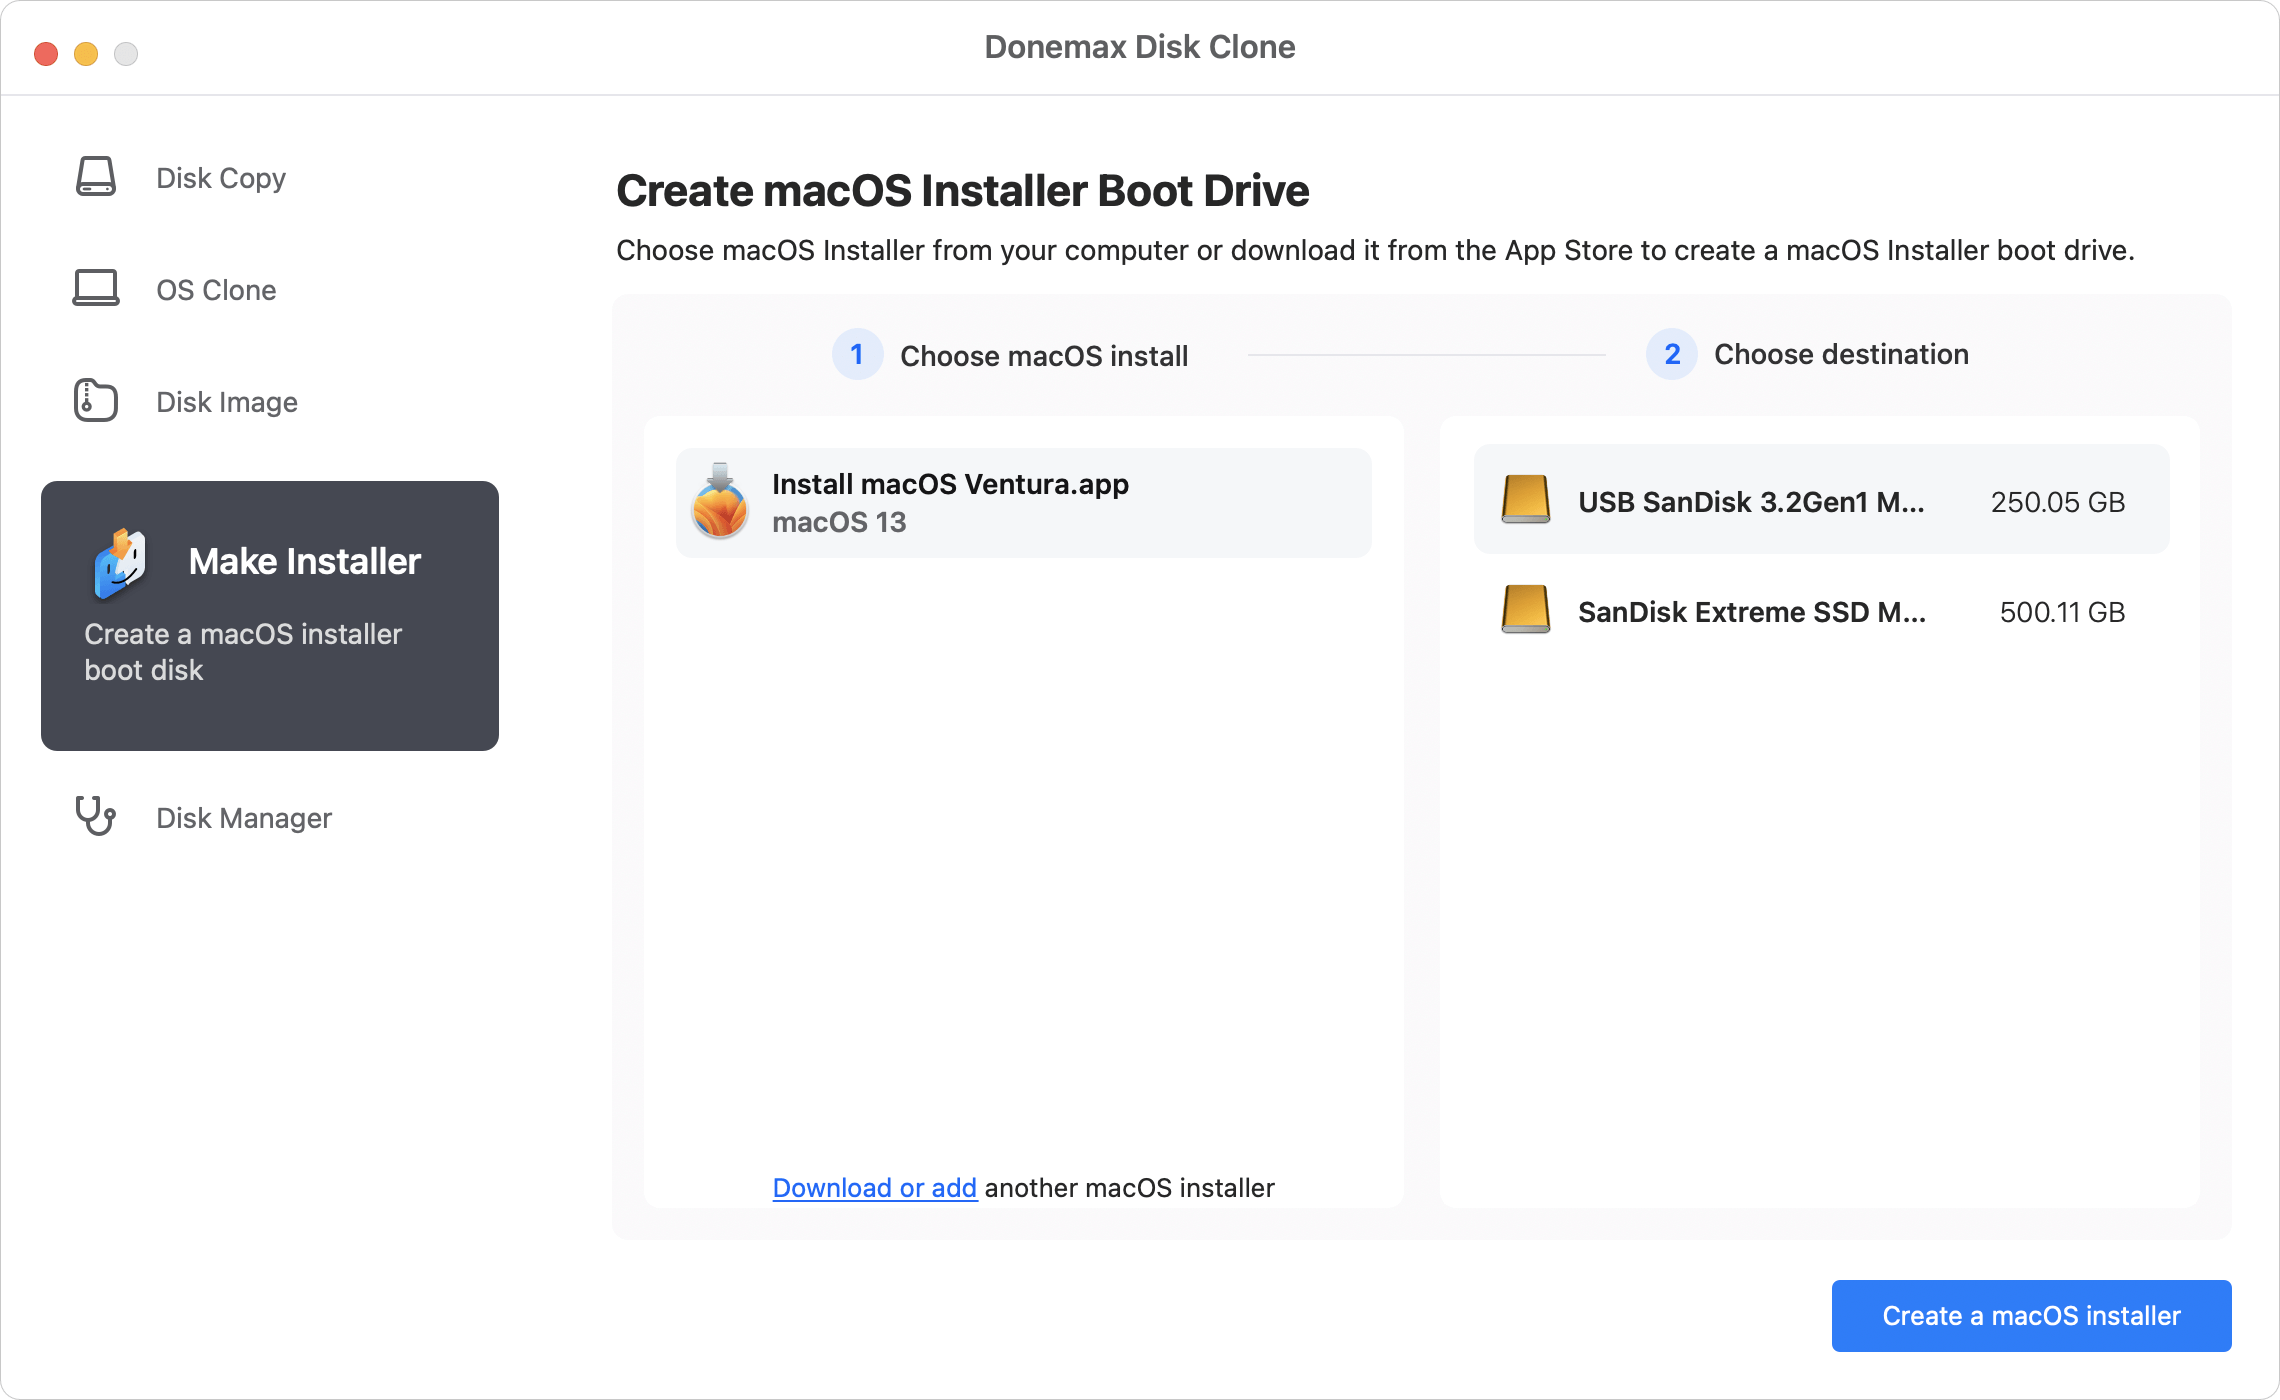
Step 6. At last, click the Create a macOS installer button. Then the software will start to make the bootable installer drive for macOS Ventura.
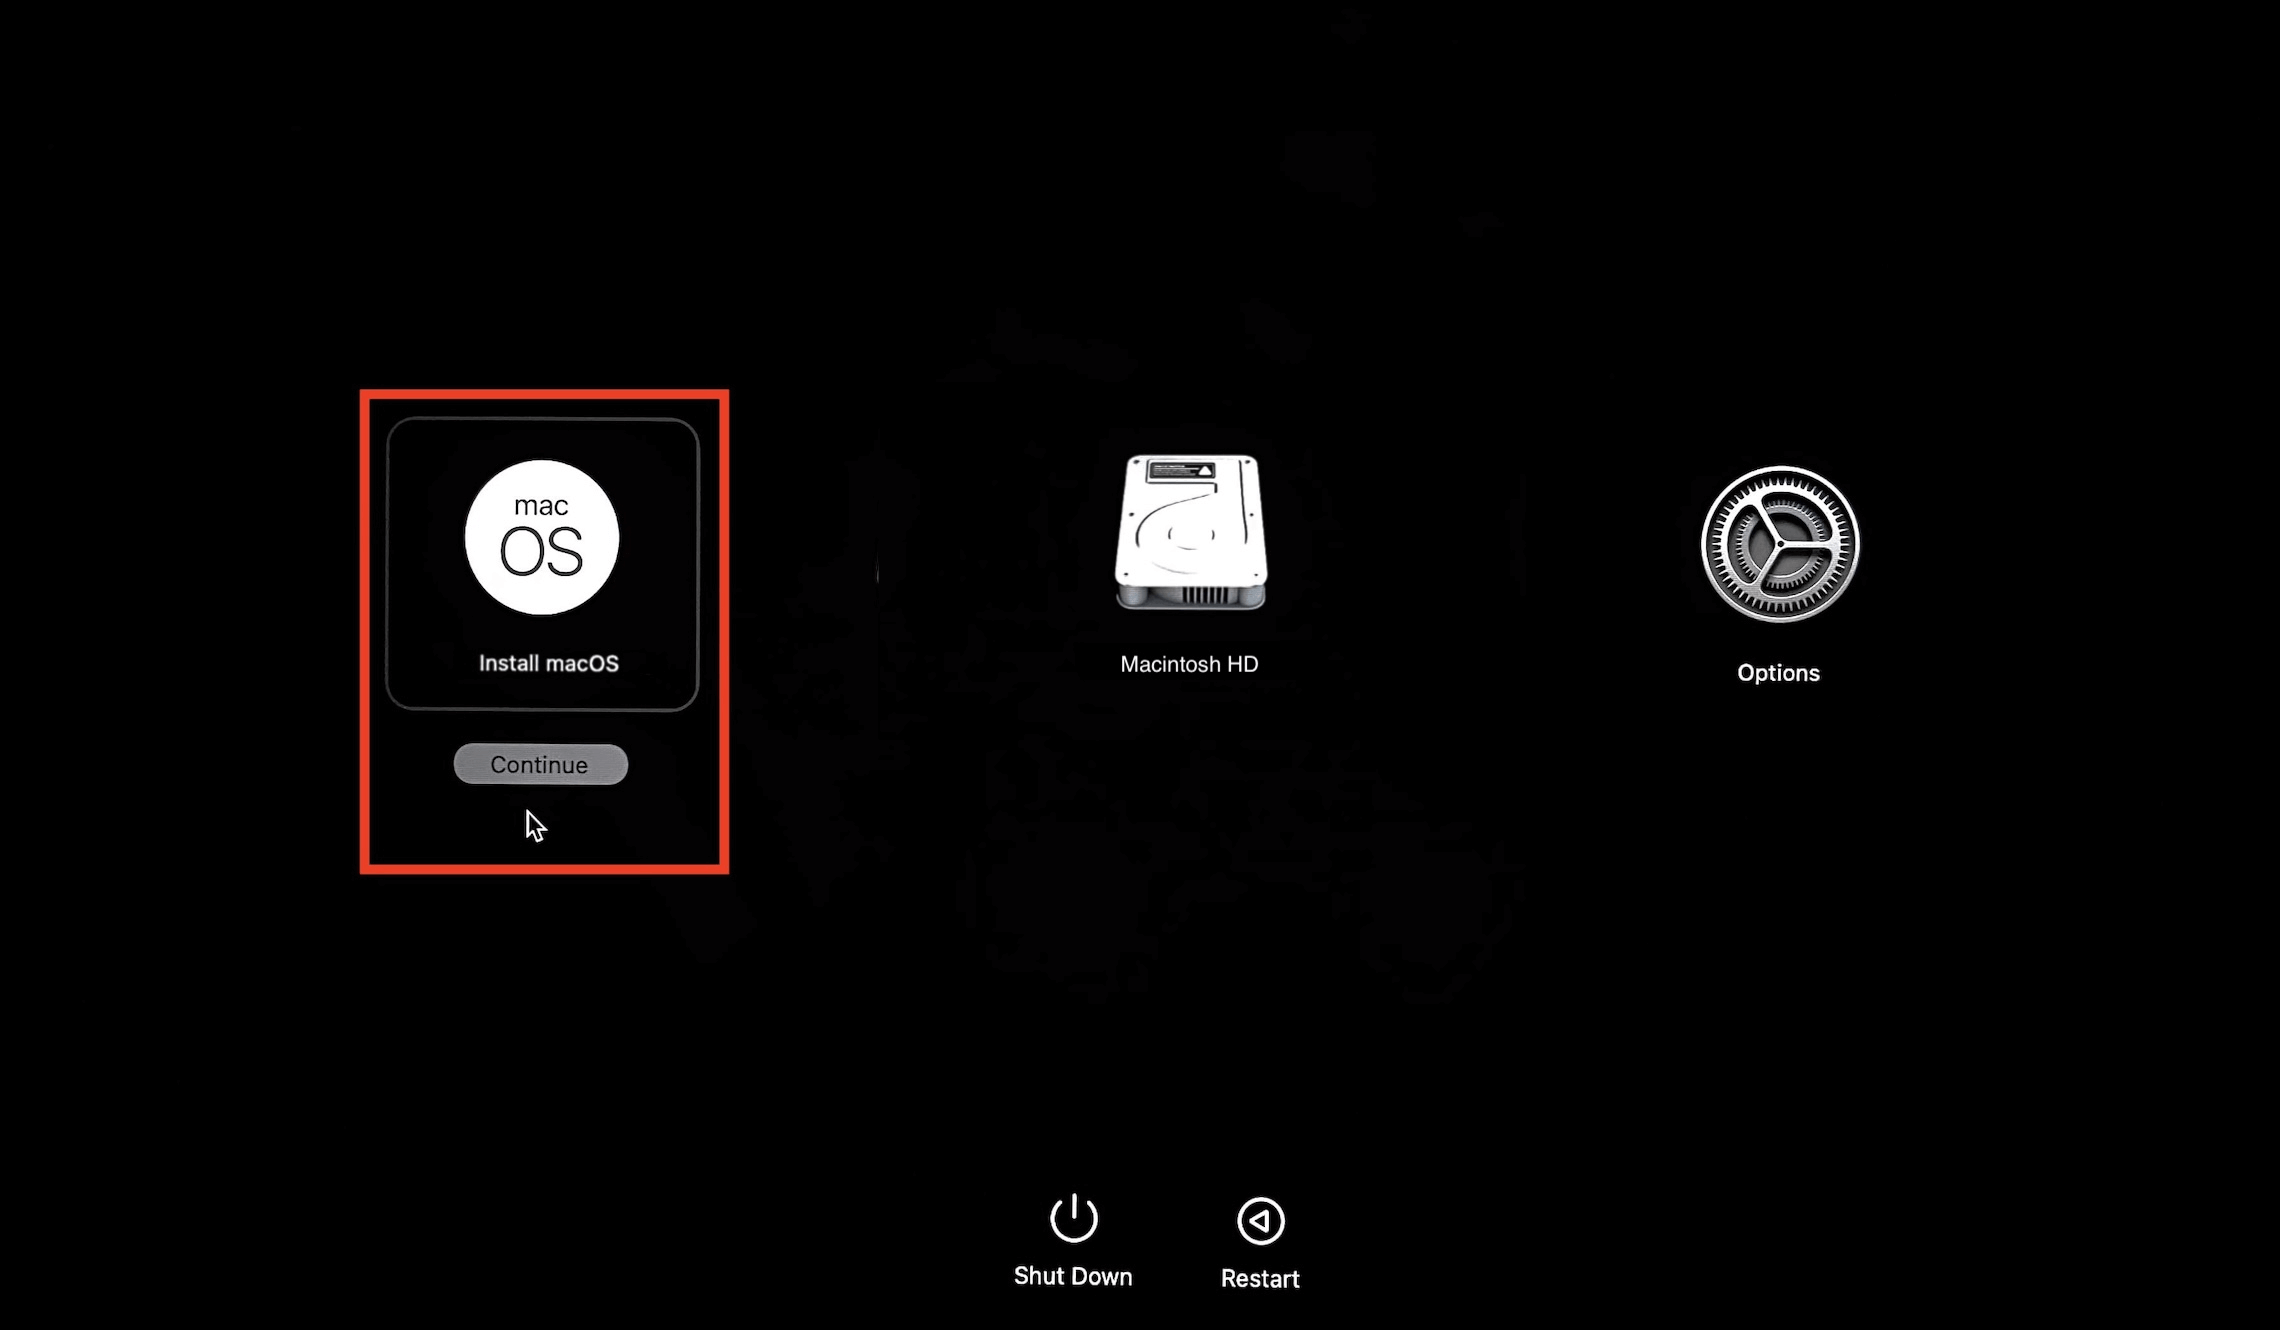
Once the bootable installer is created successfully, you can insert the bootable installer USB to a Mac machine to install or reinstall macOS Ventura. Reboot the Mac and hold Power button (or Option key) until you see the startup options screen. Choose the "Install macOS" option and click Continue. Follow the on-screen wizard to install the Mac operating system step by step.
Create Bootable Clone for macOS Ventura
If you want to make a 1:1 bootable copy of macOS Ventura instead, just try disk cloning application. Donemax Disk Clone for Mac will also help you clone Mac startup disk to an external hard drive and make it be bootable directly.
Follow this guide to help you securely and easily create a bootable clone backup for macOS Ventura.
Step 1. Connect an external hard drive to your Mac then open Donemax Disk Clone for Mac. Choose disk cloning mode - OS Clone. It will clone all data from the startup disk to the external hard drive.

Step 2. Select the external hard drive as the destination drive. Click on Clone Now button to clone all data including macOS Ventura, apps, settings and files to the external hard drive.
Once the process gets finished, you can use the external hard drive as a bootable disk. Check: how to set the external hard drive as the bootable disk for Mac >>
Conclusion:
Creating a bootable macOS Ventura USB installer is useful when you need to install the system on multiple Macs or use it on a Mac without internet access. Before you make the macOS installer, you need to get a proper USB drive and format it in APFS or HFS+ format. Download the macOS Ventura installation files.
To create the USB installer for macOS, you can use Terminal commands if you are familiar with it. Otherwise, choose Donemax Disk Clone for Mac to do the job quickly and easily. The software can even create a bootable clone for macOS Ventura as backup.
Donemax Disk Clone for Mac
An award-winning disk cloning program to help Mac users clone HDD/SSD/external device. It also can create full bootable clone backup for Macs.
Related Articles
- Jun 04, 2026How to Do if Disk Utility Failed to Clone Mac Drive?
- Aug 08, 2025How to Restore Mac from A Backup?
- Feb 11, 2026Simple Methods to Copy A Hard Drive on macOS Sierra
- Jun 24, 2025How to Use Time Machine on macOS Sequoia?
- Aug 04, 2023How to Clone Hard Drive on MacBook Air?
- Jun 19, 2024How to Clone Hard Drive On macOS Sequoia?

Contributing Writer
Steven
Steven has been a senior writer & editor of Donemax software since 2020. He's a super nerd and can't imagine the life without a computer. Over 6 years of experience of writing technical solutions and software tesing, he is passionate about providing solutions and tips for Windows and Mac users.

Editor in chief
Gerhard Chou
In order to effectively solve the problems for our customers, every article and troubleshooting solution published on our website has been strictly tested and practiced. Our editors love researching and using computers and testing software, and are willing to help computer users with their problems